background image

Installing the Outer Structure Panels and Trim

Page 164

© 2015 Cisco Systems, Inc. All rights reserved.

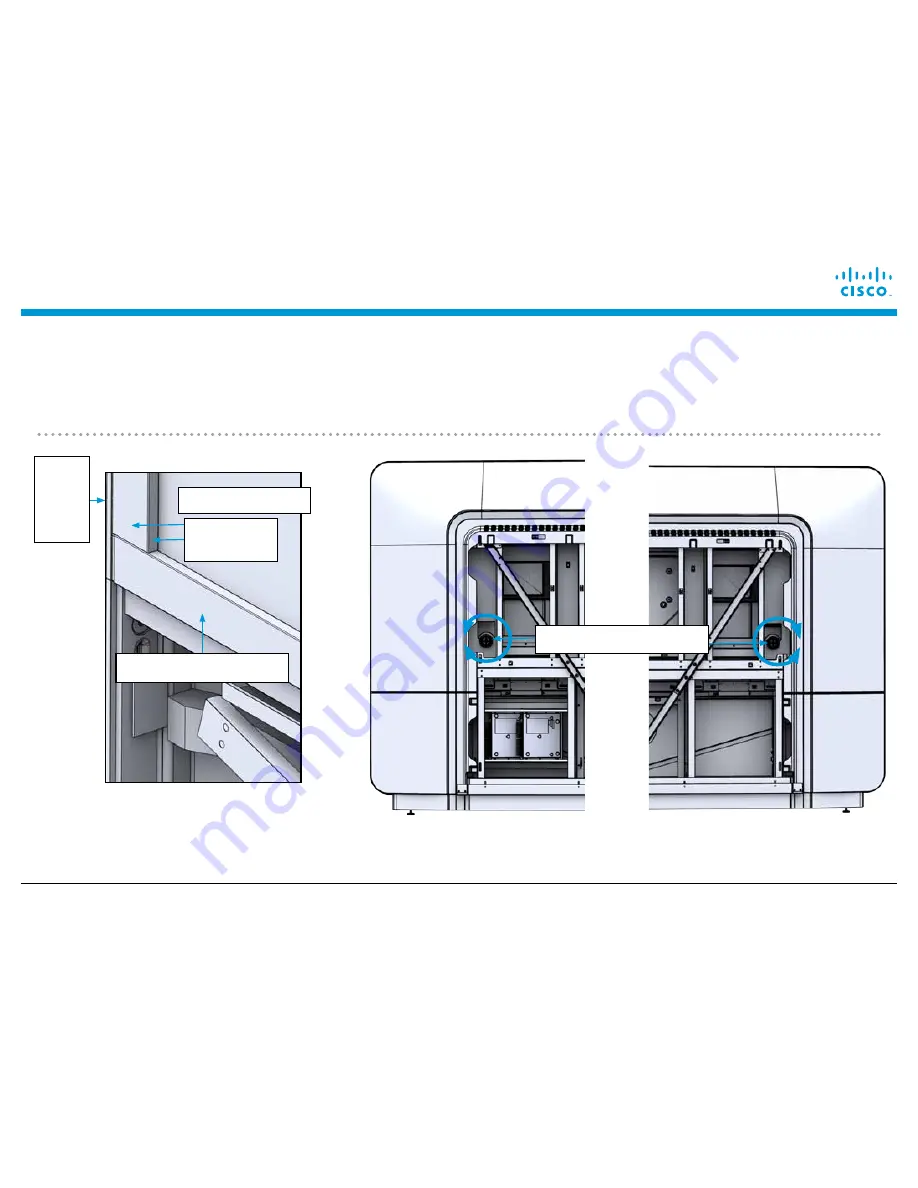
Align the display to the cabinet trim. Rotate the spools on the lower back of the displays to align the 

upper cabinet trim with the horizontal display trim and display on the side (vertical) axis.  Perform this 

alignment for both the left and right displays.

Table Top B

(700-42476-01)

Table Top A

(700-42477-01)

Table Top C

(700-42478-01)

Left display

Left 

upper 

cabinet 

trim

Horizontal display trim

Left vertical 

trim 

Display spools

Содержание TelePresence IX5000

Страница 1: ...Cisco IX5000 and IX5200 Installation Guide 2015 Cisco Systems Inc All rights reserved Page 1 Cisco TelePresence IX5000 and IX5200 Installation Guide Revised April 16 2015 ...

Страница 2: ...Ϳ ZƵŶ ƚĞƐƚ ĐĂůůƐ ĐŽŵƉůĞƚĞ ĨŝŶĂů ŝŶƐƚĂůůĂƚŝŽŶ ĐŽŵƉůĞƚĞ ƌŽŽŵ ĐůĞĂŶƵƉ ϰ ϭϱ ʹ ϱ Ɖ ŵ ŶƐƚĂůů ƐŽĨƚǁĂƌĞ ŽŶ ĞŶĚƉŽŝŶƚ ĂŶĚ ƌĞŐŝƐƚĞƌ ƚŽ h D ĂƐƐŝƐƚ ŶƐƚĂůůĞƌ Ϯ ǁŝƚŚ ŝŶƐƚĂůů ƚĂƐŬƐ ƌĞƚ ƐLJƐƚĞŵ Ϯ ϭϱ ʹ ϯ ϯϬ Ɖ ŵͿ ŝŶĂů ŝŶƐƚĂůůĂƚŝŽŶ ƚŚĞƌŵŽĨŽƌŵĞĚ ƉĂŶĞůƐ ĨĂƐĐŝĂ ĐĂŵĞƌĂ ĐŽǀĞƌ ĂŶĚ ĐĂďůĞ ĐĂƉͿ ďĞŐŝŶ ĐůĞĂŶƵƉ ϯ ʹ ϰ ϭϱ Ɖ ŵ Ϳ Ϯ Ɖ ŵ ϭ Ɖ ŵ ϭϮ ŶŽŽŶ ϭϬ Ă ŵ ϵ Ă ŵ ϴ Ă ŵ ϭϭ Ă ŵ ϱ Ɖ ŵ ϰ Ɖ ŵ ϯ Ɖ ŵ ŶƐƚĂůů ƉŝůůĂƌƐ ĐƌŽƐƐďĂƌƐ ƌĞĂƌ ŬŝĐŬ ƉůĂ...

Страница 3: ...g for all installed equipment codecs PDUs subwoofer and speakers for the endpoint structure and power laptop connectivity and PDUs for the table legs AND place the cables for the light panels and camera 9 Install the displays light panels and camera including cabling 10 Install the front kick plates and toe caps 11 Installl the front row tabletops 2 people required 12 Install and cable the microph...

Страница 4: ...river 0 1 2 and 3 Phillips drivers Snips and long nose pliers Extensions for Phillips bits long handle screw drivers Cordless driver Socket wrench set metric 10mm 13mm 19mm wrench and adjustable wrench 19mm 12 point ratcheting box end wrench Spirit level or digital Level Laser level with tripod White gloves included with accessory kit Metric tape measure Box cutter ...

Страница 5: ...can adjust the spools inward or outward after installation Each cable has a reference designator printed label attached to each end When installing cables check the cabling diagram and make sure that each reference designator on the cable corresponds to the correct reference designator on the electrical component in the table or endpoint structure In many cases you cannot use a power driver when i...

Страница 6: ...0 40928 xx 1x each left center and right upper display frames 800 40934 xx 800 40948 xx 800 40941 xx 2x Tie bars 700 43084 xx 56x black M8 X 16mm screws 69 2792 xx 1x compliance label 47 27415 xx Required Tools 3 Phillips Driver 13mm wrench or adjustable wrench 19mm 12 point ratcheting box end wrench Metric tape measure Spirit level Laser level Installing the Lower and Upper Display Frames ...

Страница 7: ...he left center and right lower display frames 800 40923 xx left 800 40920 xx center 800 40928 xx right upside down on the floor and check that there is 2 inches 51mm from the bottom of the frame to the bottom of the feet If adjustment is required loosen the 19mm lock nut 19mm lock nut Leveling foot 2 51 mm ...

Страница 8: ...as a diamond in the center of the frame for this purpose Assemble the lower left frame 800 40923 xx to the lower center frame 800 40920 xx Align the pins on the side of 800 40920 xx with the hole and slot on the side of 800 40923 xx Install and tighten 6x black M8 X 16mm screws 69 2792 xx using a 3 Phillips driver 800 40923 xx 800 40920 xx 6x 69 2792 xx Diamond shows center of system ...

Страница 9: ...age 9 3 Attach the lower right frame 800 40928 xx to the display structure Align the pins on the side of 800 40928 xx with the hole and slot on the side of 800 40920 xx Install 6x black M8 X 16mm screws 69 2792 xx and tighten using a 3 Phillips driver 6x 69 2792 xx 800 40920 xx 800 40928 xx ...

Страница 10: ...reserved 4 Set the frame position from the rear wall The distance should be a minimum of 150mm 6 inches from the back of the frame to the wall Measure two positions left side and right side of the center frame to ensure that the frame is parallel to the rear wall Minimum 6 150 mm Rear Wall ...

Страница 11: ...orizontal level Note When leveling the system use the outside feet of the two outside display frames Foot A in the illustration and both feet of the center display frame Foot C in the illustration Loosen the 19mm lock nut on the leveling feet and adjust the feet using the 13mm hex profile above each foot Foot C Foot B 19mm Lock nut Foot A Diamond shaped leveling mark Foot C Foot B Foot A 13mm hex ...

Страница 12: ...splay Frames Page 12 2015 Cisco Systems Inc All rights reserved 6 Adjust the system for plumb side to side adjustment by raising or lowering the two outer feet marked A by the same amount while checking plumb with a level Foot A Foot A ...

Страница 13: ...enter frame 800 40948 xx to the lower center frame 800 40920 xx Align the pins on the lower frame with the slot and hole on the upper frame a slot on the left side of the upper frame a hole on the right Install 8x black M8 X 16mm screws 69 2792 xx and tighten with a 3 Phillips driver 8x 69 2792 xx Slot Pin 800 40948 xx ...

Страница 14: ... Inc All rights reserved 8a Assemble the upper left frame 800 40934 xx to the display structure Align the slots and pins in the vertical beams then place the upper frame on the lower frame and align the pin and slot in the horizontal beams Pin Slot 800 40934 xx 800 40923 xx ...

Страница 15: ...ystems Inc All rights reserved Page 15 8b Install 8x black M8 X 16mm screws 69 2792 xx in the vertical columns and tighten using a 3 Phillips driver Install and tighten these screws before installing the screws on the horizontal beam 8x 69 2792 xx 800 40934 xx ...

Страница 16: ...nd Upper Display Frames Page 16 2015 Cisco Systems Inc All rights reserved 8c Install 6x black M8 X 16mm screws 69 2792 xx in the horizontal beam and tighten using a 3 Phillips driver 6x 69 2792 xx 800 40934 xx 800 40923 xx ...

Страница 17: ... reserved Page 17 9 Install the upper right frame 800 40941 xx to the display structure following the same procedure as the upper left frame using 14x black M8 X 16mm 69 2792 xx screws Install and tighten the side screws first 800 40928 xx 8x 69 2792 xx 6x 69 2792 xx 800 40941 xx ...

Страница 18: ... 1 0Set the height of the 2 levelers in the upper frame one leveler shown to 2 3 8 inches 60 mm between the surface of the beam and the top of the leveler pad Loosen the lock nut using a 13mm or adjustable wrench before adjusting the height of the leveler Do not re tighten the lock nut 2 3 8 60 mm ...

Страница 19: ...pper Display Frames 2015 Cisco Systems Inc All rights reserved Page 19 1 1Assemble 2x tie bars 700 43084 xx to the rear left and right sides of the frames using 8x black M8 X 16mm screws 69 2792 xx 8x 69 2792 xx 2x 700 43084 xx ...

Страница 20: ...mes for level and plumb horizontal and vertical using 2x Foot A and 2x Foot C Make sure that all feet touch the floor after leveling NOTE Lean the structure a few degrees toward the wall backwards After you install the displays the structure will lean slightly forward and bring it back to level Laser level is aligned with the left point of the diamond Foot C Foot B Foot A Make sure that distance f...

Страница 21: ...es 2015 Cisco Systems Inc All rights reserved Page 21 13 Attach the compliance label 47 27415 xx to the pillar on the left side of the lower left display frame Use the four locating marks on the frame to find the correct placement 1x 47 27415 xx ...

Страница 22: ...ts needed 1x Cable runner 700 42946 xx 2x Cable runner bridges 700 43302 xx 4x Black M4 X 12mm long screws with external lock washer 48 2426 xx 1x Cable runner plate 700 44717 xx 4x M6x10mm screws 69 2803 xx Required Tools 2 and 3 Phillips Driver 6mm T handle hex driver Installing the Cable Runner ...

Страница 23: ...r bridges 700 43302 xx to the cable runner base 700 42946 xx with 4x black M4x12mm screws 48 2426 xx using a 2 Phillips screwdriver b Install the cable runner plate 700 44717 xx to the cable runner 700 42946 xx with 4x M6x10mm screws 69 2803 xx 4x 48 2426 xx 700 44717 xx 4x 69 2803 xx 700 43302 xx 700 42946 xx ...

Страница 24: ...screws 3x per cable runner bracket using a 6mm T handle hex driver Place the hex driver through the access holes in the frame beam as required c Lower the runner brackets through the cutouts in the runner until both brackets are resting on the lower part of the runner not on the ribs a Slide the cable runner into position b Loosen 3x screws on each side c Lower the brackets ...

Страница 25: ... 2015 Cisco Systems Inc All rights reserved Page 25 3 d Attach the 4x captive fasteners 2x fasteners per bracket on the cable runner to the display frames e Re tighten the 6x M8 screws on both brackets with the hex driver d d e e ...

Страница 26: ...xx right 16x Black M4 X 12mm long screw with external lock washer 69 2797 xx Rear kick plates 3x Center left and right rear kick plates center 700 43100 xx left 700 43101 xx right 700 43099 xx 6x M4 nut with lock washer 69 2793 xx 1x Cardboard spacer no part number attached to the cable runner base Rear toe caps 3x Center left and right toe caps center 700 43094 xx left 700 43095 xx right 700 4309...

Страница 27: ... 2x 700 43515 xx 2x 700 43516 xx into the frame by aligning the tabs in the pillars into the slots on the frame Attach the pillars to the frame with 32x M4 X 12mm screws 69 2797 xx 4x for each pillar using a 2 Phillips screwdriver 4x 69 2797 xx Tab Tab Tab 700 43514 xx 700 43515 xx 700 43516 xx 2x 700 43514 xx 700 43516 xx 700 43514 xx 700 43515 xx ...

Страница 28: ...o Systems Inc All rights reserved 2 Place the horizontal crossbars 700 43519 xx left 700 43517 xx center 700 43518 xx right on the pillars and fasten with 14x black M4 X 12mm screws 69 2797 xx using a 2 screwdriver Tab Tab Tab 14x 69 2797 xx 700 43519 xx 700 43517 xx 700 43518 xx ...

Страница 29: ...Systems Inc All rights reserved Page 29 3 Attach the lower rear kick plate 700 43100 xx to the endpoint structure Align the threaded studs to the slots in the display stand then loosely install but do not fully tighten using 2x M4 nuts 69 2793 xx 700 43100 xx 2x 69 2793 xx ...

Страница 30: ... kick plate 700 43100 xx Level the rear kick plate with a spirit level Verify that the kick plate is at least 26mm 1 inch above the highest point on the floor measured on both the left or right side ot the kick plate then tighten the 2x M4 nuts you attached in Step 3 Save the spacer You will use it when you install the front kick plates Cardboard spacer 2x 69 2793 xx viewed from opposite side Mini...

Страница 31: ...isco Systems Inc All rights reserved Page 31 5 Install the rear center toe cap 700 43094 xx to the kick plate by placing the threaded studs into the holes in the display stand and installing and tightening the 4x M4 nuts 69 2793 xx 4x 69 2793 xx Stud Hole 700 43094 xx ...

Страница 32: ...ts reserved 6a Attach the left and right rear kick plates left 700 43101 xx right 700 43099 xx a Hook the pin on the rear side kick plates over the notch in the rear center kick plate b Place the studs one for each kick plate into the slot in the frame a Pin Notch Slot b Stud 700 43099 xx 700 43101 xx ...

Страница 33: ...sco Systems Inc All rights reserved Page 33 6b c Using a level level the rear side kick plates with the rear center kick plate d Attach the x2 M4 nuts with lock washer 69 2793 xx to the stud for each plate and tighten with the 7mm hex driver c Level here d 2x 69 2793 xx ...

Страница 34: ...7 Install the side toe caps left 700 43095 xx right 700 43093 xx Place the studs in the left toe cap 700 43095 xx into the holes in frame Attach the x3 M4 nuts with lock washer 69 2793 xx to the stud and tighten with the 7mm hex driver Repeat for the right toe cap 700 43095 xx 700 43093 xx Hole 6x 69 2793 xx Stud ...

Страница 35: ...Switches Note The switches in the endpoint structure are optional items that can be used for the Ethernet connectivity modules from the table legs You install switches in the table assembly for the Touch 10 device s in a later procedure these are required 2x WS C2960C 12PC L switch Upper and lower switch brackets 700 43091 xx top 700 43090 xx bottom 4x black 10 32x10mm screw with external tooth lo...

Страница 36: ... Inc All rights reserved 1 Assemble the brackets 700 43404 xx left 700 44771 xx right to the sides of the encoder decoder codec 800 39337 xx using 8x black M4x12mm screws 69 2797 xx Tighten with a 2 Phillips driver 800 39337 xx 4x 69 2797 xx 4x 69 2797 xx 700 43404 xx 700 44771 xx ...

Страница 37: ...ssemble the encoder decoder codec to the lower center frame by engaging the bracket hooks with the slots in the frame and then lowering the box until the hooks rest on the bottom of the slots Install 6x black M8x16mm screws 69 2792 xx and tighten with a 3 Phillips driver 800 39337 xx Hook Slot 6x 69 2792 xx ...

Страница 38: ...ems Inc All rights reserved 3 Assemble the brackets 700 43404 xx left 700 43573 xx right to the sides of the Host CPU codec 800 41502 xx using 8x black M4x12mm screws 69 2797 xx Tighten with a 2 Phillips driver 700 43404 xx 800 41502 xx 4x 69 2797 xx 700 43573 xx 4x 69 2797 xx ...

Страница 39: ...emble the Host CPU codec to the lower center frame by resting the box on the bottom beam and rotating sliding into place Engage the hook on the left side bracket with the slot in the frame Install using 6x black M8x16mm screws 69 2792 xx and tighten with a 3 Phillips driver 800 41502 xx Hook Slot 6x 69 2792 xx ...

Страница 40: ...switches WS C2960C 12PC L as shown and assemble the brackets 700 43091 xx top 700 43090 xx bottom using x4 black 10 32 X 10mm screws 69 100184 xx included with the switch brackets Engage the tabs on the brackets with the slots in the switches Tighten the screws with a 2 Phillips driver 2x WS C2960C 12PC L 4x 69 100184 xx Slot Tab 700 43091 xx 700 43090 xx ...

Страница 41: ... Inc All rights reserved Page 41 5b Optional Installing the LAN switches Install the switches and brackets by engaging the two bottom hooks in the slots in the frames Install 4x black M4 X 12mm screws 69 2797 xx and tighten with a 2 Phillips driver Hook 4x 69 2797 xx Slot ...

Страница 42: ...woofer bracket 700 43076 xx 1x power supply 341 0414 xx 8x black M4 x12mm screws 69 2797 xx 2x silver M4 washer 69 2796 xx 2x M4 nut with lock washer 69 2793 xx Speakers 6x Speakers 74 12204 xx 2x Speaker Mounting Block 700 47073 xx 48x Black M3 Shoulder Screw 69 2791 xx Required Tools 2 Phillips driver 7mm hex socket driver Installing the Subwoofer and Speakers ...

Страница 43: ...r bracket on the left display frame Install 2x M4 nuts 69 2793 xx on the threaded studs and tighten with a 7mm hex socket driver Insert the power supply 341 0414 xx into the channel on the back of the bracket and plug the power supply into the bottom of the amp 800 42333 xx 2x 69 2793 xx 341 0414 xx Cord from power supply plugs into amp ...

Страница 44: ...e bracket 700 43076 xx to the woofer 74 12848 xx Insert the standoffs in the bracket into the rubber grommets on the woofer Install the 2x silver M4 washers 69 2796 xx to the 2x M4x12mm screws 69 2797 xx and tighten with a 2 Phillips driver 74 12848 xx back side 2x 69 2797 xx 2x 69 2796 xx 700 43076 xx ...

Страница 45: ...l the woofer by rotating it forward and placing it into the lower left display frame making sure that the woofer feet are located within the sheet metal forms on the frame Rotate the woofer backward install 2x M4x12mm screws 69 2797 xx and tighten with a 2 Phillips driver Rubber feet 2x 69 2797 xx ...

Страница 46: ...er Mounting Blocks 700 47073 xx to the center pillars with 4x Black M3 Shoulder Screws 69 2791 xx 2x per pillar NOTE only the two center vertical pillars use this block Note the speaker icon which points toward the speakers after they are installed 4x 69 2791 xx 2x 700 47073 xx Center pillars Note speaker icon points toward speaker ...

Страница 47: ... rights reserved Page 47 4b Mount the speaker 74 12204 xx to the rubber block and attach it using 4x Black M3 shoulder screws 69 2791 xx per speaker Do not use a power driver for these screws as this might cause damage to the thread inserts 4x 69 2791 xx 74 12204 xx ...

Страница 48: ...48 2015 Cisco Systems Inc All rights reserved 5 Install the four remaning speakers using 4x Black M3 Shoulder Screw 69 2791 xx per speaker Do not use a power driver when installing the screws to avoid damage to the thread inserts 4x 74 12204 xx ...

Страница 49: ...eference designator extra jumper cables for middle legs Required Parts Table legs 1x left inside table leg 800 44195 xx 1x right inside table leg 800 41001 xx 2x outside table leg 800 41002 xx Ethernet Power modules 6x Power Ethernet connectivity modules part varies by country 4x Power Ethernet connectivity cover 700 47772 xx 2x Power Ethernet connectivity blanking plates 700 45421 xx 20x 4 40 nut...

Страница 50: ...he top plate is correctly installed If the plates are incorrectly installed remove the three screws that attach the plate to the leg flip it 180 degrees then re install it Correct Cloverleaf pattern on plate matches with slot on table leg Incorrect Long slot on plate matches with slot on table leg Remove the three screws flip plate 180 degrees and reattach 800 41001 xx and 800 44195 xx ...

Страница 51: ...rn the 4x table legs 1x each inside table legs 800 41001 xx and 800 44195 xx and 2x outside table legs 800 41002 xx upside down Adjust the levelers until there is 1 inch 25mm between the bottom edge of the leg and the base of the foot 25mm 1 4x first row table legs 1x 800 41001 xx 1x 800 44195 xx 2x 800 41002 xx ...

Страница 52: ...s reserved 3 Align the pins on the front row cable management assembly 800 40845 xx with hole and slot on the inner table legs 800 44195 xx left 800 41001 xx right then connect the legs to the assembly using 6x M8x16mm screws 69 2792 xx 3 per leg 6x 69 2792 xx 800 40845 xx 800 41001 xx 800 44195 xx ...

Страница 53: ...rights reserved Page 53 4 Loosely attach the Cable Runner Bracket to the Front Row assembly by by sliding the slots in the Cable Runner Bracket onto the two M6 studs located on the Front Row Cable Management assembly Attach 2x M6 nuts 69 2800 xx to the studs finger tight 2x 69 2800 xx ...

Страница 54: ...right Table leg connector 700 44718 xx to connect the table leg Attach the bracket to the table legs using 4x M8x16mm screws 69 2792 xx Connect the left table leg 800 41002 xx using the same procedure using the 700 44719 xx left connector and 4x M8x16mm screws 69 2792 xx 800 41002 xx 700 44718 xx 4x 69 2792 xx 700 44719 xx 800 41002 xx 4x 69 2792 xx Right side Left side ...

Страница 55: ...6 Using a laser level make sure that the outside table legs are level with the inside table legs Check table height by aligning these notches on the table legs inside or outside with the diamonds on the endpoint structure Diamond in center of table assembly aligns with diamond on center of endpoint structure ...

Страница 56: ...osmetic leg brackets 700 46219 xx far right 700 44754 xx right center 700 44755 xx left center 700 46218 xx far left into the table legs Use 8x M6x10mm 69 2803 xx screws to attach these to the table leg brackets 2 screws per bracket 700 44754 xx 700 44755 xx 700 46218 xx 700 46219 xx 700 46219 xx 8x 69 2803 xx 700 44755 xx ...

Страница 57: ...le them to the 4x Power Ethernet connectivity cover 700 47772 xx using the 4 40 nuts included with the power Ethernet module b Use the blanking plates 700 45421 xx for the two outside legs as shown and attach using 8x 04 40 nuts 49 0326 xx Tip Hold the cover flat and install the nuts from below using a nut driver to facilitate installation 2x Power Ethernet Modules 700 47772 xx 8x 4 40 nuts 1x Pow...

Страница 58: ... power Ethernet connectivity modules to the table legs Install 3x 4 40 nuts 49 0326 xx to the studs and tighten the nuts Insert the modules with two outlets into the 2x inside table legs and insert the modules with one outlet and one blanking plate into the 2x outside table legs Assembled power Ethernet connectivity modules ...

Страница 59: ... inside legs have room for the cable retractor installed later as shown by the yellow outline in the illustration on the right Note The extra jumper cable is used in case of failure of the power module you can replace the module without removing the tabletops Inside table legs make sure that cabling is clear from yellow dotted area as shown Inside legs do NOT get an extra jumper cable Outside tabl...

Страница 60: ...8PC L with 2x 10 32 screws 69 100184 xx b Attach the switch and the Microphone Connector 800 40951 xx to the studs in the cable management asembly using 4x M6 nuts 69 2800 xx Note the correct orientation of the Microphone Connector with the single connector facing to the right and the six connectors facing to the left WS C2960C 8PC L 800 40951 xx note six connectors on right and one connector on l...

Страница 61: ...e leg Ethernet connections d Route the 1x power cable from the PDU to the cable runner shown in red e Route the Ethernet cables from the power Ethernet table leg modules to the cable runner shown in blue Leave space above the switch for venting f Connect the mic bar cables to the Microphone Connector and route the main Microphone Connector cable through the cable runner NOTE The mic bars Touch 10 ...

Страница 62: ... number of Touch 10 cables will vary depending on the number of Touch 10 devices 1 to 6 for the first row Caution Failure to follow cabling directions can result in either the parts not fitting correctly or electrical impedance issues Inside leg power Ethernet cables Legend Green Microphone Connec tor mic bars Red power cables Blue Ethernet cables Orange presentation cables ...

Страница 63: ...ing of the Front Row Table 2015 Cisco Systems Inc All rights reserved Page 63 13 Level the system and measure the distance between the outside table legs and the edges of the display stands in the endpoint structure 1111 mm 1111 mm ...

Страница 64: ...x 1x USB to USB cable 2 Meter 37 1538 xx USB1 1x Jumper cable 2 meter 37 0994 xx D24 Cables Speakers Camera and Lights Speaker light and camera cabling kit 69 2668 xx 3x Light bar cables 37 100748 xx L1 L2 L3 3x RCA Y cable for speaker 37 1557 xx L4 L4 R L L5 L5 R L L6 L6 R L 1x DisplayPort to DisplayPort cable 2 meter 37 1547 xx DP1 Cables Woofer Woofer cabling kit 69 2673 xx includes Power Cord ...

Страница 65: ...d woofer Be sure to connect these on the correct side for example connect the side of the cable with the microphone icon to the microphones and connect the side of the cable with the MC icon to the Microphone Connectors Caution Do not plug any additional equipment that is not part of the IX5000 or IX5200 system into the PDUs NOTE Since the light bars and camera are not yet installed prepare these ...

Страница 66: ...Installing Endpoint Structure Cables Page 66 2015 Cisco Systems Inc All rights reserved Speaker Left PDU and Woofer ...

Страница 67: ...Installing Endpoint Structure Cables 2015 Cisco Systems Inc All rights reserved Page 67 Codec cabling note iPass cable between Encoder Decoder and Host CPU codecs Use Velcro cables as required ...

Страница 68: ...oint Structure Cables Page 68 2015 Cisco Systems Inc All rights reserved Codec and cable runner Power cable in the left side channel Ethernet cables in the right side channel Presentation cables in the center channel ...

Страница 69: ...Installing Endpoint Structure Cables 2015 Cisco Systems Inc All rights reserved Page 69 Codec and cable runner ...

Страница 70: ...Installing Endpoint Structure Cables Page 70 2015 Cisco Systems Inc All rights reserved Optional 42 inch display use this as a guideline only the cable runner cover will not be installed at this time ...

Страница 71: ...Installing Endpoint Structure Cables 2015 Cisco Systems Inc All rights reserved Page 71 ...

Страница 72: ...Installing Endpoint Structure Cables Page 72 2015 Cisco Systems Inc All rights reserved ...

Страница 73: ...racket screws included with the displays 2x Vertical bezel extrusions 800 41842 xx 10x M4 X 12mm screws 69 2797 xx 6x M4 X 6mm screws black 69 2625 xx Display cabling kit 69 2678 xx includes the following cables 3x power cord 3 meter 37 0833 xx 3x HDMI to DVI D patch cord 3 meter 37 1387 xx Required Tools 2 Phillips driver 3 Phillips driver 13mm wrench or adjustable wrench 19mm ratcheting box end ...

Страница 74: ...ully before installation and follow all steps in the correct order Attach the Z clips to the top of the displays 700 46232 xx goes on the left side when viewed from the FRONT of the display and 700 46233 xx goes on the right a insert the 1x M4 X 6mm screw 69 2625 xx into the bracket finger tight b peel off the adhesive tape backing on the bracket c press the bracket to the display and d tighten th...

Страница 75: ...ght displays with the 10 M6 screws included with the brackets using a 2 Phillips driver Install the bracket on the left side for the left display and install the bracket on the right for the right display NOTE For this book left and right are as viewed from the FRONT of the system therefore left and right are reversed 5x bracket screws Left display Right display ...

Страница 76: ...the FRONT of the display using a 3 Phillips driver b Install a silver M8 lock washer part of 69 2625 xx and an M8 stud part of 69 2625 xx c Tighten the stud with a 13mm wrench d Install the spool part of 69 2625 xx on the threaded stud d MAKE SURE THAT THERE IS is 1 1 8 inch 29mm distance between the spool and the rear of the display or you cannot install the display 69 2625 xx 1 1 8 29 mm ...

Страница 77: ...edure is the same as installing the spool on the right display but you place the spool on the lower left side when viewed from the FRONT of the display instead of the lower right Make sure that there is 1 1 8 inch 29mm distance between the spool and the rear of the display for correct installation of the display 69 2625 xx 1 1 8 29 mm ...

Страница 78: ...served 5a Temporarily hang the right display onto the frame rail of the structure using the top hooks Connect the power DVI and fan cables TURN THE DISPLAY POWER SWITCH TO THE ON POSITION DVI connector Fan connector AC connector Power switch Display top hooks Frame rail 74 12597 xx ...

Страница 79: ...l in the slot in the frame place the inner corner of the display on the support bracket and place the leveling bracket on the leveler Note that the display is not supported by the top hooks on the frame rail CAUTION Do not pinch your hand between the display and the support bracket Spool Slot View from back Support bracket Display Leveling bracket Leveler ...

Страница 80: ...stems Inc All rights reserved 6a Temporarily hang the center display using the top hooks and frame rail and rotate the frame out to connect the power DVI and fan cables TURN THE SWITCH FOR THE DISPLAY TO THE ON POSITION 74 12597 xx Cable access from this side ...

Страница 81: ...bling the Displays 2015 Cisco Systems Inc All rights reserved Page 81 6b Move the center display into the display frame CAUTION Do not pinch your hand between the display and the support brackets Support bracket Display ...

Страница 82: ...nto its installed position and attach the power DVI and fan cables on the rear of the display TURN THE SWITCH FOR THE DISPLAY TO THE ON POSITION CAUTION Do not pinch your hand between the display and the support bracket Spool Slot View from back Leveling bracket Leveler DVI connector Power switch power connector ...

Страница 83: ...ay Use the left and right levelers to create an even gap between the left and center and center and right displays Use a 6mm T handle hex driver to turn the leveler from below it has a socket in the end of the threaded stud Tighten the lock nut on the levelers after you complete leveling Leveler Leveling bracket View from back use a 6mm T handle hex driver from below to adjust levelers ...

Страница 84: ...Installing and Cabling the Displays Page 84 2015 Cisco Systems Inc All rights reserved 9 Remove the protective film from the displays by pulling the tape off in the directions shown by the arrows ...

Страница 85: ...k into the slot in the center pillar b Insert 4x M4x12 screws 69 2797 xx into the lower part of the extrusions 2x each per extrusion and tighten the screws with a 2 Phillips driver Do NOT use a power driver for this procedure and do not overtighten c Push the left and right displays from the sides towards the center against the extrusions to take up any gaps Leave the fim on the front of the displ...

Страница 86: ...b using a spirit or digital level Adjust the two outer feet as needed using a 13mm open end wrench or adjustable wrench on the hex profile above the foot base Make sure that all six feet are touching the floor and tighten the locknuts on all six feet using a 19mm ratcheting box wrench 19mm Lock nut 13mm hex profile nut ...

Страница 87: ... center and right light panels 3x 74 12235 xx 1x each left center and right speaker cover 700 46597 xx 700 46596 xx and 700 46595 xx respectively 1x each left and right fascia corner braces 700 46598 xx left 700 46594 xx right 8x black M4x12mm screw with external lock washer 69 2797 xx Required Tools 2 Phillips driver Installing the Camera and Light Panels ...

Страница 88: ...sco Systems Inc All rights reserved 1 a Attach the camera 74 12203 xx to the vertical structure supports of the endpoint structure The screws are pre attached to the camera b Attach the DisplayPort Cable to the port at the top of camera housing 74 12203 xx ...

Страница 89: ...the light bar b Lift the panel into position and fit the tabs on top of the light panel behind the tabs in the center horizontal crossbar Do not place the light bar tabs into the crossbar slots c Swing the bottom of the light panel inward so it sits on the small shelf on the pillar Visually center the light panel in the frame DO NOT allow the panel to fall during this procedure DO NOT put stress o...

Страница 90: ...tall the center speaker cover 700 46596 xx and attach the cover to the endpoint structure using the 4x captive Phillips screws The cover fits under the small shelf on the pillar Be careful to not pinch the light wire as shown in the below picture 4x Captive Screws 700 46596 xx Do not pinch cable ...

Страница 91: ...part of 74 12235 xx and left speaker cover 700 46597 xx then the right light panel part of 74 12235 xx and right speaker cover 700 46595 xx using the same procedure as the center speaker cover and light panel After installation make sure that the edges of the panels touch 700 46597 xx 74 12274 xx 700 46595 xx 74 12275 xx ...

Страница 92: ...aded holes behind the covers Install the 2x screws for the left display first then 2x center screws then 2x right Note If the screws do not align with the threaded holes DO NOT place a screwdriver or other object into the hole to align them Raise or lower the displays using the display levelers from the rear of the system to align the holes Table Top B 700 42476 01 Table Top A 700 42477 01 Table T...

Страница 93: ... left fascia corner brace 700 46598 xx into the tab in the horizontal crossbar then rotate the brace into position and attach the brace to the endpoint structure using 2x M4 screws 69 2797 xx Repeat for the right fascia corner brace 700 46594 xx 700 46598 xx left 700 46594 xx right Tab Hook Hook Tab 2x 700 46594 xx ...

Страница 94: ... 43098 xx left 700 43096 xx right 1x Cardboard spacer no part number attached to the cable runner base 5x black M4x12mm screw 69 2797 xx Required Tools 2 Phillips driver Installing the Front Kick Plates NOTE Make sure that all cabling between the endpoint structure and the front row table is complete before you install the front kick plates 700 43097 xx 700 43096 xx 700 43098 xx ...

Страница 95: ...r kick plate 700 43097 xx a Fit the center kick plate to the frame placing the cardboard spacer under it b Attach but do not tighten 2x black M4x12mm screws 69 2797 xx into the center of the slot Note the arrow that indicates the correct slot for the screw 2x 69 2797 xx 700 43097 xx Arrow indicates correct slot ...

Страница 96: ...er and the front kick plate and level the front kick plate using a spirit level Make sure that the front kick plate is a minimum of 26mm above the highest point on the floor either left or right d Tighten the 2x black M4x12mm screws 69 2797 xx remove the spacer and recheck the minimum 26mm of clearance Cardboard spacer Minimum 26mm 1 inch ...

Страница 97: ...n the side kick plate to the retention slots in the center kick plate Support the free end until the remaining screws are installed b Using a spirit level level the outside edge of the front left kick plate 700 43098 xx with the front center kick plate c Install and tighten 4x black M4x12mm screws 49 0420 xx 2 for each kick plate Note the arrows on the kick plates that show the correct screw place...

Страница 98: ...tall and tighten 1x black M4x12mm screw 69 2797 xx to connect the front left kick panel 700 43098 xx to the rear kick plate Re adjust the rear kick plate to align the screw hole if needed Repeat for the right side front kick plate 700 43096 xx 69 2797 xx 700 43098 xx 700 43096 xx 69 2797 xx ...

Страница 99: ...h Tabletops A B and C 700 42477 xx 700 42476 xx and 700 42478 xx 8x Biscuit Joiner 700 23909 xx 4x Half Moon Bolt M6 x 80mm 51 6068 xx 4x Joint Plate 700 23345 xx 48x M8 x 16mm screws black 69 2792 xx Required Tools 4 Phillips Screwdriver 10mm open end or ratcheting wrench Installing the Front Row Tabletops ...

Страница 100: ...ps Page 100 2015 Cisco Systems Inc All rights reserved 1 Lower Table Top Assembly A 700 42477 xx onto the table leg assembly Do not secure the table to the legs at this time Repeat this step with Table Top B 700 42476 xx 700 42477 xx ...

Страница 101: ...ed Page 101 2 With tabletop assembies A B resting on the leg assembly install x8 biscuit joiners 700 23909 xx 4x per seam into the slots in the tabletops Be sure that the biscuit joiners are fully seated in their slots 700 42477 xx 700 42476 xx 4x 700 23909 xx 4x 700 23909 xx ...

Страница 102: ...stems Inc All rights reserved 3 Slide table top assemblies A B together then slide the table top slightly to the right or left allowing enough room to install the tabletop hardware from underneath Make sure that the tops stay on the table legs and do not fall ...

Страница 103: ...x into slots in the bottom of tabletop assemblies A B Use 10mm open end or ratcheting wrench to tighten the nuts and bring the table sections together Make sure the front and back edges are aligned before tightening and make sure that the half moon bolt assemblies are insterted all the way into their recesses in the table 2x 51 6068 xx ...

Страница 104: ...e 104 2015 Cisco Systems Inc All rights reserved 5 Install the joint plates 2x 700 23345 xx to the bottom of table top assemblies A B 700 42477 xx 700 42476 xx by inserting 6x 69 2792 xx screws per joint plate 2x 700 23345 xx 6x 69 2792 xx ...

Страница 105: ...ghts reserved Page 105 6 Attach tabletop C 700 42478 xx to tabletops A B using the exact same parts tools and joining procedures as you used to join tabletops A B 2x 700 23345 xx 12x 69 2792 xx 2x 51 6068 xx Underside of table Table edge 700 42478 xx 4x 700 23909 xx ...

Страница 106: ...ystems Inc All rights reserved 7 Slide the tabletop assembly into its correct position then secure it to the table legs using 24x M8x16mm screws 69 2792 xx 6x screws per table leg Start from the inside legs then move outward 6x 69 2792 xx 3 each side of leg ...

Страница 107: ...091 xx 1x Cable runner retainer 700 44724 xx 6x M6x10mm screws 69 2815 xx 1x Cable runner cover 700 42945 xx for systems without 42 inch auxiliary displays 700 47587 xx for systems with auxiliary displays Side panel and front panel covers 2x 700 43422 xx outside of center left and center right leg 2x 700 43004 xx inside of the outside legs 2x 700 43424 xx outside of outside table legs 2x 700 43423...

Страница 108: ...te button cable through the openings underneath the tabletop to the mic bar hole c Secure the Mute Button Assembly with the 2x M4 x 12mm screws 69 2801 xx d Adjust the screws so that mute button is flush with top surface of Table Top Assembly e Repeat for each Mute Button Assembly d Mute button flush with table after installation b Mute button cable route through to mic bar hole c 2x 48 2646 a 3x ...

Страница 109: ...on to the mic bar c Gently rest the connected mic bar upside down on the table d Repeat this step for each mic bar e Loop excess cable in the cable management assembly as shown NOTE FOR IX5200 SYSTEMS ONLY Three mic bars have a red plastic covering and have a red sticker on the underside use these for the second row and DO NOT install these on the first row 3x 74 12199 xx a Mini DisplayPort cable ...

Страница 110: ...kaged with the mic bar to the mic bar using 1x M4x12mm screw 69 2801 xx d Ensure that the cables are routed under the table so that they will not be pinched when the cosmetic panels are installed Use Velcro straps as required e If your system uses additional Touch 10 devices repeat steps a though c for the right and left mic bar otherwise attach the cap to the left and right mic bars without inser...

Страница 111: ...ough the openings in the table top assembly Make sure that the wire between the mic bar and the mute button uses the routing as shown in Step 1 b b Secure the Mic Bar Assembly to the Table Top Assembly by inserting 6x M4 x 12 mm screws 69 2801 xx from the underside of the table top assembly Do not use a power driver for these screws c Repeat this step for each mic bar assembly b 6x 43 2426 xx a Pl...

Страница 112: ...irst Row Table Page 112 2015 Cisco Systems Inc All rights reserved 4 Route the Mini DisplayPort cables underneath the table towards the center of the structure Table Top B 700 42476 01 Table Top A 700 42477 01 Table Top C 700 42478 01 ...

Страница 113: ...les between the mic bar and the microphone connector MC Use Velcro cable wraps as needed to secure cables Ensure that the cables are held inside of the structure so as they are not pinched when the cosmetic panels are installed Table Top B 700 42476 01 Table Top A 700 42477 01 Table Top C 700 42478 01 Mic Bar 1 Mic bar 6 Mic Bar 2 5 MC1 to cable runner ...

Страница 114: ...ure cables and ensure that the cables are held inside of the structure so as they are not pinched when the cosmetic panels are installed Notes You can install up to six Touch 10 devices one per participant Route the cables above the switch so that a minimum amount of hot air is blocked around the heatsink To Touch 10 1 6 cables depending on number of Touch 10 devices To cable runner and Host CPU c...

Страница 115: ...6213 Note If there is not enough free play in the cable cut the two zip ties and ONLY these zip ties as shown in the illustration c Place the cable and the cup into the cup base in the Table Top Assembly d Secure the cup to the table using 4x M3 thumbscrews SE2587 e Repeat this procedure for the other cable cup Table Top B 700 42476 01 Table Top A 700 42477 01 Table Top C 700 42478 01 Underside of...

Страница 116: ...ach it using 4x M3x12mm screws 48 2091 xx b Repeat on the left side for the left cable retractor using 4x M3x12mm screws d If you did not do so before cut the two zip ties for the cable retractor Route the other presentation cable end through the cable runner to the Host CPU codec Example shows right table leg Retractor Cut these zip ties if you did not cut them yet 4x 48 2091 xx installed from ot...

Страница 117: ...tall the left and right cable side mute button covers right 700 44726 xx left 700 44727 xx to the underside of the tabletop assemblies using 8x M4x10mm black screws 69 2821 xx 4 for each side Table Top B 700 42476 01 Table Top A 700 42477 01 Table Top C 700 42478 01 4x 69 2821 xx 700 44726 xx 700 44727 xx ...

Страница 118: ...sory kit for this step 700 43422 01 outside of center left and center right leg 700 43004 xx inside of the outside legs 700 43424 xx outside of outside table legs 700 43423 xx inside of inside legs Do not install the center panel 700 43425 xx at this time Table Top B 700 42476 01 Table Top A 700 42477 01 Table Top C 700 42478 01 700 43424 xx 700 43424 xx 700 43422 xx 700 43004 xx 700 43423 xx ...

Страница 119: ...ble 2015 Cisco Systems Inc All rights reserved Page 119 11 Install the cable runner retainer 700 44724 xx using 6x M6x10mm black screws 69 2815 xx Table Top B 700 42476 01 Table Top A 700 42477 01 Table Top C 700 42478 01 8x 69 2815 700 44724 xx ...

Страница 120: ...s on the cable runner base b Lower the cover onto the cable runner being careful not to mar or strike the display frame or the front row table top c Attach the 2x M6x10mm screws 69 2815 xx to secure the cap to the cable cover d If your system includes the optional 42 inch display route the power and signal cables for the display through the hole in the runner Table Top B 700 42476 01 Table Top A 7...

Страница 121: ...t panel Align the tabs located on the mounting rails on the inner side of the Front Panel 700 43425 xx to the slots located on the front cable management panel Move the panel slightly up and over the legs then move it into position Table Top B 700 42476 01 Table Top A 700 42477 01 Table Top C 700 42478 01 700 43425 xx ...

Страница 122: ...nc All rights reserved 14 Install and secure the cable center mute button cover 700 45410 xx to the underside of the tabletop assembly using 5x M4x10mm black screws 69 2821 xx Table Top B 700 42476 01 Table Top A 700 42477 01 Table Top C 700 42478 01 700 45410 xx 5x 69 2821 xx ...

Страница 123: ...isco Systems Inc All rights reserved Page 123 15 Measure from the sides of the table to the sides of the endpoint structure Both sides should be aligned and even with the structure Table Top B 700 42476 01 Table Top A 700 42477 01 Table Top C 700 42478 01 ...

Страница 124: ...eters 37 1542 xx A7 A18 69 2677 xx includes 3x Jumper Cord 2 meter 37 0994 xx Required Parts 7x Table legs 1x far left leg 800 44198 xx 1x far right leg 800 44197 xx 5X inside legs 800 44200 xx 21x M8x16MM screws 69 2802 xx 6x each Back row cable management assembly left and right 3x 800 42717 xx and 3x 800 42715 xx 2x switches WS C2960C 8PC L 4x switch bracket 700 44758 xx 2x microphone connector...

Страница 125: ... reserved Page 125 Preinstallation requirement Plan for trenching for cables in the room using the following diagram 7 5 1 35 81 66 27 5 6 0 16 216 5 72 5 1 1 6 0 7 5 1 6 3 5 5220 75 1 0 16 216 6680 1 17 5 1 5220 7 5 6 7 1 326 7 21 6 28 127 81 5 352 8 7 75 1 6 5 25 6 21 52 21 6 ...

Страница 126: ...isco Systems Inc All rights reserved 1 Turn the 7x table legs 1x far left 800 44198 xx 1x far right 800 44197 xx 5X inside legs 800 44200 xx upside down Adjust the levelers until there is 1 inch 25mm between the bottom of the leg and the base of the foot 25mm 1 ...

Страница 127: ...note of the table legs and assemblies used for the cable management panels that go between the legs and be sure to assemble these panels in the correct order NOTE This is shown from the front so right and left are reversed 800 44197 xx 800 44198 xx 5x 800 44200 xx all inside legs 800 42715 xx 800 42717 xx ...

Страница 128: ...ll rights reserved 3 Connect the far right cable management assembly 800 42715 xx to the far right table leg 800 44197 xx and the second from right table leg 800 44200 xx by inserting 6x M8x16mm screws 69 2802 xx into each leg 6x 69 2802 xx 800 42715 xx 800 44197 xx 800 44200 xx ...

Страница 129: ...left alternating cable management assemblies and using the same attachment procedures Save the far left table leg 800 44198 xx until the very last step Tip Keep the structure centered behind the first row table and use the measurements in the next slide to keep it the correct distance from the first row table 800 42715 xx 800 42717 xx 800 44198 xx ...

Страница 130: ...tems Inc All rights reserved 5 Measure the distance between the 1st and 2nd row table legs and center the system relative to the front row 1535 mm 1535 mm 1542 mm 1542 mm Align the center of the center table leg with the center of the mute button on the front row table ...

Страница 131: ...WS C2960C 8PC L 2x MCs 800 40951 xx and 2x PDUs 74 8655 xx a Connect the 2x switch bracket 700 44758 xx to the switch with 2x 10 32 screws 69 2818 xx b Attach the 2x switches 2x MCs and 2x PDUs to the structure using 12x M6 nuts 49 100235 xx 12x 49 100235 xx 2x 74 8655 xx 2x 700 44758 xx 2x 800 40951 xx 2x WS C2960C 8PC L ...

Страница 132: ...rner 700 103476 xx right corner 700 45431 xx outside left outside right and center 700 45430 xx inside left and inside right using 14x M4x12mm 69 2801 xx screws NOTE This drawing is shown from the front left and right are reversed 700 103477 xx 700 45430 xx 2x 69 2801 xx 2x 69 2801 xx 700 103477 xx 700 103476 xx 700 45431 xx 700 45431 xx 700 45430 xx 700 45430 xx 700 45431 xx ...

Страница 133: ...er level Use the leveling feet to raise or lower the legs Check the height of the second row relative to the first row by removing the outer panels on the first row table legs and aligning the horizontal notches on the outer first and second row table legs Align this notch on the outer second row table legs with the same notch on the outer first row table legs ...

Страница 134: ...odules part number varies by country and assemble them to the 7x Power Ethernet connectivity cover 700 47772 xx using the 4 40 nuts included with the power Ethernet module b Use 2x blanking plates 700 45421 xx for the two outside legs as shown 2x Power Ethernet Modules 700 47772 xx 8x 4 40 nuts 1x Power Ethernet Modules 700 47772 xx 8x 4 40 nuts 700 45421 xx 5x Inside legs 2x outside legs ...

Страница 135: ...Install 3x 4 40 nuts to the studs and tighten the nuts Insert the modules with with one outlet and one blanking plate into the two outside table legs Add one additional jumper cable to each table leg to facilitate any replacement procedures Assembled power Ethernet connectivity modules Insert extra jumper cable and route behind power connector note jumper connections ...

Страница 136: ...ing Mute button cables Mini DisplayPort cables for the mic bars Note Use the correctly numbered cables for the mic bars and match the cable numbering to the numbering on the MCs Use the cabling diagram for complete information 12x Ethernet cables for the 12 Ethernet participant laptop connections 12x power cables for the 12 power connections for participants ...

Страница 137: ...Installing the Second Row Table IX5200 Only 2015 Cisco Systems Inc All rights reserved Page 137 Cable Routing Left ...

Страница 138: ...Installing the Second Row Table IX5200 Only Page 138 2015 Cisco Systems Inc All rights reserved Cable Routing Center ...

Страница 139: ...Installing the Second Row Table IX5200 Only 2015 Cisco Systems Inc All rights reserved Page 139 Cable Routing Right ...

Страница 140: ...in which 700 46613 xx may be mounted If the round piece is too close to the floor slide it up and use the top three holes Tip Install the downspout so that the tapered area points toward the exit path for the cables Note If you use non standard trenching between the endpoint structure and the second row table be sure that all cables can reach their intended electronic components from one side of t...

Страница 141: ...Installing the Second Row Table IX5200 Only 2015 Cisco Systems Inc All rights reserved Page 141 Cable Routing For the Downspout ...

Страница 142: ...e left three sections then put the sections together Use the table joiners half moon bolts and joint plates the same as the first row Tip There are letters on the edges of the table Match the letters on the underside of the tables to build the table correctly 700 45242 xx 700 103970 xx 700 45241 xx 700 45240 xx 700 103971 xx 700 45239 xx Numbering on table edges ...

Страница 143: ...ge 113 for the steps If your second row has Touch 10 devices install them to the switches now Do not throw away the small round microphone caps that attach to the center of the microphone bars Note that you install 3x regular mic bars and and 3x turnaound mic bars Turnaround mic bars have a red label on the underside 74 12199 xx 74 12199 xx 74 12199 xx 74 12552 xx 74 12552 xx 74 12552 xx 6x 74 122...

Страница 144: ... panel covers Place the PET panels over the magnets on the side of the table legs until they stick into place Secure the front panel covers to the cable management assemblies using 12x M6x10mm screws 69 2803 xx 700 43424 xx 700 43424 xx 3x 700 43502 xx 3x 700 43005 xx 6x 700 43427 xx left inside 6x 700 43426 xx right inside 12x 69 2803 xx ...

Страница 145: ...stems Inc All rights reserved Page 145 3x 700 45427 xx 3x 700 45426 xx 16 Attach the mute button covers to the underside of the second row table to the underside of the tabletop assemblies using 4x M4x10mm black screws 69 2817 xx for each cover 24x 69 2817 xx ...

Страница 146: ...tween the 1st and 2nd rows and adjust the tables as required Use a laser level down the center of the table and the seams between the table sections to line it up with the first row table Perform a final height check and make sure that the first and second row tables are the same height 1408 mm 1408 mm 1412 mm Laser level ...

Страница 147: ...tom trim plate 2x 700 47507 xx narrow bottom trim joint 2x 700 47506 xx medium bottom trim joint 2x 700 47505 xx wide bottom trim joint 2x M4 nuts 69 2793 xx 18x black M4x12mm long screw with external lock washer 69 2797 xx 1x horizontal display trim includes 1x trim 800 42131 xx 2x pin 700 47278 xx and 2x clip 52 100131 xx 1x each top and bottom fascia 74 12905 xx top 74 13021 xx bottom Camera le...

Страница 148: ...cabinet over the frame and lower the cabinet down onto the center horizontal cross bar c Line up the the guide blocks pointing down from the cabinet into the horizontal cross bar d Reach back behind the center cabinet to make sure the guide pin sticking out of the frame is fully engaged in the slot in the cabinet and the magnets are mated to the frame 800 41092 xx Slot engages with guide pin Insta...

Страница 149: ... into the right and center cabinet aluminum extrusions c Slide the cabinet towards the center and engage the guide pins on the side of the frame with the notches in the cabinet Tip Reach under the cabinets to feel the notches in the cabinet that match with the guide pins in the frame If the cabinet does not install correctly check the following areas 1 The trim joint is connecting to the trim 2 Th...

Страница 150: ...et 800 41094 xx f Adjust the cabinets so that there are no gaps between the upper cabinets and the trim joints and make sure that the cabinets are fully seated into the structure Tip If you cannot eliminate the gaps make the gaps even on both sides Table Top B 700 42476 01 Table Top A 700 42477 01 Table Top C 700 42478 01 800 41094 xx ...

Страница 151: ...s and Trim 2015 Cisco Systems Inc All rights reserved Page 151 3a Install the lower corner cabinets 800 41096 xx left 800 41095 xx right Table Top B 700 42476 01 Table Top A 700 42477 01 Table Top C 700 42478 01 800 41096 xx 800 41095 xx ...

Страница 152: ...he upper cabinet and connect the magnet on the cabinet to the endpoint structure Place a plastic washer 69 2842 xx over 8x black M4x12mm long screws 69 2797 xx then install the screws with washer through the cabinet brackets and into the endpoint structure Do not use a power driver to tighten these screws Tighten them so that some movement of the cabinet is allowed but it can hold its position Tab...

Страница 153: ...front of the lower cabinets to align the cabinets both verically and to line them up with the displays After you complete this alignment tighten the 4x screws 2x in each place shown in the circles in the illustration Note that these screws are hidden Table Top B 700 42476 01 Table Top A 700 42477 01 Table Top C 700 42478 01 ...

Страница 154: ...tructure Panels and Trim Page 154 2015 Cisco Systems Inc All rights reserved 4a Install the bottom trim pieces Table Top B 700 42476 01 Table Top A 700 42477 01 Table Top C 700 42478 01 800 42208 xx 800 41302 xx 800 41301 xx ...

Страница 155: ...t trim piece b Align the right side bottom trim assembly to the cabinet lifting up from below to align with the metal trim that is already assembled to the bottom cabinet c Install but do not overtighten 2x Black M4 X 12mm screw with external lock washer 69 2797 xx at the far right and left of the bottom trim Table Top B 700 42476 01 Table Top A 700 42477 01 Table Top C 700 42478 01 800 41302 xx a...

Страница 156: ...m assembly with a spirit level e Add 2x additional Black M4 X 12mm screws 69 2797 xx and tighten the 4x screws Note The trim is very flexible Take care during installation that it does not move or bend in the middle thus throwing off the level Table Top B 700 42476 01 Table Top A 700 42477 01 Table Top C 700 42478 01 2x 69 2797 xx ...

Страница 157: ... piece 800 42208 xx by using the same procecure as you did for the right trim piece After assembly level and align the left and right trim pieces Slide the trim pieces outward to the sides to close the gap with the trim on the lower cabinets Table Top B 700 42476 01 Table Top A 700 42477 01 Table Top C 700 42478 01 800 42208 xx ...

Страница 158: ...800 41301 xx by raising it upward Verify that it is level with the left and right bottom trim assemblies using the spirit level Install and tighten 4x Black M4 X 12mm long screws with external lock washer 69 2797 xx Tighten all trim pieces Table Top B 700 42476 01 Table Top A 700 42477 01 Table Top C 700 42478 01 4x 69 2797 xx 800 41301 xx ...

Страница 159: ... reserved Page 159 5 Insert the 2x bottom trim plates 700 102967 xx one between the left and center trim assembly and one between the right and center trim assembly into the trim assemblies Table Top B 700 42476 01 Table Top A 700 42477 01 Table Top C 700 42478 01 2x 700 102967 xx ...

Страница 160: ... display trim 800 42131 xx Remove the foam from the corners of the packaging and connect the metal hinges of the horizontal display trim using the 2x pin 700 47278 xx and 2x clip 52 100131 xx 1 on each side Table Top B 700 42476 01 Table Top A 700 42477 01 Table Top C 700 42478 01 800 42131 xx 2x 700 47278 xx 2x 52 100131 xx ...

Страница 161: ... rubber trim is fragile and must be handled with care to prevent tearing or permanently damaging the trim Partially unfold the trim and place the pin on the left of the trim into the hole on the left side of the endpoint structure Table Top B 700 42476 01 Table Top A 700 42477 01 Table Top C 700 42478 01 800 42131 xx Hole Pin Trim viewed from back ...

Страница 162: ...e connect the pins in the trim to the hole between the left and center displays until the studs magnets and Velcro attach then attach the trim to the Velcro magnets and studs between the center and right displays Table Top B 700 42476 01 Table Top A 700 42477 01 Table Top C 700 42478 01 Attachment points 800 42131 xx Studs ...

Страница 163: ... rights reserved Page 163 6d Place the pin in the horizontal display trim into the hole in the endpoint structure Adjust the trim until both sides are even Table Top B 700 42476 01 Table Top A 700 42477 01 Table Top C 700 42478 01 Hole Trim viewed from back 800 42131 xx Pin ...

Страница 164: ...he lower back of the displays to align the upper cabinet trim with the horizontal display trim and display on the side vertical axis Perform this alignment for both the left and right displays Table Top B 700 42476 01 Table Top A 700 42477 01 Table Top C 700 42478 01 Left display Left upper cabinet trim Horizontal display trim Left vertical trim Display spools ...

Страница 165: ...are included with the accessory kit for this procedure a Lay the fascia on the ground between the display structure and the table structure and move the sides of the bottom fascia towards the table This procedure aids in stability while you assemble the bottom fascia but still allows you to swing the fascia sides back to the display structure a View from top of system 74 13021 xx ...

Страница 166: ... structure The alignment lip that runs along the bottom and sides of the bottom fascia and the brackets with frame slots in the endpoint structure Table Top B 700 42476 01 Table Top A 700 42477 01 Table Top C 700 42478 01 Vertical alignment lip in bottom fascia 74 13021 xx Endpoint Structure Frame slots for alignment lip and magnets in bottom fascia ...

Страница 167: ... insert the alignment tabs in the left center of the bottom fascia into the slots in the center display structure to position the bottom fascia in the horizontal direction As the tabs find the slots and fully engage into the display structure you can feel and hear the magnets in the fascia attach to the structure Table Top B 700 42476 01 Table Top A 700 42477 01 Table Top C 700 42478 01 c Slot eng...

Страница 168: ...Systems Inc All rights reserved 8d d Unfold the bottom fascia one side at a time and insert the tabs in the side receiving slots until the magnets in the fascia engage with the display structure Table Top B 700 42476 01 Table Top A 700 42477 01 Table Top C 700 42478 01 ...

Страница 169: ...et s if required to fit with the fascia and the trim pieces connecting to it The aluminum trim should look seamless around the perimeter of the system and any gaps should be minimal and uniform The four circled screws with plastic washer should provide adequate movement without loosening the screws Tighten the screws and replace the fascia after final adjustment Table Top B 700 42476 01 Table Top ...

Страница 170: ...47505 xx to match the gap between the trim assemblies Secure with 2x M4 nuts 69 2793 xx You can mix and match the trim joints for example wide on one side and narrow on the other side to accomodate for varying gaps You do not need to remove the fascia to attach the trim joints Table Top B 700 42476 01 Table Top A 700 42477 01 Table Top C 700 42478 01 2x 700 47507 xx 700 47506 xx or 700 47505 xx ch...

Страница 171: ...he camera cutout in the fascia with the camera and place the top fascia over the camera Engage the alignment lip of the fascia to the receiving slots above the center display and make sure that the magnets connect the fascia to the frame b Align the top fascia vertically The upper lip of the top fascia rests in the sheet metal shelf in the display frame that is created by the horizontal cross bars...

Страница 172: ...72 2015 Cisco Systems Inc All rights reserved 11b c Unfold the top fascia one side at a time engaging the magnets and sheet metal tabs with the upper alignment points in the fascia Table Top B 700 42476 01 Table Top A 700 42477 01 Table Top C 700 42478 01 ...

Страница 173: ...ems Inc All rights reserved Page 173 12 Install the camera lens hood 800 43478 xx around the camera by placing it into the holes in the upper fascia and the endpoint structure Table Top B 700 42476 01 Table Top A 700 42477 01 Table Top C 700 42478 01 800 43478 xx ...

Страница 174: ...space between the panels and the wall if not two installers are required Engage the sheet metal hooks in the panel to the slots in the frame and gently press downward to make sure that the panel is fully seated b With an assistant install the top center PET panel 800 41097 xx engaging the sheet metal hooks in the panel to the slots in the frame and making sure that the panel is fully seated Table ...

Страница 175: ... panel 800 41099 xx and left PET panel 800 41100 xx using the same procedure you used for the center PET panels Then place the rear cable runner cover 700 43380 xx over the rear of the cable cap noting the pins on the rear part of the cover Table Top B 700 42476 01 Table Top A 700 42477 01 Table Top C 700 42478 01 800 41099 xx 800 41100 xx 700 43380 xx ...

Страница 176: ...ed Parts 42 inch display 43 100147 01 42 inch display bracket 700 47588 xx 8x M6x16mm screws 69 100199 xx Optional 1x M4x12mm screw not included Required Tools 3 Phillips Driver Stubby short 3 Phillips driver or Phillips driver with ratcheting wrench Installing the Optional 42 Inch Auxiliary Display ...

Страница 177: ...Remove the display bracket 700 47588 xx from its packaging b Lay the bracket on the ground and lift the side with tab upward and outward to separate the two pieces Tip there is a hole in the top of the bracket press in this hole with your thumb to separate the two pieces Some force may be required ...

Страница 178: ...ystems Inc All rights reserved 2 Connect the lower half of the bracket piece to the cable runner using 4x M6x16mm screws 69 100199 xx Note the cables running through the hole in the bracket Take care not to mar the lower fascia or the cable runner 4x 69 100199 xx ...

Страница 179: ...onal 42 Inch Display 2015 Cisco Systems Inc All rights reserved Page 179 3 Remove the display from its packaging and install the other half of the bracket onto the rear of the display using 4x M6x16mm screws 69 100199 xx ...

Страница 180: ... the bracket to the bracket you attached to the cable runner and slide the display bracket onto the cable runner bracket Be careful to not mar the cable runner Tip there are four metal studs two on each side that protrude from the display bracket Make sure that the studs go into the two slots on each side of the cable runner bracket b a Studs Slots hidden here Slots ...

Страница 181: ... display b Turn the power switch near the cable connections for the display to the On position and watch for the power LED to turn green then blinking amber c Rock the display and bracket backwards until the tab in the display bracket joins with the slot in the cable runner bracket c a DVI and power connectors Power switch Power LED b ...

Страница 182: ...two pieces some force might be required Loosen the four screws that hold the display to the display bracket The display pivots on the top right screw Rotate the display and tighten the screws after the display is level Note the use of a stubby screwdriver A Phillips driver and a ratcheting wrench may also be used Bracket pivots on this screw Stubby screwdriver or Phillips driver with ratcheting wr...

Страница 183: ...Installing the Optional 42 Inch Display 2015 Cisco Systems Inc All rights reserved Page 183 7 Optional Attach an M4x12mm screw not included to join the brackets together M4 screw not shown ...

Страница 184: ...Cable Routing Diagrams Page 184 2015 Cisco Systems Inc All rights reserved This chapter includes the cable routing diagrams for the system Cable Routing Diagrams ...

Страница 185: ...Cable Routing Diagrams 2015 Cisco Systems Inc All rights reserved Page 185 ...

Страница 186: ...Cable Routing Diagrams Page 186 2015 Cisco Systems Inc All rights reserved ...

Отзывы: