background image

Chapter 1 

Introduction 

1-6  CallConnector Operator 

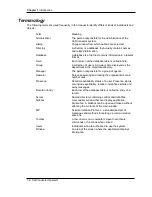
Terminology 

The following terms are used frequently in the manual to identify different kinds of individuals and 
objects. 
 

Term 

Meaning 

Administrator 

The person responsible for the administration of the 
CallConnector system.  

Dialog 

Popup window from which options are selected. 

Directory 

A directory is a database that usually contains names 
and related information. 

Database 

A database is a file that contains information in a tabular 
format.  

Field 

Each column of the database table is called a field. 

Group 

A collection of users. A group is also displayed as the 
department in the corporate directory. 

Manager 

The person responsible for a group of agents. 

Operator 

Person answering and routing the organization’s main 
number calls. 

Presence 

Real-time availability status of a user. Presence status 
can include availability, location , telephone status and 
away messages.  

Record or Entry 

Each row of the database table is called an entry or a 
record. 

Server 

Named directory containing control and data files. 

Sidebar


A secondary window that can display application 
information. A Sidebar can be open and closed without 
effecting the contents of the main window. 

SIP


Session Initiation Protocol – a standardized set of 
messages and methods for setting up communication 
sessions. 

Toolbar


A row of icons on a computer screen that activate 
commands or functions when clicked. 

Users 

Individuals who are authorized to use the system. 

Window 

An area of the screen where the application displays 
information. 


Содержание Small Business Pro

Страница 1: ...USER GUIDE Cisco Small Business Pro Cisco Smart CallConnector Operator ...

Страница 2: ...SI Cisco Eos Cisco HealthPresence Cisco IronPort the Cisco logo Cisco Lumin Cisco Nexus Cisco Nurse Connect Cisco Pulse Cisco StackPower Cisco StadiumVision Cisco TelePresence Cisco Unified Computing System Cisco WebEx DCE Flip Channels Flip for Good Flip Mino Flipshare Design Flip Ultra Flip Video Flip Video Design Instant Broadband and Welcome to the Human Network are trademarks Changing the Way...

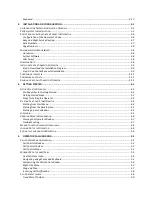
Страница 3: ...BTAINING TECHNICAL ASSISTANCE 1 11 CISCO TECHNICAL SUPPORT WEBSITE 1 11 SUBMITTING A SERVICE REQUEST 1 12 DEFINITION OF SERVICE REQUEST SEVERITY 1 12 OBTAINING ADDITIONAL PUBLICATIONS INFORMATION 1 13 2 CALLCONNECTOR OPERATOR OVERVIEW 2 1 CALLCONNECTOR OPERATOR OVERVIEW 2 2 CALLCONNECTOR OPERATOR DEPLOYMENT OPTIONS 2 3 CallConnector Standalone Operator 2 3 CallConnector Operator Backup 2 5 CallCon...

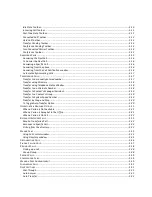
Страница 4: ... STARTED OVERVIEW 4 2 Pre Requisites for Getting Started 4 2 Getting Started Steps 4 2 Steps for Exiting the Operator 4 3 STARTING CALLCONNECTOR OPERATOR 4 4 Starting from Start Menu 4 4 Starting from the Desktop Icon 4 4 Starting up with Windows 4 5 LOGGING IN 4 5 VERIFYING OPERATOR INFORMATION 4 6 Viewing the Operator Window 4 7 Troubleshooting 4 7 MAKING YOURSELF AVAILABLE UNAVAILABLE 4 8 LOGGI...

Страница 5: ...ernate Number 5 18 Transfer to Contact s Manager Assistant 5 19 Transfer to a Contact s Group 5 19 Transfer to System Speed Number 5 19 Transfer by Drag and Drop 5 20 To Toggle Auto Transfer Option 5 20 OPERATOR CALL HANDLING OPTIONS 5 21 When a Person is Not Available 5 21 When a Person is Away but In the Office 5 21 When a Person is On Call 5 22 RECONNECT EXTENDED CALLS 5 22 Recall a Transferred...

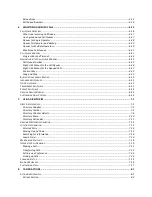
Страница 6: ...OUTING 6 50 INCOMING CALL QUEUES 6 51 HELD CALL QUEUE 6 53 TRANSFERRED CALL QUEUE 6 53 PARKED CALL QUEUE 6 54 VIEWING QUEUE WINDOW 6 54 CUSTOMIZING QUEUE S VIEW 6 55 7 USING DIRECTORIES 7 1 DIRECTORY OVERVIEW 7 2 Directory Window 7 3 Directory Toolbar 7 3 Directory Window Details 7 6 Directory Menu 7 10 Directory Action Bar 7 11 VIEWING DIRECTORY INFORMATION 7 13 LOCATING INFORMATION 7 15 Selected...

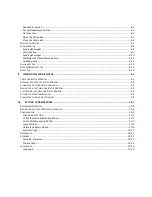
Страница 7: ...E STATUS WINDOW 9 4 CLOSING THE TELEPHONE STATUS WINDOW 9 4 NAVIGATING IN THE TELEPHONE STATUS WINDOW 9 5 CUSTOMIZING THE TELEPHONE STATUS WINDOW 9 6 FILTERING THE VIEW INFORMATION 9 9 CONNECTING TO A RINGING EXTENSION 9 9 10 SETTING UP PREFERENCES 10 1 PREFERENCES OVERVIEW 10 2 NAVIGATING WITHIN THE PREFERENCES WINDOW 10 3 CONFIGURATION 10 4 Client Side Dial Plan 10 4 To Set the Internal Extensio...

Страница 8: ... the required software The chapter includes the following topics Purpose Audience Organization Related Documentation Required Software Supported Windows Platforms Conventions Obtaining Documentation Documentation Feedback Cisco Product Security Overview Obtaining Technical Assistance Obtaining Additional Publications and Information CHAPTER 1 ...

Страница 9: ...f the system by providing step by step instructions The document also provides links to additional product information and the methods and options for accessing support Audience This manual is intended for operators who will be using the CallConnector Operator to manage the incoming business calls and messages and route them to the most appropriate available employee The guide will also be useful ...

Страница 10: ...or making answering transferring operator calls and the other call handling methods Monitoring Queued Calls This chapter describes the display of the queued calls and the features available from the queue window Using Directories This chapter describes how to use the directories to find entries make calls or send messages and to maintain the organizational contact information Taking Actions This c...

Страница 11: ...s and telephones Please visit the Cisco Systems site for the CallConnector Operator for the latest product compatibility list Supported Windows Platforms The following Windows operating systems and application versions are supported by the CallConnector Operator Windows 7 Windows XP Windows Vista Microsoft Outlook 2003 and 2007 Microsoft Internet Explorer version 6 0 7 0 and 8 0 Please visit the C...

Страница 12: ...font This pointer highlights an important line of text in an example The symbol represents the key labeled Control for example the key combination D in a screen display means hold down the Control key while you press the D key Nonprinting characters such as passwords are in angle brackets Conventions Used The following conventions are used in this guide Most of the operations of the CallConnector ...

Страница 13: ...n responsible for a group of agents Operator Person answering and routing the organization s main number calls Presence Real time availability status of a user Presence status can include availability location telephone status and away messages Record or Entry Each row of the database table is called an entry or a record Server Named directory containing control and data files Sidebar A secondary ...

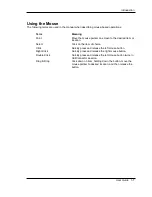
Страница 14: ...sired item or location Select Click on the item of choice Click Quickly press and release the left mouse button Right Click Quickly press and release the right mouse button Double Click Quickly press and release the left mouse button twice in CallConnector session Drag Drop Click down on item holding down the button move the mouse pointer to desired location and then release the button ...

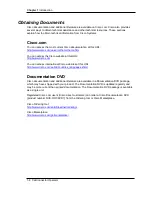
Страница 15: ...sco com You can access international Cisco websites at this URL http www cisco com public countries_languages shtml Documentation DVD Cisco documentation and additional literature are available in a Documentation DVD package which may have shipped with your product The Documentation DVD is updated regularly and may be more current than printed documentation The Documentation DVD package is availab...

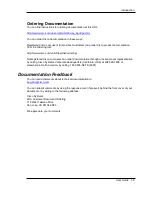
Страница 16: ...stered Cisco com users can order documentation through a local account representative by calling Cisco Systems Corporate Headquarters California USA at 408 526 7208 or elsewhere in North America by calling 1 800 553 NETS 6387 Documentation Feedback You can send comments about technical documentation to bug doc cisco com You can submit comments by using the response card if present behind the front...

Страница 17: ...S products products_psirt_rss_feed html Reporting Security Problems in Cisco Products Cisco is committed to delivering secure products We test our products internally before we release them and we strive to correct all vulnerabilities quickly If you think that you might have identified a vulnerability in a Cisco product contact PSIRT Emergencies security alert cisco com Nonemergencies psirt cisco ...

Страница 18: ...Cisco Technical Support Website requires a Cisco com user ID and password If you have a valid service contract but do not have a user ID or password you can register at this URL http tools cisco com RPF register register do Note Use the Cisco Product Identification CPI tool to locate your product serial number before submitting a web or phone request for service You can access the CPI tool from th...

Страница 19: ...numbers Asia Pacific 61 2 8446 7411 Australia 1 800 805 227 EMEA 32 2 704 55 55 USA 1 800 553 2447 For a complete list of Cisco TAC contacts go to this URL http www cisco com techsupport contacts Definition of Service Request Severity To ensure that all service requests are reported in a standard format Cisco has established severity definitions Severity 1 S1 Your network is down or there is a cri...

Страница 20: ...shooting tips configuration examples customer case studies certification and training information and links to scores of in depth online resources You can access Packet magazine at this URL http www cisco com packet iQ Magazine is the quarterly publication from Cisco Systems designed to help growing companies learn how they can use technology to increase revenue streamline their business and expan...

Страница 21: ...onfiguration Backup Operator Provides descriptions of the differences and dependencies for the CallConnector Backup Operator Client Server Operator Provides an overview of the additional features available from the CallConnector Client Server Operator Operator User Interface Provides an overview of the features available from the main CallConnector Operator windows Using Mouse and Keyboard Describ...

Страница 22: ...e alternate contacts for an employee and even send the call to an available member of their group Graphical call queues display the incoming operator calls and allow for answering the highest priority call or a specific call listed in the queue Queues also display the calls that are parked by the operator and the calls that have been extended transferred to allow them to be monitored and pulled ba...

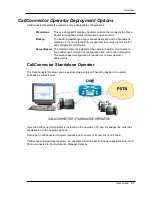
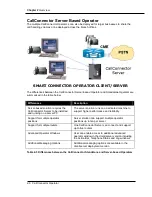
Страница 23: ...lled at the operator position It connects to the CallConnector Server for configuration and call control information The server based configuration is required or multiple operator deployments CallConnector Standalone Operator The CallConnector Operator can be deployed as a single call handling position for a small business as shown below Here the CallConnector Operator is installed on the operato...

Страница 24: ...numbers for frequently called numbers Operator calls organized into multiple call queues with priority and greeting view waiting and timed out calls Provide higher quality of service by answering the highest priority call provide greeting appropriate for the caller or answer specific calls from the queue Display of parked calls and the calls that have been extended by the attendant View all operat...

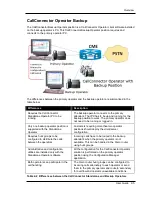
Страница 25: ...tomers requiring more than two operator positions should deploy the client server configuration Requires hunt groups to be configured to distribute the calls between the operators Incoming calls have to be routed to the backup attendant when the primary operator is not available This can be handled in the Cisco router using hunt groups Administrative and configuration utilities are installed only ...

Страница 26: ...unning on a server PC The server solution runs on a dedicated machine to support higher performance and reliability Support for multiple operator positions Server solution can support multiple operator positions up to ten per server Support for multiple routers One CallConnector Server can connect and support up to five routers Advanced Operator Windows User can enable access to additional advance...

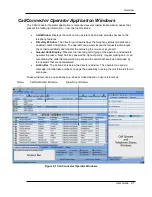
Страница 27: ...ees check their availability and transfer the call using the mouse or keyboard Queued Calls Display Presents the incoming call ringing at the operator and allows to operator to press a Next Call key answer the highest priority longest waiting call It can also display the calls that are waiting in park and the calls that have been extended by the operator that are not answered Action Bar The Action...

Страница 28: ... Call window to make transfer or conference calls Figure 2 2 CallConnector Call Control Window The operators can perform the following functions from the Call Control window and the toolbar View Call Information Displays the call information for the selected line or call including the call line state line number caller number and name Number Field The number field allows a telephone number to be e...

Страница 29: ...plays the call queues that have been configured for the operators There are two basic types of CallConnector call queues Incoming Call Queues and Monitored Call Queues The Incoming Call Queues displays the new incoming calls that are ringing at the attendant s phone The Monitored Call Queues are calls that have been processed by the operator and are waiting for some external event These are calls ...

Страница 30: ...fields in the Call Queues window Progress Bar Display A progress bar displays the duration of the calls in the queues Icons change to indicate timed out condition Next Call The longest waiting highest priority call can be answered from the incoming call queues by a single button or key press Answer Specific Call The operator can answer a specific call from the list of calls in the call queues Reca...

Страница 31: ... the display style tabular or hierarchical Character by Character Search Operators can quickly locate a contact by entering in the first few letters of the name Multiple Field Query Drill down for information by entering queries over multiple fields Quick Sort Change the order in which the contacts are listed in the view Multiple Phone Supports multiple phone numbers per entry Numbers Store Notes ...

Страница 32: ...mmunication services for the selected contact and ability to update the contacts presence and notes The Action bar has tabbed sections Directory Toolbar The directory toolbar is located at the top of the directory window Using the toolbar the operators can Locate an entry as you type in the first few letters Query the contact list to retrieve a list that matches the entered search text for a speci...

Страница 33: ... their manager assistant and backup person as well as all the members of their department group Availability to make send calls to the contact s associates Availability to make send calls or IM to an available member of their department group Send a brief message to the selected contact using one of the several message transport options including Email and SMS messages Allows the operator to chang...

Страница 34: ...e monitored extensions are line appearance buttons on the telephone These line appearances can be configured as incoming or outgoing directory numbers for receiving or placing calls from the Call Control window Alternatively they may be configured to reflect the status of an extension number on another telephone With this configuration the operator and other operators always has visibility on the ...

Страница 35: ...default the numeric key shortcuts are available for call control functions such as answering dialing or transferring calls This partitioning allows the operator to manipulate the calls from the numeric keypad while using the alpha key to search and locate contacts This figure below displays the use of keys for dialing Figure 2 8 Keyboard Partitioning for the CallConnector Operator Shortcut Keys Th...

Страница 36: ...erred number Drag a contact with a ringing call from Directory Drop in Call Control Window on a idle line no action if call is connected A pickup operation is initiated and the ringing call on the contact s number is connected to the attendant Drag an call from the Call Control window Drop the call on a contact in the directory The connected call is transferred to the selected contacts preferred n...

Страница 37: ...e personal mode Change the theme of the CallConnector Operator window The operator can also select the options to Show Basic Operator Windows This option displays only the directory and call control windows Show Advanced Operator Windows This option displays all the operator application windows including the directory call control and queue windows Keyboard The CallConnector Operator allows the op...

Страница 38: ...Chapter 2 Overview 2 18 CallConnector Operator Figure 2 9 CallConnector Operator Shortcut Preferences Window ...

Страница 39: ...ments Describes the minimum hardware and software required to run the CallConnector Operator Download Site Site from which the CallConnector Operator software can be downloaded Installing CallConnector Operator Describes the steps and options for installing CallConnector Operator Configuring CallConnector Server This section provides the steps for configuring CallConnector Operator in Standalone m...

Страница 40: ... Operator Client programs The installation of the CallConnector Operator client or standalone mode involves the following steps Collecting the information required for installing and configuring the CallConnector Operator This includes obtaining the access rights to the download site for the installation program as well as the information that required during the installation process See the Pre r...

Страница 41: ... information and if necessary make changes It uses the Telnet and HTTP access to the Router Configuration of Required Operator Features on the Cisco Router The Cisco Router need to have certain features services configured to provide an effective operator service See section below on Router Configuration for the CallConnector Operator PAK ID This is a number sent with the purchase of the CallConne...

Страница 42: ...ys Admin IP Address of Cisco Router IP Address of the Cisco Router to allow the CallConnector Operator to connect to the router Service Provider or Sys Admin Area Code The telephone area code of the location in which the router is located Service Provider or Sys Admin Dial Out Pre Fix The digit required to be pre fixed to allow an external number to be dialed Service Provider or Sys Admin Length o...

Страница 43: ... need to have local admin or power user rights to the personal computer This is to allow various system files to be loaded and Windows registry entries to be written If you are not logged in to the PC with the required access rights the installation and running of the application may fail or not run through completion ...

Страница 44: ... mail For off hour call routing the Cisco router night service routing can be enabled Park and Page Numbers Park slots or directory numbers need to be configured on the router to allow the operators to park the calls and make overhead announcements Configuration of the Operator s Phone The attendant s IP phone is required to be a multi line Cisco IP Phone with sufficient capacity to handle the ope...

Страница 45: ... Hunt group login logout for the configurations with hunt groups Record To allow emergency or problem calls to be recorded and saved to voicemail Busy and Night Service Routing The routing for the incoming calls when the operator is busy or unavailable off hours needs to be configured The configuration options are different for deployments using hunt groups versus where calls terminate directly at...

Страница 46: ...m Software CallConnector Operator also requires the following PC software Microsoft Windows XP Professional Service Pack 2 or later Microsoft Windows Vista or Microsoft Windows 7 Microsoft Windows 2003 Server for the server applications Installed and correctly configured Local Area Network with access to the Internet LAN Access The Local Area Network between the CallConnector PCs client and or ser...

Страница 47: ...ion Program Log in to the Cisco Software Download site for the CallConnector Operator and download the latest CallConnector Operator client installation program You can also obtain this from your Cisco Reseller Step 2 Run the CallConnector Installation Launching the Installer Launch the CallConnector Operator install program by double clicking on it Once the install program is loaded it will first...

Страница 48: ...erminate the installation at any time click on the Cancel button The installation program will reverse the installation process and delete any data that has been copied to your local machine Checking for required components If you are using Microsoft Windows XP the installer will check to see if the Microsoft Windows Installer 4 5 x86 component already exists in your computer If not it will ask yo...

Страница 49: ...Installation and Configuration User Guide 3 11 Figure 3 3 Required Software Component for Windows XP If you are installing the CallConnector Operator Standalone Microsoft NET Framework 2 0 is required ...

Страница 50: ...computer after the installation Entering User Data The installer will ask you for the following information User Name The name of person under which the software will be registered Company Name The name of the registering person company or organization Email The email address of the registering person Technical Support Email The email address of the company s technical support This field is option...

Страница 51: ... email address is optional By default the problem reports are emailed to a Cisco support alias however the installer has the option to have the problem reports sent to an alternate email address If this is entered when you report a problem in CallConnector Operator it will send the description of your problem to this email address Click Next or press the ENTER key to continue ...

Страница 52: ...lient without the need for Internet connection Evaluation Version By selecting the 45 days evaluations option you will have a limited period of 45 days of usage You don t need a License during the trial period Anytime during the trial or after the trial period has ended you can use a PAK ID or a serial number for license activation to continue using the product PAK ID or Serial number activation A...

Страница 53: ...ense CCO Account This is used to log in to the Cisco License site If you do not have an account you can create one on line at http tools cisco com RPF register register do CallConnector Operator Machine ID and CPU ID This information is needed for each client or server upon which CallConnector Operator software will be installed The CallConnector Operator installation program identifies this infor...

Страница 54: ...allConnector Server mode using services installed on another computer Standalone Mode In the standalone mode the following information needs to be entered Local PC Network Adapter IP Address In case you have multiple network cards on your local computer you need to specify the IP address you want to use to connect to the router Router IP Address Enter the IP address of the Cisco Router that is pro...

Страница 55: ...ea code will display the default number pattern Dial Out Prefix Enter the digit required to dial an outside PSTN number Extension Length Internal numbers in the router may be three and or four digits long Enter the length of the internal extension numbers If the internal numbers are of different lengths then enter each of these lengths separated by semi colon Figure 3 9 Location and Dialing Option...

Страница 56: ... Select the IP address you want to use to connect to the router in case you have multiple network cards on your local machine Server IP Enter the IP Address of the CallConnector Server This will be provided to you by your system administrator Username You will need to have a User Account in the CallConnector Server To log into the CallConnector Server your system administrator will provide your Lo...

Страница 57: ...r Operator in a Windows user account You can always select the Outlook email profile in the Preferences windows Enter the following information Outlook Exchange Profile On the drop down list select the profile you want to use with the CallConnector Operator If you have multiple email accounts in Outlook or if you are setup to connect to a Microsoft Exchange server then Outlook creates profiles or ...

Страница 58: ...ng way If no profile is selected then it uses the default email login If a profile is specified then it will try to log in to the email service with the parameters specified in that profile If you are an Outlook user then you should specify the Outlook profile so that the CallConnector Operator can connect to the exchange server on your behalf If you have selected an incorrect email profile then t...

Страница 59: ... do not select this option the CallConnector Operator client will start the Local SIP Server by itself when necessary Without the Admin or Power User right the CallConnector Operator client will fail to do so Run at Windows Startup When selected this option will allow the CallConnector Operator client run automatically when the Windows system starts up Choosing the Installation Folder The next win...

Страница 60: ...isco CallConnector Operator to a newer version you can download and run a later installation program The installation program will ask you if you want to upgrade the Cisco CallConnector Operator files Click on Yes to continue with the upgrade Make sure that you have closed the Cisco CallConnector Operator program The install program will then copy the newer versions of the files to your computer R...

Страница 61: ...nt options to start the CallConnector Operator Client and Standalone Logging In Describes how the operator can log into the CallConnector Operator Verifying Operator Information Provides an overview of the CallConnector Operator windows and describes how to open the windows and verify the displayed information Making Yourself Describes how to change the attendant s status Available Unavailable to ...

Страница 62: ...escription Source PAK ID Serial Number If the operator had selected to try the CallConnector Operator for 45 days they must activate the Operator during or after the trial period to use the application System Admin Service Provider Server IP Address The IP address of the CallConnector Server It can be the same with the Operator if they are installed in the same machine System Admin Username and Pa...

Страница 63: ...l queues and change the queue status to Take Call Making Yourself Available Unavailable Table 4 2 Steps for getting started Steps for Exiting the Operator The following lists the recommended steps for exiting the CallConnector Operator along with the references where the operator can find detailed instructions of the steps Steps Description References Set Unavailable Before logging out or exiting ...

Страница 64: ...s Starting from Start Menu From the Start Programs menu select the Cisco Systems group and select the CallConnector Operator option then click on CallConnector Operator Figure 4 1 Starting the Operator from Start Menu Starting from the Desktop Icon Double click on the CallConnector Operator icon located on the desktop to start the CallConnector Operator application Figure 4 2 The CallConnector Ope...

Страница 65: ...the CallConnector Server Then click on Login When the operator installs the CallConnector Operator Client if they had specified the login information in the User s Options Screen it will be populated in the login prompt The operator can also change their login information in the Preferences window The CallConnector Operator will verify the login information with the CallConnector Server and the ac...

Страница 66: ... communication services that utilize the information from the selected directory contact Call Queues Displays the incoming parked transferred and held call queues that have been configured for the operator and provides appropriate methods to handle them Telephone Status Allows the operator to view and monitor the real time status of all the lines and extension numbers in their call coverage group ...

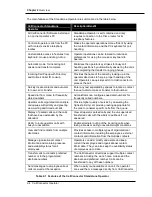
Страница 67: ...2 Note that these shortcut keys can be reassigned in the Preferences window For the tabbed window Directory Log or Telephone Status Call Queues click on the tab to open the view of that tab Troubleshooting In case the above call and contact information is not displayed the operator can try different ways to solve the issues Issue How to solve This phone has been disconnected Make sure the IP phone...

Страница 68: ...selected the Sync Operator Status with Presence Server when they change the presence status the Call Queues status will be changed as follows Presence Status Call Queue Status Description Available Take Call The CallConnector Operator logs into the hunt group call queue and begins receiving incoming calls Away Set Unavailable The CallConnector Operator logs out of the hunt group call queue and for...

Страница 69: ... File menu The CallConnector Operator will close all the application windows and present the Login prompt From then the operator can log in again or click on Quit to exit the application Exiting the CallConnector Operator As for logging out of the Operator the operator needs to change the status on the Call Queues window to Set Unavailable before exiting the Operator To exit click on Exit from the...

Страница 70: ...Toolbar Describes the features available from the Call Control toolbar Answering Calls Describes the steps for answering incoming call to the operator position Transferring Calls Describes the steps for transferring the call to another party Operator Call Describes different call handling options when the Handling Options requested person is not available or away but in the office or on call Makin...

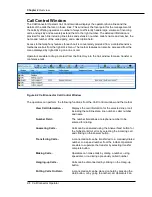
Страница 71: ...comprised of a list displaying the lines and calls on the operator phone and a toolbar providing easy access to the available telephony features see the figure below Figure 5 1 Call Control Window and Toolbar Call Control Window The Call Control window displays all available lines on the operator phone and the details of all calls currently active on these lines The displayed information consists ...

Страница 72: ...ther party in the call Depending on the call direction this is the name of the caller or the called party The name is looked up from the directory and supplied in the call information Redirected From If the call was re directed then this field displays the number and name of the original party Redirected calls include forwarded and transferred calls Description The greeting message of each line ca...

Страница 73: ... monitoring a DN When this icon presents the watched phone or the monitored DN is not in use Watch Monitor Line is Busy The line is watching a phone or monitoring a DN When this icon presents the watched phone or the monitored DN is in use Table 5 2 Call Control Window Call States and Icons Navigating using Mouse and Keyboard The CallConnector Operator windows allow features to be accessed by mous...

Страница 74: ...r will display the features available for that call state Press the Call Control Window shortcut key default shortcut F4 and scroll up or down to the desired line or call Access a telephony feature Right click on the line or call and select the feature from the drop down menu The line or call needs to be selected for the feature to apply to that call Click on the toolbar button for that desired fe...

Страница 75: ...n column to display it Change the display fonts To change the font of the Call Control window please refer to the chapter on Setting up Preferences Change the window presentation style To change the theme and the mode of the Call Control window please refer to the chapter on Setting up Preferences Change the position of the Call Control window To move the Call Control window please refer to the ch...

Страница 76: ...get Action Idle Highlight a number and drag and drop it on an idle line An outgoing call is made to the highlighted number from the selected line Idle Drag a directory or call log entry to the idle line An outgoing call is made to the work number for the selected line Idle Drag a held parked or transferred call to an idle line The held call is reconnected The parked and transferred call is picked ...

Страница 77: ... If the call was to a direct number then the called number is displayed Caller Information The caller number and name if available is displayed Answer Button Allows the incoming call to be answered Do Not Disturb The incoming call is redirected to the call forward no answer number of the ringing number The presentation of the Incoming Call Notification Window can be enabled or disabled from the Pr...

Страница 78: ...ity longest waiting call Press the Next shortcut key default Num Plus Recall parked call This feature re connects the operator with the longest ringing timed out extended call from the park and transferred queues Settings The setting options allow the operators to specify if some features should work automatically They also allow the operators to change some of the phone settings These include Dia...

Страница 79: ...eature displays a menu of page numbers Selecting a page number will auto dial and connect to the page circuit Ctrl Num Minus Pick Up Enter the extension number in the dial field and click on pickup This will connect the operator to the ringing call Ctrl Num Star enter the number to pick up then enter again Group Pickup This picks up a ringing call from the selected pickup group The pickup groups a...

Страница 80: ...e displays a menu of page numbers Selecting a page number will auto dial and connect to the page circuit Ctrl Num Minus Table 5 8 Incoming Call Toolbar Dial Tone State Toolbar Figure 5 8 Dial Tone State Toolbar Feature Procedure Default Shortcut Key Hang up This feature disconnects the current call Num Enter Speed Speed button provides access to the System Speed numbers To dial click on the catego...

Страница 81: ...ete Conference When connected on a call the conference button dials the entered number and the new call will be joined to the current call Ctrl Num Delete Park The Park feature displays a list of parked numbers configured in the CME Selecting a parked number will auto dial connect and transfer the caller to the park Ctrl P Speed Speed button provides access to the two level system speed numbers To...

Страница 82: ... page number will auto dial and connect to the page circuit Ctrl Num Minus Table 5 11 Held Call Toolbar Transfer Pending Toolbar Figure 5 11 Transfer Pending Toolbar For consult transfer after you have initiated call transfer this toolbar provides the features to complete or cancel and or make another call Feature Procedure Default Shortcut Key Complete Transfer Drops the current call and allows y...

Страница 83: ...l and connect to the page circuit Ctrl Num Minus Table 5 13 Conference Pending Toolbar Two Connected Parties Toolbar Figure 5 13 Two Connected Parties Toolbar Feature Procedure Default Shortcut Key Hang up Drops the current call and returns to the held party Num Enter Swap Places the current call on hold and connects to the held party Ctrl S Hold Hold button places the current call on hold Num Min...

Страница 84: ...The software will select an idle line appearance and you will hear the dial tone Ctrl Num Plus Table 5 15 Conference Toolbar Answering Calls Figure 5 15 Answering Calls When there is an incoming call to a line the status of that line will change to RingIn The information about the incoming call including caller s name number and the redirected number are displayed in the Call Control window The in...

Страница 85: ...ed then this call will be dropped The greeting message for the queue will be displayed in the description field The ringing call state will change to Connected Answering a Specific Call Step 2 Double click on the incoming call in the Call Control window The selected call will be connected and the call state changes from RingIn to Connected Alternative Methods Step 1 Press the Call Control window s...

Страница 86: ...call is answered it can be recalled and reconnected to the attendant Transfer to a manually entered number Step 1 Select the connected call to transfer Step 2 Enter the phone number you want to transfer to in the number field If the number was previously used you have an option to select it from the drop down list of the number field Step 3 Click the Transfer button or press Num Delete key The cur...

Страница 87: ...erred to that number Step 1 Select the connected call to transfer Step 2 In the Telephone Status window select the number you want to transfer the call to Double click on the call or press Enter Step 3 Follow the steps to complete the transfer as described in the section above Transfer to an Alternate Number A contact in the directory can have multiple numbers A call can be transferred to any of t...

Страница 88: ...o an available contact in the desired person s department group These groups are defined in the organizational directory Step 1 Select the connected call to transfer Step 2 Find the desired contact in the directory The cursor will move to the currently selected directory contact Step 3 Click on the group tab or press the shortcut key Step 4 Click on the Call Available button to send the call to th...

Страница 89: ...er in the group d Number in the Telephone Status window e To the park queue Step 3 Follow the steps to complete the transfer as described above To Toggle Auto Transfer Option This option when enabled will allow you to complete auto transfer automatically without having to click the Complete Transfer button every time you need to complete a transfer Step 1 On the Call Control toolbar click the Sett...

Страница 90: ...e call Options Methods Park the call and make a page announcement Click on the Park button and select the park number or drag the call to the park queue Place the call on hold and make a page announcement Click on the Hold button Then click on the Page button and select a page number to make an announcement Send call to the person s mobile number Find the contact and select the mobile number from ...

Страница 91: ...utton in the Action Bar Send call to the person s backup Contact s backup can be their manager assistant or a specific back person Click on the desired person s call button to that number The backup numbers are in the Group Department tab Take a message Enter the message by typing in or selecting a canned message and click on the desired message delivery method Table 5 18 When a person is on call ...

Страница 92: ... will be connected to the ringing party Making Calls With CallConnector Operator there are multiple ways to make outgoing phone call Calls can be initiated from either Call Control or Directory window Using Call Control window Figure 5 18 Call Control Window Call Control window provides a convenient way to make a phone call Simply enter the number to the Call Control phone number bar and click the...

Страница 93: ...st Click on the Dial button or press the dial shortcut key default Num Delete To dial an entry from the directory Step 1 Select a line from which you want to originate the call Step 2 Locate the contact in the directory that you want to call Step 3 Double click on the contact in the directory to make a call to the number You can also press the auto dial key to make a call The call is made to the c...

Страница 94: ...e preferred number is the primary work number but the user or operator can change it to one of their other numbers To Dial an Alternative Number Step 1 Locate the person to call in the directory Step 2 Right click on the selected contact You will see a list of numbers for that person Step 3 Select the number you want to call A call will be made to the selected number To Dial from the Action Bar Th...

Страница 95: ...p to Make a Call Step 1 Make sure you are not on a connected call You can put it on hold Step 2 Locate the contact in the directory or an extension in telephone status Step 3 Drag the contact to the Call Control window An outgoing call will be made to the contact s number Disconnecting Calls When you have completed a call you can hang up the call from the Call Control window To Hang up Step 1 Sele...

Страница 96: ...anytime To Put a Call on Hold Step 1 Select the line you want to put on hold This call should be in the Connected state Step 2 Click the Hold button or press the Num Minus key Step 3 The status of the selected line will be changed to On Hold You can either resume the call or make a new call If you are connected to a call and you become active on another then the current call will be placed on hold...

Страница 97: ...tus for a contact is displayed in the directory Step 1 Locate the contact with the ringing call Step 2 Right click on the contact and select Pick up Step 3 The CallConnector Operator will select an available line and send a pickup request to the ringing number Group Pickup When you need to pick up an incoming call to another group you can use the Group Pickup button All pickup groups are defined i...

Страница 98: ...nistrator Conferencing Calls This feature allows the operator to connect several parties in one call such that all parties can hear each other The CallConnector Operator allows you to setup a conference when you are connected to a party or if you are already in a conference and need to add another party To Conference in a Number Step 1 Select a connected call on the Call Control window Step 2 Ente...

Страница 99: ... window The current call will be placed on hold pending conference and an outgoing call is made to the selected party Step 4 When the party answers click on the Conference Complete to bridge the calls Adding a Party to a Conference Step 1 Select the conference call Step 2 Enter the number and click the Add button The conference will be placed on hold and an outgoing call is placed Step 3 Once the ...

Страница 100: ...ate Call Forward Step 1 Select a line to deactivate call forward Step 2 Click the Forward button or press the shortcut key default Ctrl F to deactivate Call Forward A green arrow appearing on the telephone will disappear Device Settings Dial Through When making phone calls the operator may have to enter more digits or special characters such as sign or sign during the call in order to complete the...

Страница 101: ...s the Complete Transfer button To Enable or Disable Auto Transfer Step 1 On the Call Control toolbar click on Settings A list of device settings options will appear A checkmark next to Auto Transfer option indicates that this option has been enabled Step 2 To enable or disable this option click on the Auto Transfer option or press the shortcut key default Ctrl Alt T Reload Lines This option retrie...

Страница 102: ... Number Step 1 On the Call Control toolbar click on Settings Step 2 Click on Edit Speed Number The Speed Numbers window that shows the corporate speed numbers will be displayed Step 3 Click on Add The Add Speed Number window will show Step 4 Enter Category Name and Number of the speed number Step 5 Click OK to save the change To Edit the Information of a Speed Number Step 1 On the Call Control too...

Страница 103: ...g Queued Calls 5 34 CallConnector Operator the corporate speed numbers will be displayed Step 3 Select the speed number to be deleted Step 4 Click on Remove The speed number will be deleted Step 5 Click on Close when done ...

Страница 104: ... busy and unavailable routing works and how to change incoming call flow manually and automatically Incoming Call Queue Describes how to answer incoming calls logging in and out of the hunt group and how to set busy unavailable forward Held Call Queue Explains how to reconnect to a held call Transferred Call Queue Describes how to recall and reconnect to a transferred call Parked Call Queue Descri...

Страница 105: ...ized Queue For each queue the administrator can specify the priority Properties level timeout values greeting text and the busy unavailable routing Customizable View Operators can customize the information fields to hide or display and change the position and size of the fields in the Call Queues window Progress Bar Display A progress bar displays the duration of the calls in the queues Icons chan...

Страница 106: ...e forwarded to these numbers Calls requiring similar operator call treatment should be routed to one call queue For example the organization s main number calls should be routed to the directory numbers in the Main Number queue and the Customer Service calls to the Customer Service queue directory numbers The incoming call queue displays only the unanswered ringing calls For each call it can displ...

Страница 107: ...receded by an auto operator to route the calls to the selected call queue Queues for Single Operator Button 1 4300 dual Operator Personal Number Button 2 4301 octal Button 3 4302 octal Main Number Calls Button 4 4304 octal Button 5 not configured Button 6 4306 octal Button 7 4307 octal Customer Service Calls Button 8 4308 octal Figure 6 1 Example Queue Configuration for Single Operator The example...

Страница 108: ...onfiguration for Operator and Backup The example queue configuration above shows the IP phone directory numbers for two operators the primary operator and the backup attendant The first directory number from the primary operator phone and the first two directory numbers from the backup operator phone serve as the operators personal numbers Each operator assigns three octal directory numbers to rec...

Страница 109: ...r and Customer Service queues Those queues are served by three operators The Main Number hunt group has eight directory numbers from the three operator positions The Customer Service hunt group has ten directory numbers from the operator IP Phones The queues for the Main Number and Customer Service have to be configured with the respective directory numbers as a part of the operator queue configur...

Страница 110: ...e CallConnector Call Queue window displays information on the calls that are waiting in the queues configured for the operators From the Call Queue window the operator can View the incoming calls waiting to be answered Answer the longest waiting highest priority call or a specific waiting call View the calls that have been placed on hold or transferred to park slots or other numbers Recall the lon...

Страница 111: ... queue to allow them to be pulled back by the attendant For each call in a queue the following information will be displayed Field Description Extension The telephone number of the attendant s phone associated with the call State The call state of the call Each state is associated with a specific icon For more information please refer to the State Icon table below Number The phone number of the ca...

Страница 112: ...n the timeout period so they can give higher priority to the waiting caller The call to this extension number has been transferred to another extension number and waiting for the other extension number to answer it Once the call has been completely transferred the status of the extension number will be set back to Idle While in this status operators can resume the phone call at any time All incomi...

Страница 113: ...ion of each call in the queue window Figure 6 5 Progress Bar When this waiting time exceeds the timeout value configured for the queue the icon and the color of the progress bar change to red as shown below Figure 6 6 Progress Bar Timeout Navigating in the Call Queue Window Call Queue Toolbar Figure 6 7 Call Queue Toolbar ...

Страница 114: ...ce status This button is visible by default However if it is not displayed the operator can right click the toolbar and click on Status Options to show it Change Queues Settings The Queues menu lets the operator to enable the following features to the configured call queues Enable Call Forwarding on all Local Queues DNs logs out of all local queues and enables call forwards using Night Routing Num...

Страница 115: ...his option allows operators to view all the numbers in a queue no matter if that number belongs to their phone See Customizing Queue s View for more information Table 6 5 Features for Queue s Right Click Menus For the hunt group queues the following features are provided Feature Description Log into all my Hunt DNs After logging into the CallConnector Operator the operator also needs to log into t...

Страница 116: ...k Menus for the Queued Calls For the local incoming calls the following options are available Figure 6 9 Local Call Right click Menus Options Feature Description Toggle Forward Selecting this option will turn on off the call auto forward feature of the selected line The number to be auto forwarded to is defined in the Configuration Manager Clear Telephone Status Clear the status of all current cal...

Страница 117: ...hunt group queues the following options are available Feature Description Log In This feature is available when the operator is logged out in order to allow them to log in a hunt group Log Out This feature is available when the operator is logged in to allow them to log out of a hunt group Clear Telephone Status Remove all current calls on the selected directory number The status of the selected l...

Страница 118: ... Reconnect to the transferred parked calls Right click the transferred call and click Connect Click on the icon of the Call Queue Toolbar Double click on the transferred call Press Ctrl Num Plus Table 6 11 Call Queue Shortcut Keys Drag and Drop You can drag the call from one window to another window to do the following Features Method Connect to an incoming call Drag the incoming call from the Cal...

Страница 119: ...ilable then the CallConnector Operator will manually the call forward settings for the local queues or login to the hunt group To Manually Change Incoming Call Flow You can manually login logout or set clear call forwards for each of the incoming call queues Step 1 Right click on the incoming call queue header to show the call queue menu Step 2 From the pull down menu select Log into all my Hunt D...

Страница 120: ...he call from the Call Queues window to the Call Control window View all DNs in Queue Right click on the Call Queue and click on Show all Directory Numbers in the queue Login Logout Right click on the hunt s directory number and click on Log In Log Out Set Busy Unavailable Forward Select Make Busy Set Unavailable from the Call Queue toolbar Table 6 14 Incoming Queue Operations To Answer Next Call O...

Страница 121: ...available Option 3 Select Queues Log Out of all My Hunt Queues from the Call Queue toolbar Option 4 Right click on the hunt group queue and click on Log out of all my Hunt DNs Option 5 Right click on the hunt DN and click on Log Out To Set Busy Routing Option 1 Select Make Busy from the Call Queue toolbar The CallConnector Operator will forward the incoming calls to the Busy Routing Number configu...

Страница 122: ...N numbers The queued calls display the duration progress bar and the time out status Operations Using mouse Using keyboard Recall a timeout transferred call Right click on the call and click on Connect Press on F10 Recall a specific call Right click on the call and click on Connect Press on F10 Recall by Drag and Drop Drag a call from the Transferred call queue to an idle line in the Call Control ...

Страница 123: ...ll Step 2 From the pull down menu select Connect Viewing Queue Window To view the Call Queue window On the main menu select View Queue or press the shortcut key default F3 Select Options Preferences to open the Preferences window Then check on Show Queue Manager in the Appearance window To Sort by Extension Number Step 1 Click on the Extension column header to sort Click again to change the sort o...

Страница 124: ...ck on the column name to present it Customizing Queue s View For each queue in the Call Queue window the CallConnector Operator shows only the lines that fall into these categories incoming calls held calls transferred calls and parked calls However operators have several options to display other lines that belong to a particular queue To Show or Hide Directory Numbers in Queue This option allows ...

Страница 125: ...ed the Show all Directory Numbers in the queue option it will be deselected when you pick the Show only my Directory Numbers option To Show or Hide the List of Displayed Phone Numbers In case there is long list of queues in the Call Queue window operators may want to shrink some of them to have more space for other queues Step 1 If a queue is expanded the minus icon will be displayed next to the q...

Страница 126: ...allConnector Operator Directory window Viewing Your Directories Describes how to open and close different types of directories as well as adjust and refresh the views Locating Information Describes how to navigate to a directory entry search and query the contact databases for a specific entry Maintaining Contacts Describes how to add modify or delete the entries in the Directory Integrated Call H...

Страница 127: ...aracter by Character Search Operators can quickly locate a contact by entering in the first few letters of the name Multiple Field Query Drill down for information by entering the query text for multiple fields Quick Sort Change the order in which the contacts are listed in the view Multiple Listed Numbers Supports multiple phone numbers per entry Store Notes Lets you store extensive notes for eac...

Страница 128: ...hically Action Bar Provides quick access to communication services for the selected contact and ability to update the contacts presence and notes The Action bar has tabbed sections Directory Toolbar The directory toolbar is located at the top of the directory window Using the toolbar the operators can Locate an entry as you type in the first few letters Query the contact list to retrieve a list th...

Страница 129: ...ed The character by character search mode is enabled by selecting the search field in the directory toolbar Query The query operation is different from the search in the following ways The query can display the results from matches over multiple fields Only the records that match the entered text are displayed Users do not have to select the fields over which to perform the query The query mode is...

Страница 130: ...utton clears the text in the query fields and resets the search Press F7 to start the query after entering the text Press F7 again to clear Directory Update This button enables you to refresh the list of entries in directory This Delete button deletes the currently selected entry This Edit button allows you to open the edit entry window to edit information of selected directory entry This New butt...

Страница 131: ...ry This directory displays the contents of the attendant s Outlook personal folder Figure 7 3 CallConnector Operator Directory Window Details Notes on CallConnector Directories The Corporate Directory can display the telephone status of the contacts It also displays the current availability status of the users The Corporate Directory contains the CallConnector users CallConnector users are those c...

Страница 132: ...pplication will not display any icon Telephone Status The telephone status of the contact The value of this field can be The phone line is in the dialing state There is an incoming call to this line The called number is ringing The phone line is connected to another party If the telephone status of the contact is unknown or idle the application will not display any icon Display Name This is typica...

Страница 133: ...A second custom field for user defined data Flags Operators may want to put a flag here to distinguish the selected contact or to highlight some attribute Flags are displayed as colored icons Table 7 2 Fields of Corporate Directory Outlook Directories View The Cisco CallConnector Operator will retrieve your Outlook contacts from your Outlook personal contact folder This requires the setup of the e...

Страница 134: ... a common value An example of a listing of contacts in different departments is shown below Figure 7 5 Hierarchical Yellow Pages Directory Listing The hierarchical view is dynamically generated from the data The number of levels in the hierarchy and the fields that comprise the hierarchy can be customized to best suit your needs The hierarchical view can be expanded or collapsed Information is loc...

Страница 135: ...ke a call to home number of the selected entry Alternate phone Allows you to make a call to an alternate number of the selected entry Transfer to Voice mailbox Allows you to call the voice mail number of the selected entry Pickup Allows you to select a number to pickup These numbers are Work Work 2 Mobile Home and Alternate Conference Allows you to select a number to invite to a conference These n...

Страница 136: ...tact numbers Switch Directory Allows you to open another directory displayed in the pop up directory list Directory Action Bar Message Text Message Delivery Methods Alternate Phone Numbers Figure 7 7 Directory Action Bar The Directory Action Bar provides quick access to the integrated communication services associated with the directory The Action Bar is a tabbed window Each tab provides access to...

Страница 137: ...ontact s primary phone Group Department Section Figure 7 9 Directory Action Bar Group Department The Group Department section displays the contacts backup contacts and a list of the members in their group The operator can click to call or IM the backup contacts or an available member from the contact s group Notes Section Figure 7 10 Directory Action Bar Notes The Notes section displays any notes ...

Страница 138: ...y will display and the selected directory button will be highlighted Step 2 You can also press the Directory Switch shortcut key default CRTL F5 This will toggle the display through the directories Step 3 You can also select a directory view associated with that directory see below for details To Open a Different View Step 1 On the Directory Toolbar select the Directory View Field Step 2 A drop do...

Страница 139: ...section Change the font type and size See the Customizing View section Change the size and position of the directory window See the Customizing View section Customize and save a directory view See the Customizing View section To Refresh the Current View Step 1 On the Directory Toolbar click on the icon to reload the directory data from the database and refresh the information display Alternate Ste...

Страница 140: ...se the mouse or scroll bar to navigate the Directory view moves The selected entry does not You need to click on an entry with the mouse to select it Moving Up and Down You can scroll through the directory one line or one page at a time using either the keyboard or the mouse You need to first move the focus to the directory window and select an entry To Do Click on selected entry or directory view...

Страница 141: ...en you finished typing the search text will be selected so that you search for a new entry without having to delete the previous entry If you want to continue the search press End before entering additional characters To Find an Entry The CallConnector Operator allows you to quickly find an entry by typing the first few letters of the information The highlighted cursor immediately moves to the nea...

Страница 142: ...ext The CallConnector Operator will display the full directory listing The query fields display the text as you enter them You may edit the text using BACKSPACE DELETE LEFT or RIGHT arrow keys The query fields display the text from the last query This is highlighted when you press ENTER As you begin typing the old text is erased You may edit the old text instead of replacing it Clearing the query ...

Страница 143: ...n how to select a directory to work with please refer to the Viewing Your Directories section of this chapter Figure 7 11 Directory Contact Information Notes on Editing Contact Information You can only view and edit the contact s manager assistant and backup person if the contact is a CallConnector User CallConnector Users are the contacts who have CallConnector accounts and can log into the CallC...

Страница 144: ...tor Operator For instructions on how to do the integration see Chapter 3 Installation and Configuration Clear button deletes all information in the contact edit window and displays the blank edit window Save button saves the information in the edit window to the database and closes the edit window Close button closes the edit window without saving the contact information To Add a New Contact Step ...

Страница 145: ...ber Description Available from Work 1 Number This is the primary extension of the contact or employee Double click on directory entry Right click menu and from Action Bar Work 2 Number A second extension number associated with the contact Right click menu and action bar Mobile Number Contacts mobile telephone number Right click menu and action bar Home Number Contacts home telephone number Right c...

Страница 146: ...e CallConnector Operator will select an idle line and dial out the selected number Step 3 The number selected will be immediately auto dialed If you are connected to a party then the call will be put on hold pending transfer and a new call originated If you are on an outgoing call that has not connected that call will be dropped The telephone number is converted to a dialable number format with ac...

Страница 147: ...number The method is the same as making an outgoing call If you are connected on a call then the current call is placed on hold pending transfer and a transfer initiated to the selected number Step 1 Locate the person to be called in the Directory Step 2 Right Click on the entry and select the alternate number you wish to transfer the call to You can also click on the Action bar telephone numbers ...

Страница 148: ... be highlighted Step 2 Right click on the contact and from the menu select Conference and then the contact s number from the sub menu Step 3 The first party is put on hold and a new line is selected for dialing the selected number Step 4 The ringing symbol will indicate that the called number is ringing Step 5 When the caller number answers click on the Conference Complete button again to bring th...

Страница 149: ...ct whose phone is ringing and an action menu will appear Step 2 Select the Pickup option Step 3 The CallConnector Operator will proceed to dial that phone and retrieve the ringing phone call Step 4 Your phone line status will become connected to the incoming phone call Pickup will only work for numbers that are in the same Cisco CME as the attendant Notes ...

Страница 150: ...ction Bar and use the pull down menu to change the status Step 5 This status will be updated and made available to all users of the CallConnector system You can also change a contact s status from the Action Bar See Chapter 8 Taking Actions To Change the Location Step 1 In the Directory window right click on the contact whose location you want to change Step 2 On the drop down menu select the Curr...

Страница 151: ... See Chapter 3 Installation and Configuration for information how to integrate your MS Outlook with the CallConnector Operator To Send SMS Step 1 Press the Action Bar shortcut key default F6 to move to the message textbox Step 2 Enter the message manually or use Insert Message to add a pre defined message or right click and copy shortcut Ctrl C and paste shortcut Ctrl P a message to the message te...

Страница 152: ...nding order Step 1 The arrow icon appearing next to the Column Name indicates the sort direction of all the entries Click on the Column Name again to reverse the sorting order You can hold the Shift key and click on the column header of multiple columns to sort all those columns To Group Ungroup the Directory Listing Step 1 Right click on any column name in the Directory window Step 2 When the pop...

Страница 153: ...d if a column is not shown click on the column name to present it Step 4 Repeat these steps to add or remove additional columns To Save a Customized View Step 1 Select a directory Step 2 Customize the directory fields position size grouping sorting Step 3 On the Directory Toolbar select the Directory View Field Step 4 A drop down list will appear showing a list of saved views Click on the Save cur...

Страница 154: ...escribes the features of each tab and how to use them It will also show you how to navigate in the Action Bar using the mouse and keyboard shortcuts The sections include Action Bar Overview Provides an overview of the Action Bar as well as how to open and close it Navigation Options Describes how to navigate to different controls in the Action Bar Actions Tab Describes the features of the Actions ...

Страница 155: ...ng one of the several message transport options including Email and SMS Message Allows the operator to change the contact s call forward settings Allows the operator to change the contact s presence settings availability location and away message Actions Section The Actions tab displays the actions available for a directory contact These actions enable the following services Transfer conference or...

Страница 156: ... a specific person in the group or to the first available member Pickup a call from a specific person or the first ringing call in their group This section is available only for the Corporate Directory Notes Section The Notes tab allows you to view the personal notes for a contact This section is available only for the Corporate and External directories Open the Action Bar The Action Bar is associ...

Страница 157: ...s I The Actions Tab shows the shortcut keys beginning with I Step 3 Press N A drop down menu which may contain a list of predefined messages will be displayed Each menu item is assigned a shortcut key Step 4 In the drop down list use the arrow up down keys to move up and down to the desired item and press Enter Or enter the shortcut key Step 5 If the item is a pre defined message the message will ...

Страница 158: ...the selected contact Step 5 Press P to pickup the call from mobile number of the selected contact Step 6 Press C to conference a call to mobile number of the selected contact Step 7 Press T to transfer a call to mobile number of the selected contact Home Step 1 Follow the steps to move to the Actions Tab Step 2 Press H The shortcut key of the dialing options for the contact s mobile number will be...

Страница 159: ...S Step 3 Press N to move to the SNR field Refresh Follow the above steps to move to the Availability Tab Then press R Update Follow the above steps to move to the Availability Tab Then press U Group De partment Tab Step 1 Press the shortcut key to move to the Directory window default F5 Step 2 Then press Alt The Action Bar shows the shortcut keys of all the tabs Step 3 Press G The CallConnector Op...

Страница 160: ... instant messages to the first available group member Call Group De partment Members Step 1 Follow the steps to move to the Group Department Tab Step 2 Press C The Group Department Tab shows the shortcut keys beginning with C Step 3 Press 2 to call the selected group member Remember to select a group member prior to use these steps By default when you move the Group Department Tab the first group ...

Страница 161: ...To learn more please see Chapter 5 Operator Call Handling Actions Section Figure 8 1 Actions Bar The Actions tab allows the operator to make or send calls and messages using the information from the selected directory contact The action buttons are context sensitive enabling only the features that are available for the selected contact of the Directory window Sending Messages Field Description Mes...

Страница 162: ...configured Allows you to transfer or make a call to the contact s work number 2 If the button is grayed out work number 2 for the selected contact is not configured Allows you to transfer or make a call to the contact s mobile number If the button is grayed out mobile number for the selected contact is not configured Allows you to transfer or make a call to the contact s alternate number If the bu...

Страница 163: ...ove focus to the message textbox Step 5 Enter the message manually or use Insert Message to add a pre defined message or right click and copy shortcut Ctrl C and paste shortcut Ctrl P a message to the message textbox Step 6 You can also drag the caller information from the Call Control window Step 7 Click on the desired message button or press the shortcut key to send the message In order to send ...

Страница 164: ...ey want to select a stored message to use Message the actual message which will be copied to the message textbox To Add a New Message Step 1 Click on the arrow next to Insert Message or press the shortcut key A drop down menu which may contain a list of predefined messages will be displayed Step 2 Select Edit or press the shortcut key The Stored Messages dialog will show Step 3 On this dialog clic...

Страница 165: ...o save the change To Insert a Message into the Message Box Step 1 Click on the arrow next to Insert Message or press the shortcut key A drop down menu which may contain a list of predefined messages will be displayed Step 2 Select the title of the message you want to use The selected message will be appended to the message box Handling Calls For each directory contact there are six buttons for the...

Страница 166: ...ld Description Status The current status of the contact The value of this field can be The contact is available The contact is away The contact is busy The contact is not available The status of the contact is unknown To change the status click to the arrow and select the desired value Location The current location of the contact The value of this field can be The contact is currently at home The ...

Страница 167: ...l then incoming calls will be forwarded to the Busy number To change it enter the new value and click on Update You may need to click on the Refresh button for the current setting No Answer When there is no answer the call will be transferred to the No Answer number To change it enter the new value and click on Update You may need to click on the Refresh button for the current setting No Ans Timeo...

Страница 168: ...the information you want to update in the appropriate field Step 2 Click Update or press the shortcut key To Refresh Call Forward Information At times you may want to refresh and get the updated call forward information from the Cisco CME When you click on Refresh the Cisco CME is queried and the current settings for the call forward are obtained Step 1 Click Refresh or press the shortcut key ...

Страница 169: ...Connector Operator user The following information of the group members will be displayed Field Description Availability Status The current status of the group member The value of this field can be The contact is available The contact is away The contact is busy The contact is not available The status of the contact is unknown You can change the status of a group member in the Directory window Loca...

Страница 170: ...e defined number You can change the telephone status of a group member in the Directory window Group Members Each entry displays the name of a group member You can change the display name of a group member in the Directory window Away Message If a group member specifies an away message it will be visible to all members in the group You can change the away message of a group member in the Directory...

Страница 171: ...he bottom of the window Click down on the vertical scrollbar of the window and drag it to the bottom of the window Press the End key Move up one page Click down on the vertical scrollbar of the window and drag it to the desired field Press the Page Up key Move down one page Click down on the vertical scrollbar of the window and drag it to the desired field Press the Page Down key Selecting a group...

Страница 172: ...lease refer to Chapter 12 Setting up Preferences Change the window presentation style To change the theme and the mode of the Group Department tab please refer to Chapter 12 Setting up Preferences Change the position of the Call Control window To move the Group Department tab please refer to Chapter 12 Setting up Preferences Change the shortcut key assignments To change the shortcut key assignment...

Страница 173: ...ng the window Describes how to open the Telephone Status window Closing the window Describes how to close the Telephone Status window Navigation Options Describes how to move up and down in the Telephone Status window select a specific line or extension number access a feature from a selected line or extension number and open the CallConnector Operator window when minimized Customizing the window ...

Страница 174: ...one Status Monitor The monitored extensions are line appearance buttons on the telephone These line appearances can be configured as incoming or outgoing directory numbers for receiving or placing calls from the Call Control window Alternatively they may be configured to reflect the status of an extension number on another telephone With this configuration the operator and other operators always h...

Страница 175: ...s information is retrieved from your contacts in the Directory window Redirect Name The name of the party where the phone call is transferred from Redirect Number The number of the party where the phone call is transferred from Start Time The time the call started Line Status Fields The Telephone window displays the following information about the current state of a line or monitored extension but...

Страница 176: ...ues window Step 3 On the CallConnector Operator main menu click on View Step 4 On the drop down list make sure Queue is selected If not click on Queue or press the queue hot key default Ctrl F2 to bring up the Call Queues window Step 5 On the Call Queues window click on the Telephone Status tab You can view and change hot keys in the Preferences window Closing the Telephone Status Window Step 1 On...

Страница 177: ...scroll bar handle to the top Home Move to the bottom of the window Pull scroll bar handle to the bottom End Move up one page Scroll bar between the top arrow and the handle Page Up Move down one page Scroll bar between the bottom arrow and the handle Page Down Select a line or call Click on the line or call in the Telephone Status Window The selected item will be highlighted Press the Telephone St...

Страница 178: ... location To change the location of a field Step 1 Click on the column name and drag the field to the desired position To view additional fields Step 1 Use the horizontal scrollbar to move the view to the left or to the right To view additional lines or extension numbers Step 1 Use the vertical scrollbar to move the view up or down To select which fields to display By default the CallConnector Ope...

Страница 179: ...oup the entries in each queue by that column Step 4 To ungroup all the queues right click on any column name and select the Clear Grouping option from the drop down menu Step 5 Alternatively click on the Group Ungroup phone calls icon on the Telephone Status window When a group is expanded you may click on the minus sign located next to the group name to narrow it When a group is hidden you may cl...

Страница 180: ...e Cisco CallConnector Operator provides you a list of themes that let you change the color of your CallConnector Operator window CallConnector Operator supports Blue Black Silver and Aqua themes The default theme is Blue Step 1 Open the Preferences dialog by clicking on Options Preferences on the main menu of the Cisco CallConnector Operator window Step 2 On the left panel click on the Appearance ...

Страница 181: ... for all available lines and extension numbers or only connected lines and extension numbers or only ringing lines and extension numbers These options are described in the table below with references to the sections where the steps for making the change are described Icon Description Methods Show Hide Ringing Numbers Click on the icon or press the shortcut key Show Hide Connected Numbers Click on ...

Страница 182: ... an overview of the Preferences window as well as how to open and close it Navigation Options Describes how to navigate within the Preferences window Configuration Describes how to change the configuration options including dial plan network adapter login and email settings Appearance Describes how to change the font and presentation styles of the CallConnector Operator window Keyboard Describes h...

Страница 183: ...play and customize the position as well as the size of each window Keyboard Describes how to use keyboard shortcuts to interact with the CallConnector Operator You can change the default hotkeys in this section Localization The CallConnector Operator supports a set of languages including German English Spanish French and Italian Only the CallConnector Operator user interface will be affected The l...

Страница 184: ...ight to expand it In some cases when you move to a closed section it will be expanded automatically Narrow a section Click on the minus sign next to the section name or double click the section name Use the arrow key Up and Down to move to the section Then use arrow key Left to narrow it Move within the left panel Click on an option Use the arrow key Up and Down to move to an option Move with the ...

Страница 185: ...ocation It can be empty if the location doesn t have an area code Location Pattern The specified number pattern for the location This pattern governs how the number will be formatted for displaying purpose To Enable Client Side Dial Plan Step 1 On the CallConnector Operator main menu select Options Preferences to open the Preferences window Step 2 Click on Enable Client Side Dial Plan option To Ad...

Страница 186: ... get the selected location from the Phone and Modems Options window and use it to properly route the telephone call to the desired destination Any changes in this window will be reflected on the Current Location Setting section Step 1 After you make changes to the dialing rules such as adding or editing a location click Reload ...

Страница 187: ...n or a comma Special PSTNs These are phone numbers that need to be dialed out however they either have a similar pattern to a CME extension mask or a different pattern from the PSTN format for the specified location You can have more than one Special PSTN each Special PSTN is separated by a semi colon or a comma 1 If CME s dial peer is setup to handle special PSTN numbers such as 911 without diali...

Страница 188: ...t consists of four digits If you have an 2 Extension Masks one consists of three digits and another that consists of four digits If all the internal extension numbers start with the digit 4 and have a total of five digits To Set Multiple Special PSTNs To add both 911 and 411 to the Special PSTNs ...

Страница 189: ...ot require an area code enter the number pattern without brackets Figure Number Pattern dialog To Add a Number Pattern Step 1 On the Number Patterns section select a country name Step 2 Click Add and enter the new number pattern Step 3 Click OK to save the change To Edit a Number Pattern Step 1 On the Number Patterns section select a country name A list of existing number patterns for the selected...

Страница 190: ...password in this section To Change Login Information Step 1 On the CallConnector Operator main menu select Options Preferences or press the shortcut key to open the Preferences window Step 2 Use mouse or the arrow keys to select Login Settings under Configuration Step 3 Enter the information you want to change These include CallConnector Server IP Local Port Login Name and Password Step 4 Click OK...

Страница 191: ...Preferences window please refer to Font Options Change the shortcut key assignments To change the shortcut key assignments of the Preferences window please refer to Shortcut Key Assignment Enable another language in the CallConnector Operator interface To use another language in your Preferences window please refer to Localization Options To Select or Deselect a Network Adapter Step 1 Move focus t...

Страница 192: ... or if the MAPI session is re connected you will be prompted to choose a MAPI profile This allows you to select either the default or a different profile from your Outlook client Always use the following profile and password If this option is selected the specified MAPI profile will always be used independently of the profile selected for Outlook If the specified MAPI profile s password is provide...

Страница 193: ...ption will show the Call Queue and Telephone Status windows Step 4 Select the window you want to show and click OK to save the change To Lock All Windows Step 1 Open the Preferences dialog by clicking on Options Preferences on the main menu of the Cisco CallConnector Operator window or press the shortcut key Step 2 On the left panel click on the Appearance Appearance option Step 3 On the right pan...

Страница 194: ... the left panel click on the Appearance Appearance option Step 3 On the right panel select Enable Dockable Panes This option permits you to drag and drop your windows to any place on the screen and to automatically hide a specific window when not in use Step 4 Click on the icon located on the top right corner of each window to auto hide it The window will be hidden when it lose focus When hidden o...

Страница 195: ...ctor Operator window Step 2 On the left panel click on the Appearance Appearance option Step 3 On the right panel click on Show Basic Operator Windows Only Step 4 Click OK to save the change To Show All CallConnector Operator Windows Step 1 Open the Preferences dialog by clicking on Options Preferences on the main menu of the Cisco CallConnector Operator window Step 2 On the left panel click on th...

Страница 196: ...phabetical and numeric keys from the alphanumeric keypad are routed to the Directory window The operator is able to switch between these two windows quickly Since the operators may prefer to use the numeric keys from the alphanumeric keypad to handle calls the CallConnector Operator allows them to switch off the default setting so that the numeric keys from the alphanumerical keypad are routed to ...

Страница 197: ...entered in the Number field You will get dial tone if no numbers are entered Hang up Num Enter Disconnect the selected connected call Forward Ctrl F This sets up a call forward to the number in the dial field for the selected line New Call Ctrl Num Plus Start a new call The software will select an idle line appearance and you will hear the dial tone Next Call Num Plus Answer the highest priority l...

Страница 198: ...ail number of the selected contact in the directory Some of the Call Control features have shortcuts that cannot be changed Feature Shortcut Keys Action Lines Ctrl line number The CallConnector Operator supports 9 lines The first line from the top is considered line 1 Press Ctrl and the line number to reach the first call in that line Then use up down arrow keys for calls within a line Send key Nu...

Страница 199: ...mized it to suit their needs and preferences Action Bar F6 Set focus to the Action bar window Query Directory F8 Set focus to the search query text field in order to enter the search terms or clear the current search terms Search Directory F7 Set focus to the search query fields in order to enable query mode by selecting All Fields or select the search field Queue Ctrl F3 Set focus to the Call Que...

Страница 200: ...he keys on a U S keyboard To Assign Reassign the Shortcut Keys Step 1 Open the Preferences dialog by clicking on Options Preferences on the main menu of the Cisco CallConnector Operator window Step 2 On the left panel select Keyboard HotKeys A list of features along with their shortcuts will be displayed Step 3 On the right panel select the feature whose shortcut keys you want to change The select...

Страница 201: ... to all available features Step 4 Click OK or press Enter to save the changes To View Default HotKeys Step 1 Open the Preferences dialog by clicking on Options Preferences on the main menu of the Cisco CallConnector Operator window Step 2 On the left panel select KeyBoard HotKeys A list of features along with their shortcuts will be displayed Step 3 Click on View Default Hotkeys The CallConnector ...

Отзывы: