background image


© 2017 Cisco and/or its affiliates. All rights reserved. This document is Cisco Public. 

Page 24 of 146 

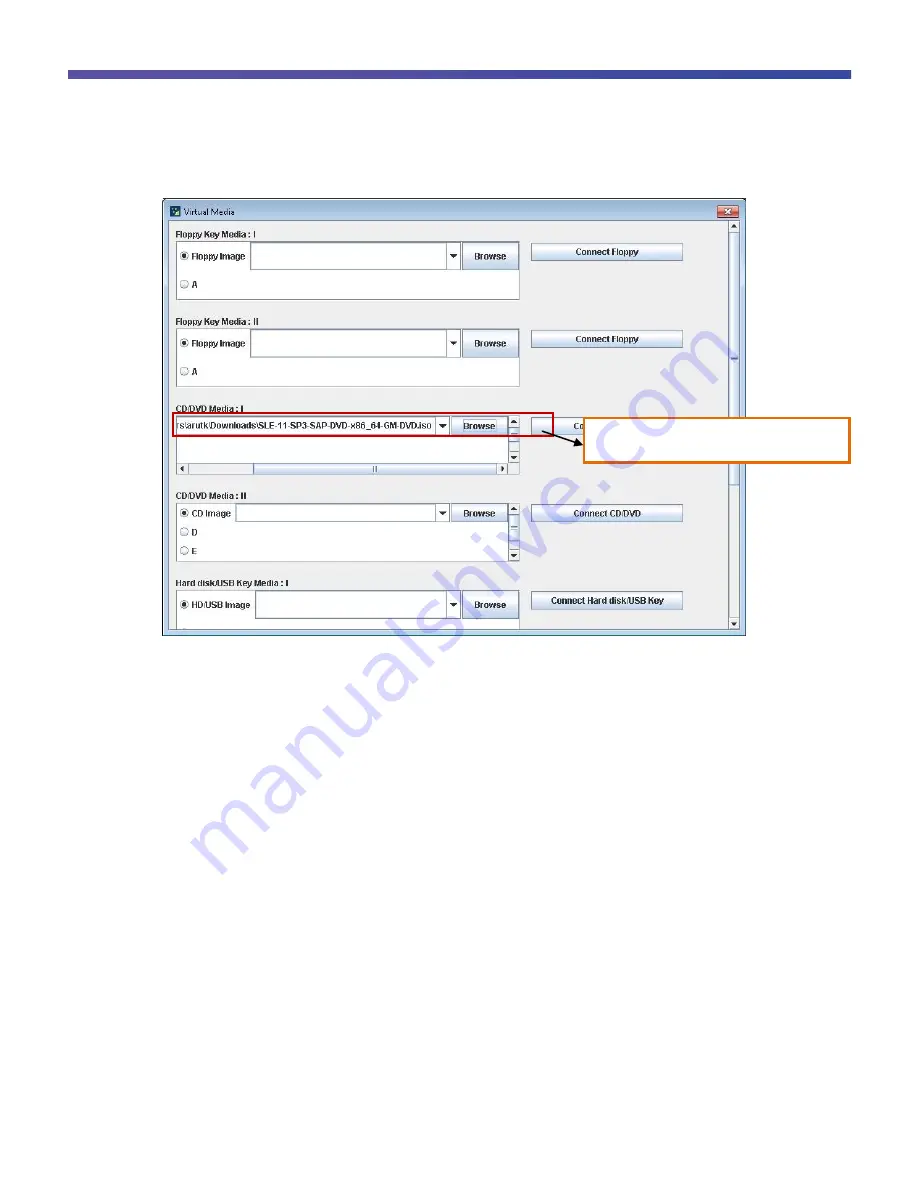
Figure 22.   

Cisco C880 M4: Selecting and Mounting the ISO Image 


8.  Select Power On and set the boot selector to Force Boot into EFI Boot Manager. Then click Apply at the 

bottom of the page (Figure 23). 

Browse the SLES for SAP SP3 ISO and click 
Connect CD/DVD. 

Содержание C880 M4

Страница 1: ...ts reserved This document is Cisco Public Page 1 of 146 Cisco C880 M4 Server with SAP HANA Tailored Datacenter Integration Design and Deploy a SAP HANA Single Node Solution Based on Standalone Cisco UCS C460 M4 Rack Servers with SLES for SAP 12 SP1 February 2017 ...

Страница 2: ...Boot System Installation 57 Configure the SAN Boot Environment 58 Notes on SAN Boot System Operation 71 16 Gbps Fibre Channel Card Settings UEFI Driver Version 6 11a5 or Later 72 Set UEFI Driver Version 6 11a5 or Later on the 16 Gbps Fibre Channel Card 72 Select the Method for Configuring the 16 Gbps Fibre Channel Card 73 Display the Device Manager 75 Start the HBA Setup Utility and Select the HBA...

Страница 3: ...HANA Setup SAN 130 mkfs xfs 130 etc fstab 130 etc after local 130 SAP HANA Installation 131 SAP Notes 131 Linux Notes 131 SAP Application Notes 132 Notes About Third Party Software 132 SAP HANA Virtualization Notes 132 SAP HANA High Availability Scale Out Only 133 Configure High Availability 133 Enable the SAP HANA Storage Connector API 134 Test the IPMI Connectivity 134 Autostart SAP HANA 135 SAP...

Страница 4: ...and configuration Skills highly recommended for installing the solution at the customer site SAP HANA installation and configuration Cisco Transport Gateway installation and configuration Cisco Smart Call Home configuration on Cisco Nexus and Cisco UCS platforms Optional skills SAP Landscape Transportation SLT Replication Server installation and configuration SAP Business Suite configuration focus...

Страница 5: ... Cisco Nexus 2000 Series for Small Computer System Interface over IP iSCSI boot Cisco Nexus 9000 Series for internal and external communication Cisco MDS 9000 Family SAN connectivity Computing components Cisco C880 M4 Server 4 x 16 Gbps Fibre Channel 8 x 10 Gigabit Ethernet 4 x 1 Gigabit Ethernet Storage components This document describes how to use existing customer storage to connect the Cisco C...

Страница 6: ... 2017 Cisco and or its affiliates All rights reserved This document is Cisco Public Page 6 of 146 Figure 1 SAP HANA Network Layout Source SAP HANA TDI Network Guide SAP_TDI_Network_Guide ...

Страница 7: ... layout will automatically invalidate certification and SAP will deny any support Neither local SAP consultants nor customers can change these rules Please report any attempt to do so to the SAP HANA product management team usr sap SID Node specific volume for storing local HANA information hana shared SID Shared volume for storing the HANA executable files hana data SID mnt00 001 999 Data volumes...

Страница 8: ...M4 in a SAN environment The base unit will be delivered with four 16 Gbps Fibre Channel interfaces which can be used for OS SAN boot and for SAP HANA shared data and log volumes The network and SAN connectivity shown in this figure can be changed to meet customer requirements but it must follow the SAP HANA Tailored Datacenter Integration TDI rules Figure 3 Sample SAN Configuration ...

Страница 9: ...nt The base unit will be delivered with eight 10 Gigabit Ethernet interfaces which can be used for SAP HANA shared data and log volumes The recommended approach is to use two of the four 1 Gbps Ethernet interfaces for iSCSI boot of the OS The network connectivity shown in this figure can be changed to meet customer requirements but it must follow the SAP HANA TDI rules Figure 4 Sample NAS Configur...

Страница 10: ...ng and ongoing support Hardware Configuration Check Tool for SAP HANA documentation attached to SAP note 1943937 provides self managed tests for customers to determine whether the hardware that they intend to use meets the minimum performance criteria required to run SAP HANA in a production environment SAP provides go live checks and other support services for SAP HANA customers as part of the SA...

Страница 11: ...is document is Cisco Public Page 11 of 146 Physical Components of the Cisco C880 M4 Server This section shows the components of the Cisco C880 M4 Figure 5 shows the front of the Cisco C880 M4 Figure 5 Cisco C880 M4 Front View of Connectors and System Boards ...

Страница 12: ...igure 6 shows the rear of the Cisco C880 M4 Make sure that the power supply units PSUs and fans are placed in the slots as shown in this figure Figure 6 Cisco C880 M4 Rear View of Connectors Figure 7 shows the management board MMB connectors on the Cisco C880 M4 Figure 7 Cisco C880 M4 MMB 0 Connectors ...

Страница 13: ...80 M4 MMB Connections MMB Connectors View RS 232 Cable RJ 45 Connection Customer Management Network CIMC Ports 100 MB S Note After you power on the controller wait for the ready RDY and active ACT LEDs to display a steady green light before performing the initial setup Connect to the Management Board After you turn on the power the MMB initialization process starts During the initialization proces...

Страница 14: ...nter the same password Cisco 1541432026 login Administrator You are required to change the password immediately root enforced New password Retype New password Administrator Note To see more commands and command syntax enter the help command Set the Integrated Management Controller IP Address Now set the IMC IP address 1 Verify that the IMC ports are connected to the management network as shown in ...

Страница 15: ...terface Table 2 shows settings Table 2 Settings to Log in to Web User Interface Item Value URL http Integrated Management controller IP 8081 User name Administrator Password Administrator s password Figure 9 shows the login screen Figure 9 Cisco IMC Web User Interface Login Screen Figure 10 shows the system status and health screen that appears after you log in ...

Страница 16: ...com Choose Support Products and select the Cisco C880 M4 Server Figure 11 Figure 11 Downloading Server Firmware 2 Choose the firmware according to the processor you are using Ivy Bridge Intel e7 88x0v2 firmware 1 0 x x 4 in August 2016 Haswell Intel e7 88x0v3 firmware 1 2 x x 4 in August 2016 3 Unzip the downloaded C880M4 1 0 4 zip or C880M4 1 2 4 zip archive into a new directory on the system you...

Страница 17: ...le 6 Click Update 7 Wait for the firmware version check window to appear this process takes about 5 minutes 8 Verify the firmware version Then click OK After about 1 minute the progress bar appears The time needed to update the firmware in a single MMB is about 70 minutes 9 The web user interface session is disconnected during the firmware update process For a single MMB configuration log in to th...

Страница 18: ...figuring it at the command line interface CLI Note IPMI is not supported for the MMB IP address Only the baseboard management controller BMC IP address can be used for the IPMI Figure 14 You can check whether IPMI is enabled by entering the following command mgmtsrv01 tftpboot ipmitool I lanplus U admin P admin H 172 23 1 101 power status Error Unable to establish IPMI v2 RMCP session mgmtsrv01 tf...

Страница 19: ...ress 2 Create the BMC user admin with password admin The BMC user is disabled by default mgmtsrv01 tftpboot telnet 172 23 1 100 Telnet escape character is 337 Trying 172 23 1 100 Connected to 172 23 1 100 login Administrator Password Last login Tue Aug 2 12 00 37 from 172 25 1 6 Administrator set bmc user admin admin admin quiet Connection closed ...

Страница 20: ...MI for SLES is shown here Note The server01 ipmi and server02 ipmi parameters refer to the BMC IP address Add those entries in the etc hosts file of both nodes server01 crm configure crm live configure primitive STONITH Server01 stonith external ipmi op monitor interval 0 timeout 60s op monitor interval 300s timeout 60s on fail restart op start interval 0 timeout 60s on fail restart params hostnam...

Страница 21: ...6 Checking for New Firmware 2 Before you can set up the correct performance BIOS settings you need to configure console redirection Open a web browser and connect to the IMC web user interface as explained previously 3 On the homepage choose System Console Redirection Setup IPv4 Console Redirection Setup Figure 17 Figure 17 Cisco C880 M4 Console Redirection for Keyboard Video and Mouse KVM 4 Enter...

Страница 22: ...46 5 In the menu on the left select Console Redirection 6 Select the Video Redirection check box and click the Apply button at the bottom of the page Figure 18 Figure 18 Selecting Video Redirection 7 Select Mode to configure the memory performance mode Figure 19 Figure 19 Selecting the Memory Mode ...

Страница 23: ... 2017 Cisco and or its affiliates All rights reserved This document is Cisco Public Page 23 of 146 Figure 20 Cisco C880 M4 KVM Initial Screen Figure 21 Cisco C880 M4 Selecting the Media Menu ...

Страница 24: ...co Public Page 24 of 146 Figure 22 Cisco C880 M4 Selecting and Mounting the ISO Image 8 Select Power On and set the boot selector to Force Boot into EFI Boot Manager Then click Apply at the bottom of the page Figure 23 Browse the SLES for SAP SP3 ISO and click Connect CD DVD ...

Страница 25: ...eserved This document is Cisco Public Page 25 of 146 Figure 23 Cisco C880 M4 Powering on the Server The server boots Figure 24 Figure 24 Booting the Server 9 After the servers boots it displays the BIOS menu Select CPU Configuration Disable C State ...

Страница 26: ... or its affiliates All rights reserved This document is Cisco Public Page 26 of 146 10 Enable Uncore Frequency Override Figure 25 Figure 25 CPU Configuration 1 11 Configure other settings as shown in Figures 26 and 27 ...

Страница 27: ... 2017 Cisco and or its affiliates All rights reserved This document is Cisco Public Page 27 of 146 Figure 26 CPU Configuration 2 ...

Страница 28: ...erved This document is Cisco Public Page 28 of 146 Figure 27 CPU Configuration 3 12 Select the Commit Changes and Exit option and press Enter 13 Press Esc to exit from the menu and return to the Main BIOS menu 14 Select Memory Configuration Figure 28 ...

Страница 29: ...iates All rights reserved This document is Cisco Public Page 29 of 146 Figure 28 Memory Configuration 15 Select the Commit Changes and Exit option and press Enter 16 Press Esc to exit from the menu and return to the main BIOS menu ...

Страница 30: ...itoring via SNMP This example will show one of many options to monitor the system via SNMP The next pictures will explain how the system gets prepared for SNMP monitoring and how the system can be integrated into Nagios Check_MK First of all prepare the system to be able to respond on SNMP requests Log in on the MMB ...

Страница 31: ...sco and or its affiliates All rights reserved This document is Cisco Public Page 31 of 146 Figure 29 Navigate to Network Configuration SNMP Configuration Set the SNMP community the Network and the SNMP version ...

Страница 32: ...d SNMPv2 MIB sysObjectID 0 OID SNMPv2 SMI enterprises 9 1 31 1 1 DISMAN EVENT MIB sysUpTimeInstance Timeticks 740495 2 03 24 95 SNMPv2 MIB sysContact 0 STRING Ralf Klahr SNMPv2 MIB sysName 0 STRING CISCO 1541432026 SNMPv2 MIB sysLocation 0 STRING Walldorf CISCO 4th SNMPv2 MIB sysORLastChange 0 Timeticks 5 0 00 00 05 SNMPv2 MIB sysORID 1 OID SNMP MPD MIB snmpMPDMIBObjects 3 1 1 SNMPv2 MIB sysORID 2...

Страница 33: ... 2017 Cisco and or its affiliates All rights reserved This document is Cisco Public Page 33 of 146 Figure 31 Configure the SNMP trap destination where traps will be automatically send to ...

Страница 34: ...o Public Page 34 of 146 Now register the system in Check_MK Nagios Select Hosts New Host in Check_MK Create a hostname for this system and fill in the IP address Figure 32 Once you select SNMP Appliance a new field with the SNMP Community string appears Save and go to Services ...

Страница 35: ... 2017 Cisco and or its affiliates All rights reserved This document is Cisco Public Page 35 of 146 Now the main system parameters are monitored with Check_mk and Nagios View from Nagios ...

Страница 36: ... to configure iSCSI boot Prepare for iSCSI Configuration Perform the following steps before configuring iSCSI 1 Start the system and from the Extensible Firmware Interface EFI Boot Manager select Device Manager Figure 33 This selection will start the Device Manager Figure 33 Starting the Device Manager 2 Select LAN Remote Boot Configuration Figure 34 ...

Страница 37: ... 2017 Cisco and or its affiliates All rights reserved This document is Cisco Public Page 37 of 146 Figure 34 Selecting LAN Remote Boot Configuration 3 Enable the LAN controller BIOS Figure 35 ...

Страница 38: ... 2017 Cisco and or its affiliates All rights reserved This document is Cisco Public Page 38 of 146 Figure 35 Enabling the LAN Controller BIOS 4 Select Commit Changes and Exit Figure 36 ...

Страница 39: ...ghts reserved This document is Cisco Public Page 39 of 146 Figure 36 Committing the Changes Configure iSCSI Boot Now you are ready to configure iSCSI boot 1 Reboot the system 2 After the system has booted restart the Device Manager Figure 37 ...

Страница 40: ...ights reserved This document is Cisco Public Page 40 of 146 Figure 37 Restarting Device Manager 3 Select iSCSI Configuration Figure 38 Figure 38 Selecting iSCSI Configuration 4 Define the iSCSI initiator name of the system Figures 39 and 40 ...

Страница 41: ... 2017 Cisco and or its affiliates All rights reserved This document is Cisco Public Page 41 of 146 Figure 39 Defining the iSCSI Initiator 1 ...

Страница 42: ...or its affiliates All rights reserved This document is Cisco Public Page 42 of 146 Figure 40 Defining the iSCSI Initiator 2 5 Configure the iSCSI adapter that you will use for the initial system boot Figures 41 and 42 ...

Страница 43: ... 2017 Cisco and or its affiliates All rights reserved This document is Cisco Public Page 43 of 146 Figure 41 Configuring the iSCSI Adapter 1 ...

Страница 44: ... 2017 Cisco and or its affiliates All rights reserved This document is Cisco Public Page 44 of 146 Figure 42 Configuring the iSCSI Adapter 2 6 Specify the iSCSI target Figure 43 ...

Страница 45: ... 2017 Cisco and or its affiliates All rights reserved This document is Cisco Public Page 45 of 146 Figure 43 Specifying the iSCSI Target ...

Страница 46: ... 2017 Cisco and or its affiliates All rights reserved This document is Cisco Public Page 46 of 146 Figure 44 ...

Страница 47: ... 2017 Cisco and or its affiliates All rights reserved This document is Cisco Public Page 47 of 146 Figure 45 ...

Страница 48: ... 2017 Cisco and or its affiliates All rights reserved This document is Cisco Public Page 48 of 146 Figure 46 ...

Страница 49: ... 2017 Cisco and or its affiliates All rights reserved This document is Cisco Public Page 49 of 146 Figure 47 ...

Страница 50: ... 2017 Cisco and or its affiliates All rights reserved This document is Cisco Public Page 50 of 146 Figure 48 ...

Страница 51: ... 2017 Cisco and or its affiliates All rights reserved This document is Cisco Public Page 51 of 146 Figure 49 ...

Страница 52: ... 2017 Cisco and or its affiliates All rights reserved This document is Cisco Public Page 52 of 146 Figure 50 ...

Страница 53: ... 2017 Cisco and or its affiliates All rights reserved This document is Cisco Public Page 53 of 146 Figure 51 7 Reboot the system and select Boot Maintenance Manager Figure 52 ...

Страница 54: ... 2017 Cisco and or its affiliates All rights reserved This document is Cisco Public Page 54 of 146 Figure 52 Selecting Boot Maintenance Manager 8 Boot the system Figure 53 ...

Страница 55: ... 2017 Cisco and or its affiliates All rights reserved This document is Cisco Public Page 55 of 146 Figure 53 Booting the System ...

Страница 56: ...he OS installation in all the host bus adapters HBAs to be used to start the system Before turning on the power to the partition of the Cisco C880 M4 confirm that the SAN storage in which the OS will be stored and the Fibre Channel switch are completely ready 1 Design the SAN boot environment a Create a diagram for Fibre Channel cabling between the SAN storage unit and the Cisco C880 M4 in which t...

Страница 57: ...easure Fibre Channel performance on a test system before installing software For SAN storage the boot disk assigned for each server must be configured so that it can be accessed exclusively by that server You accomplish this by zoning or masking LUNs or by combining them In a SAN boot environment boot disk LUNs must be configured so that servers and storage have a one to one correspondence Only a ...

Страница 58: ...ment After the OS is installed when the system is installed on the UEFI BIOS you should set the boot path in the boot options 1 Start the system Figure 54 Figure 54 Starting the System 2 When the Cisco logo appears press any key except the Enter key to display the Boot Manager main page 3 Select Boot Maintenance Manager Figure 55 ...

Страница 59: ...This document is Cisco Public Page 59 of 146 Figure 55 Selecting Boot Maintenance Manager 4 On the Boot Maintenance Manager screen select Boot Options Figure 56 Figure 56 Selecting Boot Options 5 On the Boot Options screen select Add Boot Option Figure 57 ...

Страница 60: ...ghts reserved This document is Cisco Public Page 60 of 146 Figure 57 Selecting Add Boot Option 6 On the File Explorer screen select Fiber Disk Volume Main For Fiber connected to WWN connected to LUN select Volume Main see Figure 58 Figure 58 ...

Страница 61: ...1 of 146 7 Select the boot file and press Esc several times The selection hierarchy and the file differ depending on the OS For example for an RHEL server select EFI and then redhat and then grub efi Figures 59 60 and 61 Figure 59 Selecting the Boot File 1 Figure 60 Selecting the Boot File 2 ...

Страница 62: ...g the Boot File 3 8 On the Modify Boot Option Description screen select Input the description and then press the Enter key Figure 62 Figure 62 Getting Ready to Enter a Description 9 On the Please type in your data screen enter Boot Option Name Main Figure 63 The boot option name should contain five or more characters ...

Страница 63: ... Entering the Main Boot Option Name 10 On the Modify Boot Option Description screen select Commit Changes and Exit and then press the Enter key Figure 64 Figure 64 Saving the Changes 11 Repeat steps 6 through 10 to set up Boot Option Sub 12 On the Boot Maintenance Manager screen select Boot Options Figure 65 ...

Страница 64: ... 2017 Cisco and or its affiliates All rights reserved This document is Cisco Public Page 64 of 146 Figure 65 Selecting Boot Options 13 On the Boot Options screen select Change Boot Order Figure 66 ...

Страница 65: ...of 146 Figure 66 Selecting Change Boot Order 14 On the Change Boot Order screen select Change the order Figure 67 Figure 67 Changing the Boot Order 15 On the Change Boot Order screen press the key or the key and set the boot priority as follows Figure 68 a Move Boot Option Name Main to the top ...

Страница 66: ...66 of 146 b Move Boot Option Name Main so that it is second from the top Figure 68 Setting the Boot Priority 16 After modifying the boot priority press the Enter key Figure 69 Figure 69 17 On the Change Boot Order screen select Commit Changes and Exit and then press the Enter key Figure 70 ...

Страница 67: ...liates All rights reserved This document is Cisco Public Page 67 of 146 Figure 70 Saving the Changes 18 On the Boot Maintenance Manager screen select Boot Options 19 On the Boot Options screen select Delete Boot Option Figure 71 ...

Страница 68: ... Page 68 of 146 Figure 71 Selecting Delete Boot Option 20 On the Delete Boot Options screen select the ID boot option which is set when you install the OS Figure 72 Press the Enter key to delete it the ID boot option is shown as an entry named HD Figure 72 Deleting the ID Boot Option ...

Страница 69: ...nt is Cisco Public Page 69 of 146 21 On the Delete Boot Option screen select Commit Changes and Exit Figure 73 Figure 73 Saving the Changes 22 On the Boot Maintenance Manager screen select Reset System Figure 74 Then reboot the system Figure 74 Selecting Reset System ...

Страница 70: ...rd When SAN storage and settings in the Fibre Channel switch were changed LUN mapping was changed When host affinity port zoning etc were changed When the OS that starts by configuration change is changed When you register the device to the Fibre Channel card to add the LUN device For more information about initialization of the Fibre Channel card refer to the section Initialization of the Fibre C...

Страница 71: ...Fibre Channel card has been replaced with a maintenance part the HBA UEFI or traditional BIOS must be reset Also the SAN storage unit must be reset In the SAN boot environment an OS boot may fail depending on the quality of the Fibre Channel transmission path In such a case use the Fibre Channel switch and SAN storage unit to check the alarm or system status and identify the faulty part Then in th...

Страница 72: ...the SAN boot environment the process described here is required for all HBAs to be used to start the system Running this process registers in the HBA the SAN storage unit LUN from which the system is to be started The figures in this section use UEFI Driver Version 6 11a5 All screenshots in the figures are examples only and contents may vary depending on the system configuration etc Note the follo...

Страница 73: ...ifferent versions of the 16 Gbps Fibre Channel card firmware or UEFI driver install the same version of the firmware driver in the server and partition Select the Method for Configuring the 16 Gbps Fibre Channel Card Check the UEFI driver version from the Device Manager screen of the Boot Manager main page 1 From the Boot Selector screen in the Power Control window of the MMB select Force boot int...

Страница 74: ... 2017 Cisco and or its affiliates All rights reserved This document is Cisco Public Page 74 of 146 Figure 76 Selecting Device Manager The Device Manager screen appears Figure 77 ...

Страница 75: ...k the UEFI driver version Before deleting a registered boot entry with the Delete Boot Device process be sure to change the BIOS setting Set Boot from SAN to Disable Running the Delete Boot Device process with Enable as the BIOS setting Set Boot from SAN may sometimes render the Emulex Configuration Utility inoperable In such a case in the Power Control window of the MMB web user interface select ...

Страница 76: ...the Enter key The Device Manager screen appears Start the HBA Setup Utility and Select the HBA Now set up the HBA The Device Manager screen displays the list of HBAs to be set 1 Select Port 001 Emulex LPe16002B M6 F 16Gb 2 port PCIe Fiber Chann Figure 79 In the example here port 0 of the LPE16002B M6 F dual port Fibre Channel card is selected ...

Страница 77: ...All rights reserved This document is Cisco Public Page 77 of 146 Figure 79 Selecting the HBA 2 Press Enter The Emulex Adapter Configuration Main Menu screen is displayed Figure 80 Figure 80 Emulex Adapter Configuration Main Menu Screen ...

Страница 78: ... Slots item whose Seg Bus and Dev values match the Seg Bus and Dev values on the Emulex Adapter Configuration Main Menu screen Note that the I O Unit IOU and PCI_Box screens of the System menu display the PCI Express Slots items The Emulex Fibre Channel EFI Bios Utility screen uses hexadecimal notation for the displayed values and the MMB web user interface uses decimal notation Table 3 Table 3 MM...

Страница 79: ...lized settings and does not require the steps listed here Perform these steps to restore the default adapter settings 1 Select Set Emulex Adapter to Default Settings and then press the Enter key Figure 82 Figure 82 Selecting Set Emulex Adapter to Default Settings 2 The Set Emulex Adapter to Default Settings screen appears Select Set Adapter Defaults and then press the Enter key Figure 83 ...

Страница 80: ...eturned to the Adapter Selection screen Enable the BIOS Enable the HBA BIOS so that the HBA can recognize the LUNs of the SAN storage unit and so that the system can be started from one of them 1 On the Emulex Adapter Configuration Main Menu screen select Set Boot from SAN Disable 2 The screen for selecting Disable or Enable appears Select Enable and then press the Enter key Figure 84 ...

Страница 81: ...affiliates All rights reserved This document is Cisco Public Page 81 of 146 Figure 84 Enabling the Adapter 3 Confirm that Set Boot from SAN Enable is displayed Figure 85 Figure 85 Confirming That Set Boot from SAN Is Enabled ...

Страница 82: ...annel Arbitrated Loop FCAL connection is not supported If you use a 16 Gbps Fibre Channel card with the link speed slowed to 4 or 8 Gbps you can use a FCAL connection Set a Static Topology On the Emulex Adapter Configuration Main Menu screen configure the settings that correspond to the connection pattern fabric connection or FCAL connection 1 Select Configure HBA and Boot Parameters and then pres...

Страница 83: ...cting the Topology 3 Select the connection method and then press the Enter key Change the setting from the default setting of AUTO Loop First default as follows For a fabric connection select the Point to Point option Figures 88 and 89 For a FCAL connection select the FCAL option for 4 and 8 Gbps connections only ...

Страница 84: ... 2017 Cisco and or its affiliates All rights reserved This document is Cisco Public Page 84 of 146 Figure 88 Setting a Fabric Connection Figure 89 Point to Point Topology Displayed ...

Страница 85: ... or 16 Gbps Note Do not set Auto negotiate Default First set the fixed link speed Otherwise the connected device will not be recognized 1 Select Force Link Speed Auto negotiate Default and then press the Enter key Figure 90 Figure 90 Static Link Speed Setting 1 2 Select the link speed that corresponds to the connection environment connected Fibre Channel switch or SAN storage unit and then press t...

Страница 86: ... rights reserved This document is Cisco Public Page 86 of 146 Figure 91 Static Link Speed Setting 2 3 Confirm that the specified link speed is displayed for Force Link Speed Figure 92 Figure 92 Topology and Link Speed Change Confirmation 1 ...

Страница 87: ...tings and then select Discard Changes if you are returned to the screen for changing settings the changes to the 16 Gbps Fibre Channel card settings have been discarded However you may still see the changed settings displayed by the utility In this case select the 16 Gbps Fibre Channel card again from the menu as described earlier in the section Start the HBA Setup Utility and Select the HBA befor...

Страница 88: ...d This document is Cisco Public Page 88 of 146 Figure 94 Boot Device Settings 1 During the search process Please Wait is displayed 2 Press the Esc key or select Go to Configuration Main Menu to return the previous page Then press the Enter key Figure 95 ...

Страница 89: ...95 Boot Device Settings 2 Note If the expected Fibre Channel device is not displayed the SAN storage or physical connection setting of the Fibre Channel switch may be incorrect Confirm these settings again 3 On the Configuration Main Menu screen press the Enter key Figure 96 Figure 96 Boot Device Settings 3 ...

Страница 90: ...ppears Select Add Boot Device and then press the Enter key Figure 97 Figure 97 Boot Device Settings 4 5 The SAN Discovery Target List screen displays the targets found in the search by the Scan for Fiber Devices option Select the Fibre Channel device that specifies the boot device and then press the Enter key Figure 98 Figure 98 Boot Device Settings 5 ...

Страница 91: ...The LUN connected to the selected target is displayed Select the LUN from which the system is to be started Then press the Enter key A confirmation screen appears Figure 99 Figure 99 Boot Device Settings 6 7 Select Commit Changes and then press the Enter key Figure 100 Figure 100 Boot Device Settings 7 ...

Страница 92: ... 8 Select Return to Previous Page and then press the Enter key to return to the next higher menu level Figure 101 Figure 101 Boot Device Settings 8 9 Select Go to Configuration Main Menu and then press the Enter key to return to the next higher menu level Figure 102 Figure 102 Boot Device Settings 9 ...

Страница 93: ... Emulex Adapter Configuration Main Menu screen select Delete Boot Device and then press the Enter key Figure 103 Here confirm only the registration status of the boot device that was set with Commit Changes Figure 103 Boot Device Settings 10 12 Confirm the registration of the boot device that was set with Commit Changes In the following example LUN 0007 is confirmed as connected to the target WWN ...

Страница 94: ...age 94 of 146 Figure 104 Boot Device Settings 11 13 Select Discard Changes and then press the Enter key to return to the next higher menu level Figure 105 Figure 105 Boot Device Settings 12 14 Press the Esc key and then press the Y key to return to the next higher menu level Figure 106 ...

Страница 95: ...Settings 13 Important Do not select Back to Display Adapters and RECONNECT DEVICES to return to the next higher menu level Figure 107 If you do your system will hang If your system hangs and does not operate for three minutes and more reset the system and restart the configuration process Figure 107 Boot Device Settings 14 ...

Страница 96: ...to return to the Device Manager menu Note If following message appears after you complete the operations press the N key or the Esc key You need not perform another operation here because the Commit Changes or Discard Changes operation from the menu completes the task of changing or discarding settings Select the relevant item from the Delete Boot Device or Change Boot Device Order menu Then selec...

Страница 97: ...is Cisco Public Page 97 of 146 2 Select Boot Maintenance Manager and then press the Enter key to go to the Boot Maintenance Manager screen Figure 109 Figure 109 Restarting the System 2 3 Select Reset System and then press the Enter key The system is restarted Figure 110 ...

Страница 98: ...key except Enter Record the WWN Information of the Fibre Channel Port Using the design diagram for the SAN boot environment refer to the WWN address information assigned to the Fibre Channel port of the 16 Gbps Fibre Channel card of each server Confirm the WWN with Port Name in the Adapter Selection menu The menu appears after the Emulex Configuration Utility restarts Figure 111 ...

Страница 99: ...te To clearly identify the mounting location of the 8 Gbps Fibre Channel card record the host name the name that identifies the Cisco C880 M4 Server mounted card mounting slot location BUS number and DEV number For the BUS number and slot number check the BUS number and slot number of the target HBA from the IOU menu and PCI_Box menu of the MMB web user interface The BUS number is the middle of th...

Страница 100: ... C9 0x 00 10 00 00 00 C9 Server 2 MC 0JFC21 0x 00 10 00 00 00 C9 0x 00 10 00 00 00 C9 Note Always keep the WWN information up to date and share and manage it together with the SAN boot system administrator and maintenance personnel If the WWN information is wrong connection to the SAN storage is disabled and you will experience problems such as being unable to start the operating system When an 8 ...

Страница 101: ...ional BIOS Driver Version 6 02x6 or later Configure the HBA Setup Utility Start by configuring the HBA Setup Utility 1 Start the system and when the screen shown in Figure 108 appears press Alt E or Ctrl E Figure 112 Starting Traditional BIOS Setup 2 Start the Emulex LightPulse BIOS Utility Fibre Channel ports of the Fibre Channel card appear on the HBA list screen Select a Fibre Channel port to s...

Страница 102: ...ex LightPulse BIOS Utility 1 The menu for the Fibre Channel port you selected in the previous screen appears The memory address Mem Base firmware version World Wide Port Name WWPN World Wide Node Name WWNN and topology for the Fibre Channel port also are listed Figure 114 Figure 114 Emulex LightPulse BIOS Utility 2 ...

Страница 103: ...rted from one of them 1 On the Port 001 Emulex LPe16002B M6 F 16Gb 2 port PCIe Fiber Chann screen select Set Boot from SAN Disable 2 The screen for selecting Disable or Enable appears Select Enable and then press the Enter key 3 Select Enable Disable Boot from SAN and then press the Enter key Figure 115 Figure 115 Enable Disable Boot from SAN Setup Screen 1 4 Select Enable for the boot BIOS and th...

Страница 104: ...ble Boot from SAN Setup Screen 2 Note Confirm that the boot BIOS is enabled Set the Link Speed and Topology This section describes how to set the speed and topology Set the Topology Follow these steps to set the topology 1 In the main menu select Configure Advanced Adapter Parameters and then press the Enter key Figure 117 ...

Страница 105: ...ffiliates All rights reserved This document is Cisco Public Page 105 of 146 Figure 117 Topology Selection Settings 1 2 Select Topology Selection and then press the Enter key Figure 118 Figure 118 Topology Selection Settings 2 ...

Страница 106: ...s case Confirm the SAN connection configuration and select the appropriate setting Then press the Enter key Change the setting from Auto Topology Loop First Default by referring to the connection settings in Figure 119 Figure 119 Fabric Point to Point Setting Screen Set the Link Speed Configure the setting that corresponds to the connection kink speed 2 4 or 8 Gbps Do not set Auto Select Default 1...

Страница 107: ...its affiliates All rights reserved This document is Cisco Public Page 107 of 146 Figure 120 Configure Advanced Adapter Parameters Screen 2 On the next screen select Link Speed Selection and then press Enter key Figure 121 ...

Страница 108: ...his document is Cisco Public Page 108 of 146 Figure 121 Link Speed Selection Settings Screen 1 3 Select the link speed that corresponds to the connection environment connected Fibre Channel switch or SAN storage unit and then press the Enter key Figure 122 ...

Страница 109: ...ghts reserved This document is Cisco Public Page 109 of 146 Figure 122 Link Speed Selection Settings Screen 2 4 Press the Esc key three times to return to the LightPulse BIOS Utility Figure 123 Figure 123 Emulex LightPulse BIOS Utility Screen ...

Страница 110: ...to reboot the system and save your changes Figure 124 Figure 124 Saving Emulex LightPulse BIOS Settings Set the Boot Device Now set the boot device Note that the settings for the 8 Gbps 12002 and the 16 Gbps 16002 devices are identical 1 Select a connected boot device from the Fibre Channel port and then press the Enter key Figure 125 ...

Страница 111: ...liates All rights reserved This document is Cisco Public Page 111 of 146 Figure 125 BIOS Device Settings 1 2 In the main menu select Configure Boot Devices and then press the Enter key Figure 126 Figure 126 BIOS Device Settings 2 ...

Страница 112: ...eserved This document is Cisco Public Page 112 of 146 3 Select Primary Boot and then press the Enter key Figure 127 Figure 127 BIOS Device Settings 3 4 Select the boot device in this case FUJITSU ETERNUS_DXL and then press the Enter key Figure 128 ...

Страница 113: ... 2017 Cisco and or its affiliates All rights reserved This document is Cisco Public Page 113 of 146 Figure 128 BIOS Device Settings 4 5 The device information is displayed Press the Enter key Figure 129 ...

Страница 114: ...sco and or its affiliates All rights reserved This document is Cisco Public Page 114 of 146 Figure 129 BIOS Device Settings 5 6 Select the device that is registered Figure 130 Figure 130 BIOS Device Settings 6 ...

Страница 115: ...rights reserved This document is Cisco Public Page 115 of 146 7 Select Boot this device via WWPN and then press the Enter key Figure 131 Figure 131 BIOS Device Settings 7 The boot device is added Figure 132 Figure 132 BIOS Device Settings 8 ...

Страница 116: ...8 Press the Enter key From the main menu select Scan for Target Devices and then press the Enter key Figure 133 Figure 133 BIOS Device Settings 9 The search results for the boot device are displayed Figure 134 Figure 134 BIOS Device Settings 10 9 Press the Esc key to return to the main menu Figure 135 ...

Страница 117: ...n return to the Device Manager 11 For a multipath configuration configure the settings described earlier in the sections from Start the HBA Setup Utility to Set the Link Speed and Topology for all the HBAs connected to the SAN storage unit LUN from which the system is started Also after installing the OS and multipath driver perform the operation described in the section Set the Boot Device for al...

Страница 118: ... you complete the installation of the OS and multipath driver If the server is in a multipath connection state the OS cannot be installed correctly Manually disconnect the secondary Fibre Channel path before you begin the installation disconnect the secondary cable of each server Install the OS and Bundled Software If the OS supports UEFI mode you can install it in this mode using the following pr...

Страница 119: ...directory 3 For information about how to install OCManager refer to the installation procedure for the original equipment manufacturer OEM driver Note One end of the Fibre Channel cable is still off the connector at this point Install the Multipath Driver Install the multipath driver For the installation procedure refer to the manual for the multipath driver that you are using Restore the Multipat...

Страница 120: ...s 8 Gbps Fibre Channel Card and 16 Gbps Fibre Channel Card for more information 2 From the Boot Manager main page select Boot Maintenance Manager Boot Options Set Legacy HardDisk Drive Order 3 Review the screen Figure 137 If multiple HDDs are not listed you need to recover the multipath connection Figure 137 Set Legacy HardDisk Drive Order Menu Multipath 4 After confirming the existence of multipl...

Страница 121: ...hts reserved This document is Cisco Public Page 121 of 146 SLES 11 and 12 Installation iSCSI After the system has been prepared for iSCSI or SAN boot you can install the OS 1 Boot the system Figures 138 and 139 Figure 138 Booting the System 1 ...

Страница 122: ...iliates All rights reserved This document is Cisco Public Page 122 of 146 Figure 139 Booting the System 2 2 After the Cisco C880 M4 reboots the installation option for SLES appears Select it Figure 140 Figure 140 Installing SLES ...

Страница 123: ...l release a SAP HANA OS release matrix soon Not all available OS releases are supported for all SAP HANA releases Verify the Driver Specification The only driver that is dependent on the system is the Emulex Fibre Channel driver This driver must match the installed firmware on the Emulex controller Explicitly check which driver must be used for the installed firmware of the Emulex controller All o...

Страница 124: ...g boot kdump off linux chkconfig boot md off linux chkconfig boot lvm off linux chkconfig lvm_wait_merge_snapshot off linux chkconfig postfix off linux chkconfig smartd off linux chkconfig smb off linux chkconfig smbfs off linux chkconfig splash off linux chkconfig splash_early off linux chkconfig xdm off linux chkconfig ntp on Bond Linux Ethernet Interfaces You usually must have a redundant netwo...

Страница 125: ...ame bus pci 0000 00 0c 0 ifcfg eth1 BOOTPROTO none MTU 9000 NAME vNIC REMOTE_IPADDR STARTMODE off UNIQUE rBUF FgrwMRwr45 USERCONTROL no _nm_name bus pci 0000 00 0d 0 ifcfg bond0 BOOTPROTO static BROADCAST 172 16 32 255 IPADDR 172 16 32 10 MTU 9000 NETMASK 255 255 255 0 NETWORK 172 16 32 0 REMOTE_IPADDR STARTMODE onboot BONDING_MASTER yes BONDING_MODULE_OPTS mode 1 miimon 100 BONDING_SLAVE0 bus pci...

Страница 126: ...erver01 Last login Mon Jan 9 15 00 57 2012 from mgmtsrv02 cisco hana corp server01 sysctl conf Use the following configuration Controls IP packet forwarding net ipv4 ip_forward 0 Do not accept source routing net ipv4 conf default accept_source_route 0 Controls the use of TCP syncookies net ipv4 tcp_syncookies 1 fs inotify max_user_watches 65536 kernel shmmax 9223372036854775807 kernel sem 1250 256...

Страница 127: ...v4 icmp_echo_ignore_broadcasts 1 net ipv4 conf default accept_source_route 0 net ipv4 tcp_rmem 65536 16777216 16777216 net ipv4 tcp_wmem 65536 16777216 16777216 net ipv4 conf default accept_source_route 0 net ipv4 tcp_syncookies 0 net ipv4 tcp_dsack 0 net ipv4 tcp_no_metrics_save 1 net ipv4 tcp_moderate_rcvbuf 1 net ipv4 tcp_window_scaling 1 net ipv4 tcp_timestamps 1 net ipv4 tcp_sack 1 sunrpc tcp...

Страница 128: ...rv01 vi etc ntp conf server CUSTOMER_NTP_Server Generall Time Server server 127 0 0 1 Timeserver for the Appliance fudge 127 127 1 0 stratum 10 LCL is unsynchronized mgmtsrv01 ntpq p remote refid st t when poll reach delay offset jitter timehost3 wdf s PPS 1 u 61 64 377 0 954 1 137 4 382 localhost STEP 16 l 64 0 0 000 0 000 0 000 mgmtsrv02 Configure all application nodes as follows server01 ntpq p...

Страница 129: ... Setup Network File System You need to define the volumes on the NAS system The recommended approach is to split the data and log volumes between the two storage systems Refer to NetApp TR 4290 for detailed storage information Figure 142 Volume Layout Figure 143 shows the volume layout for the NetApp FAS8040 ...

Страница 130: ...s xfs f b size 4096 dev sapdatavg logvol mkfs xfs f b size 4096 dev sapdatavg sapmnt etc fstab DEVICE data lun hana data xfs nobarrier noatime nodiratime logbufs 8 logbsize 256k async 1 2 DEVICE log lun hana log xfs nobarrier noatime nodiratime logbufs 8 logbsize 256k async 1 2 DEVICE shared lun hana shared xfs defaults 1 2 etc after local bin bash c Cisco Systems Inc 2014 after local Performance ...

Страница 131: ...NA IMDB Notes SAP Note 1730999 Configuration changes in SAP HANA appliance SAP Note 1514966 SAP HANA 1 0 Sizing SAP In Memory Database SAP Note 1780950 Connection problems due to host name resolution SAP Note 1780950 SAP HANA SPS06 Network setup for external communication SAP Note 1743225 SAP HANA Potential failure of connections with scale out nodes SAP Note 1755396 Released disaster tolerant sol...

Страница 132: ...ID SAP Note 1577128 Supported clients for SAP HANA 1 0 SAP Note 1808450 Homogenous system landscape for SAP HANA BW Notes About Third Party Software SAP Note 1730928 Using external software in a SAP HANA appliance SAP Note 1730929 Using external tools in an SAP HANA appliance SAP Note 1730930 Using antivirus software in an SAP HANA appliance SAP Note 1730932 Using backup tools with Backint for SAP...

Страница 133: ...ains the two configuration files located in the C880_HA_Scripts tar package Copy both files to hana shared HA and adapt the user settings At the Cisco C880 M4 console prepare the script to match the configured IPMI user name and password The default settings are ipmi user sapadm and ipmi user password cisco linux mkdir hana shared HA linux cd hana shared HA linux tar xvf tmp C880_HA_Scripts tar li...

Страница 134: ...ANA global hdb custom config ls l rw r 1 anaadm sapsys 90 Feb 15 11 22 global ini rw rw r 1 anaadm sapsys 9560 Feb 15 11 23 hdbconfiguration_1 drwxr x 3 anaadm sapsys 4096 Feb 15 11 22 lexicon rw r r 1 anaadm sapsys 128 Feb 15 12 34 nameserver ini server01 hana shared ANA global hdb custom config server01 hana shared ANA global hdb custom config vi global ini persistence basepath_datavolumes hana ...

Страница 135: ...server04 ipmi 192 168 76 38 server02 ipmi server02 ipmi mgmtsrv01 opt Cisco scripts The Python class will be called from the master name server of the SAP HANA database Therefore the Python class must be mentioned in the global ini file Autostart SAP HANA If you prefer to have the SAP HANA system started automatically after a reset you can enable the autostart function in the instance profile of S...

Страница 136: ...nagement IP addresses are in the etc host file of the appliance mgmtsrv01 opt Cisco scripts grep ipmi etc hosts 192 168 76 28 server03 ipmi server03 ipmi 192 168 76 29 server01 ipmi server01 ipmi 192 168 76 37 server04 ipmi server04 ipmi 192 168 76 38 server02 ipmi server02 ipmi mgmtsrv01 opt Cisco scripts If the SAP HANA master name server is killing one of the nodes a status message is written i...

Страница 137: ...ates All rights reserved This document is Cisco Public Page 137 of 146 From the SAP HANA Studio failover will look like Figures 143 through 146 Figure 143 Normal Operation Figure 144 Failover Detected Figure 145 Failover Initiated ...

Страница 138: ...00 To optimize the internode traffic the MTU value needs to be 9000 which is already set in the storage VLAN in this example VLAN 220 Hence you need to change the traffic to the access VLAN as shown here Figure 147 As part of setting up a distributed system you need to configure the network parameters Make sure that you do this before you add hosts because one server needs to be available so that ...

Страница 139: ... 2017 Cisco and or its affiliates All rights reserved This document is Cisco Public Page 139 of 146 Figure 147 ...

Страница 140: ...TX OK TX ERR TX DRP TX OVR Flg eth0 1500 0 335051 0 94 0 192786 0 0 0 BMRU eth1 1500 0 160 0 0 0 15 0 0 0 BMRU eth2 9000 0 91 0 0 0 12 0 0 0 BMRU eth3 9000 0 87 0 0 0 11 0 0 0 BMRU eth4 9000 0 1181301 0 0 0 3183694 0 0 0 BMRU eth5 9000 0 35809384 0 0 0 48992286 0 0 0 BMRU eth6 1500 0 85 0 0 0 11 0 0 0 BMRU eth7 9000 0 700 0 0 0 735 0 0 0 BMRU eth8 9000 0 86 0 0 0 11 0 0 0 BMRU lo 16436 0 308 0 0 0...

Страница 141: ...hostnameResolution internal For more information see http help sap com saphelp_hanaplatform helpdata en 32 c22f81e8c14268a4e5de01cd033e8f content htm http help sap com saphelp_hanaplatform helpdata en 0c 6738ab85c64da1aed0fa91c25ed47c content htm linux1 sapcontrol nr 42 function GetSystemInstanceList 04 10 2013 12 20 21 GetSystemInstanceList OK hostname instanceNr httpPort httpsPort startPriority ...

Страница 142: ...uster data ONTAP to archive the KPIs You should download the latest SAP HANA Hardware Configuration Check Tool HWCCT from the SAP marketplace After parsing the test persist the settings in the database These files show the necessary test parameters OS Validation report_id ntap_evalos use_hdb false blades cishana01 tests package LandscapeTest test_timeout 0 id 1 config class EvalOs Storage Test Not...

Страница 143: ...it on async_write_submit_active on max_parallel_io_requests 128 async_write_submit_blocks all duration long class LogVolumeIO id 2 package FilesystemTest test_timeout 0 config mount cishana01 hana data ANA mnt00001 para async_read_submit on async_write_submit_active on max_parallel_io_requests 128 async_write_submit_blocks all duration long class DataVolumeIO Configure the settings to persist in t...

Страница 144: ... must collect all the data files cishana01 usr sap ANA HDB00 ls lR hana data ANA hana data ANA drwxr x 5 anaadm sapsys 4096 Aug 28 01 33 mnt00001 hana data ANA mnt00001 hdb00001 rw rw r 1 anaadm sapsys 342114304 Sep 3 18 41 datavolume_0000 dat hana data ANA mnt00001 hdb00002 rw r r 1 anaadm sapsys 3473588224 Sep 3 18 42 datavolume_0000 dat hana data ANA mnt00001 hdb00003 rw r r 1 anaadm sapsys 341...

Страница 145: ...vailable 1 host cishana01 port 030001 NameServer ActiveYes pid 30859 2 host cishana01 port 030002 Preprocessor ActiveYes pid 30987 cishana01 usr sap ANA HDB00 hdbparam paramset fileio hana data ANA mnt00001 hdb00001 async_write_submit_active on Following servers available 1 host cishana01 port 030001 NameServer ActiveYes pid 30859 2 host cishana01 port 030002 Preprocessor ActiveYes pid 30987 cisha...

Страница 146: ... http www cisco com en US docs unified_computing ucs hw chassis install quadblade pdf Cisco Nexus 5000 Series Switches hardware installation guide http www cisco com en US docs switches datacenter nexus5000 hw installation guide n5k_hig pdf Cisco Nexus 2000 Series Fabric Extenders hardware installation guides http www cisco com en US docs switches datacenter nexus2000 hw installation guide N2KFEX_...

Отзывы: