background image

22

GB

1.Cleaning

Use only a less wet cloth for cleaning. Caution: Never use benzene, thinner or other aggressive cleaning agents for surface cleaning as this dama

-

ge caused. The device is only for private home use and for use suitable indoors. Keep the unit clean and moisture from the device.

2.Storage

Plug out the power supply unit while intending the unit for more than 4 weeks not to use. Push the saddle slide toward the handlebar and the 

seat support tube as deeply as possible into the frame. Choose a dry storage in-house and put some spray oil to the pedal bearings left and right. 

Cover the bike to protect it from being discolor by any sunlight anddirty through dust.

3.Checks

We recommend every 50 hours to review the screw connections fortightness, which were prepared in the assembly. Every 100 operating hours, 

you should put some spray oil at the pedal bearings left andright.

If you cannot solve the problem with the following information, please contact the authorized service center.

CLEANING, CHECKS AND STORAGE OF THE ERGOMETER BIKE:

TROUBLESHOOTING

Problem

Possible Cause

Solution

Computer has no value at Dis

-

play if you press any key.

No power adapter is well plugged or wall 

power is without power.

Check that the power adapter is properly plugged in, possibly 

with another electric device check if the wall power is fine.

Computer is not counting data 

and do not switch on after start 

cycling.

Sensor impulse missing base on not well 

plugged connection

Check the plug connections at computer and inside of handle

-

bar support.

Computer is not counting data 

and do not switch on after start 

cycling.

Sensor impulse missing base on not cor

-

rect position of sensor.

Take off the cover and check the distance between magnet and 

Sensor. The magnet at turning belt wheel should have only less 

than < 5mm distance against the sensor position.

No pulse value

Pulse cable is not plugged in.

Check the separately pulse cable is well connected with compu

-

ter.

No pulse value

Pulse sensors not well connected.

Screw out the screw for pulse measurement and check if plugs 

are well connected and no damage at pulse cable.

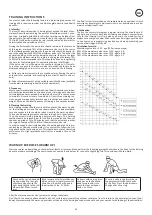
Training area in mm

(for home trainer and user)

Free area in mm

(Training area and security area

(rotating 60cm))

Содержание 2091

Страница 1: ...1 RST 3200 HEIMSPORT TRAININGSGERÄT ERGOMETER DE GB Montage und Bedienungsanleitung Bestell Nr 2091 RST 3200 Assembly and exercise instructions Order No 2091 RST 3200 Seite 2 14 Page 15 26 ...

Страница 2: ...schfeste Sohle besitzen 12 ACHTUNG Wenn Schwindelgefühle Übelkeit Brustschmerzen und andere abnormale Symptome wahrgenommen werden das Training abbrechen und an einen geeigneten Arzt wenden Achtung Vor Benutzung Bedienungs anleitung lesen 13 Generell gilt dass Sportgeräte kein Spielzeug sind Sie dürfen daher nur bestimmungsgemäß und von entsprechend informierten und unterwiesenen Personen benutzt ...

Страница 3: ...3 MONTAGEÜBERSICHT ASSEMBLY OVERVIEW DE GB ...

Страница 4: ...gscheibe 12 einem Feder ring 13 und einer Hutmutter 11 Ziehen Sie dieher gestellte Verbindung fest 3 Montieren Sie den Transportgriff 49 am hinteren Fuß 7 mittels der Schrauben M8x75 50 gebogenen Unterlegscheiben 12 und Federringen 13 4 Drehen Sie den Gummifuss 28 in den Grundrah men 1 an entsprechender Stelle ein und sichern Sie die Position durch Festziehen der Mutter 23 Nach Beendigung der Gesa...

Страница 5: ...entsprechen der Richtung durch die Sitzaufnahme 2 Achten Sie dabei auf die richtigen Befestigungspunkte vorne und hinten 3 Legen Sie die Sitzschiene 4 mit Sitzaufnahme 2 in die Aufnahmen am Grundrahmen 1 ein sodass die Bohrungen fluchten Schrauben Sie mittels der Schrauben M8x16 14 Federringen 13 und Unter legscheiben 8 16 15 die Sitzschiene 4 am Grund rahmen 1 fest SCHRITT 3 Montage der Computera...

Страница 6: ...xtremitäten stärkt das Herz Kreislaufsystem und fördert somit die Gesamtfitness des Körpers SCHRITT 7 Montage des Sitzpolsters 36 und des Rückenpols ters 37 an der Sitzaufnahme 2 1 Legen Sie das Sitzpolster 36 auf die Sitzaufnahme 2 sodass die Bohrungen von Sitzaufnahme 2 und die Gewinde im Sitzpolster 36 übereinstimmen 2 Stecken Sie auf die Schrauben M8x16 14 je eine Unterlegscheibe 8 16 15 und s...

Страница 7: ...verbrauch Die Entfernung kann von 1 999 km eingegeben werden Mittels der Durchschnittswerte errechnet der Computer die Kalorien die in Kcal angezeigt werden Zum Umrechnen der verbindlichen Maßeinheit für Energie Joule in die allgemein gebräuchlichen Angabe Kalorien ver wenden Sie die folgende Formel 1Joule 0 239 cal bzw 1cal 4 186J Der Kalorienverbrauch kann von 10 990 kcal eingegeben werden Die Z...

Страница 8: ... ist oder es eine Störung in der Widerstandsein stellung gibt Überprüfen Sie alle Kabelverbindungen besonders an den Steckern Nach Behebung des Fehlers die Start Stop Taste 3 Sek ge drückt halten um das System auf 0 zurückzusetzen Programm Manual Dieses Programm entspricht den Funktionen eines normalen Heimtrai ners So werden hier die Zeit die Geschwindigkeit die U min die Ent fernung die Wattleis...

Страница 9: ...ommt leicht mit Wasser anfeuchten um die Transmis sion zu verbessern e Überprüfen ob die im Sender befindliche Batterie leer ist und diese ggf austauschen f Batterien einmal herausnehmen und wieder einsetzen Werden gleichzeitig beide Pulsmessverfahren angewendet z B Sie tragen einen Brustgurt und legen gleichzeitig Ihre Hände auf die Handpuls Sensoren so hat die Handpulsmessung Vorrang START Taste...

Страница 10: ...rschleißteilen oder Beschädigungen durch missbräuchliche oder un sachgemäße Behandlung Gewaltanwendung und Eingriffen die ohne vorherige Absprache mit unserer Service Abteilung vorgenommen wer den erlischt die Garantie Problem Mögliche Ursache Lösung Der Computer schaltet sich durch Drücken einer Taste nicht ein Kein Netzteil eingesteckt oder die Steck dose führt keine Spannung Überprüfen Sie ob d...

Страница 11: ...ch gymnastische Übungen über eine Dauer von fünf bis zehn Minuten möglich Danach sollte das eigent liche Training Trainings Phase beginnen Die Trainingsbelastung sollte erst einige Minuten gering sein und dann für eine Periode von 15 bis 30 Minuten so gesteigert werden daß sich der Puls im Bereich zwischen 70 und 85 des Maximalpulses befndet Um den Kreis lauf nach der Trainings Phase zu unterstütz...

Страница 12: ...tung der Grenzwerte wird angezeigt Fitness Test Anzeige Geeignet bis zu einem Körpergewicht von max 150 kg Art Nr Stellmaße cm Gerätegewicht kg Trainingsplatzbedarf m2 Stand der technische Daten 2091 37 2 5 136 x 64 x 107 27 11 2020 0 5 10 15 20 25 30 40 50 60 70 80 90 100 Top Sports Gilles GmbH Friedrichstraße 55 42551 Velbert Telefon 49 0 20 51 60 67 0 Telefax 49 0 20 51 60 67 44 e mail info chr...

Страница 13: ...T 57 Schraube 4x10 8 55 56 36 9836 22 BT 58 Sicherungsring C17 2 62 36 9211 33 BT 59 Kugellager 6003Z 2 1 39 9947 60 Wellscheibe 17 25 1 62 36 9918 22 BT 61 Tretkurbelscheibe 1 62 36 1213 15 BT 62 Tretkurbelachse 1 59 33 1826 10 SI 63 Selbstsichernde Mutter M8 5 14 67 39 9981 64 Stellmotor 1 1 43 36 1721 09 BT 65 Flachriemen 1 61 85 36 1213 16 BT 66 Spannrolle 1 67 36 9211 28 BT 67 Spannrollenbüge...

Страница 14: ...14 DE NOTIZEN ...

Страница 15: ...feet firmly and must have non slip soles 12 WARNING If you notice a feeling of dizziness sickness chest pain orother abnormal symptoms stop training and consult a doctor Attention Before use read operating instructions 13 Never forget that sports machines are not toys This appliance can beused by children aged from 8 years and above and persons with reducedphysical sensory or mental capabilities o...

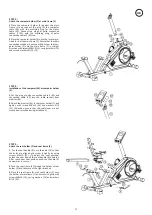
Страница 16: ...ear foot 7 with screws M8x75 50 Curved washers 12 and spring washers 13 4 Screw in the rubber foot 28 into the appropria te threat of main frame 1 and secure position with nut 23 After assembly has been completed you can compensate for minor irregularities in the floor by turning the wheel at end cap 26 and rubber foot 28 The equipment should be set up that the equip ment does not move of its own ...

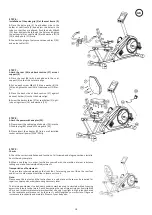
Страница 17: ...nwards to secure 2 Push the seat frame 4 through the holder of seat holder 2 and take care of the right direction 3 Place the seat frame 4 with seat holder 2 onto the holder of mainframe 1 and screw it tightly with screws M8x16 14 spring washers 13 and washers 8 16 15 STEP 3 Attach the computer holder 5 at main frame 1 1 Place the computer holder 5 against the main frame 1 and connect the plug for...

Страница 18: ...scles of legs and increase cardio capacity and maintain fitness of your body also STEP 7 Attach the seat 36 and back cushion 37 at seat support 2 1 Place the seat 36 with back side onto the seat support 2 so that the holes are align 2 Put on each screw M8x16 14 one washer 8 16 15 and tighten the seat 36 at seat support 2 firm ly 3 Place the back side of back cushion 37 against den seat holder 2 so...

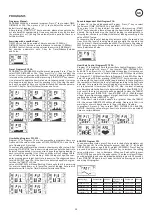
Страница 19: ...power display show in Watt Preset range 30 350Watt only in Watt program P16 RPM SPEED KMH Indicates RPM or Speed alternately or permanently by pressing the F key The RPM display shows the cycle turnings per minute The speed display show kilometers per hour DIST CAL Indicates Distance or Calorie alternately or permanently by pressing the F key The distance display show kilometer Preset range 1 999k...

Страница 20: ...inish setting press START STOP key and hold the pulse sensor Then the display will show your body fat data and your individual body fat program in 10 seconds Press START STOP again to exit body fat test and press again to start exercising this program Programm Manual PROGRAM MANUAL is a manual program Press F key to select TIME DISTANCE or CAL Then press or key to adjust the values The default lev...

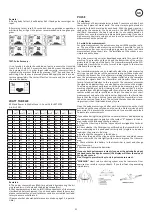
Страница 21: ...mitter of the pulse measuring unit is positioned correctly and is legible to a person looking at the person in training c Ensure that the computer is switched on d Moisten the part of the strap neat the transmitter and which comes into contact with the skin lightly with water to improve the transmis sion e Check whether the battery in the transmitter is spent and change this if necessary f Remove ...

Страница 22: ... AND STORAGE OF THE ERGOMETER BIKE TROUBLESHOOTING Problem Possible Cause Solution Computer has no value at Dis play if you press any key No power adapter is well plugged or wall power is without power Check that the power adapter is properly plugged in possibly with another electric device check if the wall power is fine Computer is not counting data and do not switch on after start cycling Senso...

Страница 23: ...tic exercises lasting five to ten minutes Then the actual training training phase should begin The training exertionshould be relatively low for the first few minutes and then rai sed over a period of 15 to 30 minutes such that the pulse rate reaches the region of between70 to 85 of the maximum pulse rate In order to support the circulation after the training phase and to pre ventaching or straine...

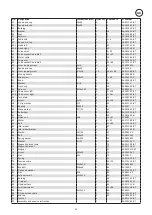
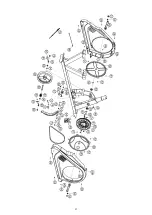
Страница 24: ... 64 x 107 27 11 2020 0 5 10 15 20 25 30 40 50 60 70 80 90 100 Top Sports Gilles GmbH Friedrichstraße 55 42551 Velbert Telefon 49 0 20 51 60 67 0 Telefax 49 0 20 51 60 67 44 e mail info christopeit sport com www christopeit sport com No Designation Dimensions mm Quantity Attached to ET number 1 Main frame 1 33 1826 01 SW 2 Seat frame 1 4 33 1826 02 SW 3 Hand grip 1 2 33 1826 03 SW 4 Seat rail 1 1 3...

Страница 25: ...36 2091 04 BT 57 Screw 4x10 8 55 56 36 9836 22 BT 58 C Clip washer C17 2 62 36 9211 33 BT 59 Bearing 6003Z 2 1 39 9947 60 Wave washer 17 25 1 62 36 9918 22 BT 61 Belt wheel 1 62 36 1213 15 BT 62 Axle 1 59 33 1826 10 SI 63 Nylon nut M8 5 14 67 39 9981 64 Motor 1 1 43 36 1721 09 BT 65 Belt 1 61 85 36 1213 16 BT 66 Idler wheel 1 67 36 9211 28 BT 67 Idler wheel bracket 1 1 33 1212 03 SI 68 Washer 10 2...

Страница 26: ...26 GB NOTES ...

Страница 27: ...27 ...

Страница 28: ... Service Abteilung Internet Service und Ersatzteilportal www christopeit service de 11 2020 Druckfehler vorbehalten Top Sports Gilles GmbH Friedrichstrasse 55 D 42551 Velbert Tel 49 0 2051 6067 0 Fax 49 0 2051 6067 44 info christopeit sport com http www christopeit sport com by Top Sports Gilles GmbH D 42551 Velbert Germany ...

Отзывы: