17
GB
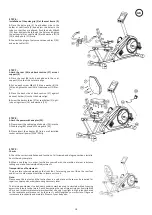
STEP 4:
Installation of the computer (44) at computer holder
(5).
1.
Put the plug of pulse connection cable 3 (45) and
connection cable (30) into the cable sockets from
monitor (44).
2.
Attach the monitor (44) to computer holder (5) and
tighten with screws M4x10 (24) and washers 4//8
(52). (Attention: Ensure that the cable loom are not
crunched or pinched during installation.)
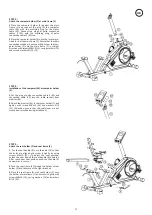
STEP 5:
Attach the seat holder (2) and seat frame (4).
1.
Put the seat handle (8) onto the axle (19) so that
the holes are aligned and screw it tightly by using
screws M6x10 (22). (To adjust the seat position,
unlock the seat by pull the seat handle (8) upwards.
After reach new seat position push seat handle (8)
downwards to secure.)
2.
Push the seat frame (4) through the holder of seat
holder (2) and take care of the right direction.
3.
Place the seat frame (4) with seat holder (2) onto
the holder of mainframe (1) and screw it tightly with
screws M8x16 (14), spring washers (13) and washers
8//16 (15).
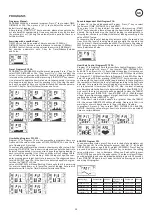
STEP 3:
Attach the computer holder (5) at main frame (1).
1.
Place the computer holder (5) against the main
frame (1) and connect the plug for the computer
cable (30) with the matching plug for the motor
cable (42). Connect the plugs of pulse connection
cables 3 (45) with the matching plug of pulse
connection cables 2 (42) too.
2.
Place the computer holder (5) onto the locator pro
-
vided for it at the mainframe (1). Ensure that the cable
connections made are not squashed. Screw the com
-
puter holder (5) onto the main frame (1) in straight
direction with screws M8x16 (14), spring washers (13)
and curved washers 8//20 (12).
Содержание 2091
Страница 3: ...3 MONTAGEÜBERSICHT ASSEMBLY OVERVIEW DE GB ...
Страница 14: ...14 DE NOTIZEN ...
Страница 26: ...26 GB NOTES ...
Страница 27: ...27 ...


