


15
GB
CONTENT
IMPORTANT RECOMMENDATIONS AND
SAFETY INSTRUCTIONS
Dear customer,
We congratulate you on your purchase of this home training sports unit
and hope that we will have a great deal of pleasure with it. Please take
heed of the enclosed notes and instructions and follow them closely
concerning assembly and use.
Please do not hesitate to contact us at any time if you should have any
questions.
Top-Sport Gilles GmbH
Our products are all tested and therefore represent the highest current
safety standards. However, this fact does not make it unnecessary to
observe the following principles strictly.
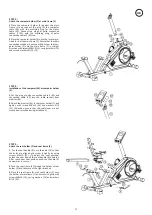
1.
Assembly the machine exactly as described in the installation
instructionsand use only the enclosed, specific parts of the machine.
Before assembling,verify the completeness of the delivery against
the delivery notice and thecompleteness of the carton against the
assembly steps in the installationand operating instructions.
2.
Before the first use and at regular intervals (approximately every
50 Operating hours) check the tightness of all screws, nuts and other
connections andthe access shafts and joints with some lubricant
so that the safe operatingcondition of the equipment is ensured. In
particular, the adjustment of saddleand handlebar need smooth
function and good condition.
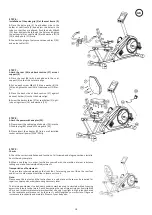
3.
Set up the machine in a dry, level place and protect it from moisture
andwater. Uneven parts of the floor must be compensated by suitable
measuresand by the provided adjustable parts of the machine if such
are installed.Ensure that no contact occurs with moisture or water.
4.
Place a suitable base (e.g. rubber mat, wooden board etc.) beneath
themachine if the area of the machine must be specially protected
againstindentations, dirt etc.
5.
Before beginning training, remove all objects within a radius of 2
metresfrom the machine.
6.
Do not use aggressive cleaning agents to clean the machine
and employonly the supplied tools or suitable tools of your own to
assemble the machineand for any necessary repairs. Remove drops of
sweat from the machineimmediately after finishing training.
7. WARNING!
Systems of the heart frequency supervision can
be inexact.Excessive training can lead to serious health damage or
to the death. Consulta doctor before beginning a planned training
programme. He can definethe maximum exertion (pulse, Watts,
duration of training etc.) to which youmay expose yourself and can
give you precise information on the correctposture during training,
the targets of your training and your diet. Nevertrain after eating large
meals.
8.
Only train on the machine when it is in correct working order. Use
originalspare parts only for any necessary repairs.
WARNING!
Replace
the wormparts immediately and keep this equipment out of use until
repaired.
9.
When setting the adjustable parts, observe the correct position
and themarked, maximum setting positions and ensure that the newly
adjustedposition is correctly secured.
10.
Unless otherwise described in the instructions, the machine must
onlybe used for training by one person at a time. The exercise time
should notovertake 90 min./daily.
11.
Wear training clothes and shoes which are suitable for fitness
trainingwith the machine. Your clothes must be such that they cannot
catch during training due to their shape (e.g. length). Your training
shoes should beappropriate for the trainer, must support your feet
firmly and must have non-slip soles.
12. WARNING!
If you notice a feeling of dizziness, sickness, chest pain
orother abnormal symptoms, stop training and consult a doctor.
Attention:
Before use
read operating
instructions!
13.
Never forget that sports machines are not toys. This appliance can
beused by children aged from 8 years and above and persons with
reducedphysical, sensory or mental capabilities or lack of experience
and knowledge if they have been given supervision or instruction
concerning use ofthe appliance in a safe way and understand the
hazards involved. Children shall not play with the appliance. Cleaning
and user maintenance shall not make by children withoutsupervision.
Take suitable measures to ensure that children never use themachine
without supervision.
14.
The appliance use only to be used with the power supply unit
providedwith the appliance.
15.
Ensure that the person conducting training and other people never
moveor hold any parts of their body into the vicinity of moving parts.
16.
At the end of its life span this product is not allowed to dispose
overthe normal household waste, but it must be given to an assembly
point forthe recycling of electric and electronic components. You may
find the symbolon the product, on the instructions or on the packing.
The materials are reusable in accordance with their marking. With the
re-use,the material utilization or the protection of our environment.
Please ask thelocal administration for the responsible disposal place.
17.
To protect the environment, do not dispose of the packaging
materials,used batteries or parts of the machine as household waste.
Put these inthe appropriate collection bins or bring them to a suitable
collection point.
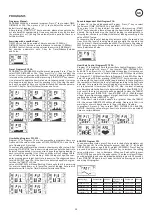
18.
For speed dependent operation mode, the braking resistance level
canbe adjustable manually and the variations of power will depend
on the pedaling speed. For speed independent operation mode, the
user can set thewanted power consumption level in Watt, constant
power level will be keptby various braking resistance levels, that will
be determined automaticallyby system. That is independent on the
pedaling speed.
19.
The machine is equipped with 24-step resistance adjustment. This
makesit possible to reduce or increase the braking resistance and
thereby thetraining exertion. Pressing the button “-” for the resistance
setting towardsstage 1 reduces the braking resistance and thereby
the training exertion.Pressing the button “+” for the resistance setting
towards stage 24 increasesthe braking resistance and thereby the
training exertion.
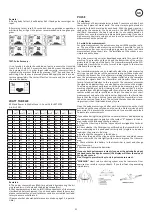
20.
This machine has been tested and certified in compliance with
DIN ENISO 20957-1/2014 and EN 20957-5/2016 “H,A”. The maximum
permissibleload (=body weight) is specified as 150 kg. The classification
of HA meansthis exercise bike is designed foe home use only and with
good accuracyclass, the variations of power consuming are within ±5W
up to 50W and±10% over 50W. This item’s computer corresponds to
the basic demandsof the EMC Directive of 2014/30/EU.
21.
The assembly and operating instructions is part of the product.
If sellingor passing to another person the documentation must be
provided withthe product.
1. Assembly overview
3
2. Content
15
3. Important Recommendations and Safety Instructions
15
4. Assembly Instructions
16-18
5. Computer Instructions
19
6. Programs
20-21
7. WATT Table
21
8. Pulse
21
9. Cleaning, Checks and Storage of the Ergometer bike
22
10. Troubleshooting
22
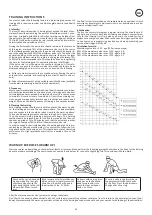
11. Training instructions / Warm up exercises (Warm Up) 23
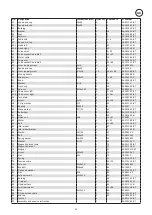
12. Parts List – Spare Parts List
24-25
13. Notes
26
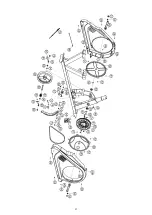
14. Exploded view
27
Содержание 2091
Страница 3: ...3 MONTAGEÜBERSICHT ASSEMBLY OVERVIEW DE GB ...
Страница 14: ...14 DE NOTIZEN ...
Страница 26: ...26 GB NOTES ...
Страница 27: ...27 ...


