background image

3-18

RPMX/RPMSP-D132U & RPMSP-D180U User Manual

020-100245-03 Rev. 1 (11-2010)

Section 3: Operation

If you do 

not

 want to copy the current channel, press 

 to cancel and return to the previous menu. 

F

IGURE

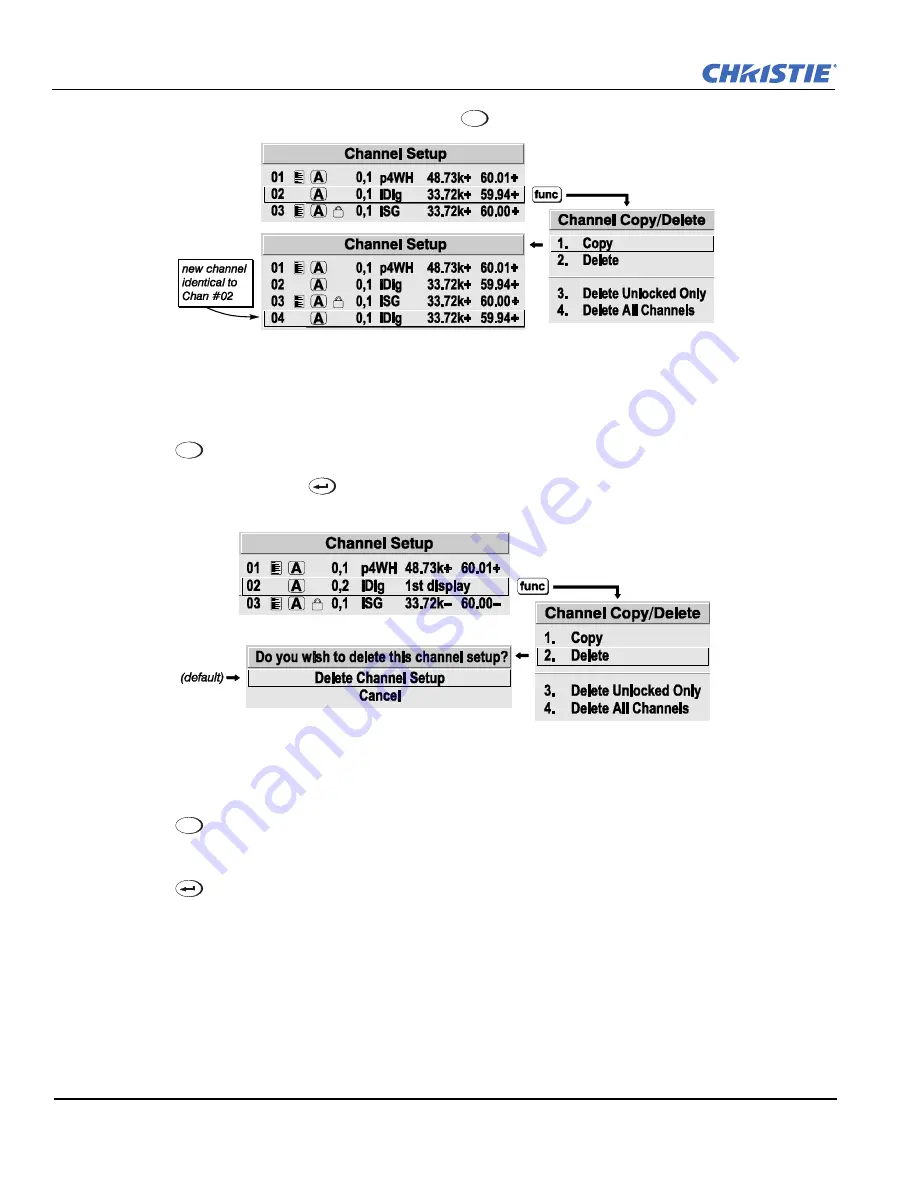
 3-15 C

OPYING


A

 C

HANNEL

Deleting a Channel

1. Highlight the channel in the 

Channel Setup

 menu. 

2. Press 

 to activate the 

Channel Copy/Delete

 submenu. 

3. Select “Delete” and press 

. A confirmation window will appear to verify that you want to delete this 

channel.

F

IGURE

 3-16 D

ELETING


A

 C

HANNEL

DELETING MULTIPLE CHANNELS

1. Highlight any channel in the 

Channel Setup

 menu. 

2. Press 

 to go to the 

Channel Copy/Delete

 submenu. 

3. Select “Delete Unlocked Only”. 

4. Press 

 to delete all unlocked channels. Or select “Delete All Channels” to delete all channels, even 

those that are locked. In either case, the current channel will remain but will be redefined from projector 
defaults. A confirmation window will appear to verify that you want to delete the channels.

Editing a Channel Setup

The 

Channel Setup

 menu lists the basic setups that describe how and where a channel can be accessed. These 

channel setups can be edited in the 

Channel Edit

 submenu.

Exit

Func

Func

Содержание RPMSP-D132U

Страница 1: ...RPMX RPMSP D132U RPMSP D180U U S E R M A N U A L 020 100245 03 ...

Страница 2: ......

Страница 3: ...RPMX RPMSP D132U RPMSP D180U U S E R M A N U A L 020 100245 03 ...

Страница 4: ...g condi tions Performance specifications are based on information available at the time of printing Every effort has been made to ensure accuracy however in some cases changes in the products or availability could occur which may not be reflected in this document Christie reserves the right to make changes without notice or obligation WARRANTY For complete information about Christie s limited warr...

Страница 5: ...cting Multiple Projectors 2 17 2 4 5 Ethernet Network Setup 2 18 2 4 6 Separating Networks 2 19 2 4 7 Communicating to All Ports 2 19 2 4 8 System Integration GPIO Connector 2 20 2 5 Power Connection 2 20 2 5 1 Connecting the projector to AC 2 20 2 5 2 Disconnecting the projector from AC 2 21 3 Operation 3 1 About the Projector 3 1 3 1 1 Projection Head Module 3 1 3 1 2 6 Axis Adjuster 3 1 3 1 3 L...

Страница 6: ...bmenu 3 30 3 7 10 Advanced Image Settings Submenu 3 32 4 Advanced Configuration and Controls 4 1 Language 4 1 4 2 Image Orientation 4 1 4 3 Fade Time 4 1 4 4 Auto Power up 4 1 4 5 Set Date Time 4 2 4 6 Menu Preferences Submenu 4 2 4 7 Communications 4 3 4 7 1 Baud Rates 4 3 4 7 2 Projector 4 3 4 7 3 Network Routing 4 4 4 7 4 Ethernet Settings Submenu 4 5 4 7 5 Broadcast Key 4 6 4 7 6 Front IR Prot...

Страница 7: ... Adjustment Procedure 4 21 4 14 3 Using the Color Saturation Menu for Color Matching 4 23 4 14 4 Achieving Brightness Uniformity 4 23 4 15 Edge Blending SXGA Only 4 27 4 15 1 Edge Blending Procedure 4 29 4 16 Remote Control of the Projector 4 30 4 17 Error Conditions 4 30 4 17 1 User Errors 4 31 4 17 2 Input Signal Errors 4 31 4 17 3 System Warnings Errors 4 32 5 Maintenance 5 1 Warnings and Safet...

Страница 8: ... to Projector A 2 B Dimensions Mounting Information B 1 Horizontal Configuration B 1 B 2 Vertical Configuration B 2 B 3 Horizontal Configuration for SXGA B 3 B 4 D132U Horizontal Configuration for XGA B 4 C System Integration C 1 Configuring the GPIO C 1 C 1 1 Real Time Event C 2 D Optional Input Modules D 1 RGB500 Input Module 38 804606 xx D 1 D 2 RGB400BA Input Module 38 804610 xx D 1 D 3 RGB400...

Страница 9: ...n flexibility each projector can be configured for straight throw or 90 mirrored applications The 6 axis adjustment mechanism enables accurate alignment of the lens to the screen minimizing distortion at all corners and edges of the display A dual lamp hot swappable system allows the projector to operate with minimal downtime The mechanical lamp changer enables an automatic lamp change to occur wh...

Страница 10: ...e Section 7 Specifications for a complete list of product specifications 1 2 How the projector works The user selects which lamp will be in operation through the Lamp Menu Lamp 1 or Lamp 2 After the lamp ignites the light generated is sequentially filtered into the RGB color primaries by the spinning color wheel in the light engine of the projector This filtered light is then presented to the sing...

Страница 11: ... assistance contact your dealer or Christie Digital Systems Fill out the information in the table below and keep with your records for future reference 1 5 1 Purchase Record NOTE The serial number can be found on the license label To register your product on line visit http www christiedigital com Product Resources Service Product Registration This will keep you in touch with all the latest produc...

Страница 12: ......

Страница 13: ...om your projector When designing a projection room consider are you operating single or multiple units the room size lighting and audience seating distance the audience is sitting from the display from which angle the display is viewed These are important when deciding where to place the display or what type and size of screen to use 2 1 1 Screen Size and Type Choose an appropriate screen size for...

Страница 14: ...e Keep the projector away from devices radiating electromagnetic energy such as motors and transformers slide projectors speakers power amplifiers elevators etc Use an optical mirror for rear screen installations to shorten the optical light path and use less space in the projection room When designing a projection room consider positioning the projector and screen for maximum audience coverage an...

Страница 15: ... Internal Cable Connections Remove the lock screw located on the mechanical lamp changer See Figure 2 2 Remove Lamp Changer Lock Screw This screw is used for shipping purposes only and must be removed prior to turning the projector on Failure to do so can result in projector damage Check lamp handles These handles must lay flat against the lamp surface otherwise they will interfere with lamp opera...

Страница 16: ... the light engine and electronics module All disconnects must be made on the light engine side 3 Remove the 6 M4 screws securing the light engine module to the 6 axis adjuster see Figure 2 3 Loosen Light Engine 4 Lift the light engine off the adjuster and set aside 5 Align the shorter end of the L shaped bracket with the mounting holes in the adjuster base as shown in Figure 2 4 Install configurat...

Страница 17: ... 1 11 2010 7 Place the light engine in the lens horizontal position on the L shaped bracket and adjuster base Align the mounting holes between the configuration bracket and light engine and secure using the 6 additional M6 screws provided with the projector 90 FIGURE 2 5 RE POSITION LIGHT ENGINE ...

Страница 18: ...ng holes in the tray to the screen Use the appropriate formula for your projector model when calculating In both vertical and horizontal configurations TD Throw Distance W screen width in millimeters See Figure 2 7 Throw Distance Formula for Lens Horizontal Configuration for an illustration of the formula RPMX D132U For XGA 0 69 1 lens TD 0 69 x W 54 mm RPMSP D132U For SXGA 0 69 1 lens TD 0 69 x w...

Страница 19: ... a first surface mirror is used to shorten the distance between the projector and screen by folding the optical path throw distance is a little more difficult to calculate as there are many variables to consider FIGURE 2 7 THROW DISTANCE FORMULA FOR LENS HORIZONTAL CONFIGURATION FIGURE 2 8 THROW DISTANCE FORMULA FOR LENS VERTICAL CONFIGURATION ...

Страница 20: ...lled at Input 5 if additional connections are required Refer to Appendix D Optional Input Modules Step 5 Turning the projector on and selecting a source A North American rated line cord is provided with this projector For all other regions make sure that you are using a line cord power plug and socket that meet the applicable rating standards Do not use a damaged line cord Before powering on make ...

Страница 21: ...t Lock lens adjustments to prevent unnecessary tampering Step 7 Adjusting image geometry using the 6 axis adjuster The light engine is mounted to the 6 axis adjuster mechanism which can fine tune the geometry of a displayed image by moving and rotating the light engine about the X Y and Z axes For single projectors adjust the 6 axis adjuster until the displayed image fills the screen and appears w...

Страница 22: ... 2 Select a lamp operation mode Perform all setups in the mode you select 3 Select Image Orientation in the Configuration menu and change the orientation of the displayed image to suit the installation 4 Assign projector ID number s 5 Modify options in Menu Preference to suit your display preferences For example select Language to change the menu language to any of the available languages Vertical...

Страница 23: ...Color Wheel Delay if necessary See Section 4 9 6 Color Wheel Calibration Submenu 13 Perform Color Temperature setup 14 Adjust Black levels and Input Levels 15 Adjust Lamp Power to match lamp brightness of adjacent projectors if necessary 16 Adjust color primaries brightness uniformity and edge blending using the detailed procedure provided in Section Section 3 Operation Matching Colors in Multiple...

Страница 24: ...are required If the source provides a composite sync output connect it to the SYNC input labeled HOR COMP If the source provides separate horizontal and vertical sync outputs connect horizontal sync to the SYNC input labeled HOR COMP and connect vertical sync to SYNC input labeled VERT See Figure 2 12 NOTES 1 Depending on the source you may need a custom adapter cable with BNC connectors at the pr...

Страница 25: ...ing the Image FIGURE 2 13 CONNECTING YPBPR DVI Digital Video Use the DVI I connector at INPUT 2 to connect either analog or digital video devices to the projector Use a cable with DVI I connectors at both ends to connect devices that transmit digital and analog video signals such as high quality DVD players satellite receiver and digital cable TVs NOTES 1 To make sure of true digital output from d...

Страница 26: ...te video source INPUT 3 and an S Video source INPUT 4 FIGURE 2 15 CONNECTING COMPOSITE S VIDEO Extra Video To use an extra video source in addition to the video source s connected at input 3 or input 4 connect either a Composite or S video source to input 1 as shown NOTES 1 Do not simultaneously connect composite and s video to input 1 2 You can switch between video sources connected at input 1 an...

Страница 27: ... Direct the projector s IR remote keypad towards the display screen or the projector s IR sensor Alternatively connect a wired tethered version of the remote to the RCA jack labeled REMOTE on the projector s input panel Response to a wired keypad must be enabled in the Communications menu see 3 6 Adjusting System Parameters and Advanced Controls for more information 2 4 2 Serial Port Connections R...

Страница 28: ...TING RS 422 2 4 3 Ethernet Communications To add the projector to an existing Ethernet network connect standard CAT5 Ethernet cable between your Ethernet hardware and the Ethernet port on the side of the projector The project factory default is DHCP enabled an IP address will be ob ta i ed automatically If there is no DHCP server available on the network or if a static IP address for the projector...

Страница 29: ...ating through RS 232 Mixed Network To control multiple projectors with a computer controller having an RS 422 interface first set them all to the same baud rate as your RS 422 controller NOTE You must enable this combination of RS 422 and RS 232 in the Communications menu Set the Network Routing option to RS 232 and RS 422 Joined See Section 3 for details Then chain the projectors together by conn...

Страница 30: ...ch all projectors NOTES 1 To avoid damage connect only properly wired serial communication cables See Appendix C for details 2 Each RS 232 communication cable must be no more than 25 feet in length Use high quality cables 2 4 5 Ethernet Network Setup To add one or more projectors to an Ethernet network use standard CAT5 cable to connect each projector s Ethernet port to a hub belonging to the netw...

Страница 31: ...is enabled If a static IP is used these must be assigned The Default Gateway is an optional router device used to send and receive data outside the subnet The address is provided by the system administrator ArtNet INTERFACE SETTINGS Refer to ArtNet Interface Settings SUBMENU on page 4 5 for additional information about ArtNet settings 2 4 6 Separating Networks By default communications originating...

Страница 32: ...tion Do not attempt operation if the AC supply and cord are not within the specified voltage and power range A North American rated line cord is provided with this projector For all other regions make sure that you are using a line cord power plug and socket that meet the appropriate rating standards Do not use a line cord that is damaged 2 5 1 Connecting the projector to AC Plug an appropriately ...

Страница 33: ... the internal cooling fans to stop before turning the main power switch on the electronics module OFF This allows the lamps enough time to cool Unplug the line cord from the wall outlet Refer to Section 7 Specifications for complete details on all power requirements for the projector Wait for the cooling fans to stop before turning the main power switch OFF and unplugging the projector ...

Страница 34: ......

Страница 35: ...on head module PHM contains the projection lens IR sensor color wheel DMD lamps and other optical components The PHM is mounted to the 6 axis adjustment mechanism in a lens vertical 90 degree configuration at the factory It can be removed and positioned in a lens horizontal 0 degree configuration with the configuration bracket that comes standard with the projector 3 1 2 6 Axis Adjuster The 6 axis...

Страница 36: ... connections are made to the main input panel Use INPUT1 to connect RGB and YPbPr sources INPUT 2 for analog or digital display signals INPUT 3 for composite video INPUT 4 to connect S video INPUT 5 to install one of the available optional input modules Refer to Appendix D Optional Input Modules for a list of modules For more details on connecting sources refer to 2 4 Connecting Sources Status Dis...

Страница 37: ...commended empty space around the projector This will make sure there is sufficient air flow and prevent overheating 3 2 Using the Remote IR Keypad The IR remote keypad uses a battery powered infrared IR transmitter to control the projector Use the IR remote keypad the same way you would use a remote TV or VCR remote When making key presses direct the keypad toward the screen or toward the front of...

Страница 38: ... Rev 1 11 2010 Section 3 Operation Laser radiation is emitted from the laser diode on the remote Do not look directly into the beam of the remote LASER RADIATION DO NOT STARE INTO BEAM LASER DIODE Wavelength 670nm Max Output 1mW CLASS II LASER PRODUCT CAUTION ...

Страница 39: ...32U RPMSP D180U User Manual 3 5 020 100245 03 Rev 1 11 2010 3 2 1 Keypad Commands When using the keypad keep these guidelines in mind Press keys one at a time there are no simultaneous key combinations required FIGURE 3 2 REMOTE KEYPAD ...

Страница 40: ... the lamp cooling fan remains on for approximately 1 2 minutes to cool the lamp 2 Keep the projector OFF for a few minutes Hot re strikes of the lamp may reduce lamp life 3 The projector enforces a 60 second wait between powering OFF and ON to allow the lamp to cool down You will see vertical scrolling bars across the status display during this wait period Test Steps through the internal test patt...

Страница 41: ...plays the composite video source connected to INPUT 3 Input 4 Displays the S video source connected to INPUT 4 Input 5 Displays the source connected to the INPUT 5 interface module installed in the Option 1 slot NOTE With the optional Dual SD HD SDI Module installed at input 5 you can connect two inputs A and B Whether you are displaying from input 5 or from another input press to display the inpu...

Страница 42: ...ss ambient light washes out the image and it becomes difficult to see details in dark areas lower the gamma setting to compensate Menu Press to enter or exit the projector s menu system OSD On screen display Press followed by to hide the projector s menu system during use Invisible menus are fully functional enabling hidden access to numbered features and image adjustments by entering the correspo...

Страница 43: ...enu Preferences menu A checkmark indicates that the projector is connected to a keypad and is listening to commands from that keypad If there is no checkmark you are communicating with a different projector To control a specific projector with the keypad enter the projector s 3 digit number If you switch to another projector the checkmark will disappear When broadcasting to multiple projectors pre...

Страница 44: ...t the screen to highlight an area of the presentation Release it to turn it off The closer you are to the screen the brighter the laser beam appears The laser pointer works best in an environment where ambient lighting can be controlled NOTE The batteries must be in the wired remote keypad for the key to work 3 3 Navigating the Menus FIGURE 3 3 ENTERING THE MENU SYSTEM Press at any time to display...

Страница 45: ...tes of inactivity the menu system closes Press to return to the previous screen Press to leave the menu system and return to the presentation On line Help Displays summary information about the current menu or highlighted option Press again to exit From presentation level press to access general Help Topics Press or to return to your presentation FIGURE 3 5 ACCESSING GENERAL HELP TOPICS Time outs ...

Страница 46: ...DEBAR Slidebars in menus The current value for a given parameter appears to the left of its slidebar adjustment window This number expresses a percentage or units such as pixels degrees Kelvin depending on the option Press to adjust the setting up or down Both the number and the length of the bar change accordingly Hold for continuous adjustment or press to activate a slidebar text box for number ...

Страница 47: ...cter highlighted in a square cursor signifying that this character is ready for editing To navigate the edit window press to move the cursor forward or to move the cursor backwards FIGURE 3 9 ENTERING AND EDITING TEXT To edit a character press and to scroll through the alphabet numbers spaces and punctuation available When the character you need appears press to select it The cursor will move to t...

Страница 48: ...cting an Input or Channel INPUT An input is a source physically connected at the projector describes the source signal according to which input slot it is connected SWITCHING INPUTS Press the appropriate direct key to display from one of the five inputs connected The image will be displayed according to the following If it is the first time you have used the source input or if you used the input b...

Страница 49: ...st see Menu Preferences later in this section To access channels by using on the keypad you must first create the channels 3 4 2 Creating a New Channel Automatic To use a new source with the projector a new channel must be added to the projector memory for it to respond to an input signal from that source A new channel can be created automatically or copied and then edited see 3 4 4 Copying or Del...

Страница 50: ...layed here the first channel in the list is highlighted Defined Channels FIGURE 3 13 ALL CHANNELS APPEAR IN THE CHANNEL SETUP MENU All available channels are listed in the Channel Setup menu which describes how each channel can be accessed and which serves as the gateway for editing copying and deleting channels From the presentation level press to display the Main menu To display the Channel Setu...

Страница 51: ...th the key list and the Channel Setup menu identify signal types in a shortened form as defined in table 3 2 These descriptors indicate what signal information the projector uses to identify a match for a given channel and are preceded by either an i interlaced signals or p progressive signal Table 3 3 Abbreviations for Signal Type 3 4 4 Copying or Deleting Channels Copying channels is a quick met...

Страница 52: ...ING A CHANNEL DELETING MULTIPLE CHANNELS 1 Highlight any channel in the Channel Setup menu 2 Press to go to the Channel Copy Delete submenu 3 Select Delete Unlocked Only 4 Press to delete all unlocked channels Or select Delete All Channels to delete all channels even those that are locked In either case the current channel will remain but will be redefined from projector defaults A confirmation wi...

Страница 53: ...here on the projector s input panel the source is connected IN MENU If checked default except for automatically defined channels with unchanged parameters this defined channel will then appear in the list available when key is pressed If unchecked the channel must be accessed via on the keypad or via the Auto Source function NOTE On screen display of the channel list is an option that must be set ...

Страница 54: ...ey from presentation level to go directly to a particular option without traveling through the menu system NOTE Available for some display parameters only For example press to access the contrast slidebar immediately Press to return to your presentation NOTES 1 To hide these direct slidebars disable the Display Slidebars checkbox in the Menu Preferences menu 2 To hide the entire menu system from v...

Страница 55: ...he width or height of your display Size Position and Blanking parameters automatically adjust or if Blanking is set first define an Active Input Area Resize Preset scaling will occur only in this region of interest Default By default when displaying a new source your image will utilize as much of the projector s display area e g 1400 x 1050 for SXGA as possible for the type of incoming source data...

Страница 56: ...black border the black border areas are unused areas See below Full Size Uses all pixels for displaying the image regardless of source or original aspect ratio Incoming source material having a different aspect ratio than the projector will be stretched for display Full Width Fills the projector s display from left to right without changing the original aspect ratio of the image Depending on the s...

Страница 57: ...vertical stripes or bands across the entire image shows poor pixel tracking Proper pixel tracking makes sure that the image quality is consistent across the screen that aspect ratio is maintained and that pixel phase can be optimized see 3 6 5 Pixel Phase Tracking determines the frequency of the pixel sampling clock indicated by the number of incoming pixels per line so that all pixels generated b...

Страница 58: ...the image right or left within the area of available pixels The value shown represents where the approximate center of the image lies in relation to the total number of pixels available horizontally This varies widely according to the signal watch the image while adjusting 3 6 7 V Position Moves the image up or down within the area of available pixels The value shown represents where the approxima...

Страница 59: ...Plug Play EDID source outputs a signal according to the EDID Extended Display Identifica tion Data information provided by the projector To override this information and display in a different format for example if your Plug Play EDID device does not support the projector s resolution or frequency select the Plug Play EDID resolution from the list Any daisy chained projectors will also display acc...

Страница 60: ...ng that determines how gray shades are displayed between minimum input black and maximum input white for all signals A good gamma setting optimizes blacks and whites while ensuring smooth transitions for the in between values utilized in other colors The overall tone of images can be lightened or darkened without changing the extremes and all images will be more vibrant while still showing good de...

Страница 61: ... how the color components of an analog input signal are decoded for accurate color in the display Useful only for analog signals connected to INPUT 1 INPUT 2 or INPUT 5 Although color space for these analog signals is automatically determined by the projector you may wish to override this and manually set a specific color space NOTE For digital signals or for signals connected to INPUT 3 or INPUT ...

Страница 62: ...e projector automatically detects the incoming horizontal and vertical frequencies and sets the projector s processing of this signal to the corresponding standard The current video standard name appears in the Video Options submenu and includes an A if it is auto detected Press to view or select a different video standard from those available to the projector any that are disabled have frequency ...

Страница 63: ...if black appears crushed when brightness 50 choose 0 IRE If black appears excessively elevated use 7 5 IRE Color Adjusts the color saturation level the amount of color in a video image Lower settings produce less saturated colors for example a setting of 0 produces a black and white image If the color level is too high colors will be overpowering and unrealistic Tint Adjusts the red green color hu...

Страница 64: ...onsecutive white pixels in the image Without these pixels input levels may produce skewed colors particularly in non video images For an unusual source exhibiting one or more overly high blacklevels typically caused by a noisy source causing blacklevel spikes an experienced user can use the Input Levels menu These adjustments serve as a calibration process compensating for differences in sources a...

Страница 65: ...ces For most sources the best clamp location is automatically selected by the projector Use the normal Back Porch location if the image is either sufficiently bright or overly bright Select Sync Tip if the image appears unusually dim if there are horizontal streaks across the image or if there is significant color drift This moves the clamping pulse from the normal back porch location which is lik...

Страница 66: ...esents the last band of the grayscale pattern which is 100 white or the current color if a color is enabled Do not adjust too far 5 Check the black band and adjust the blacklevel slidebar if necessary Blacklevel and Input Drive adjustments are related so you need fine tune them until both bands are optimized 6 Repeat Steps 2 5 with the other two remaining primary colors When each primary color sho...

Страница 67: ...and intensity of each color component in the Color Adjustment by X Y or Color Saturation submenus This is often used with multiple projector applications Select the color adjustment producing the best color accuracy for your application and installation NOTE User 1 is the default setting for all sources and test patterns To configure a User color adjustment gamut use either the Color Adjustment by...

Страница 68: ...l of delay between the input signal and its appearance on screen For applications such as simulation where the feeling of real time image response is a priority a minimum setting is usually preferable NOTE If frame delay is set too low it can cause frame tears Motion Filter Useful for smoothing out moving images from interlaced sources Normally the Motion Filter setting is automatically determined...

Страница 69: ... globe icon alongside the option NOTE The Configuration menu is recommended for experienced users technicians only FIGURE 4 1 CONFIGURATION MENU 4 1 Language Choose from available languages to use in the projector s menus The change will take effect immediately 4 2 Image Orientation Set the orientation of the image according to the orientation of your projector If the setting is incorrect projecte...

Страница 70: ...ars to move the menu to the desired location Avoid locations too close to a corner or edge to prevent cropping of larger menus HORIZONTAL SHIFT AND VERTICAL SHIFT Shift your menus as desired creating a customized menu location DISPLAY CHANNEL LIST Checkmark to see a scroll channel list when you press from your presentation Channels marked with a list icon in the Channel Setup menu will appear here...

Страница 71: ... projector currently in use If the current projector already has a number assigned that number will appear instead Numerical identity for projectors enables you to communicate with a single projector within a multiple projector application see also DISPLAY ERROR MESSAGES Choose how you want to be notified of errors detected in either the incoming signal or projector Select Screen or All to see a b...

Страница 72: ... 232 RS 422 and Ethernet messages on their respective paths instead of being broadcast to the other types of ports In Figure 4 5 Using Network Routing Options A RS 422 controls only the projector to which it is connected In Figure 4 4 Network Routing Options B either RS 232 or RS 422 will control the network RS 232 AND RS 422 JOINED Messages originating from an RS 232 or RS 422 controller will be ...

Страница 73: ...o use a port below 1024 as these ports are typically reserved for and used by common network applications Subnet Mask and Default Gateway The Subnet Mask and Default Gateway are automatically assigned when DHCP is enabled If a static IP is used these must be assigned The Default Gateway is an optional router device used to send and receive data outside the subnet The address is provided by the sys...

Страница 74: ...cutive channels or 10 consecutive channels when not enabled The projector processes requests beginning with the base channel defined here The requests implement these functions DMX CHANNEL FUNCTION VALUE Base Shutter Open 0 64 No Action 65 192 Closed 193 255 Base 1 Slider Lock Locked 0 254 Unlocked 255 Base 2 Input Input 1 8 Base 3 Channel Channel 1 99 Base 4 Lens vertical Lens down 0 Stop 1 124 L...

Страница 75: ... accidentally disabling the wired keypad during use 4 8 Geometry and Color In the Configuration menu select the Geometry and Color submenu to modify overall color performance or image geometry for all sources 4 8 1 Test Pattern Choose the desired internal test pattern or select OFF to turn off a test pattern Use the key for cycling through test patterns 4 8 2 Vertical Keystone Corrects an image di...

Страница 76: ...sable the Brightness Uniformity function NOTE See Section 4 13 Using Multiple Projectors for the complete step by step procedure for achieving uniform brightness in adjacent displays 4 8 4 Edge Blending SUBMENU Provides a range of controls for smoothing the overlapping bright edges of multiple adjacent projected images to create a single seamless image NOTE See also Section 4 13 Using Multiple Pro...

Страница 77: ...multiple adjacent displays Use either the Color Adjustments by X Y or Color Saturation submenu to define the precise hue of each primary color component red green blue and white You can create up to four custom color gamuts User 1 2 3 or 4 defined by these adjustments The 2 menus differ only in their user interface use the one best suited to your needs and application Color Adjustments by X Y Ente...

Страница 78: ...ordinates for red will either move the color closer to orange or closer to violet This will in turn affect all displayed colors having a red component Adjust the slidebars or enter new specific coordinates as desired to define or change up to four User color gamuts needed for your environment and applications Apply the new User gamut at any time in the Advanced Image Settings menu NOTE If adjustme...

Страница 79: ...9 1 Test Pattern Choose the desired internal test pattern to display or select OFF to turn off a test pattern Use the key for cycling through test patterns 4 9 2 Gray Level Set the desired level of gray for displaying in the full gray field test pattern 4 9 3 Freeze Image Enter a check mark to stop an image on a single frame Use this diagnostic tool to examine in detail a still version of an incom...

Страница 80: ...implifies this process see 4 9 6 Color Wheel Calibration Submenu 1 Use an external analog native sized continuous grayscale test pattern with at least 256 levels 2 Turn Level Detector on 3 Set Level Value to 200 The image is now black and white or black and one color if you use Color Enable function 4 Adjust offset for one color As you adjust you will see half of the pixels move the other half wil...

Страница 81: ...els set by the Auto Input Level function Enabling Peak Detector activates an operating mode for detecting only pixels that are considered black or white all other levels are displayed as a mid level gray Adjust individual blacklevels and input drives using a 16 step grayscale pattern with black and white bands at opposite edges of the image Adjust the levels until both bands are just visible Image...

Страница 82: ...ing to replace the lamp NOTES 1 It is recommended the Lamp Message checkbox remain enabled 2 If a lamp warning message appears during power up press to temporarily cancel the message This message will continue to appear upon power up of the projector until a new lamp is installed Lamp Limit Set the lamp limit to the number of hours you expect to log on the current lamp before replacing it This wil...

Страница 83: ...selected using the keypad the Lamp Control button is pressed NOTE A full lamp change will take approximately 80 seconds including igniting the lamp and reaching partial brightness The switch can take up to 6 minutes if the lamp doesn t ignite on the first attempt The projector will try a total of 3 times to ignite the lamp Lamp Position Use this slidebar to fine tune the position of the lamp to ac...

Страница 84: ...enu Since both features utilize the projector s double processing capability PIP and Seamless Switching cannot be used together For example fading a pair of PIP images into a new display from a different source is not possible For best PIP or Seamless Switching results use two different signal types as defined in Section Table 4 1 Do not mix two signals of the same type Table 4 1 FAILED TO STRIKE ...

Страница 85: ...picture controls through the Main menu To control the secondary PIP image access picture controls through the Picture in Picture and Switching menu FIGURE 4 19 PIP AND SWITCHING MENU Use the first of six options in the PIP and Switching menu to enable and define how you want to use PIP Swap Main and PIP Image Toggle the current picture in picture relationship so that the primary main image becomes...

Страница 86: ... will stretch the pixels horizontally to regain the intended aspect ratio of the PIP image NOTE If the image is already resized at the source it will remain that way in the PIP window If for example an NTSC signal is already set to anamorphic through the Resize and Preset menu it will remain that way in the PIP window If the NTSC signal is formatted as widescreen at the source then the image in th...

Страница 87: ...rces The image will fade from one image to another according to the Fade Time control Seamless Switching overrides the Frame Lock Enable settings and forces the output to run at 60Hz regardless of the input signal Image is 100 seamless when switching sources NOTE Disable PIP and Best Switching for Interlaced sources 35kHz Fade Time Set how long in seconds it takes to gradually dissolve one image i...

Страница 88: ...out communicating with multiple projectors 4 14 Matching Colors In Multiple Screens In a multiple projector wall you will likely want to precisely match color and intensity from image to image so that the full wall is as uniform as possible This matching is typically done in conjunction with brightness uniformity TIP You may need to adjust the position of the on screen menu in Menu Preferences whi...

Страница 89: ... since you will be redefining color performance in this procedure but do optimize each projector in every other aspect Closely align all screen edges 2 Assign projector numbers to make communications easier Use a wired keypad 3 Use the same lamp mode for all projectors and do the following Set Select Color Adjustment to Max Drives Display a full white test pattern Adjust lamp power until adjacent ...

Страница 90: ...oordinates slightly in the following manner To match reds decrease Red X until full field red screens match To match greens decrease Green Y until full field green screens match To match blues increase both Blue X and Blue Y until full field blue screens match NOTE For speed enable the Auto Color Enable checkbox Each color coordinate you select will then automatically trigger a full field display ...

Страница 91: ...s to 1000 and the secondary values to 0 Then judge by eye and adjust the slidebars as needed Note that adjustments here define new x y coordinates in the Color Adjustments by X Y menu 4 14 4 Achieving Brightness Uniformity What is Brightness Uniformity When used to refine screens already matched for their primary colors see Matching Colors in Multiple Screens above and overall light output proper ...

Страница 92: ...here is enough range of adjustment when examining brightness variables from screen to screen It will help prevent maxing out before matching to a specific color zone or projector USE A USER COLOR TEMPERATURE Adjust Brightness Uniformity for a User color temperature defined when you matched primary colors and continue to use it for all sources displayed on the wall Your other color temperatures wil...

Страница 93: ...r 1 Color Adjustment to create a well matched wall recommended select User 1 and then choose a color Continue with Step 1e If you prefer maximum brightness rather than a particular color temperature select Max Drives IMPORTANT Do not change User 1 Color Adjustments in color matched applications e In the White Uniformity menu set Overall to 50 0 and set all others to 0 This decreases the light outp...

Страница 94: ...of the left side closely match the center color temperature Adjust an edge first focusing on its center then adjust its corners See Figure 4 23 Match Zones to Center Color Temperature FIGURE 4 23 MATCH ZONES TO CENTER COLOR TEMPERATURE Repeat the color adjustment of sides and corners for each edge of the screen that does not yet match the center note that each corner is adjustable in either of its...

Страница 95: ... the Brightness Uniformity menu Christie Edge Blending is an innovative set of software functions that can blend white levels along the edges of multiple adjacent projected images to create a single seamless larger image 4 15 Edge Blending SXGA Only In simple terms a blend appears as a gradient strip along an edge of a projected image It is darkest along the extreme edge of the image and lightens ...

Страница 96: ...ting of 3 creates a blended edge 24 pixels wide A setting of 0 signifies no blending For best results in most applications use a blend width of 16 48 steps 128 384 pixels Ranges 0 80 horizontal 0 60 vertical Blend Shape determines the rate of roll off across the blend width i e how quickly the white levels across the blend change from light and dark Increasing the Blend Shape setting accelerates t...

Страница 97: ...our intended external source Match colors and Brightness Uniformity IMPORTANT For a shared edge all Blend procedures and settings must be identical on BOTH projectors 1 Start with 2 projectors Display full white field test pattern from both 2 In the Edge Blending submenu enter a checkmark in the top checkbox to enable Edge Blending 3 Set Starting points for adjustment a Set all blend widths to 0 b...

Страница 98: ...ly values for overlapping height will differ If side overlap is 15 set Blend Width to 24 If side overlap is 20 set Blend Width to 32 If side overlap is 25 set Blend Width to 40 If side overlap is 30 set Blend Width to 48 4 16 Remote Control of the Projector As an alternative to using a keypad most projector functions can be controlled remotely typically at a controller such as a PC via simple bi d...

Страница 99: ...ich the projector detects a problem While menus remain operational and any key press will temporarily remove the error message you must resolve the signal problem to permanently eliminate the message No Signal Occurs when there is no source signal detected at the selected input both HSYNC and VSYNC are inactive and the screen background is black Connect or correct the signal or try another input B...

Страница 100: ...et the projector System Errors Indicates that a serious malfunction exists and must be reported to the manufacturer as soon as possible The projector will no longer operate Reset the projector The Status Display If one of the error codes in table is shown in the status display window you have a system error that will require the attention of a qualified service technician Acknowledge and clear the...

Страница 101: ...ailure 55 Ballast A Fan Failure 56 Ballast B Fan Failure 57 Color Wheel Fan Failure 58 Power Fan Failure TIPM image processor 60 Boot code CRC failed 61 Unable to program the DigMux PLD 62 Unable to program the Control PLD 63 Unable to program the BUBKS PLD 64 Unrecognized ROM type 65 Write to flash ROM failed 66 General image processor failure 67 Downloaded code will not fit in the ROMs 68 Commun...

Страница 102: ...D that will illuminate one of three colors to convey the current status of the system A solid red LED indicates a system error and the corresponding error code will display in the status display See Status LED on page 3 2 for description of the LED variations Press to acknowledge and clear the error A2 Unable to program the Backplane module A3 Unable to program the Warp Module qCODE qDESCRIPTION E...

Страница 103: ...mage For protection from ultraviolet radiation keep all projector shielding intact during operation Installation must be performed by CHRISTIE accredited service technicians 5 1 1 Labels and Markings Observe and follow all warnings and instructions marked on the projector The exclamation point within the equilateral triangle alerts the user to important operating and maintenance servicing instruct...

Страница 104: ...end of life see Section 6 Specifications for lamp hours and specifications if they have failed during operation or have a drastic change in brightness typical of aging lamps To effectively maintain operation of the projector be aware of changes that occur in brightness and the duration of each lamp Refer to Section 5 4 1 Replacing a lamp for more details on lamp replacement Follow all safety and w...

Страница 105: ...radiator or heat register Do not place the projector in an enclosure without proper ventilation Do not poke objects into the ventilation openings of the projector They may touch dangerous voltages or short out components resulting in a fire or shock hazard Do not spill liquids into the projector If a spill occurs unplug the projector immediately and have it serviced by a CHRISTIE accredited servic...

Страница 106: ...any particles remaining on the lens NEVER use a cleaning solvent that contains ammonia Avoid lens contact with Xylene and Ether Lamp Module glass exit window only As required Clean glass only It is important to never touch the glass surface of the lamp Any oil left by fingerprints will seriously degrade a lamp s performance or cause hotspots which can lead to an accumulation of intense heat in the...

Страница 107: ...nt this feature benefits applications where downtime must be kept to a minimum When do I replace a lamp Lamps that show a reduction in brightness or have reached their end of life must be replaced immediately To check the hours each lamp is in use look at the number of LAMP HOURS in individual lamp submenus or in the Status menu From the Lamp menu you can set a LAMP LIMIT and enable the projector ...

Страница 108: ...hot lamp Wait at least 5 minutes after powering down or switching lamp operation modes to allow the lamp to cool sufficiently before removing 2 Remove the cover over the lamp changer Turn the thumb wheel Figure 5 2 on the cover until it is loose Lift the cover off 3 Loosen the 3 lock screws Figure 5 3 on the lamp module held in the reserve position 4 Using the lamp handle pull the lamp straight up...

Страница 109: ...t in place Lower the lamp handle until it clips in place Put the lamp handle flat before requesting a lamp position change 8 If the other lamp requires replacement change the lamp position Figure 5 6 to access the other lamp Let the lamp cool and replace it using the steps described earlier in this procedure 9 Each new lamp is supplied with a lamp card that contains lamp specific information such ...

Страница 110: ......

Страница 111: ...an you access test patterns Make sure there is not a full black test pattern selected for display press to access test patterns then cycle patterns with keys Severe motion artifacts There is a synchronization problem with reversed 3 2 pull down in 60Hz to 24Hz film to digital conversion in your source Correct at the source The display is jittery or unstable 1 Make sure that the source is properly ...

Страница 112: ...plicably it is possible that excessive voltage noise on the AC or ground input has interrupted the projector s ability to lock on to a signal Power down the projector and disconnect from AC Then plug in again and power up as usual Colors in the display are inaccurate 1 The color tint color space color temperature and or other settings may require adjustment 2 Make sure you are using the proper cha...

Страница 113: ...he projector will wait 30 seconds before striking the lamp again It will try a total of five times before it declares the lamp as Failed to Strike Therefore it could take up to 2 minutes before light is seen on the wall You can check the status of either lamp in the projector by checking LAMP STATUS in the Lamp Menu refer to 4 10 1 The Lamp Menu Incorrect Lamp Serial Number on Status Page When rep...

Страница 114: ......

Страница 115: ...TNESS 132W White Boost ON 2320 lumens 790 lumens 132W White Boost OFF 1390 lumens 465 lumens 120W White Boost ON 2100 lumens 660 lumens 120W White Boost OFF 1225 lumens 365 lumens 160W 1259 lumens 180W 1422 lumens CONTRAST RATIO 2365 1 1180 1 2009 1 BRIGHTNESS UNIFORMITY 90 90 90 COLORS AND GRAY SCALE Resolution 8 bits 8 bits 8 bits Displayable Colors 16 8 million 16 8 million 16 8 million COLOR W...

Страница 116: ...l 180Mpix s processing which limits the number of pixels that can be processed ANALOG RGB OR YPRPB Interlaced or Progressive Scan Format Pixel Clock Rate 13 210 MHz max Color Space RGB or YPbPr Input Levels R G B with sync 1 0Vp p 2dB R G B without sync 0 7Vp p 2dB Pb Pr 0 7p p 2dB DC Offset 2V Nominal Impedance 75 ohms SYNC Interlaced or Progressive Scan Format Horizontal Frequency Range 15 120 k...

Страница 117: ...put Characteristics Same as Analog RGB except as noted below Formats RGB or YPbPr video signal cannot be routed to the decoder Sync Types Separate H and V direct or swapped Bi level TTL levels only Composite XOR OR Sync on green Serrations and or Equalization pulses MacroVision standard progressive Analog Sync Logic Low 0V 0 8v Analog Sync Logic High 2 4V 5V Analog Sync Input Impedance 1kΩ DVI I D...

Страница 118: ...ed AA 1 5V Alkaline WIRED CONTROL Connector Type 3 5mm plug Input Levels High 2 2V min Low 0 9V max Power 500mA 5V GENERAL RPMX D132U RPMSP D132U RPMSP D180U Voltage Range 100 240 VAC nominal 100 240 VAC nominal 100 240 VAC nominal Line Frequency 50 60 Hz nominal 50 60 Hz nominal 50 60 Hz nominal Maximum Inrush Current 30A max 30A max 75A max Current Rating typical 2 13A 100VAC 2 26A 100VAC 2 95A ...

Страница 119: ...Equipment Emissions FCC Code of Federal Regulations Title 47 Part 15 Conducted and Radiated Emissions Class A EN55022 CISPR 22 for Information Technology Equipment Conducted and Radiated Class A EN61000 3 2 Induced Harmonic Distortion EN61000 3 3 Induced Voltage Fluctuations Flicker Immunity EN55024 specific to Information Technology Equipment all parts under which are EN61000 4 2 ESD EN61000 4 3 ...

Страница 120: ...ween 0 to 95 Altitude 30 000ft 25 C to 70 C 7 8 Standard Components Line Cord rated North American Configuration bracket shipped loose for vertical configuration 6 M6 screws for installation of configuration bracket EM mounting bracket 7 9 Optional Accessories User s Kit includes User Manual IR Remote Keypad Setup and Adjustment Tools Service manual Dual frequency IR remote keypad Optional Input M...

Страница 121: ...ith the projector so that it can be controlled remotely from a PC or other controller From a PC connect a standard 9 wire RS 232 serial cable to the RS 232 IN port Or for long distance 100 ft links with an RS 422 compatible PC or controller connect RS 422 cable to the RS 422 port A 1 Projector to Computer RS 232 A 2 Projector to RS 422 compatible Computer ...

Страница 122: ...A 2 RPMX RPMSP D132U RPMSP D180U User Manual 020 100245 03 Rev 1 11 2010 Appendix A Cable Connections A 3 Projector to Projector ...

Страница 123: ...RPMX RPMSP D132U RPMSP D180U User Manual B 1 020 100245 03 Rev 1 11 10 B Dimensions Mounting Information B 1 Horizontal Configuration FIGURE B 1 HORIZONTAL CONFIGURATION ...

Страница 124: ...B 2 RPMX RPMSP D132U RPMSP D180U User Manual 020 100245 03 Rev 1 11 2010 Appendix B Dimensions Mounting Information B 2 Vertical Configuration FIGURE B 2 VERTICAL CONFIGURATION ...

Страница 125: ...Appendix B Dimensions Mounting Information RPMX RPMSP D132U RPMSP D180U User Manual B 3 020 100245 03 Rev 1 11 2010 B 3 Horizontal Configuration for SXGA ...

Страница 126: ...B 4 RPMX RPMSP D132U RPMSP D180U User Manual 020 100245 03 Rev 1 11 2010 Appendix B Dimensions Mounting Information B 4 D132U Horizontal Configuration for XGA ...

Страница 127: ...er an input or output depending on the desired outcome In general configure the pin as an input if you want the projector to respond to something the device does and as an output if you want the external device to respond to an action taken by the projector For example configure the pin as an output if you want the lighting in a room to automatically dim when the projector is turned on By using th...

Страница 128: ...s GIO HHLLHLH OOIOOOI Reply with pin state and configuration GIO C2 Request the configuration for pin 2 GIO C2 O Reply with pin 2 configuration as output GIO 2 Request the state of pin 2 GIO H Reply with pin 2 state as high Parameter Name Value P1 RTE type G Real Time I O Event P2 I O bit 1 7 P3 Pin state 1 Character String H High L Low LHXXXHL Combine multiple inputs and trigger occurs when all c...

Страница 129: ...posite sync or separate horizontal and vertical sync up to 500 MHz bandwidth BNC connectors for RGB signal inputs NOTE The audio connectors are not functional D 2 RGB400BA Input Module 38 804610 xx The RGB400 Buffered Amplifier Input Module may be installed in this projector in a Marquee Signal Switcher or in a Marquee Case Power Supply Connect three four or five wire RGB video signals of up to 40...

Страница 130: ...tputs NOTE The audio connectors are not functional D 4 PC250 Analog Input Module 38 804609 xx The PC250 Analog Input Module may be installed in this projector a Marquee Signal Switcher or a Marquee Case Power Supply The module receives analog RGB input signals from IBM PC compatibles or Macintosh computers Video inputs are 75Ω terminated Video outputs are provided for buffered loop through to anot...

Страница 131: ...component video signal YCbCr via a single SERIAL IN BNC connector The signal can loop through the SERIAL OUT BNC out to another device such as another projector Inputs are 75Ω terminated SDI Features accepts serial digital 4 2 2 component video YCbCr provides both a SERIAL IN and a SERIAL OUT BNC connector includes status LEDs for signal and error D 7 Dual SD HD SDI Module 38 804856 xx The Dual SD...

Страница 132: ...ix D Optional Input Modules Dual SD HD SDI Features accepts and decodes up to two serial digital inputs outputs up to two 10 bit YCbCr 4 2 2 video signals provides input s to output s loop through capability supplies interchangeable inputs as part of the Picture in Picture display ...

Страница 133: ......

Страница 134: ...ypress ph 714 236 8610 Canada Kitchener ph 519 744 8005 United Kingdom ph 44 118 977 8000 Germany ph 49 2161 664540 France ph 33 0 1 41 21 44 04 Hungary Eastern Europe ph 36 0 1 47 48 100 Singapore ph 65 6877 8737 Shanghai ph 86 21 6278 7708 Beijing ph 86 10 6561 0240 Korea ph 82 2 702 1601 Japan ph 81 3 3599 7481 Corporate offices Worldwide offices ...

Отзывы: