Section 3: Operation
3-18
User’s Manual
TO DELETE MULTIPLE CHANNELS
, highlight any channel in the Channel Setup menu
and press
Func
to go to the Channel Copy/Delete submenu. Select “Delete Unlocked
Only” and press
to delete all unlocked channels. Or select “Delete All Channels”
to delete all channels, even those that are locked. In either case, the current channel
will remain but will be redefined from projector defaults.
NOTE: For any deletion, a confirmation box appears to make sure that you really
want to delete. Select “Cancel” (default) if you don’t want to delete after all.
The basic setups that describe how and where a channel can be accessed are listed in
the Channel Setup menu. These channel setups can be edited at any time in the
Channel Edit submenu.
From the presentation level press
Menu
to display the main menu. To display the
Channel Setup menu, press
3
, or move the highlight to the Channel Setup option
and press
. The Channel Setup menu will appear.
To edit parameters shown in the Channel Setup menu, select the relevant channel and
press
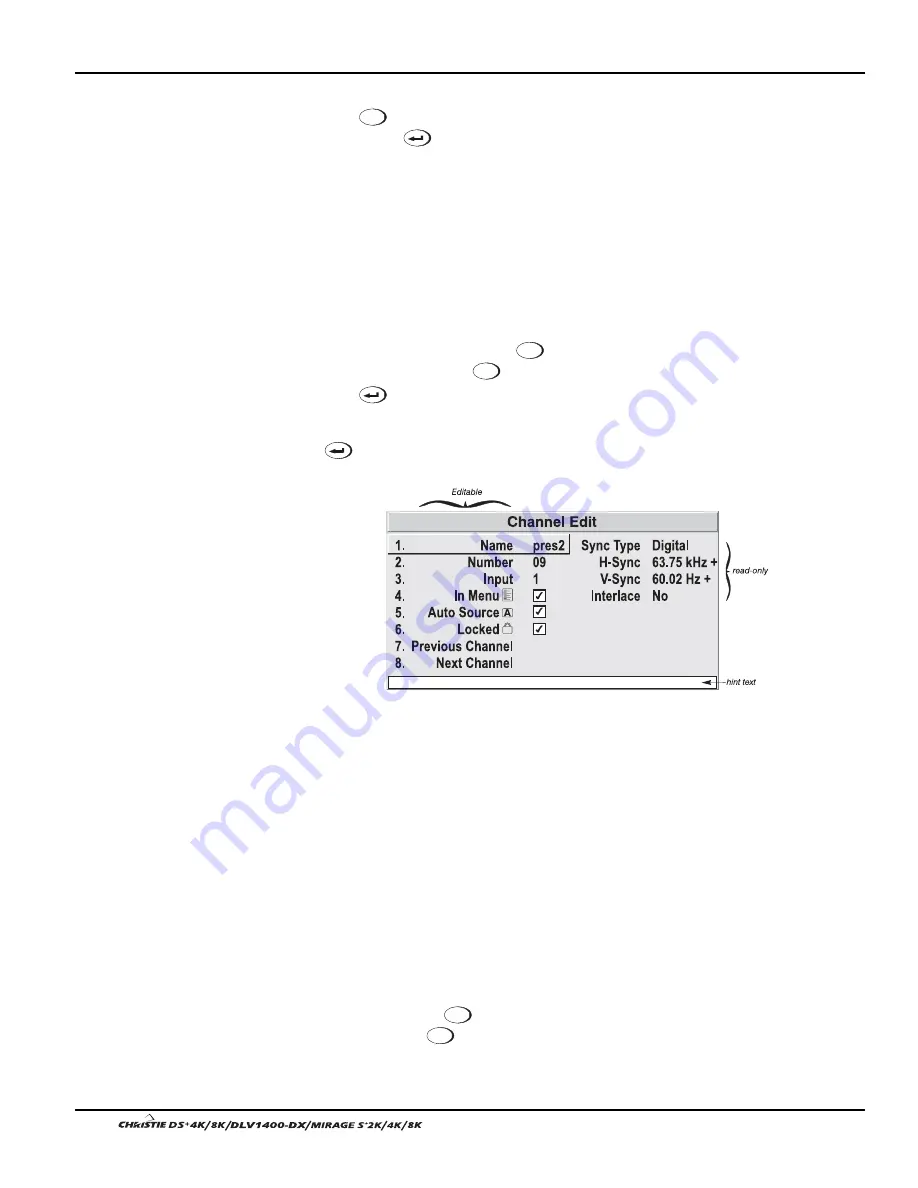
. The Channel Edit menu will appear similar to the sample shown in Figure
3.12.
Figure 3.12. Channel Edit Menu (
SAMPLE
)
If desired, review and/or edit the following channel setups in the Channel Edit menu:
•
CHANNEL NAME:
An alpha-numeric label can be defined and/or changed here.
Channel names can be up to 12 characters in length.
•
CHANNEL NUMBER:
A 2-digit channel number can be changed here. NOTES:
1) If you enter a channel number that already exists, a dialog message appears
indicating that this number is already in use–assign a different channel number.
2) You can define up to 50 channels.
•
INPUT:
1-8, corresponding to where on the projector’s input panel the source is
connected.
•
IN MENU:
If checked (default, except for automatically defined channels with
unchanged parameters), this defined channel will then appear in the list
available when
Channel
key is pressed. If unchecked, the channel must be
accessed via
Channel
on the keypad or via the Auto Source function. NOTE: On-
screen display of the channel list is an option that must be set in the Menu
Preferences menu.
Editing a Channel Setup
'
CHANNEL EDIT — STEP 1
CHANNEL EDIT — STEP 2
CHANNEL EDIT — STEP 3
Содержание DS+4K
Страница 2: ......
Страница 11: ...Section 2 Installation and Setup User s Manual 2 7 Figure 2 2 Vertical Offset Examples...
Страница 12: ...Section 2 Installation and Setup 2 8 User s Manual Figure 2 3 Lens Vertical Offsets...
Страница 14: ...Section 2 Installation and Setup 2 10 User s Manual Figure 2 5 Lens Horizontal Offsets...
Страница 22: ......
Страница 75: ...Section 3 Operation User s Manual 3 53 Figure 3 29 Customizing the Input Signal...
Страница 92: ......
Страница 102: ...Section 4 Maintenance 4 10 User s Manual Figure 4 8...
Страница 106: ......
Страница 120: ......
Страница 122: ......
Страница 124: ...Appendix C Serial Communication Cables C 2 User s Manual...
Страница 126: ...Appendix D Throw Distance D 2 User s Manual...
Страница 127: ...Appendix D Throw Distance User s Manual D 3...
Страница 128: ...Appendix D Throw Distance D 4 User s Manual...
Страница 129: ...Appendix D Throw Distance User s Manual D 5...
Страница 130: ...Appendix D Throw Distance D 6 User s Manual...
Страница 131: ...Appendix D Throw Distance User s Manual D 7...
Страница 132: ...Appendix D Throw Distance D 8 User s Manual...
Страница 133: ...Appendix D Throw Distance User s Manual D 9...
Страница 134: ...Appendix D Throw Distance D 10 User s Manual...


