Section 3: Operation
User’s Manual 3-13
.
If you prefer to quickly scroll through a list without first pulling it down, highlight the
option and use
or
. Press
when the desired choice appears.
NOTES: 1) Press
or
to jump between pages in an extra long pull-down list.
2) Press
Exit
while in a pull-down list to cancel any change.
ACTIVATE THE EDIT WINDOW:
To enter or edit text, highlight the desired parameter
(such as a channel name) and press
to activate its adjacent edit window. Any
previously entered text is displayed with its first character highlighted in a square
cursor, signifying that this character is ready for editing.
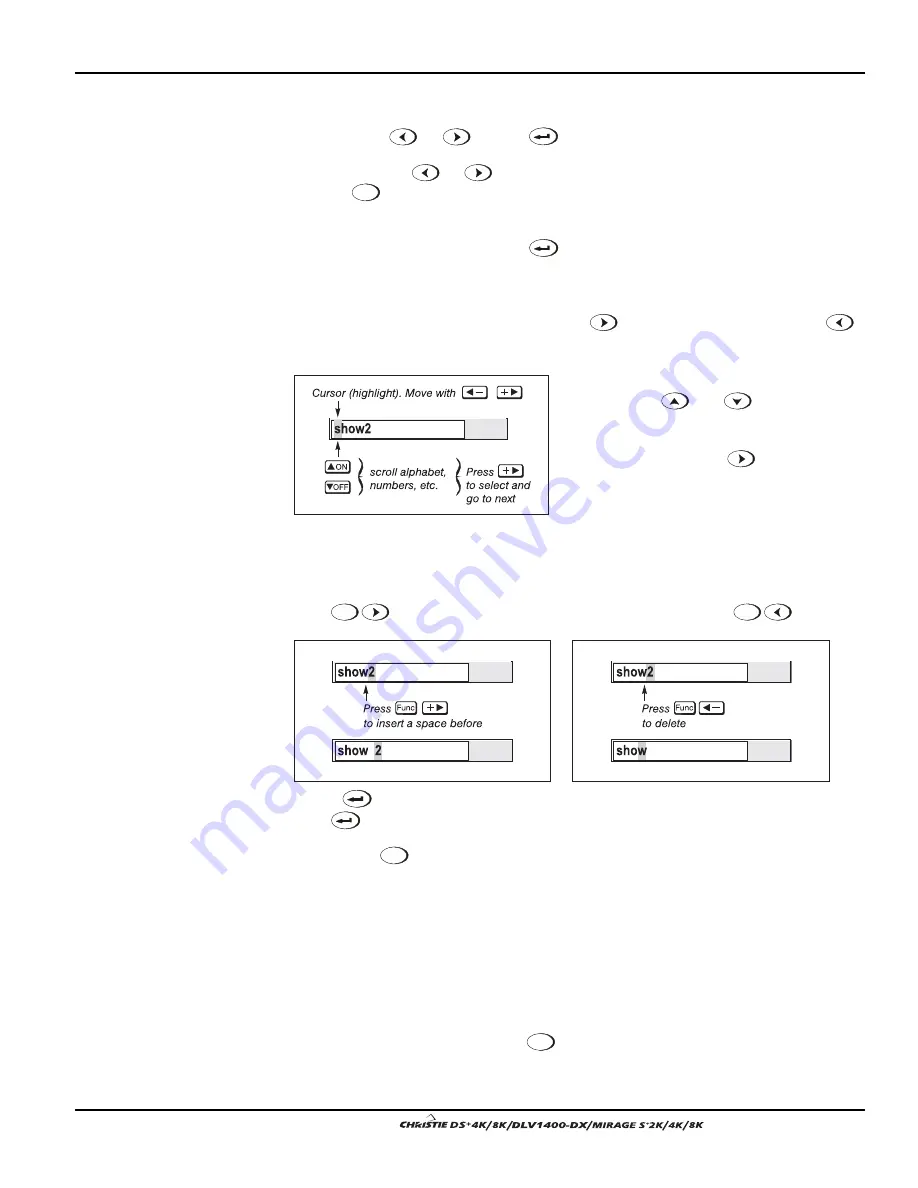
NAVIGATE WITHIN THE EDIT WINDOW:
Press
to move the cursor forward or
to move the cursor backwards as desired.
EDIT A CHARACTER:
To edit a highlighted
character, use
and
to scroll
through the alphabet, numbers, spaces and
punctuation available. When the character
you need appears, press
to select it—
the cursor will move to the next character of
current text, if present. Note that you can
also enter a number directly from the
keypad—it will be accepted and the cursor
will move on.
ADD OR DELETE A CHARACTER OR SPACE:
To insert a space at the cursor location,
press
Func
. To delete a highlighted character (or space), press
Func
.
PRESS
(ENTER) WHEN FINISHED:
To accept edits and leave the edit window,
press
(Enter).
NOTE: Press
Exit
at any time to cancel changes and return to the previously-defined text.
Enter numbers directly from the keypad in order to specify numbers representing
projectors, channels (source setups), or slots. As each digit is entered, it is displayed
and the cursor moves on. Note that channel numbers are defined with 2 digits—for
example, if you enter only a single digit (such as “7”) for a channel number, the
channel will automatically be defined as “07”. Enter “07” to utilize this channel.
NOTES: 1) Once you enter the first digit, this digit replaces all old digits. 2) If you
press any non-numbered key, the number entered up to that point is accepted and
updated as the new value. 3) Press
Exit
to cancel editing of numerical values.
Editing Text
'
Figure 3.8. Entering Text
Editing Numerical Values
'
Содержание DS+4K
Страница 2: ......
Страница 11: ...Section 2 Installation and Setup User s Manual 2 7 Figure 2 2 Vertical Offset Examples...
Страница 12: ...Section 2 Installation and Setup 2 8 User s Manual Figure 2 3 Lens Vertical Offsets...
Страница 14: ...Section 2 Installation and Setup 2 10 User s Manual Figure 2 5 Lens Horizontal Offsets...
Страница 22: ......
Страница 75: ...Section 3 Operation User s Manual 3 53 Figure 3 29 Customizing the Input Signal...
Страница 92: ......
Страница 102: ...Section 4 Maintenance 4 10 User s Manual Figure 4 8...
Страница 106: ......
Страница 120: ......
Страница 122: ......
Страница 124: ...Appendix C Serial Communication Cables C 2 User s Manual...
Страница 126: ...Appendix D Throw Distance D 2 User s Manual...
Страница 127: ...Appendix D Throw Distance User s Manual D 3...
Страница 128: ...Appendix D Throw Distance D 4 User s Manual...
Страница 129: ...Appendix D Throw Distance User s Manual D 5...
Страница 130: ...Appendix D Throw Distance D 6 User s Manual...
Страница 131: ...Appendix D Throw Distance User s Manual D 7...
Страница 132: ...Appendix D Throw Distance D 8 User s Manual...
Страница 133: ...Appendix D Throw Distance User s Manual D 9...
Страница 134: ...Appendix D Throw Distance D 10 User s Manual...


