background image

        Introduction

HS Series D16-20 User Manual

21

020-001466-01 Rev. 1 (10-2018)
Copyright ©2018 Christie Digital Systems USA Inc. All rights reserved.

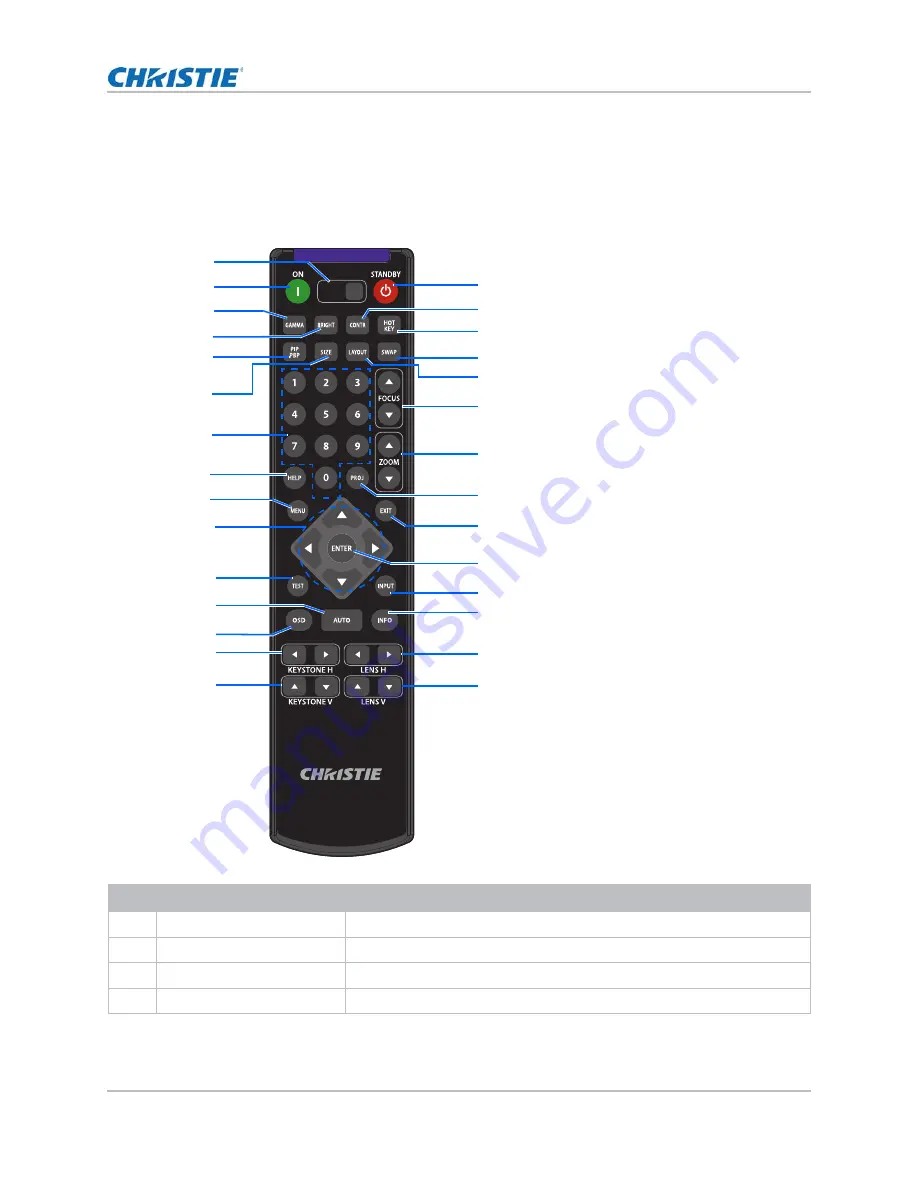
IR remote keypad

The IR remote keypad communicates with the projector by way of wireless communications.
Use a cable length of 20 m or less. If the length of cable exceeds 20 m, the IR remote keypad may 
not work correctly. 

ID

Button

Description

1

SHUTTER

Displays or blanks the video image.

2

ON

Turns the projector on.

3

GAMMA

Adjusts the mid-range levels.

4

BRIGHT

Adjusts the amount of light in the image.

SHUTTER

VGA

HDMI2

DVI-D

BNC

DP

3G-SDI HDBaseT

PRESENT.

CVBS

HDMI1

16

17
18

19
20

21

22

24

25

26
27

28

29

1

2

3

4
5

6

7

8

9

10

11

12

13
14

15

23

Содержание D16HD-HS

Страница 1: ...HS Series D16WU HS D16HD HS D20WU HS D20HD HS User Manual 020 001466 01...

Страница 2: ...ved by Christie for such use f Except where the product is designed for outdoor use problems or damage caused by use of the product outdoors unless such product is protected from precipitation or othe...

Страница 3: ...tact your dealer 14 Key features 14 How the projector works 15 List of components 15 Product documentation 16 Related documentation 16 Site requirements 16 Physical operating environment 16 Power conn...

Страница 4: ...er 30 Enabling auto warp filter 30 Adjusting warp filter 30 Resetting geometry correction setting 30 Creating edge blending 31 Enabling basic image blending 31 Blending multiple images 31 Applying the...

Страница 5: ...e 42 Adjusting the color wheel speed 42 Setting the Real Black threshold 43 Configuring the HDMI setting 43 Configuring system settings 44 Changing the language 44 Adjusting lens settings 44 Setting u...

Страница 6: ...baud rate 54 Enabling serial port echo 54 Setting serial port path 54 Using web user interface 55 System requirements 55 Logging on to the web user interface 55 Setting the system notification 56 Con...

Страница 7: ...All rights reserved Selecting a test pattern 62 Restoring factory default settings 63 Signal connectivity specifications 64 Inputs 64 Picture in picture picture by picture PIP PBP compatibility 68 Re...

Страница 8: ...location can be granted entry to the area FIRE HAZARD Keep hands clothes and all combustible material away from the concentrated light beam of the projector TRIP OR FIRE HAZARD Position all cables wh...

Страница 9: ...The AC power cord must be inserted into an outlet with grounding SHOCK HAZARD Disconnect the product from AC before installing moving servicing cleaning removing components or opening any enclosure In...

Страница 10: ...within the hazard distance or install the product preventing potential exposure of the spectators eyes from being in the hazard distance C No access zone Horizontal clearance of the no access zone sha...

Страница 11: ...o instructions provided by Christie Ensure the projection system is securely mounted or immobilized to prevent unintended movement or misalignment of the projections Temporary show installations conta...

Страница 12: ...rain or moisture Do not alter the power plug overload the power outlet or use it with extension Cords Do not remove the product enclosure Only Christie qualified technicians are authorized to service...

Страница 13: ...ousehold use Consult the service manual Disconnect all power sources before performing maintenance or service procedures Indicates the presence of an earth ground FDA laser variance US projectors only...

Страница 14: ...ith the servicing of your projector If you encounter a problem with your Christie projector contact your dealer Key features Understand the important features of the projector HD 0 95 1920 1080 resolu...

Страница 15: ...pad or a PC device using serial communications Ethernet or RS232 A web page using Ethernet or from a PC or device using a wireless USB dongle optional How the projector works The HS series D16 20 proj...

Страница 16: ...loads tab Related documentation Additional information on the projector is available in the following documents HS Series D16 20 Installation and Setup Guide P N 020 001464 XX HS Series D16 20 Product...

Страница 17: ...ed with the product or recommended by Christie Projector components Identify the main components of the projector Front view Identify the main components on the front of the projector Model name Power...

Страница 18: ...jector 2 Input Output I O panel Connects the projector to external devices 3 Cooling air vents exhaust Provides cooling to the projector Keep these vents unobstructed to prevent the projector from ove...

Страница 19: ...e projector from overheating ID Button Description 1 AUTO Automatically optimizes an image 2 POWER Turns the projector on or off 3 SHUTTER Displays or blanks the video image 4 OSD HIDE SHOW Hides or s...

Страница 20: ...Adjusts the zoom 12 BACK Returns to the previous level or exits the menus if at top level ID Connector name ID Connector name 1 3G SDI IN 9 HDMI OUT 2 3G SDI OUT 10 DC OUT 3 HDBaseT 11 REMOTE OUT 4 H...

Страница 21: ...ns Use a cable length of 20 m or less If the length of cable exceeds 20 m the IR remote keypad may not work correctly ID Button Description 1 SHUTTER Displays or blanks the video image 2 ON Turns the...

Страница 22: ...EYSTONE V Adjusts the vertical keystone 16 STANDBY Turns the projector off 17 CONTR Adjusts the difference between dark and light 18 HOT KEY Selects your preset key quickly 19 SWAP Swaps the main and...

Страница 23: ...DVI 3G SDI and HDBaseT The projector detects the source you selected and displays the image 6 If using the projector for the first time select a preferred language from the Main Menu after the startup...

Страница 24: ...ing A problem exists with the projector that does not cause it to shut down Examples of warnings include filter needs changing one of the pumps is damaged or a fan is operating at full speed due to ov...

Страница 25: ...dth or to the maximum size while keeping the original aspect ratio 1 Select Menu Size Position Size Presets 2 Select the appropriate size preset Auto Display with the detected size Native Display in i...

Страница 26: ...input the values of moving pixels 3 After inputting the value press ENTER to apply Setting the digital size of display image These functions are similar technologies as in camera image processing Use...

Страница 27: ...geometry correction on page 27 for further information 2 Select Menu Size Position Geometry Correction Warp Memory Apply Warp 3 To apply specific geometry setting select the required record 4 To confi...

Страница 28: ...tion list select the required record 3 To download the selected warp file click OK 4 To send the downloaded warp settings to the projector on the canvas right click a projector window and select Send...

Страница 29: ...t a pinched image shape in which the horizontal straight lines are curved inwards or horizontal straight lines are curved outwards from the center Uploading warp settings from Christie Twist erases th...

Страница 30: ...auto warp filter Improve the sharpness of the image and reduce the ghosting automatically after geometry correction such as warping keystone pincushion and 4 corner 1 Select Menu Size Position Geometr...

Страница 31: ...nd area select Pixel Height 7 Adjust the slider by arrow keys or press ENTER to input the width of blend area 8 After inputting the size of blend area press ENTER 9 To set the gamma value of the blend...

Страница 32: ...projectors For multiple projectors use Twist to identify the projectors Applying the saved blend file You can apply the saved blend file from Twist interface or use the projector s on screen display O...

Страница 33: ...degree of difference between the lightest and darkest parts of the image and changes the amount of black and white in the image 1 Select Menu Image Settings Contrast 2 Adjust the slider by arrow keys...

Страница 34: ...age Settings Detail 2 Select the sharpness Maximum High Normal Low Minimum 3 To confirm the selection press ENTER Setting up 3D display Use the functions in 3D Display menu to make the timing adjustme...

Страница 35: ...the 3D sync output signal 1 Select Menu Image Settings 3D Display 3D Sync Out 2 Select the appropriate 3D sync out setting To Emitter If the 3D sync out port is connected to an emitter select To Emitt...

Страница 36: ...ce Adjust the red green color balance in NTSC video images NTSC named after the National Television System Committee is the analog video color system used in North America and most of the South Americ...

Страница 37: ...unctions are used to adjust gain and offset error and correct the color Adjusting the color gain Set the color gain to correct the color intensity of the image This function is used when the image is...

Страница 38: ...6000K with 70 of maximum brightness Bright This function is used for large size or high brightness application It sets the color temperature to 7500K with 100 brightness Enhanced This function is use...

Страница 39: ...trast Enhancement 2 Select the appropriate calculation method for contrast ratio Off Disable the contrast enhancement which show the normal contrast ratio Dynamic Black Adjust the contrast ratio depen...

Страница 40: ...aturation and gain HSG to adjust each color component to essentially calibrate a projector to its surroundings compensating for factors such as screen type lamp and or ambient lighting and improves co...

Страница 41: ...press ENTER 10 Repeat steps 3 to 9 for each primary color component except white 11 To edit the color of white by three components red blue and green adjust the slider or enter the values until you a...

Страница 42: ...the color temperature Adjust the color temperature as expressed in degrees Kelvin 1 Select Menu Image Settings Advanced Image Settings Color Temperature 2 Select appropriate color temperature Warmest...

Страница 43: ...selected from 0 to 5 with 0 being the darkest black and 5 being the brightest 3 To confirm the selection press ENTER Configuring the HDMI setting Enable or disable the Extended Display Identification...

Страница 44: ...Languages You can also select Menu Languages 2 Select the appropriate language 3 Press ENTER Adjusting lens settings Adjust various lens settings including the lens type zoom focus lens position memo...

Страница 45: ...refine your adjusts repeat steps 2 to 7 Adjusting lens position Shift the lens to the specific position 1 Display an image or test pattern that can be used to analyze image location 2 Press LENS on ke...

Страница 46: ...o home position Set the lens offset back to the home position 1 Press LENS on keypad or LENS H LENS V on remote control 2 You can also select Menu Configuration Lens Settings Lens Calibration 3 To sta...

Страница 47: ...the value press ENTER to apply Setting the transparency of the on screen display position Change the on screen display OSD menus background to be transparent As the value increases more of the image...

Страница 48: ...e 3 Press ENTER Setting up password protection Protect your projector with a password Once enabled you must enter the password before you can project an image 1 Select Menu Configuration Menu Preferen...

Страница 49: ...e AC power Enable or disable this function to power on the projector directly or not when AC power is on 1 Select Menu Configuration Power Management AC Power On 2 To swap press ENTER Setting the time...

Страница 50: ...To swap press ENTER Adjusting the back light settings Control the back light behavior and timeout setting for the keypad and status LED 1 Select Menu Configuration Backlight Preferences Keypad Backli...

Страница 51: ...settings HS Series D16 20 User Manual 51 020 001466 01 Rev 1 10 2018 Copyright 2018 Christie Digital Systems USA Inc All rights reserved Image Freeze Information 3 To set the selected function as the...

Страница 52: ...unobstructed for uninterrupted communications with the projector 1 Select Menu Configuration IR Control 2 To enable the front IR sensor check Front 3 To confirm the selection press ENTER 4 To enable...

Страница 53: ...Address Assign the network IP address Subnet Mask Assign the network subnet mask Default Gateway Assign the network default gateway Primary DNS Assign the primary DNS Secondary DNS Assign the seconda...

Страница 54: ...message Reset to Default Reset the network configuration setting including LAN setting and WLAN setting back to default 3 To apply the network configuration press ENTER Setting serial port baud rate...

Страница 55: ...b To check the projector address in a wireless network select Menu Configuration Communications WLAN Default Gateway 3 If network is unavailable connect the projector to the computer with an RJ45 cab...

Страница 56: ...that are sent from the projector They are only received by a trap receiver MIB Browser in the computer 1 From the web user interface select Network Notification See Using web user interface on page 5...

Страница 57: ...the active input press ENTER Setting second input source Select an active input to be used as the picture in picture PIP picture by picture PBP 1 Select Menu Input Switching PIP PIP PBP Input 2 To sel...

Страница 58: ...nfirm the selection press ENTER Setting up the display layout with two input sources Set the display location for main input source and second input source on the screen See Input sources layout and s...

Страница 59: ...source and most 4 3 input sources For 4 3 input sources not recognized by Wide mode for example 1400 x 1050 perform Auto Image using Normal mode 3 To confirm the selection press ENTER Setting the inp...

Страница 60: ...Intensity to maintain current constant brightness and color settings This function can remain at current setting for longer period of time than Constant Power mode Note Light sensor calibration must b...

Страница 61: ...Constant Power 2 Adjust the slider by arrow keys or press ENTER to input the value you selected 3 After inputting the value press ENTER to apply Calibrating the light sensor Light brightness decays n...

Страница 62: ...nfo 3 To view the communication information such as projector s IP address subnet and so on select Menu Information Communications Info 4 To view the light source information such as total projector h...

Страница 63: ...default settings Restoring factory settings removes all custom device settings 1 Select MENU Configuration Service 2 Enter the service password 3 Select Factory Reset All customized settings are set...

Страница 64: ...jector Inputs The list of formats listed below are not exhaustive and other formats may be supported For more information contact Christie Technical Support Signal Type Resolution Frame rate Hz VGA HD...

Страница 65: ...1152x720 85 1152x864 60 1152x864 70 1152x864 75 1152x864 85 1152x870 75 1280x720 50 1280x720 60 1280x720 75 1280x720 85 1280x720 120 1280x768 60 1280x768 75 1280x768 85 1280x800 50 1280x800 60 1280x8...

Страница 66: ...60 1400x1050 75 1440x900 60 1440x900 75 1600x900 60 1600x1200 60 1680x1050 60 1920X1080 50 1920X1080 60 1920X1200RB 60 1920X1200RB 50 SDTV 480i 60 576i 50 EDTV 480p 60 576p 50 HDTV 1080i 25 1080i 29...

Страница 67: ...and Bottom 720p 50 Top and Bottom 720p 60 Top and Bottom 1080p 24 Frame sequential 3D 800x600 120 1024x768 120 1280x720 120 1080p 120 1080p 60 WUXGA 60 SD SDI 480i YcbCr422 10bit 59 94 576i YcbCr422 1...

Страница 68: ...he picture in picture picture by picture PIP PBP compatibility Dot PIP PBP combinations are enabled Dash PIP PBP combinations are disabled 3GB SDI 1080p YcbCr422 10bit With 352M Payload ID 50 59 94 60...

Страница 69: ...l Requirements Laser safety IEC 60825 1 Safety of Laser Products Part 1 Equipment Classification and Requirements IEC 62471 1 Photobiological safety of lamps and lamp systems IEC EN 62471 5 Photobiolo...

Страница 70: ...and the applicable official amendment s EU Directive 2012 19 EU on waste and electrical and electronic equipment WEEE and the applicable official amendment s Regulation EC No 1907 2006 concerning the...

Страница 71: ...ic of South Africa ph 27 0 11 510 0094 Korea Seoul ph 82 2 702 1601 Japan Tokyo ph 81 3 3599 7481 India ph 91 080 6708 9999 Germany ph 49 2161 664540 France ph 33 0 1 41 21 44 04 Russian Federation an...

Страница 72: ......

Отзывы: