55
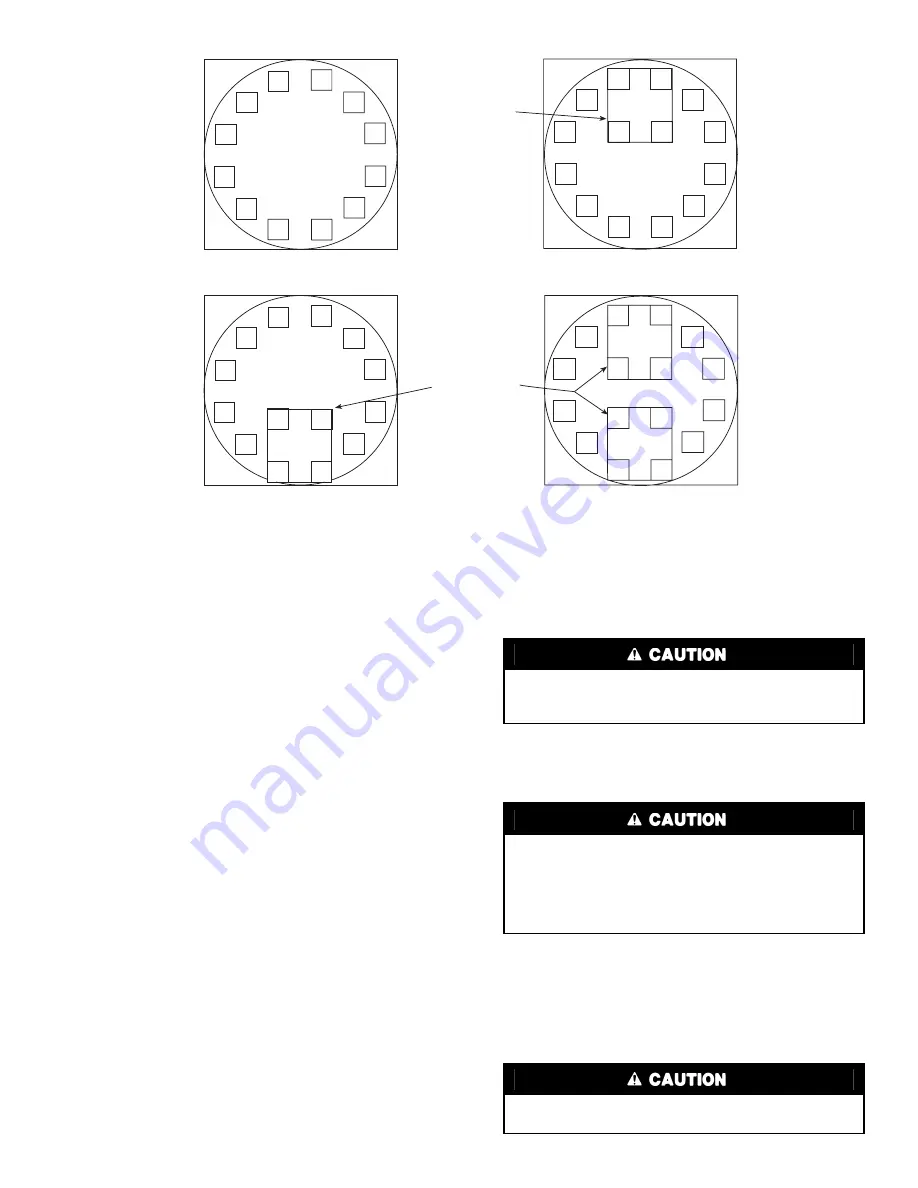
1. Install all bolts finger tight.
2. Follow numbered sequence shown for head type being
installed. This will apply even pressure to the O-ring.
3. Apply torque in one-third steps until required torque is
reached. Load all bolts to each one-third step before pro-
ceeding to the next one-third step.
4. No less than one hour later, retighten all bolts to required
torque values.
5. Restore water/brine flow and check for leaks. Fix leaks as
necessary. Replace insulation (on cooler heads only).
Inspecting/Cleaning Heat Exchangers
COOLERS — Inspect and clean the cooler tubes at the end of
the first operating season. Because these tubes have internal
ridges, a rotary-type tube cleaning system is necessary to fully
clean the tubes. Tube condition in the cooler will determine the
scheduled frequency for cleaning, and will indicate whether
water treatment is adequate in the chilled water/brine circuit.
Inspect the entering and leaving thermistors for signs of corro-
sion or scale. Replace the sensor if corroded or remove any
scale if found.
CONDENSERS (30HX Only) — Since this water circuit is
usually an open-type system, the tubes may be subject to con-
tamination and scale. Clean the condenser tubes with a rotary
tube cleaning system at regular intervals, and more often if the
water is contaminated. Inspect the entering and leaving con-
denser water thermistors (if installed) for signs of corrosion or
scale. Replace the sensor if corroded or remove any scale if
found.
Higher than normal condenser pressures, together with in-
ability to reach full refrigeration load, usually indicate dirty
tubes or air in the machine. If the refrigeration log indicates a
rise above normal condenser pressures, check the condenser re-
frigerant temperature against the leaving condenser water tem-
perature. If this reading is more than what the design difference
is supposed to be, then the condenser tubes may be dirty, or wa-
ter flow may be incorrect. Due to the pressure in the R-134a
system, air usually will not enter the machine; the refrigerant
will leak out.
During the tube cleaning process, use brushes specially de-
signed to avoid scraping and scratching the tube wall. Contact
your Carrier representative to obtain these brushes. Do not use
wire brushes.
Water Treatment —
Untreated or improperly treated
water may result in corrosion, scaling, erosion, or algae. The
services of a qualified water treatment specialist should be ob-
tained to develop and monitor a treatment program.
Condenser Coils (30GX Only)
COIL CLEANING — Clean coils with a vacuum cleaner,
fresh water, compressed air, or a bristle brush (not wire). Units
installed in corrosive environments should have coil cleaning
as part of a planned maintenance schedule. In this type of
application, all accumulations of dirt should be cleaned off the
coil.
Hard scale may require chemical treatment for its preven-
tion or removal. Consult a water treatment specialist for
proper treatment procedures.
Water must be within design flow limits, clean and treated
to ensure proper machine performance and reduce the
potential of tubing damage due to corrosion, scaling, ero-
sion, and algae. Carrier assumes no responsibility for
chiller or condenser damage resulting from untreated or
improperly treated water.
Do not use high-pressure water or air to clean coils as fin
damage may result.
11
13
4
4
15
16
4
BLANK PLATE
BLANK PLATES
9
5
2
4
7
11
12
8
1
3
6
10
9
9
9
11
11
5
5
5
6
6
6
2
2
2
7
7
7
1
1
1
13
13
14
14
14
8
8
8
12
12
12
10
10
10
3
3
3
Fig. 15 — Cooler and Condenser Head Recommended Bolt Torque Sequence


