background image

88

Configure Motion and Sensor Settings

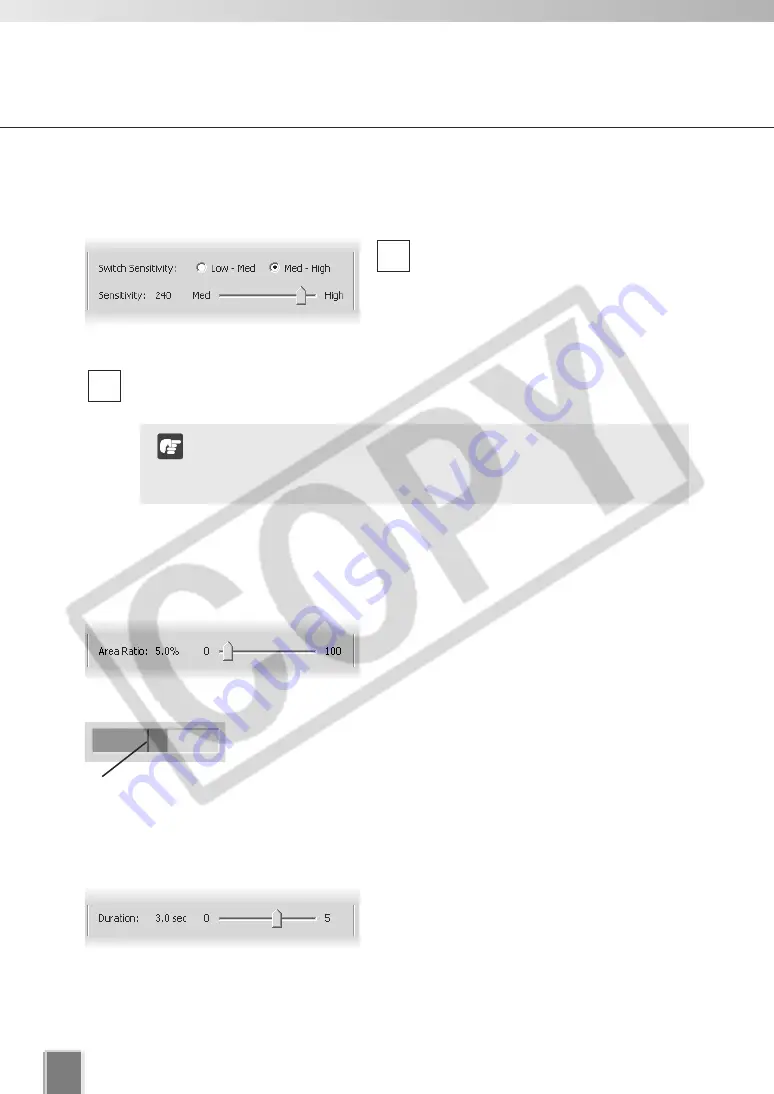
Set the Sensitivity

Sensitivity

is the degree of change detected as motion.

Select 

Low-Med

or 

Med-High

. The

available sensitivity settings range from
1 to 256. 

You can specify 1 through 128 as
Sensitivity by clicking 

Low-Med

and 129

through 256 by clicking 

Med-High

.

Drag the slide bar to adjust 

Sensitivity 

to the desired value (depending on the

Switch Sensitivity setting).

Set the Area Ratio

Area Ratio

is the degree of change of area (ratio against the defined detection area)

detected as motion.

Click and drag the 

Area Ratio

slide bar to any

position from 0% to 100%. This establishes
the proportion of image inside the Active
Region (dotted frame) allowed before motion
is detected.

When you drag the slide bar, the black vertical line in the Detection
Indicator will move to reflect the change in specified 

Area Ratio

.

Set the Duration

Duration

is the length of time necessary for the change to be recognized as motion.

Click and drag the 

Duration

slide bar to any

position between 0.0 and 5.0 seconds. This
establishes the duration of motion allowed
before an event is triggered. It also establishes
the period where there is no motion in order
for the event to be completed.

2

1

The Motion Detection settings are affected by the video quality
setting of the Camera Server. After configuring the Motion
Detection settings, do not change the video quality on the
Camera Server.

Note

Area Ratio marker.

Содержание VK-16

Страница 1: ...3 Ver 1 4 Network Video Recorder VK 64 VK 16 Network Camera Recording and Monitoring System Setting Manual In addition to Viewer Manual and Setting Manual Administrator s Manual is also available in C...

Страница 2: ...that result from operation You should agree with it before using the product Support Information For various types of information relating to support including updated product software patch installe...

Страница 3: ...21 Chapter 2 Configuring the Storage Server Configuring the Storage Server 24 Configuring the Storage Server 25 Message 30 Logon As Service Privilege 31 Setting up Event Notifications 32 Set up a user...

Страница 4: ...Dialog 62 About the Add Camera Server Dialog 62 Set up camera position and saved video 62 Add a Camera Server Set connection details 63 Camera Summary Edit Camera Server Settings 65 Edit and Remove C...

Страница 5: ...ngs window Use large captions for Video Windows 118 Viewer Settings window Identify the Master Storage Server 118 Viewer Settings window Configure the proxy server 118 Viewer Settings window Configure...

Страница 6: ...6...

Страница 7: ...connecting to the Storage Server Some functions such as video recording sensor events and motion detection Capture Still Frame are not available P 18 P 42 Video resolution can be as high as 640 x 480...

Страница 8: ...ns of cameras can be performed easily In addition it is possible to flexibly install new cameras and change installation locations of cameras VC C50i VC C50iR VB150 VB C300 VB C50iR P l a y b a c k P...

Страница 9: ...Monitor Record video to the Storage Server 1 Storage Server Administrator Capabilities Configure Storage Server Configure Event Notification Configure Users View live and recorded video Viewer Admini...

Страница 10: ...on details Camera Servers P 12 Install the Storage Server and Viewer 2 The Storage Server and Viewer can be installed on one computer Alternatively the Viewer can be installed on other computers on th...

Страница 11: ...application From the Viewer you can customize the Viewing Area and save Layouts Configure Recording Settings 3 Create and save Viewer Layouts 4 Register Camera Servers and Storage Servers and set up r...

Страница 12: ...a Servers Camera Server Firmware Version VB C300 Ver 1 0 VB C50FSi Ver 1 0 Rev 77 or later VB C50Fi Ver 1 0 Rev 77 or later Ver 1 0 Rev 26 or later VB150 Ver 1 1 Rev 41 or later VB C50iR VB C50i If us...

Страница 13: ...onal SP2 or Windows Server 2003 follow the procedures as described in Administrator s Manual for changing your Windows settings Only 32 bit Edition of Windows XP Windows Server 2003 and Windows Vista...

Страница 14: ...P SP2 or Windows Server 2003 you need to change Windows settings Make sure to change the settings Refer to Administrator s Manual When recording to a NAS server it is recommended to separate the commu...

Страница 15: ...Chapter 1 Installation This chapter outlines the installation of the Storage Server and Viewer...

Страница 16: ...tem performance Installation of both Storage Server and Viewer on a single PC may cause a heavy load on your PC depending on the number of Camera Servers or recording schedule If you use VK 64 VK 16 w...

Страница 17: ...the Storage Server and or Viewer are installed on multiple PCs you ll need to purchase the necessary licenses separately P 7 Note Viewer Storage Server Storage Server Viewer Storage Server Record vid...

Страница 18: ...estrictions on functions such as recording and Event Search P 42 Viewer Only mode allows to view live videos When multiple Storage Servers are operated if the Storage Servers other than the Master Sto...

Страница 19: ...icense agreement and then click Next to continue 2 Enter your License Key s and click Next Your License Key is indicated on the About License Key included in the package 3 Installation Procedures Type...

Страница 20: ...tomatically started after installation Note Click Help to obtain details on the type of installation The type is indicated by the icon next to the application to be installed You can set a custom inst...

Страница 21: ...you connect to the Storage Server v1 2 you cannot use the recording functions which are not supported by v1 2 e g preset tour If the Storage Servers v1 2 v1 3 or v1 4 coexist either Storage Server can...

Страница 22: ...22...

Страница 23: ...strators how to start and stop the Storage Server as required It also explains how to configure the Camera Server proxy for the Storage Server set disk space used set event notifications and configure...

Страница 24: ...etwork Video Recorder VK Series v1 4 Storage Server Configuration If User Account Control is enabled on Windows Vista the User Account Control screen will be displayed In this case click the Allow but...

Страница 25: ...ver Click the icon of the toolbar or right click the title bar to display the About box Set maximum disk space used for each device Also add or remove network drives Enter a proxy address for connecti...

Страница 26: ...mum file size duration option enter a value and select MB or Hours You can enter 32 1024 for MB and 1 24 for Hours This will establish the maximum size used for each file of recorded video If you do n...

Страница 27: ...Network Drive Delete an added network drive 4 3 Adding Removing a Network Drive By adding a network drive you can save recorded vided data on a network drive such as NAS Network Attached Storage in a...

Страница 28: ...that appears and click OK to enter the path of the selected folder in the path field Enter the user name and password to access the network drive in the respective fields and click OK Be sure to use d...

Страница 29: ...ch to an account which is allowed to use the network drive i e account with Windows Administrator and Logon As Service privileges Refer to P 31 for the Logon As Service privilege You cannot use a UNC...

Страница 30: ...following message will appear Drive configuration has been changed and Storage Server must be restarted Are you sure to restart Storage Server Change the Logon Settings If you need to log onto the St...

Страница 31: ...ecurity Settings dialog appears Select Local Policy and User Privilege Assignment from the tree to the left Double click Logon as Service from the list to the right The Logon as Service Properties dia...

Страница 32: ...ediate Action Required Enter the address of the recipient and enter your from address Enter a Host Name or IP address and Port Number of mail server for outgoing mail Enable authentication POP before...

Страница 33: ...33 2 Configuring the Storage Server Setting up Event Notifications Example event notification email An event of priority 3 occurred on 12 05 2006 at 15 15 17 PM 1000 Parking Lot 1 Sensor on...

Страница 34: ...remove users Setting up Users Tick to enable user to have Administrator privileges full access to configuration functions If the Authentication is required when starting this tool box is checked the L...

Страница 35: ...erscore _ Enter the password in Password The Confirm Password field will become active Re enter the password up to 20 characters including alphanumeric letters and underscore _ Click OK when finished...

Страница 36: ...user list to bring up the Edit User dialog 2 1 Step 2 Enter user details In the Edit User dialog enter the new password for the user up to 20 characters including alphanumeric letters and underscore...

Страница 37: ...Chapter 3 Starting the Viewer This chapter describes how to start and login to the Viewer and connect to the Storage Server...

Страница 38: ...er and the Viewer are installed on separate PCs Not use Storage Server Select this option to use the Viewer only without connecting to a Storage Server If you want to add a Storage Server to the conne...

Страница 39: ...localhost from the drop down menu Click Connect Enter your User Name and Password and click Login 3 2 1 The default user name and password are as follows User name admin Password NVR It is strongly re...

Страница 40: ...Server to the Viewer The Apache proxy server does perform response buffering so is not recommended You cannot transmit or receive audio when using a proxy server Note Starting the Viewer Specify the I...

Страница 41: ...iewer Use Viewer only without connecting to Storage Server Viewer Only Mode You can use the Viewer only without connecting to a Storage Server When Storage Server is not used some functions such as vi...

Страница 42: ...ensor events and motion detection are not available In the Storage and Camera Server Summary Storage Servers tab is not displayed P 52 In the Storage and Camera Server Summary the Camera Server list s...

Страница 43: ...Chapter 4 Overview of Viewer Configuration This chapter gives a brief overview of the Viewer Configuration process which is outlined in Chapters 5 to 7...

Страница 44: ...ith camera information the entire Viewing Screen is initially blank You will need to configure the Viewer using the Configuration and Preferences screen After the Viewer has launched It is recommended...

Страница 45: ...located at the top left of the Viewing Screen In the Menu Bar select View Configuration The Configuration and Preferences screen opens with the Storage and Camera Server Summary window displayed An e...

Страница 46: ...the Configuration and Preferences Screen System Configuration Process Register Storage and Camera Servers 1 The first step is to register Storage Servers and Camera Servers with the Viewer You will al...

Страница 47: ...tor live video and play back recorded events in the Viewer From here you can customize the Viewing Area and save Layouts In the Viewer Settings window you can adjust live viewing frame rate identify a...

Страница 48: ...Camera Servers on the network This is discussed in Chapter 5 Recording Schedules set up recording schedules for each known camera and specify events for triggering recording You can also set special...

Страница 49: ...Configuration and Preferences screen 49 4 Overview of Viewer Configuration Storage and Camera Summary windows Recording Schedules window Viewer Settings window...

Страница 50: ...50...

Страница 51: ...Chapter 5 Register Storage Servers and Camera Servers This chapter outlines how to register Storage Servers and Camera Servers and to manage Locations and Zones...

Страница 52: ...indow consists of two sub windows which are opened by their respective tabs Storage Servers and Locations Zones Camera Summary Window When the Storage Servers tab is selected When the Locations Zones...

Страница 53: ...e Server you selected The following options are available via the Locations Zones tab Add Location Allows you to add a new location to the system Add Zone Allows you to add zones to locations When you...

Страница 54: ...r The diagram below illustrates an example of physical Locations and Zones on a VK 64 VK 16 network Viewer access is via the Location and Zone drop down menus Location and Zone Zones are different are...

Страница 55: ...images indicates that there are six cameras in the Zone The Location Zone hierarchy is independent of the grouping of cameras into Storage Servers For example a single Storage Server may record video...

Страница 56: ...g opens Enter connection settings and click OK 3 2 1 Configure Camera Summaries Do not add the same Storage Server more than once If you add a Storage Server with a different configuration such as one...

Страница 57: ...is Storage Server will be lost Note Delete the Storage Server Click a Storage Server in the list to highlight it and select Delete from the Edit menu Alternatively press the Delete key on your keyboar...

Страница 58: ...2 1 Configure Camera Summaries Camera Summary Add Edit or Delete a Location Zone You can easily add a new location to your system then add zones to the new location folder For example a location coul...

Страница 59: ...Location before you add the Zone Each Location name must be unique and each Zone name within a Location must be unique There is no fixed limit on the number of Zones and Locations that can be added N...

Страница 60: ...amera Summary Find Camera Servers You can easily locate and register Camera Servers via Find Camera Servers Configure Camera Summaries When you initiate the Find Camera Servers function your computer...

Страница 61: ...can configure settings for the Camera Server Alternatively double click an item to bring up the Add Camera Server dialog Using the Add Camera Server dialog is discussed on the following pages 2 1 You...

Страница 62: ...e It must be set on the Camera Server Refer to the Camera Server s User s Manual for more information on setting the name Camera Name for VB C300 VB C50i VB C50iR VB C50FSi VB C50Fi and VB C10 VB C10R...

Страница 63: ...ut is set to Single two through four tabs are added The number of tabs shown for a VB150 does not indicate the physical number of cameras connected It indicates the number of cameras which have been e...

Страница 64: ...th VK 64 or 16 cameras with Network Video Recorder VK 16 If you have changed the Camera Server s IP address you also need to change the host names in the Connection Settings and Storage Server Setting...

Страница 65: ...n the Zone field select a zone for the camera from the drop down menu If necessary click Add to add another Location or Zone The Add Location or Add Zone dialog opens Enter Location Name or Zone Name...

Страница 66: ...ngly When you move the mouse cursor to the center of the image a zoom in or zoom out control will appear Hold down the mouse on to zoom in Hold down the mouse on to zoom out Choose a pre defined camer...

Страница 67: ...nu select a hard disk drive on the Storage Server Click OK when finished The Camera Summary screen reappears Using the Add Camera Server Dialog Network drives registered via Storage Server Configurati...

Страница 68: ...Click OK to close the dialog 2 1 Camera Summary Edit Camera Server The right hand portion of the Camera Summary window features Edit Camera Server for editing the Camera Server s on your system regard...

Страница 69: ...vers or Locations Zones Step 1 Select a Camera Server In the Camera Server list click a server to highlight it Step 2 Click Remove Camera Server Click Remove Camera Server you can also press the Delet...

Страница 70: ...nges to keep all your settings Click Discard Changes to cancel any modifications you have made If you want to return to the Viewer dialog select View Viewing Screen from the menu bar The bottom right...

Страница 71: ...ules for cameras on the network Recording schedules are configured for recording videos by motion detection and by sensors Chapter 6 After setting the recording schedule make sure to perform tests und...

Страница 72: ...d time period Motion Detection recording Record video by sensor during the specified time period Sensor Event recording Day of the week Specific day Continuous recording Motion Detection recording Sen...

Страница 73: ...on the Add Edit Schedule Item dialog under the Normal Schedule dialog If you want to record video on a specific day specify the day on the Special Day Schedule dialog and specify the time on the Add...

Страница 74: ...and configure settings While only the frame rate fps needs to be set for the Continuously at Max further settings are necessary for the On motion detection and On sensor event on the Motion Detection...

Страница 75: ...he Normal Schedule is selected The Normal Schedule consists of Storage Server selector Select the Storage Server to edit the recording schedule When the Recording Schedules window is first opened the...

Страница 76: ...holding down the Ctrl key click on individual schedule items to select them You can adjust or move multiple schedule items to new positions by dragging them You can also create multiple camera schedul...

Страница 77: ...age Servers If you select another Storage Server the Schedule Area will refresh and associated schedule zones will be shown Step 2 Create the recording schedule Click and drag a time period for a came...

Страница 78: ...dule Item dialog P 77 Tip Configuration is discussed on the following pages Set start and end times and the day of the week P 79 Set frame rate enable Motion Detection and sensor event recording P 80...

Страница 79: ...holidays such schedules will override normal schedule times for the whole day Times are given in 24 hours for example 18 00 is 6 00 pm If a Camera Server has been configured with Restrict Service Time...

Страница 80: ...ou can set the frame rate from 0 1 to 30 frames per second The default is 5 frames per second 2 1 Configure Normal Recording When the load on the storage server CPU and hard disk is high recording at...

Страница 81: ...hanged by moving your mouse pointer in the Preview area to display controls Click the controls to pan tilt and zoom P 66 After the camera has been controlled the preset will be set to Custom The value...

Страница 82: ...ual for details You can edit an existing Camera Server s settings Tip If you select Enabled the Night Mode status will be changed to Disabled after the configured recording schedule finishes A higher...

Страница 83: ...e new settings and close the dialog Click Cancel to discard the new settings When you click OK the Preset and Backlight settings are effective on Video Windows in the Viewer Control the camera as requ...

Страница 84: ...ording video when a sensor input has occurred In the Add Edit Schedule Item dialog there are two options available for setting recording parameters To enable recording options and adjust settings Disp...

Страница 85: ...available Camera Servers have certain features to allow image capture operations based on sensor input or schedule If settings are enabled on the Camera Server they take precedence over any settings m...

Страница 86: ...Server to detect motion This menu is only active for VB150 servers with the Video Input set to Single or VB C50i VB C50iR VB C50FSi VB C50Fi In the Analysis Frame Rate menu select from 0 1 to 30 fram...

Страница 87: ...t the yellow level for the defined duration a red color bar is displayed and an event is triggered The behavior of the Detection Indicator is described as follows Green color bar The area of change th...

Страница 88: ...ishes the proportion of image inside the Active Region dotted frame allowed before motion is detected When you drag the slide bar the black vertical line in the Detection Indicator will move to reflec...

Страница 89: ...mber of seconds for the amount of recording time after the event has transpired up to a maximum of 999 seconds Step 6 Set the External Outputs Click the drop down menu for the target external device a...

Страница 90: ...n Camera Servers have features to allow image capture operations based on sensor input or schedule If settings are enabled on such a Camera Server they take precedence over any settings made in VK 64...

Страница 91: ...s Set whether or not to use additional options exposure white balance and focus Night Mode is available for VB C300 VB C50i VB C50iR VB C50FSi and VB C50Fi Camera Servers or VC C50i VC C50iR cameras c...

Страница 92: ...Not specified the camera will not be moved The camera angle can also be changed by moving your mouse pointer in the Preview area to display controls and clicking to pan tilt and zoom P 66 After the ca...

Страница 93: ...e Backlight compensation option is set to Not Specified Note Step 6 Set frame rate and pre and post event recording duration In the Record Video At field Max Frame Rate select a maximum frame rate for...

Страница 94: ...e event recording will increase memory usage Longer pre event recording with insufficient memory may greatly reduce performance when the disk based virtual memory runs short If Continuous and Motion D...

Страница 95: ...h the correct camera preset You should disable such Camera Server features if you wish VK 64 VK 16 settings to take precedence Note Configure Motion and Sensor Settings If Setup is clicked click the d...

Страница 96: ...o the first preset after the last preset When the preset tour is used the Motion Detection recording backlight compensation and additional options are not available Presets used for Preset Tour are se...

Страница 97: ...to set the value Check the settings and click OK This returns to the Preset Tour Settings dialog 3 2 1 1 For VB C300 you can return the focus to the default setting by ticking the Focus is returned to...

Страница 98: ...the Preset Order Select a preset to change the order from the list and click Move Up or Move Down Delete a Preset Select a preset to delete from the list and click Remove Click OK This returns to the...

Страница 99: ...me Refer to the following tables Total tour time for 100 000 round trips in the pan direction estimated Example If the movement rate PT is 1 still time is 30 seconds and movement range angle in the pa...

Страница 100: ...saved to the Storage Server Click Discard Changes to cancel any modifications you have made If you wish to return to the Viewer select View Viewing Screen from the menu bar Saving Normal Recording Ch...

Страница 101: ...tion for the time period where the highest load is expected when the schedule is performed Number of Camera Servers Number of Camera Servers with Motion Detection Total Recording Frame Rate Total Reco...

Страница 102: ...102 Saving Normal Recording Changes Click Copy to copy the contents of the Recording Setting Summary dialog to the Clipboard Tip If the load is too high adjust the recording schedule again Note...

Страница 103: ...ule is selected The Special Day Schedule consists of Storage Server Select a Storage Server from the list to add edit schedules for that server Associated Locations and Zones are displayed in the Sche...

Страница 104: ...ions the same as the Normal Recording Schedule but only covers a single day from 00 00 hrs to 24 00 hrs To have a special day schedule run over a long weekend Fri Sat Sun all dates of three days must...

Страница 105: ...ppear in the Schedule Type list 2 1 Add Edit and Delete a Schedule Type The Add Schedule Type dialog allows you to create a name for a new schedule type for example a public holiday You must create a...

Страница 106: ...a schedule type in the Schedule Type list to select it Click Edit This will bring up the Edit Schedule Type dialog Overwrite the existing name For example you may wish to change the name Company Holi...

Страница 107: ...ays list click Add This will bring up the Select Date calendar see below Click to select a day in the calendar then click OK Click Add again to add another day to the same schedule type if you wish Ad...

Страница 108: ...day is deleted from the schedule type 2 1 Configure Special Day Recording If you attempt to associate the same day with different schedule type you will be given a warning and asked to delete the oth...

Страница 109: ...s are then saved to the Storage Server Click Discard Changes to cancel any modifications you have made If you wish to return to the Viewer select View Viewing Screen from the menu bar The bottom right...

Страница 110: ...period where the highest load is expected when the schedule is performed Number of Camera Servers Number of Camera Servers with Motion Detection Total Recording Frame Rate Total Recording Frame Rate C...

Страница 111: ...guring Recording Schedules Saving Special Day Changes Click Copy to copy the contents of the Recording Setting Summary dialog to the Clipboard Tip If the load is too high adjust the recording schedule...

Страница 112: ...rd Mode Status Resolution f spec and Quality 4 3 2 1 In the Status area the following information is shown Not Connected A communication or connection error has occurred The error number is also displ...

Страница 113: ...rom the Camera Server list and click Edit The Edit Camera Server dialog appears Click Connect This establishes connection with the Camera Server Select the desired camera from the Camera Settings tab...

Страница 114: ...114...

Страница 115: ...Configure Viewer Settings This chapter outlines how to configure settings that are specific to the Viewer Chapter 7 After configuring the Viewer make sure to perform tests under actual conditions Note...

Страница 116: ...the connect menu Proxy Setting Use this option to make an access to Storage Server via proxy server Layout setting Confirm if the layout was preserved when quitting or when the screen changes Event No...

Страница 117: ...captions in the Viewer The current Master Storage Server is indicated here You can select the Master Storage Server when launching the Viewer P 38 Add the current Storage Server into connect menu Dele...

Страница 118: ...r Settings window Viewer Settings window Configure the proxy server When you wish to access the Storage Server using the proxy server set in the Internet Option tick Use internet proxy settings and re...

Страница 119: ...ange from 1 to 60 minutes default is 10 minutes When the specified period of time passes during audio transmission it will be terminated automatically Viewer Settings window Configure Focus Settings Y...

Страница 120: ...red will not flash and a color bar will light for one minute Tick the Requires operator acknowledgement box for the event When an event occurs it will flash in the Live Events Log and the audio alert...

Страница 121: ...r settings are then saved to the local disk Click Discard Changes to cancel any modifications you have made If you wish to return to the Viewer select View Viewing Screen from the menu bar The bottom...

Страница 122: ...122...

Страница 123: ...Chapter 8 Arranging and Saving Layout This chapter details how to create and save Video Window Layouts and Layout Sequences...

Страница 124: ...ay the Layout menu Below the Layout menu options existing Layouts are displayed and divided into two sections Shared Layouts All the users can available these layouts You need Administrator privilege...

Страница 125: ...ect New Layout The Viewing Area will become blank and the default layout name Untitled will be displayed The process of creating folders and saving a layout could be done in the following order 1 Orga...

Страница 126: ...Sequences dialog allows you to create folders and sub folders in which to save item layouts and layout sequences P 128 To display the dialog Open the Layout menu and select Organize The Organize Layo...

Страница 127: ...in the same manner 2 1 Move an entry up or down Click an item or folder to highlight it then click Move Up or Move Down The item will move up or down within a folder Edit or delete a layout or folder...

Страница 128: ...ayout to a personal folder Once you have saved an item the name will appear next to the Layout button in the Viewing Area 2 1 Managing Video Layouts Saving a Layout or Layout Sequence Administrators a...

Страница 129: ...layouts Use the Add Layout button to add layouts to the new sequence Click Up and Down to change the display sequence of layouts Click Delete to delete the layout In the Duration menu select a set dur...

Страница 130: ...yout sequence Click OK to bring up the Select destination folder dialog Select or enter the time You can set the time within the range from 1 to 9999 Click Add Layout to add a selected layout from the...

Страница 131: ...You can arrange Video Windows freely Alignment Grid creates a grid of dots in the Viewing Area You can re size Video Windows using the grid Small Grid Medium Grid and Large Grid creates a small 160x1...

Страница 132: ...rag the image outwards to snap to a larger grid area Release the mouse button The selection boundary will become a Video Window and snap into alignment along the grid closest to it 2 1 Working with th...

Страница 133: ...dary onto the Viewing Area grid The boundary will re size Release the mouse button The selection boundary will become a Video Window and snap into alignment along the grid closest to it To re size the...

Страница 134: ...n add more the number of Video Windows you can display simultaneously will depend on your video card the speed of your computer the maximum frame rate P 117 configured with Viewer setting the video si...

Страница 135: ...135 8 Arranging and Saving Layout Working with Layout Grids The Viewing Area with a Large Grid could look like this In this example the Camera Selection Area and Timeline are hidden...

Страница 136: ...els In the Horizontal or Vertical field overwrite the existing value with a custom value or use the up down arrows to select a value When you adjust the value in one field you ll notice the value chan...

Страница 137: ...Video Windows as shown below in the Large Grid example Pressing the Esc key returns the menu bar You can also select to hide Video Window Captions the Camera Control and Live Events The number of Vide...

Страница 138: ...138...

Страница 139: ...Index...

Страница 140: ...ration Changes 70 Camera Summary tab 52 Checking Recording Status 112 Configuration and Preferences screen 45 48 Configure Motion and Sensor Event Settings 84 E Edit Users 36 Event 32 Event Notificati...

Страница 141: ...r Only Mode 41 Storage Server 24 Configuring the Storage Server 24 Supported Camera Servers 12 System Configuration 8 16 T Task Areas 137 U User Management 34 V Viewer 37 43 115 Launching Procedure 38...

Страница 142: ...the CANON CANADA Customer Information Centre toll free at 1 800 OK CANON 652 2666 Canada only MEXICO CANON MEXICANA S DE R L DE C V Boulevard Manuel Avila Camacho No 138 PB Pisos 15 16 y 17 Col Lomas...

Отзывы: