background image

Admin Viewer/VB Viewer

5

155

Note

Register presets and the home position beforehand with [Preset Registration] tab in [Control for Admin] > [Preset/Initial Setting] > [Preset 
Setting] (P. 170). The registered preset will appear in the preset selection menu.

Use Backlight Compensation

Click [BLC] to brighten video that is dark due to backlight.

Click the button again to cancel backlight compensation.

Note

Use Smart Shade Control (P. 159) if over-exposure of highlights is prominent in the video.

Receive/Transmit Audio  

Receive audio from the camera, transmit audio from the Viewers and configure the respective volume settings.

Note

When you are using Internet Explorer 11 in a 64-bit operating system and the camera is registered as a trusted site and protected mode is 
enabled, reception and transmission of audio will be disabled.

Receive Audio

Receive audio from the microphone connected to the camera and play it back in the Viewer.

Important

• The [BLC] button is not available if [Smart Shade Control] (P. 159) is set to [Auto].

• The [BLC] button is not available if [Exposure] (P. 162) is set to [Manual].

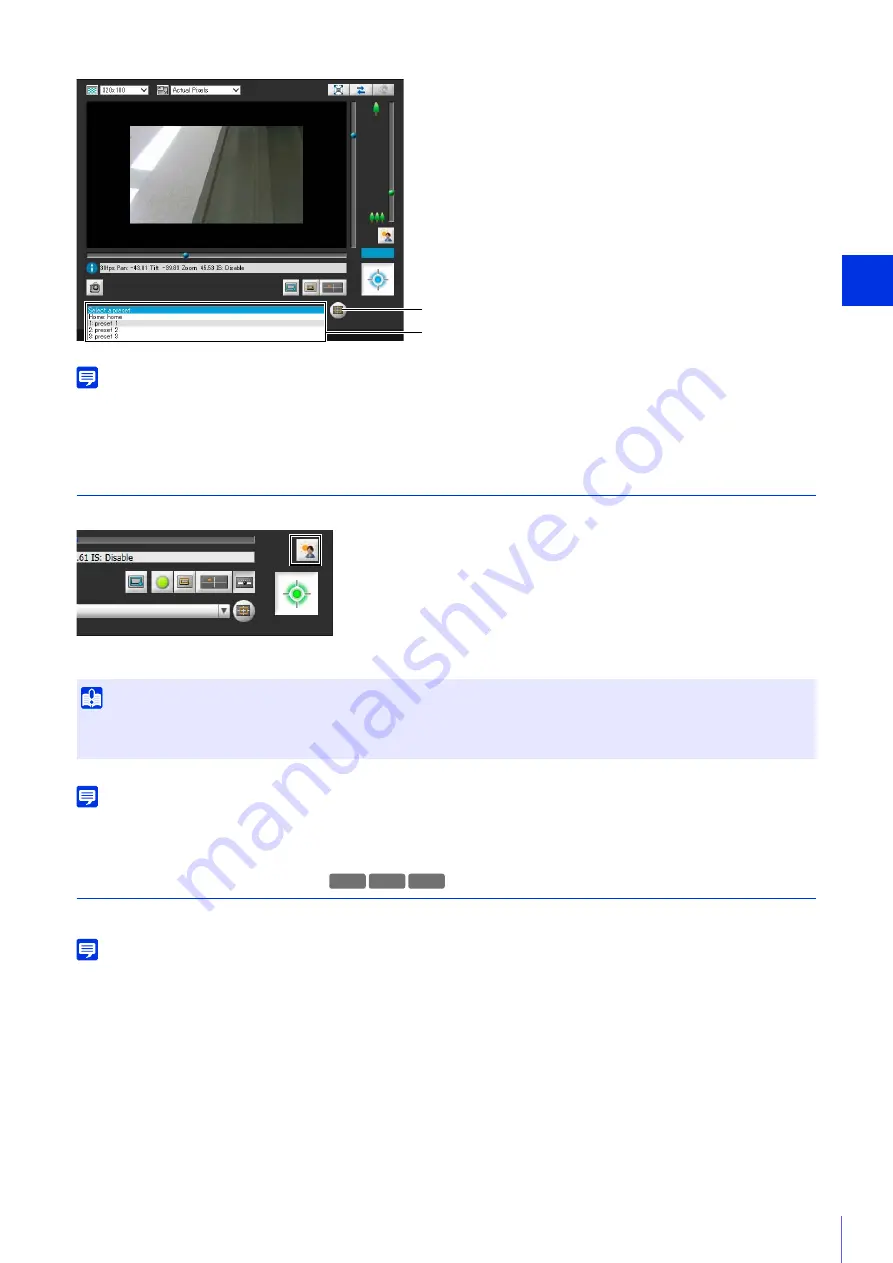
[Home Position] Button

Preset 

S

election Menu

R11 M

6

41 M741

Содержание VB-M640V

Страница 1: ...The Operation Guide should be read before using the network camera ENGLISH Network Camera Operation Guide ...

Страница 2: ...Y MERCHANTABILITY FITNESS FOR A PARTICULAR PURPOSE OR USE OR NON INFRINGEMENT AND 2 NEITHER CANON INC NOR ANY OF ITS SUBSIDIARIES OR AFFILIATES SHALL BE LIABLE FOR ANY DIRECT INCIDENTAL OR CONSEQUENTIAL DAMAGES OF ANY NATURE RESULTING FROM THE USE OF THIS MATERIAL OR THE CAMERA Network Security The user is responsible for the network security of this product and its use Take appropriate network se...

Страница 3: ...nts to provide MPEG 4 compliant video No license is granted or implied for any other use for MPEG 4 standard Trademarks Canon and the Canon logo are registered trademarks of Canon Inc Microsoft Windows Windows Vista Internet Explorer Windows Server Windows Media and ActiveX are trademarks or registered trademarks of Microsoft Corporation in the United States and other countries Windows is legally ...

Страница 4: ...ast three years from the day you purchased this product Please note we may bill you for any costs we incur in providing you the source code Security Export Control This product is subject to security export control Therefore to export or carry it overseas may require an authorization by governmental agencies ...

Страница 5: ...hots used with the explanations are from a Windows 8 1 computer connected to a VB R11 network camera The video size set selected for explanations is 1280 x 720 640 x 360 320 x 180 If using a different video size set substitute those sizes User Manuals Included User Manuals Installation Guide This describes precautions and procedures for installing the camera Sections you should reference in this g...

Страница 6: ...Camera Model VB R11VE VB R11 VB R10VE VB M641VE VB M641V VB M640VE VB M640V VB M741LE VB M740E R11 R10 M641 M640 M741 M740 Symbol Meaning Warning Failure to follow the instructions indicated by this symbol may result in death or serious injury Be sure to follow these warnings to ensure safety Caution Failure to follow the instructions indicated by this symbol may result in injury Be sure to follow...

Страница 7: ...hether FDA regulations apply FCC REGULATIONS Network Camera Model Name VB R11VE VB R10VE VB M641VE VB M640VE VB M741LE VB M740E This equipment has been tested and found to comply with the limits for a Class A digital device pursuant to Part 15 of the FCC Rules These limits are designed to provide reasonable protection against harmful interference when the equipment is operated in a commercial envi...

Страница 8: ...eceiver is connected Consult the dealer or an experienced radio TV technician for help Do not make any changes or modifications to the equipment unless otherwise specified in the manual If such changes or modifications should be made you could be required to stop operation of the equipment Canon U S A Inc One Canon Park Melville New York 11747 U S A Tel No 1 800 OK CANON 1 800 652 2666 Warning If ...

Страница 9: ...ion The Camera Angle Setting Tool is for use when installing the camera Do not use on a daily basis Frequent use may result in camera malfunction Caution Do not use the following built in camera functions or included software in situations requiring high reliability Intelligent Function Image Stabilization Function Network Video Recording Software RM Lite These do not guarantee high precision capt...

Страница 10: ...ure Auto focus functionality may be degraded if the lens surface is dusty or dirty Camera Disposal Dispose of the camera in accordance with local laws and regulations Important Grime on the front cover and dome cover may result in focusing problems and or reduction of image quality It is recommended that the cover be cleaned on a regular basis ...

Страница 11: ...tely 23 Operating Environment 24 Camera Angle Setting Tool Admin Viewer VB Viewer Admin Tools 24 Steps for Setting Up Camera 25 Step 1 Pre Installation Preparations 25 Step 2 Check Camera Connection 25 Step 3 Install the Camera 25 Step 4 Set the Camera Angle 25 Step 5 Adjust Advanced Settings According to Use 26 Step 6 Use the Viewers 26 Step 7 Use Admin Tools 26 Troubleshooting 26 Chapter 2 Camer...

Страница 12: ...53 Set the Camera Angle and Zoom 53 Set the Focus and Exposure Compensation 54 Use a Camera Specification File 56 Create a Camera Specification File 56 Chapter 4 Setting Page How to Use The Setting Page 60 Access the Setting Page 60 Common Setting Page Operations 61 About Each Setting Page 62 Configure Network Settings Basic Settings Network 64 LAN 64 IPv4 64 IPv6 65 DNS 66 mDNS 67 Set the Adminis...

Страница 13: ...eo and Audio Audio Settings 87 General Sound 87 Sound Clip Upload1to 3 88 HTTP SNMP and FTP Server Settings Server Server Settings 89 HTTP Server 89 SNMP Server 89 FTP Server 90 WS Security 90 Video Transmission Settings Server Video Server 91 Audio Transmission Reception Settings Server Audio Server 92 RTP Settings Server RTP Server 93 RTP Server 93 Audio Multicast 93 RTP Streaming 1 to 5 94 HTTP...

Страница 14: ...nt Linked Event 113 Linked Event 1 to 4 113 Linked Event Operation Examples 115 Set Users Who Connect to the Camera Security User Restrictions 118 Authorized User Account 118 User Authority 118 Set Access Restrictions Security Host Access Restrictions 119 IPv4 Host Access Restrictions 119 IPv6 Host Access Restrictions 120 Set HTTP Communication Encryption Security SSL TLS 121 Certificates 121 Cert...

Страница 15: ...t of Video Viewer PTZ 151 Cropping and Displaying Part of an Image Digital PTZ 153 Using Presets or the Home Position 154 Use Backlight Compensation 155 Receive Transmit Audio 155 Use Control for Admin 158 Control for Admin Panel 158 Pan Tilt Zoom 159 Preset Initial Setting Registration 159 Smart Shade Control 159 Haze Compensation 160 Focus 161 Exposure 162 White Balance 164 Day Night 165 Infrare...

Страница 16: ...1 Create a Panorama Image 201 Delete a Panorama Image from the Camera 204 Save Load Panorama Image File 204 View Restriction Setting Tool 206 Configure View Restrictions 206 Intelligent Function Setting Tool Overview 210 Intelligent Function 210 Notes on Intelligent Function Settings and Operations 213 Pre register Presets 214 Select the Intelligent Function Operation Mode 214 Intelligent Function...

Страница 17: ...ata Organization of Memory Card 250 Data Downloaded with Recorded Video Utility 250 Modifiers 252 Troubleshooting 254 List of Log Messages 256 Log Messages on the Camera 256 Error Log 256 Warning log 261 Notification log 263 List of Viewer Messages 269 Messages Displayed in the Information Display 269 Restore Default Settings 270 Restoring the Initial Setting from the Maintenance Page in the Web B...

Страница 18: ...18 ...

Страница 19: ...Chapter Before Use This chapter explains camera functions software and operating environment It also describes the flow from preparation and setup through to actual use ...

Страница 20: ...the memory cards that can be used by the cameras Network Camera Capabilities Uploading video Recording to memory card Operation and setup by administrator Admin Viewer Operation by guest users VB Viewer Monitoring by intelligent functions Inputting outputting audio Using external devices Pan Tilt Digital PTZ Audio I O Terminals External Device Terminals Infrared Illumination Camera Angle Setting T...

Страница 21: ... Note To use Admin Viewer and Admin Tools NET Framework 3 5 SP1 when using Internet Explorer 8 9 or NET Framework 4 5 when using Internet Explorer 10 11 is necessary If it is not installed on the computer it will be automatically installed when using the installer P 28 Software Included on the Setup CD ROM The software included on the setup CD ROM is installed and used on a computer Camera Managem...

Страница 22: ...M Lite Software M641 M640 M741 M740 Type Overview License RM Lite Storage Server Up to four cameras can be registered to record video JPEG 1 license RM Lite Viewer Plays video recorded in the storage server and displays live video JPEG H 264 from the camera Up to four cameras can be registered for the viewer 1 license RM Lite Manager Use register cameras and configure recording schedules 1 license...

Страница 23: ...playing recording and playing back videos from the camera The number of cameras that can be registered with RM 64 RM 25 RM 9 varies 64 25 or 9 cameras respectively can be registered By using multiple Storage Servers you can construct a surveillance system supporting up to 512 cameras Note Licenses for upgrading from RM 9 to RM 25 or RM 64 and from RM 25 to RM 64 are also available RM V This additi...

Страница 24: ...a Management Tool please refer to Camera Management Tool User Manual Operating Environment CPU Intel Core i7 2600 or higher OS 1 Windows Vista Ultimate Business Enterprise Home Premium SP2 32 64 bit Windows 7 Ultimate Professional Enterprise Home Premium SP1 32 64 bit Windows 8 Windows 8 Pro Windows 8 Enterprise 32 64 bit 4 Windows 8 1 Windows 8 1 Pro Windows 8 1 Enterprise 32 64 bit 4 Windows Ser...

Страница 25: ...mputer to ensure preparations have been properly completed Access the camera top page using a web browser Access the Top Page from Camera Management Tool P 41 Launch VB Viewer to check camera video Checking Camera Video P 43 Step 3 Install the Camera Install the camera to suit the operating environment it will be used in Installation Guide Step 4 Set the Camera Angle Use Camera Angle Setting Tool ...

Страница 26: ...eck content distributed to guest users and Admin Viewer to make all settings and fully check all preparations Admin Viewer VB Viewer P 137 Step 7 Use Admin Tools Admin Tools can be used to set masks to ensure privacy set view restrictions and set the Intelligent Function to detect changes in video You can also view logs of the camera s operational status as well as browsing and managing video reco...

Страница 27: ...up To prepare the camera for use install necessary computer software and make initial settings for web browser security and the camera When initial settings are complete access the camera and check if video can be viewed ...

Страница 28: ...llation or you can select which software to install using Custom Installation Note Easy Installation will also install the Camera Angle Setting Tool which cannot be used by VB R11VE VB R11 and VB R10VE Use Custom Installation and exclude the Camera Angle Setting Tool if you do not need to install it If you plan to use Admin Viewer and Admin Tools on a computer that will not be used for the initial...

Страница 29: ... software that will be installed and click Next If you select Custom Installation select the software to be installed and click Next The User License Agreement screen appears 4 Select the installation method 5 Confirm or select the software that will be installed ...

Страница 30: ...ion starts The Camera Management Tool icon and Camera Angle Setting Tool icon if installed will appear on the desktop 6 Read through the user license agreement and click Yes if you accept it 7 Click Exit or Reboot ...

Страница 31: ...where Windows Firewall is enabled you may need to register the Camera Management Tool as an application allowed to communicate via the firewall Note Even if you do not perform the following steps you can still register the Camera Management Tool with the Windows Security Alert dialog box that appears when you launch the software P 36 Check Make Security Settings 1 Click System and Security Windows...

Страница 32: ...egister the camera s IP address as a trusted site to access the Admin Viewer VB Viewer Setting Page or Admin Tools Note Set the camera IP address with the Camera Management Tool P 37 If you skip registration in this step you can perform registration later using Camera Management Tool P 40 3 Click Change settings Allow another app 4 Select Camera Management Tool and click Add 1 Click Tools menu Int...

Страница 33: ...he 192 160 1 portion of the address will be registered as trusted sites Settings When Using Windows Server Register about internet and the Camera Host Name Admin Viewer and Admin Tools will not launch when IE ESC Internet Explorer Enhanced Security Configuration is enabled in Windows Server 2008 Windows Server 2012 Before using the tools register about internet and the host name for the connected ...

Страница 34: ...08 Windows Server 2012 the sound function is disabled by default To use audio functions with the viewer follow the steps below to enable the sound function Important When about internet is registered the security level in Windows 7 is the same as when using Internet Explorer After using Admin Viewer Admin Tools it is recommended that you remove about internet and the camera name as necessary and r...

Страница 35: ...vice Not Running dialog box appears The Sound dialog box appears If no audio device is installed refer to your computer manual 2 Click Sound 3 Click Yes 4 Click the Playback tab to confirm that an audio device has been installed ...

Страница 36: ...Tool Launch the Camera Management Tool that was installed onto the computer from the setup CD ROM Please refer to Installation Guide Connecting the Camera Camera Management Tool launches and the Camera Search Settings dialog box appears The Camera Management Tool main screen will appear Searching for Cameras and Setting up Networks This will explain network settings so you can search for network c...

Страница 37: ...bnet Mask and IPv4 Default Gateway Address 2 IPv4 Address If you selected IPv4 Address Setting Method Manual enter a fixed IPv4 address 3 Subnet Mask If you selected IPv4 Address Setting Method Manual enter the designated subnet mask values for each network 4 Enter a default gateway address Select this to manually set the default gateway address 1 Click the Search Camera icon 2 Detected cameras wi...

Страница 38: ...ll restart and the settings will take effect When you click OK other settings in Password Date and Time Camera Video Basic Camera Settings will also take effect Set the Password Date and Time Camera Name and Video Set basic camera information such as the camera name administrator password and date Once you have entered information for each item click OK Password Setting Click Password and set the ...

Страница 39: ...e setting method time zone and daylight saving time For details on each item please refer to Setting P 69 in Set the Date Time Camera Name Setting Click Camera and set the camera name displayed in the viewers and other software For setting details please refer to Camera Name P 75 in Set General Camera Controls ...

Страница 40: ... s security level for Internet and intranet sites is set to High by default As a result it may be necessary to register the camera s IP address as a trusted site to access the Admin Viewer VB Viewer Setting Page or Admin Tools A confirmation message appears The camera will be registered as a trusted site for Internet Explorer Note The registered information will be loaded when Internet Explorer is...

Страница 41: ...era is Not connectable You can also launch the camera top page by entering the IP address configured with the Camera Management Tool P 37 directly into the web browser If the camera top page does not launch please refer to Troubleshooting P 254 Top Page From the top page of the camera you can navigate to the Setting Page to configure various camera settings launch Admin Tools and access Viewers to...

Страница 42: ...trators can connect to a camera using the Setting Page and Admin Tools Authorized users with camera control privileges can also connect using Admin Viewer You can set the user privileges of registered users with Security User Restrictions User Authority on the Setting Page P 118 Important To ensure system security be sure to change the administrator password Do not forget the new password Restore ...

Страница 43: ... For details on how to use each Viewer please refer to Admin Viewer VB Viewer P 137 Note If the blocked content dialog box appears when you launch a viewer click Add in the dialog box to register the camera s IP address as a trusted site Viewing Video With VB Viewer VB Viewer allows any user with camera access to use the camera The user however is restricted to a limited set of functions When you ...

Страница 44: ...44 The Admin Viewer launches and displays the camera video 2 Enter a user name and password P 42 and click OK ...

Страница 45: ...amera Angle Setting Tool After installing the camera connect to it with the Camera Angle Setting Tool and view the displayed video to make settings such as the camera angle focus and exposure M641 M640 M741 M740 ...

Страница 46: ...o set the camera angle There are two methods for connecting to the camera Specify camera information Use a Camera Specification File P 56 Launch the Camera Angle Setting Tool and Connect to a Camera Important The Camera Angle Setting Tool is for use when installing the camera Do not use on a daily basis Frequent use may result in camera malfunction After changing settings with the Camera Angle Set...

Страница 47: ...communication Normally disabling SSL communication the factory default setting is not an issue P 123 5 Port Set the HTTP port number to 80 443 or a value in the range of 1024 to 65535 Normally use 80 factory default setting P 89 A confirmation message will appear Note Connecting to the camera with the Camera Angle Setting Tool will disconnect connections to that camera from Viewers and recording s...

Страница 48: ...rmation listed in a camera specification file P 56 The Select Camera dialog box appears The camera specification file will be loaded and the camera name will appear in Camera List 1 Click File menu Select Camera 2 Click Load camera specification file 3 Select a camera specification file and click Open ...

Страница 49: ... the X in the upper right corner of the dialog box The camera list will be discarded when the Camera Angle Setting Tool is closed Load the camera specification file the next time you launch the Camera Angle Setting Tool Disconnect from the Camera and Close the Software Once you have completed setting the camera angle follow the steps below to disconnect from the camera and close the Camera Angle S...

Страница 50: ...50 You will disconnect from the camera The Camera Angle Setting Tool will close 1 Click File menu Disconnect 2 Click File menu Exit ...

Страница 51: ...een between small and large sizes You can select the screen size with Display menu Display screen size 3 Control Assist Display Display dotted lines indicating the possible ranges for panning and tilting Camera Angle Setting Tool Screen M641 M640 11 12 13 4 14 15 16 17 18 5 6 8 2 6 1 3 4 5 7 10 9 8 M741 M740 1 14 15 16 17 18 8 2 10 9 8 M641 M640 ...

Страница 52: ...ble the digital zoom range will appear on the zoom slider and you will be able to use digital zoom The higher the digital zoom ratio the lower the video quality 15 Image Flip Selection Menu Select the orientation of the camera video If Enable is selected the video is displayed rotated 180 degrees 16 Image Stabilizer Select this to reduce blur in video due to camera vibration If there is still blur...

Страница 53: ...king Video If you click anywhere in the video display area the camera angle will change to center on that location If you click outside the pan or tilt range however the camera angle will only change for the one which is within its range Note If the camera moves differently than the intended operation or if settings in the full range displayed by control assist cannot be made control assist may be...

Страница 54: ...it the brightness of subjects Note The exposure compensation value set with the Camera Angle Setting Tool will be reset when the camera is rebooted Set the Focus You can automatically or manually focus on subjects or set focus to infinity You can use One shot AF to focus on subjects manually 1 Auto Automatically focuses on the subject 2 Manual Use buttons 4 and 5 to manually adjust focus 3 Fixed a...

Страница 55: ...hrow the camera out of focus Set the Exposure Compensation Set the video brightness Focuses further away Focuses nearer Focus Mode Day Night Settings Day mode Night mode Auto Manual 0 3 m 12 in infinity 0 3 m 12 in infinity Fixed at Infinity Fixed near infinity A white wall or other subject lacking bright dark contrast A slanting subject A subject reflecting strong light Asubject consisting of onl...

Страница 56: ...File Important Enter the actual administrator passwords in the camera specification file Handle the camera specification file with sufficient care Important The maximum number of cameras that can be listed in a camera specification file is 30 An error will be generated if you try to load a file with the Camera Angle Setting Tool listing 31 or more cameras Header Row RegisterName HostName PortNumbe...

Страница 57: ... 80 root camera1 0 1Fa VB M640VE 192 168 100 2 80 root camera2 0 1Fb VB M641V 192 168 100 3 80 root camera3 0 2Fa VB M641V 192 168 100 4 80 root camera4 0 2Fb VB M641V 192 168 100 5 80 root camera5 0 3Fa VB M741LE 192 168 100 6 80 root camera6 0 R VB M740E 192 168 100 7 443 root camera7 0 Important If you separate items with a delimiter other than a comma such as a semicolon the Camera Angle Setti...

Страница 58: ...58 ...

Страница 59: ...age is used to make necessary basic settings after camera installation such as network video and security settings and to make settings to suit the situation in which a camera will be used It also has the maintenance menu for the camera ...

Страница 60: ...ick this button to launch Admin Viewer 2 Back to top Click this button to navigate to the top page 3 Setting Menus If you click this a submenu P 62 will appear excluding the Memory Card Maintenance and User Page menus Click the submenu to navigate to each Setting Page How to Use The Setting Page 1 Launch the camera top page and click Setting Page P 41 2 Enter a user name and password P 42 and clic...

Страница 61: ... Apply and reboot to apply the changed settings and reboot the camera Click Clear to revert to the previous settings Return to the Setting Menu Click Settings menu at the top right of each Setting Page to return to the top menu Help Click Help at the beginning of any setting item to display a detailed explanation of that setting item Setting Ranges and Character Limits For settings where you enter...

Страница 62: ...r the camera name and external input output devices and for camera use and installation settings Initial Setting P 79 Sets initial settings such as video quality compensation at camera start up Video Settings P 72 ADSR P 82 ADSR is an abbreviation for Area specific Data Size Reduction Reduces the size of transmitted H 264 video by reducing the video quality of unspecified area On screen Display P ...

Страница 63: ...mer P 110 The timer function can generate events that can trigger operations such as video recording and e mail notifications at regular intervals Switch Day Night P 112 The camera angle can be moved to preset positions when events cause Day Mode and Night Mode to switch Linked Event P 113 By linking two types of events a single event is triggered R11 M641 M741 R11 M641 M741 R11 M641 M741 R11 M641...

Страница 64: ...dress Configure Network Settings Basic Settings Network Important If any network settings are changed the camera may become inaccessible from the active web browser If this occurs a confirmation dialog box will appear when you click Apply or Apply and reboot Click OK to apply the new settings If you reboot the camera after changing settings and cannot connect to the camera from the web browser any...

Страница 65: ...ble AutoIP IPv4 Address AutoIP When AutoIP is set to Enable an automatically set IPv4 address is displayed IPv6 Settings for using IPv6 to connect to the camera The IPv6 address can be assigned by the RA or DHCPv6 server automatically or set manually IPv6 Select this to enable or disable IPv6 Auto RA Select Enable to set an address automatically using RA Router Advertisement network information au...

Страница 66: ...ver Name Server Address 1 Name Server Address 2 Enter the name server address you want to register To register only one address keep the Name Server Address 2 field blank You must set at least one if you manually set the IPv4 address or IPv6 address Note If Name Server Address 1 is unavailable Name Server Address 2 will be accessed However Name Server Address 2 must be set in advance Auto Setting ...

Страница 67: ...ame to the Search Domain List Specify the host name without specifying a domain name for a server such as the upload server to search domains in the form host name domain name where the domain names are specified in the Search Domain List Do not use _ underscore in the domain name in Internet Explorer 8 9 10 11 Search Domain List A list of domain names added using Search Domain The function querie...

Страница 68: ...n Viewer Admin Tools etc are connected terminate the connection before changing the password Confirm Password Enter the same password as above for confirmation Set the Administrator Password Basic Settings Password Important To ensure system security be sure to change the administrator password Do not forget the new password Press the reset switch to restore factory default settings if you have fo...

Страница 69: ...time setting method The settings are configured as follows depending on the setting configured in Setting Method Set manually Set the desired date and time in Date and Time Set the time in 24 hour format in hour minute second order Synchronize with NTP server Select the setting method displayed in Auto Setting of NTP Server Not used Enter the IP address or host name of the NTP server in NTP Server...

Страница 70: ...h the time of the NTP server at the address acquired from the DHCP server or DHCPv6 server If the NTP server address can be acquired from both the DHCP server IPv4 and DHCPv6 server the NTP server address acquired from the DHCP server IPv4 will be used Synchronize with NTP broadcast The camera will synchronize time with NTP broadcasts received from the NTP server The camera s NTP broadcast mode do...

Страница 71: ...e time difference is large Time Zone Select the appropriate time zone If the time zone is changed the date and time display will update automatically according to the specified time zone Daylight Saving Time Select whether or not to automatically adjust for daylight saving time to suit the time zone ...

Страница 72: ...e reflected in the other Video Settings submenus The following may occur if video size video quality and target bit rate are set higher as this increases network load and data size per frame JPEG The frame rate may drop H 264 Video may be temporarily disrupted In case of H 264 video block noise may become noticeable if a large video size and low target bit rate are set The data size may increase d...

Страница 73: ...oad a video or record it to a memory card with Video Record Upload or Memory Card Video Record Action P 96 H 264 1 Settings for H 264 1 video transmitted from the camera Configure settings here for using H 264 video for upload or memory card recording H 264 2 video cannot be used for upload or memory card recording H 264 1 video can be displayed using Admin Viewer and RM Lite Viewer It cannot be d...

Страница 74: ...o Video Size Bit Rate Control Target Bit Rate kbps Video Quality Frame Rate fps I Frame Interval sec Please refer to each setting in H 264 1 Important When H 264 1 is used for memory card recording and upload the following restrictions apply to the H 264 1 setting Bit Rate Control Use bit rate control only Target Bit Rate kbps 3072 or less I Frame Interval sec either 0 5 1 or 1 5 The included RM L...

Страница 75: ...ct On2 The angle of view will be narrower and video noisier when using stabilization compared to when it is not used AGC Limit Select the Auto Gain Control AGC limit value for increasing gain to brighten video in low light conditions The greater the value the higher the sensitivity will become but video noise will increase Set General Camera Controls Camera Camera Settings Important The image stab...

Страница 76: ...esired contrast on the object would like the image brighter or darker please adjust the Exposure Compensation P 80 and or the Metering Mode P 80 Pan Tilt Speed Control Select the pan tilt control mode If Control by zoom position is selected the pan tilt speed will be slower in telephoto and faster in wide angle Note Pan Tilt Speed Control can also be set in Control for Admin Pan Tilt Speed P 148 I...

Страница 77: ... monochrome sooner Response sec Select the number of seconds for determining when to switch Day Night Mode when Day Night is set to Auto Day Night Mode switches when the brightness continues to exceed or fall below the brightness set in Switching Brightness within any of the settings for the number of seconds selected Select 30 or 60 if brightness changes frequently such as when a light source pas...

Страница 78: ... camera control privileges If Return to Home Position has been selected the home position of the camera must be set in advance with Control for Admin Preset Initial Setting Preset Setting Preset Registration tab P 170 External Input Device 1 2 Enter each device name in order to identify the corresponding external input device being connected There are 2 external input device terminals on the camer...

Страница 79: ...g Clear will revert to the initial camera settings saved in the camera In addition if you click Preset Initial Setting Initial Setting Registration P 159 in Control for Admin the settings at that point will applied here as initial camera settings 1 Video Display Area This displays a preview of how video will appear due to changes made in each item The video display area is used for confirmation To...

Страница 80: ...sure Selects an exposure For details please refer to Exposure in Use Control for Admin P 162 Slow Shutter When Auto is selected for Exposure you can select the slowest shutter speed For details please refer to Exposure in Use Control for Admin P 162 Exposure Compensation Selects an exposure compensation value For details please refer to Exposure in Use Control for Admin P 162 Metering Mode Selects...

Страница 81: ...vel If the subject is obscured by haze this adjusts contrast in the video to improve subject visibility For details please refer to Haze Compensation in Use Control for Admin P 160 Day Night Select a capture mode suited to the brightness of the subject For details please refer to Day Night in Use Control for Admin P 165 Use Infrared Infrared Level Select whether or not to use the Day Night linked ...

Страница 82: ...lay area and you will not be able to configure a specified area Reduce Data Size by Lowering Video Quality in Specific Areas Video and Audio ADSR Important This function can be used if Bit Rate Control is set to Do not use bit rate control in Video Settings H 264 1 or H 264 2 Some image scenes and settings for selected areas may not be able to reduce data size using ADSR Please test the ADSR featu...

Страница 83: ...e area you want to specify Change the size of the frame by dragging any of the 8 handles If you want to change the camera angle use the pan tilt zoom sliders Preview The camera will move to a specified area if you click Preview for that area Note You can use Admin Viewer to check video with ADSR settings applied Video outside the specified area will deteriorate according to the amount of applied d...

Страница 84: ...e in H 264 1 Select Enable to lower video quality outside areas set with Specified Area in H 264 1 video Enable in H 264 2 Select Enable to lower video quality outside areas set with Specified Area in H 264 2 video Important If you use ADSR with H 264 1 H 264 1 video cannot be uploaded or recorded to a memory card ...

Страница 85: ... order Time display Select whether to display the time on the Viewer Position of time display Select position for time display on the Viewer Text display Select the text strings to display on the Viewer Display designated string Displays the text string entered in Text string display below Display camera name Displays the camera name entered in Camera Name alphanumeric characters P 75 Position of ...

Страница 86: ... be displayed in alphanumeric characters Color of text Select from eight colors for the text color Background color Select from eight colors for the background color Color depth of text and background Select a color depth combination Filling Transparence Translucence for the text and background color ...

Страница 87: ...t to Enable Audio Input Select the type of microphone connected to the camera Set Audio Input Output Video and Audio Audio Settings Important Video and audio can be distributed to up to 30 clients However when there are many clients or they are connected to the camera over an SSL connection the video frame rate may slow down and the sound may drop out if audio reception from the camera is enabled ...

Страница 88: ...File Format wav µ law PCM 8bit Sampling frequency 8000 Hz monaural A sample sound clip is included on the Setup CD ROM in the SOUND folder Sound Clip Name Enter the name of the sound clip to upload Be sure to enter the sound clip name If it is blank when you click the Apply button the sound clip will be deleted To delete an uploaded sound clip click Delete next to the name of the sound clip Cautio...

Страница 89: ...SNMP MIB2 supporting RFC1213 Supports SNMP protocol versions v1 and v2c v3 unsupported SNMP Select this to enable or disable SNMP When using SNMP the camera information can be referenced by the SNMP Manager Community Name Enter a community name for SNMP HTTP SNMP and FTP Server Settings Server Server Settings Important If the setting of HTTP Port or HTTPS Port is changed and the camera may become ...

Страница 90: ...ation Setting information can be referenced by the SNMP manager If left blank the camera model name will be used Installation Location Enter information regarding the installation location of this camera Setting information can be referenced by the SNMP manager FTP Server Use FTP Server Select whether to use an FTP server Important Canon will assume no liability for any accident or damage resultin...

Страница 91: ... Admin Viewer and Admin Tools can queue for camera control Maximum Connection Time sec Enter the maximum time in seconds during which an individual client can connect to the camera If set to 0 the connection time is unlimited Camera Control Time sec Enter the maximum time VB Viewer can retain camera control privileges Video Transmission Settings Server Video Server Important When there are many cl...

Страница 92: ... Select whether to detect when there is no sound coming from the microphone When set to Enable audio data transmission will pause while there is no sound input from the camera This can reduce the load on the network used Audio Reception from Viewer Select to receive audio from Admin Viewer and RM Viewer Received audio can be output from a speaker with an amplifier connected to the camera Audio Tra...

Страница 93: ... transmission as follows IPv4 Range from 224 0 0 0 to 239 255 255 255 IPv6 Address starting with ff00 8 Set IPv4 to 0 0 0 0 and IPv6 to 0 to disable multicast Multicast Port Enter the multicast port number for audio transmission If set to 0 multicast is disabled Multicast TTL Enter the effective range for multicast transmission If set to 0 multicast is disabled The TTL Time To Live representing th...

Страница 94: ...cremented each time the signal passes through a router When the value reaches 0 the signal can no longer pass through the router and be transmitted For example if TTL is set to 1 multicast transmission is confined to the local segment only and cannot pass through the router to be transmitted Audio Transmission Select whether to use audio transmission for RTP streaming Note RTP Streaming URL rtsp A...

Страница 95: ...s of the Server Audio Server Audio Transmission from the Camera setting RTP streaming audio will be used However to use audio settings select Enable for Audio Transmission from the Camera and configure the settings R11 M641 M741 ...

Страница 96: ...Video Record settings configured with each of the Event menus External Device Audio Detection and Linked Events The setting in the Event tab of the Intelligent Function Setting Tool P 227 When using the upload function or recording to the memory card do not change the settings in the Setting Page Doing so may result in the upload function or the recording to memory card to stop If you are using HT...

Страница 97: ... Buffer or Post event Buffer P 97 If Volume Detection Event is enabled disable ON Event Operation OFF Event Operation or Ongoing ON Event Operation P 107 From the Intelligent Function Setting Tool Event tab disable ON Event Operation OFF Event Operation or Detected mode Operation P 227 If External Device Input Event is enabled disable Active Event Operation Inactive Event Operation or Ongoing Acti...

Страница 98: ...r enter the port number of the proxy server Proxy User Name Proxy Password Enter to use a user name and password for the proxy server Digest authentication is not supported Parameter query string Enter the request parameters Parameters can be specified using the character P 252 HTTP Upload Test Clicking Exec initiates an upload test based on the settings currently entered Only a single JPEG will b...

Страница 99: ...cond ms jpg Example 20140123112122000 jpg YYYYMMDD Directory HHMMSSms A subdirectory named year month day is created first and then the video is uploaded using the file name hour minute second ms jpg Example 20140123 112122000 jpg Loop Video is loaded with a file name numbered in sequence from 0000 up to the value set in Maximum Number of Loops Example 0000 jpg 0001 jpg The number will return to 0...

Страница 100: ... to User Setting enter the subdirectory name to be created as well as the name of the created file Parameters can be specified in the entry with the character P 252 FTP Upload Test Clicking Exec initiates an upload test based on the settings currently entered Only a single JPEG will be uploaded but it is not necessary to click Apply at that time After entering a password first click Exec then clic...

Страница 101: ... Sets whether to record video from the camera to a memory card or upload it with HTTP or FTP These can also be set with the Upload submenu P 96 and will be reflected in Video Record Setting here Video Record Action Select Record to Memory Card to record to a memory card Memory Card Operations For details on settings please refer to P 130 Memory Card Information For details on settings please refer...

Страница 102: ...Mail Server Name Enter the host name or IP address of the SMTP server Mail Server Port Enter the port number for the SMTP server Sender From Enter the e mail address of the sender Recipient To Enter the e mail address of the recipient Authentication Select an authentication method suited to the destination SMTP server User Name Password POP Server Enter the user name and password needed for authen...

Страница 103: ...in alphanumeric characters Message Body Enter the message body text of the e mail in alphanumeric characters Parameters can be specified in the text using the character P 252 E mail Notification Test Clicking Exec initiates an e mail notification test based on the settings currently entered It is not necessary to click Apply After entering a password first click Exec then click Apply ...

Страница 104: ...rminals remain in the closed state conducting circuit during normal operation and the terminals open upon an active event and close upon an inactive event Active Output Format Select the output format when the external device output is active Pulse Output Time sec Enter the output duration time sec when Active Output Format is set to Pulse External Device Input External Device Input Event Select w...

Страница 105: ...riggered If Enable is set Preset Video Record and E mail Notification will be executed according to their settings when an active event is triggered Inactive Event Operation Select the operation to be performed when an inactive event is triggered If Enable is set Preset Video Record and E mail Notification will be executed according to their settings when an inactive event is completed Ongoing Act...

Страница 106: ...or the external device input Audio Playback at Inactive Event If you select Enable the sound clip specified in Sound Clip will play back at inactive events for the external device input Sound Clip Select the sound clip when Audio Playback at Active Event or Audio Playback at Inactive Event has been set to Enable You must register the sound clip with Video and Audio Audio Settings P 88 beforehand V...

Страница 107: ...ria for triggering a volume detection event Reference Volume Level Enter the reference sound level to be used for detection Set the reference volume level by performing an actual test while checking Current Volume Level before configuring the setting Current Volume Level The current volume level appears on the status bar The level set in Reference Volume Level is indicated by a red mark Volume bel...

Страница 108: ...estination specified in Video Record Action P 96 E mail Notification Select whether to send an e mail notification depending on the volume detection event If you select Enable and a volume detection event is triggered an e mail notification will be sent To use e mail notification you must set Video Record E mail Notification P 102 beforehand External Device Output for ON Event Select whether exter...

Страница 109: ...If you select Enable and a scream detection event is triggered video will be transmitted to the recording destination specified in Video Record Action P 96 E mail Notification Select whether to send an e mail notification depending on the scream detection event If you select Enable and a scream detection event is triggered an e mail notification will be sent To use e mail notification you must set...

Страница 110: ...erval for 24 hours starting from the time specified in Start Time When set to Enable only Video Record operations will be performed Start Time Enter the start time of the timer event in 24 hour format The timer event will be triggered at the start time End Time When 24 Hour Continuous Setting is set to Disable enter the end time in 24 hour format for repeating the timer event The timer event will ...

Страница 111: ... is triggered This can only be set with Timer 1 Select Switch to Day Mode to switch to Day Mode at the start time and Night Mode at the end time Select Switch to Night Mode to switch to Night Mode at the start time and Day Mode at the end time Repeat Interval is not supported Important When control privileges are held by applications like Admin Viewer and the camera angle has moved as a result of ...

Страница 112: ...ht Mode switching in Switch Day Night in External Device Input P 105 or Timer P 110 Preset when Switching to Day Mode Executes the preset when switched to Day Mode Preset when Switching to Night Mode Executes the preset when switched to Night Mode Execute Presets When Switching Day Night Mode Event Switch Day Night Important When the Admin Viewer or other camera control applications have control p...

Страница 113: ... register up to four linked events You can link five types of events Volume Detection Scream Detection External Device Input Timer and Intelligent Function Linked Events Select whether to use a linked event Event Linking Method Select the event linking conditions AND A new linked event is triggered if both event types selected with Event 1 and Event 2 are triggered Set Event Order and Event Gap fo...

Страница 114: ... Function cannot be specified in both Event 1 and Event 2 For Volume Detection select whether an ON event or OFF event triggers a linked event For Scream Detection select whether an ON event or OFF event triggers a linked event For External Device Input select External Device Input 1 or 2 then select an active event or inactive event to trigger a linked event For Timer select the timer event numbe...

Страница 115: ...e sent To use e mail notification you must set Video Record E mail Notification P 102 beforehand External Device Output for ON Event Select whether external device output 1 or 2 is active or inactive when an ON event is triggered External Device Output for OFF Event Select whether external device output 1 or 2 is active or inactive when an OFF event is triggered Audio Playback at ON Event If you s...

Страница 116: ...ed but Event Gap Setting 4 sec Exceeded ON Event 1 Event 2 Consolidated state OFF ON OFF ON OFF ON Event 1 Event 2 Consolidated state OFF ON OFF ON OFF ON Event 1 Event 2 Consolidated state OFF ON OFF ON OFF Both events are ON but their order of occurrence is incorrect Therefore a linked event does not occur here ON Event 1 Event 2 Consolidated state OFF ON OFF ON OFF The gap between the occurrenc...

Страница 117: ...itches Between ON OFF ON Event 1 Event 2 Consolidated state OFF ON OFF ON OFF The linked event does not occur when event 1 turns OFF but at the moment event 2 turns ON Event gap 4 sec in this example ON Event 1 Event 2 Consolidated state OFF ON OFF ON OFF Event gap 4 sec in this example ...

Страница 118: ...core Enter the password in alphanumeric characters Up to 50 authorized users can be added User List Displays a list of added authorized users The order of the list can be changed with the buttons on the right To delete an authorized user from the list select the user and click Delete User Authority Set the permissions for authorized users and guest users Privileged Camera Control Camera Control Vi...

Страница 119: ...4 addresses that have not been specified in Network Address Subnet Network Address Subnet Enter IPv4 addresses into the list and select Yes or No for access for each address You can specify the subnet to set access restrictions by network or host If set to No access to all ports is blocked Set Access Restrictions Security Host Access Restrictions Important To prohibit access via a proxy server in ...

Страница 120: ...estrictions Default Policy Select whether to allow or block access from IPv6 addresses that have not been specified in Prefix Prefix Length Prefix Prefix Length Enter IPv6 addresses prefixes into the list and select Yes or No for access for each address You can specify the prefix length to set access restriction by network or host If set to No access to all ports is blocked ...

Страница 121: ...certificate will appear Country C Enter the ISO3166 1 alpha 2 country code State Province ST Locality L Organization O Organizational Unit OU Common Name CN Enter state province name locality organization name organizational unit and common name in alphanumeric characters spaces or printable characters Enter an FQDN format host name etc to set the common name required Validity Period Start Date Va...

Страница 122: ...take effect after rebooting Note To install an intermediate certificate and a primary intermediate certificate use a text editor or similar software to place them in the same file and install them as an intermediate certificate Delete Server Certificate Click Exec to delete the server certificate However if SSL communications are enabled the certificate cannot be deleted Set SSL Communications to ...

Страница 123: ...le or disable SSL communications The setting will take effect after rebooting However if no certificate is installed SSL communications cannot be used Note It may take a few minutes to generate an SSL key If SSL communications are used video transmission performance drops Depending on the type of the certificate being installed on the camera a dialog box may appear indicating that the web browser ...

Страница 124: ... User Name Enter the user name used for authentication Password Enter the required password for authentication This is displayed only when Authentication Method is set to EAP MD5 EAP TTLS or EAP PEAP Certificate Information This is displayed only when Authentication Method is set to EAP TLS EAP TTLS or EAP PEAP CA Certificate Status If no CA certificate is installed Not Installed is displayed If a...

Страница 125: ...d is set to EAP TLS Client Private Key Password Enter the password for the client private key Required when a password has been configured for the private key This is displayed only when Authentication Method is set to EAP TLS Delete Certificate Deletes all installed CA certificates client certificates and client private keys Only CA Certificate is displayed when Authentication Method is set to EA...

Страница 126: ...ange protocol IKE Set IPsec Security IPsec Important To run this camera with IPsec the communicating devices and network must be set beforehand Contact your system administrator for these settings When connecting with IPsec set the camera IP address manually For IPv4 addresses use addresses with IPv4 Address Setting Method set to Manual in Basic Settings Network IPv4 For IPv6 addresses use address...

Страница 127: ... mode Destination IPv4 Address Destination IPv6 Address Enter the IP address of the connection destination Source IPv4 Address Source IPv6 Address Enter the IP address of the source Security Protocol Select the IPsec protocol If ESP is selected enter only the setting items relating to ESP If AH is selected enter only the setting items relating to AH If ESP and AH is selected enter all setting item...

Страница 128: ...urity Gateway IPv4 Address Security Gateway IPv6 Address Enter the IP address of the security gateway if IPsec Mode is set to Tunnel Mode Destination Subnet Mask Length IPv4 Destination Prefix Length IPv6 Enter the subnet mask IPv4 or prefix length IPv6 when IPsec Mode is set to Tunnel Mode When Security Protocol Is Set to ESP or ESP and AH SA ESP Encryption Algorithm to SA ESP SPI inbound must be...

Страница 129: ...is item need not be set if No Authentication was selected SA ESP SPI inbound Enter the SA SPI value for inbound Set a desired value in the range of 256 to 4294967295 Since this setting is used as an ID for identifying the SA be careful not to specify an inbound SPI whose value is already used in the SPI for other ESP When Security Protocol Is Set to AH or ESP and AH SA AH Authentication Algorithm ...

Страница 130: ...These can also be set with Video Record Upload P 96 and will be reflected in Video Record Setting here Video Record Action Select Record to Memory Card to record to a memory card Memory Card Operations The setting items will change depending on the memory card status unmounted mounted Memory Card Operations and Information Display Memory Card Important Information recorded to the memory card may b...

Страница 131: ...curs the frame rate of video recorded in JPEG format is always 1 fps When a network error occurs interrupting the transmission of recording mode stream video video is saved in the JPEG format regardless of the Video Format setting the frame rate is fixed at 1 fps Pre event Buffer number of frames JPEG Pre event Buffer sec H 264 1 Enter the number of frames or seconds of video to be buffered before...

Страница 132: ...ted on the memory card The memory card cannot be accessed during this process It is also recommended that users not upload or stream video from the camera The more files that are involved in the recreation of video management information the longer the process will take and may require several hours to process Format Click Exec to format the memory card Formatting erases all files and directories ...

Страница 133: ...nformation Recreation Required This status indicates that management files are corrupted or not consistent with saved video files It is necessary to click Exec in Recreate Video Management Information to recreate the management file If the management files are not recreated even when Recreate Video Management Information is used Format P 132 must be used Video Saving Displays whether videos can be...

Страница 134: ... Display information on 3rd party software licenses Reboot Reboot the camera Restore Default Settings Except for the following settings all user settings will be discarded and returned to the default settings after rebooting Administrator password of the basic settings LAN IPv4 IPv6 Date and Time Host access restrictions for security SSL TLS Display Camera Device Information and Perform Maintenanc...

Страница 135: ... backup file created with Back Up Settings The IP address certificates used by SSL and 802 1X and private key will also be restored After restore is completed the camera will be rebooted Refresh Drive System Cleans the connection parts inside the camera When Exec is clicked the pan operation is performed for two cycles each of left and right and then the camera returns to the camera angle before e...

Страница 136: ...136 ...

Страница 137: ...Chapter Admin Viewer VB Viewer Access the Viewers included on the camera with a web browser to view and use live video and configure those display settings ...

Страница 138: ...e Viewers each user can access depend on the granted access privileges P 118 Administrator This user is granted full privileges and can launch the Admin Viewer and VB Viewer The user name is fixed to root The administrator can prohibit all camera access from guest users by revoking all privileges for authorized users and guest users Authorized user This user can launch the Admin Viewer and VB View...

Страница 139: ...on Audio Distribution Scope of Privilege Admin Viewer Use VB Viewer Use View Video With VB Viewer Receive or Audio with Admin Viewer VB Viewer Grant to Authorized Users Yes Yes Yes Yes Grant to Guest Users No Yes Yes Yes Important The Admin Viewer launched by an administrator can access only one camera at a time While administrator privileges are used to access the camera from a given computer acc...

Страница 140: ...e Admin Viewer by clicking Admin Viewer in the upper right of the Admin Tools page P 193 In environments without a proxy server select Internet options Connections tab LAN settings and clear the Automatically detect settings check box in Internet Explorer Exit the Viewer Close the web browser to exit the Viewer View Video With Admin Viewer Important The Admin Tools Certificate must be installed on...

Страница 141: ... Viewer 1 Video Display Area Displays video received from the camera 2 Video Size Set the size and format of video received from the camera Admin viewer only P 143 R11 R10 M641 M640 M741 M740 2 3 4 5 6 25 8 26 27 12 13 11 10 14 9 15 16 17 18 19 20 21 22 23 7 1 R11 M641 M741 R11 R10 M641 M640 M741 M740 2 3 4 7 8 13 11 10 14 9 18 20 21 23 24 12 1 5 R11 M641 M741 ...

Страница 142: ...klight P 155 14 Snapshot Button Open the snapshot panel and display a still image of the moment you clicked the button P 186 15 Memory card mount status icon Displays the camera s memory card mount status Memory card is mounted memory card is not mounted 16 Memory Card Recording Button Start and stop video recording to a memory card P 186 You can use this when a memory card is mounted and you have...

Страница 143: ...splay Screen Size You can set the video size to receive from the camera and the size to display on the computer screen Change the Video Size Select the video size to receive from the camera with the video size setting in the upper left of the Viewer The sizes that can be selected depend on the setting in Basic Settings Video Settings All Videos Video Size Set on the Setting Page P 72 Important Whe...

Страница 144: ...e screen and select Exit Full Screen Mode from the menu that appears Video Size Set Setting Selectable video size JPEG H 264 1280x720 640x360 320x180 320x180 640 x 360 1280 x 720 The sizes set with Video Size in Basic Settings Video Settings H 264 1 or H 264 2 in the Setting Page P 73 determine the sizes displayed to the menu 1280 x 960 640 x 480 320 x 240 320 x 240 640 x 480 1280 x 960 When H 264...

Страница 145: ...ensation button and Obtain Release Camera Control Privileges button Pan Tilt Slider Display the pan and tilt sliders Control for Admin Displays the Control for Admin panel Drag to Move Mode Area Zoom Mode Switch between Area Zoom and Drag to Move functions for dragging in the video display area Video Capture Size Switches the video capture size Snapshot Take a snapshot Audio Reception Displays the...

Страница 146: ...146 Exit Full Screen Mode Exit full screen mode ...

Страница 147: ... Users operating the Admin Viewer with the administrator privileges can control the camera outside the view restrictions Users operating the Admin Viewer with authorized user privileges can control the camera only within the view restrictions Operate the Camera With Admin Viewer Important Multiple users cannot obtain control privileges simultaneously If the Admin Viewer obtains control privileges ...

Страница 148: ...The slider can also move by clicking directly on the slider bar Slider When Using Digital Zoom If you set Camera Camera Settings Camera Control Digital Zoom to Enable on the Setting Page the digital zoom range will appear on the zoom slider and you will be able to use digital zoom Note The higher the digital zoom ratio the lower the video quality Use Pan Tilt Zoom in Control for Admin You can pan ...

Страница 149: ...Camera Control Pan Tilt Speed Control P 76 is set to Control at set speed If Pan Tilt Speed Control is set to Control by zoom position Control speed by zoom position cannot be deselected 3 Zoom Click the buttons to zoom in and zoom out Operation will continue while you hold the button down and stop when you release it 4 Zoom Speed Select the zoom speed when using the Zoom buttons Note The pan tilt...

Страница 150: ...gged right to left the camera will zoom out centered around the area in the rectangle Use Drag to Move to Change the Camera Angle The camera angle will move in the direction of the arrow Movement speed increases with the length of the arrow The maximum length of the arrow is half the width and height of the video display area and corresponds with the maximum movement speed 1 Click the Switch Area ...

Страница 151: ...he frame If you drag an edge of the frame to change its size the camera will zoom in or out to capture the area in the frame Move by Clicking If you click outside the frame the frame will move and center on that point panning and tilting the camera Magnify and Display Part of Video Viewer PTZ User the Viewer PTZ to magnify part of a video using digital zoom without moving the camera When you do no...

Страница 152: ...can use the pan tilt and zoom sliders in the video display area to move the preview frame Note The Viewer PTZ uses digital zoom so the higher the digital zoom ratio the lower the quality of the video Exiting Viewer PTZ When you click the Viewer PTZ button while using the Viewer PTZ the Viewer PTZ panel closes and you exit the Viewer PTZ Note If you close the Viewer PTZ panel without exiting the Vi...

Страница 153: ...nciples Crop Video With Digital PTZ Panel The Digital PTZ panel appears The preview frame operations are the same as with the Viewer PTZ P 152 The preview frame size can be set to any of 5 sizes The screen sizes that can be selected change as follows depending on the setting in Basic Settings Video Settings All Videos Video Size Set on the Setting Page 1280 x 720 640 x 360 320 x 180 selected 640x3...

Страница 154: ...hile using the Viewer PTZ the Digital PTZ panel closes and you exit Digital PTZ Note If you close the Digital PTZ panel without exiting Digital PTZ Digital PTZ continues to operate However when you reconnect to the Admin Viewer the initial state will be restored The Digital PTZ button display will change as follows depending on whether or not you are using Digital PTZ You are not using Digital PTZ...

Страница 155: ...t in the video Receive Transmit Audio Receive audio from the camera transmit audio from the Viewers and configure the respective volume settings Note When you are using Internet Explorer 11 in a 64 bit operating system and the camera is registered as a trusted site and protected mode is enabled reception and transmission of audio will be disabled Receive Audio Receive audio from the microphone con...

Страница 156: ...o even if you close the panel To use the audio function in environments that use a proxy server select in Internet Explorer Use a proxy server for your LAN in Internet options Connections tab LAN settings Proxy server then specify the camera IP address in Advanced Exceptions If you click Reconnect button and reconnect audio reception will stop and camera control will be released Transmit Audio You...

Страница 157: ...smission will continue even if you close the Audio Transmission panel To use the audio function in environments that use a proxy server select in Internet Explorer Use a proxy server for your LAN in Internet options Connections tab LAN settings Proxy server then specify the camera IP address in Advanced Exceptions Only Administrator can transmit audio from the Viewer 3 Select the amount of time to...

Страница 158: ...ll be applied to each setting item in Control for Admin Control for Admin Panel Display Control for Admin Panel If the Control for Admin panel is closed obtain camera control privileges and click the Control for Admin button The Control for Admin panel appears Note You can open the various control items even without obtaining camera control privileges but you will only be able to configure setting...

Страница 159: ...be registered to Camera Initial Setting in the Setting Page Video Reception External Device Output A confirmation message appears when you click Initial Setting Registration If yes is clicked the present pan tilt zoom position as well as the camera settings are registered If No is clicked only the present camera setting values are registered If cancel is clicked nothing is registered and the messa...

Страница 160: ...a size increases When Manual is selected for Smart Shade Control setting a high compensation level may increase video noise If noise is noticeable lower the control level Haze Compensation If the subject is obscured by haze this adjusts contrast in the video to improve subject visibility 1 Haze Compensation Modes Auto Automatically uses Compensation Removal Manual Use buttons in 2 to manually set ...

Страница 161: ... Ranges The estimated focus ranges for Auto and Fixed at infinity depending on the Day Night setting are shown in the following table Important If you set Smart Shade Control to Auto or Manual Haze Compensation is set to Disable Important The focus set with the Admin Viewer will be applied to other users Depending on the lighting used focus may not be maintained when switching between Day Mode and...

Страница 162: ...djusted automatically to suit the lighting conditions Video flickering caused by fluorescent lights etc is reduced Auto Shutter priority AE The aperture is adjusted automatically to suit the specified shutter speed Note If Auto is selected in Camera Initial Setting Day Night on the Setting Page select Auto Auto Flickerless or Auto Shutter priority AE for Exposure 2 Exposure Compensation When you s...

Страница 163: ... If Manual is selected set the shutter speed in the range of 1 1 sec to 1 16000 sec If Auto Shutter priority AE is selected set the shutter speed in the range of 1 2 sec to 1 16000 sec When capturing a moving subject selecting a higher shutter speed can reduce blurry video capture Setting a slow shutter speed may prevent Intelligent Function from working correctly Select a shutter speed that suits...

Страница 164: ...alogen Lamp Select this option to capture video under halogen lamps or incandescent bulbs 3 One shot WB If you set white balance to Manual this will force the white balance to match the light source and lock the setting Setting Method Example Illuminate a white subject white paper etc using the light source making sure the subject fills the entire screen and then use One shot WB Important When the...

Страница 165: ...g a subject continuously day and night appropriate colors may not be achieved In this case applying changes to the image to capture will achieve the appropriate colors Important If you use Auto conduct a thorough operation test to check the effectiveness of the setting beforehand If you use Auto set Control for Admin Exposure P 162 to Auto Auto Flickerless or Auto Shutter priority AE Note that dep...

Страница 166: ... capture video under infrared 740 nm wavelength illumination Infrared 850nm Select this option to capture video under infrared 850 nm wavelength illumination Infrared 940nm Select this option to capture video under infrared 940 nm wavelength illumination 6 None When switching Day Night Mode the camera automatically focuses on each of the fluorescent lighting focus positions set beforehand for Day ...

Страница 167: ...rared illumination strength when Day Night Operation is selected Note If all or part of the image appears to have a white glow there is a possibility that a wall even a wall not in the image is reflecting the infra red lighting If this occurs please adjust the camera angle External Device Output Use external device output Click the icons to activate and deactivate output Output status is shown by ...

Страница 168: ...ard Strong the video file size becomes larger 3 Color Saturation Set a color saturation level Video Reception Video reception settings for the video display area 1 Max Frame Rate JPEG You can select the maximum frame rate for JPEG video The setting is not selectable when displaying H 264 video in the video display area 2 Enable H 264 reception Select to receive H 264 video The Software Product Lic...

Страница 169: ...esets at predetermined times or during switches between Day Mode and Night Mode Auto Control Settings P 177 Automatically cycle through multiple presets at a set time and in a predetermined sequence Tour Route Settings P 179 When using the Intelligent Function lock the monitoring position at a preset camera angle P 216 You can also automatically return to a preset position after Auto Tracking comp...

Страница 170: ...u click Preset Setting in Control for Admin Preset Initial Setting the Preset Setting panel will appear Note The following panels will also appear with the Preset Setting panel Panorama Display Panel Digital PTZ Panel Register Presets Important Reconfigure the presets if you change the Camera Camera Settings Installation Conditions Image Flip P 78 settings on the Setting Page Reconfigure the prese...

Страница 171: ... the registered preset name PTZ Position Settings Yes appears if pan tilt or zoom positions are registered in presets Camera Settings Yes appears if camera settings P 174 are registered in presets and Yes partially if only partial camera settings are registered Show in viewers Shows whether presets are set to be selectable in the Viewers Enable appears when using Quick Registration or for presets ...

Страница 172: ...Z Panel Select Home to set the home position You can register the following information Current PTZ Positions The current pan tilt and zoom positions displayed in the video display area Current Camera Settings Current settings for items in Control for Admin excluding the following items Pan Tilt Zoom Video Reception 1 Use the Viewer to display the camera angle in the video display area that you wa...

Страница 173: ...registered preset and click Quick Registration the preset settings will be exchanged with the current camera angle and settings Presets set with Quick Registration will be selectable in the Viewers Register with Advanced Preset Settings Panel You can use the Advanced Preset Settings panel to arbitrarily name presets load camera information to configure advanced preset settings and perform other ta...

Страница 174: ...ng values The pan tilt zoom positions appear Note This check box cannot be cleared for Home home position Be sure to set this warning icon will appear to the left of the value if you enter settings that fall outside the setting range 4 Camera Settings Select the items in Control for Admin to apply to the preset For details on each item please refer to Use Control for Admin P 158 3 Set each item 1 ...

Страница 175: ...incorrect settings etc click this to revert to the settings registered in the camera 8 Save settings Registers the settings in the Advanced Preset Settings panel The edited preset settings are saved to the camera If you configure preset settings be sure to save them to the camera using Save settings Context Menu If you right click on a preset in the preset list the following menu appears Preview T...

Страница 176: ...you select multiple presets on the preset list and register settings with Quick Registration or the Advanced Preset Settings panel all of the presets will be configured with the same settings Note Home positions cannot be configured simultaneously ...

Страница 177: ...in 24 hour format and select the preset Automatically Move to a Preset Position at a Specified Time Auto Control Settings Important If both Switch Day Night and Day Night Day Night Focus Settings Focus control when switching Day Night Mode P 165 have been set Focus control when switching Day Night Mode will be given priority Important You cannot specify the same time multiple times in Timer 1 to T...

Страница 178: ...gs will not be executed while you have camera control privileges Important Restore settings is shared with the Tour Route Settings tab Since clicking this affects both tabs also take care when restoring tour route settings Important Save settings is shared with the Tour Route Settings tab Since clicking this affects both tabs also take care when saving tour route settings ...

Страница 179: ...utes you can register the numbers of preset that can be toured per route and the tour conditions vary depending on the camera model screen configurations differ as follows Configure the Preset Tour Route Important Since use of preset tour could lead to overuse of the camera possibly resulting in camera malfunction it should only be used when necessary The amount of camera move in unit time can be ...

Страница 180: ...ill be toured appear in this list They will be toured in order from the top of the list You can configure settings such as changing the preset order and the time to pause at a preset position 5 Restore settings This discards the settings you are configuring and reverts to the settings registered in the camera 6 Save settings The settings in the Tour Route Settings tab are saved to the camera Impor...

Страница 181: ... is connected to the camera Always Preset tour is always performed Note When Not used is selected the subsequent preset tour route settings cannot be configured 2 Route Name Enter the tour route name of 64 characters or less 3 Active Time Settings Select Specify Active Time to configure a preset tour at a predetermined time and enter the start time and end time for the preset tour 4 Reverse route ...

Страница 182: ...k Delete the preset will be deleted Note If a preset has already been added to Tour Presets List and is selected when another preset is added from the Select Preset list the added preset will appear below the selected preset Select the preset to configure in Tour Presets List and click Tour Operation Settings The Tour Operation Settings panel appears 4 Click 5 Configure the preset speed and pause ...

Страница 183: ...ra Context Menu Route List Context Menu If you right click on a tour route in Route List the following menu appears Copy The settings for the tour route you right clicked on are copied Paste Copied tour route settings are applied to the tour route you right clicked on Clear The tour route you right clicked on is returned to its initial state It is not saved to the camera Preset selection list menu...

Страница 184: ...nction is displayed for each detection setting number When the detection settings configured in Intelligent Function Moving Object Detection Abandoned Object Detection Removed Object Detection Camera Tampering Detection Passing Detection or Intrusion Detection are triggered the corresponding icon will turn green If names are entered in Detection Setting Name in Intelligent Function Setting Tools P...

Страница 185: ...ion or Scream Detection set in Event Audio Detection P 107 in the Setting Page If detection is triggered the icon will turn green Example Volume Volume Detection status ON Scream Scream Detection status OFF 5 Linked Events Displays the status of linked events for Intelligent Function set with Event Linked Events P 113 in the Setting Page If a linked event is triggered the icon will turn green Exam...

Страница 186: ... The memory card inserted in the camera is mounted P 142 Set Operation Settings to Save Logs and Videos in Video Record Memory Card Memory Card Operations P 101 in the Setting Page The format and size of the video recorded to a memory card depends on the settings configured on the Setting Page Video format Memory Card Memory Card Operations Video Format P 130 Video size JPEG Basic Settings Video S...

Страница 187: ... Recorded Video Utility button to launch the Recorded Video Utility 2 Click the Memory Card Recording button Not recording Recording 3 To stop video recording click the Memory Card Recording button again Important Manually recorded video to the memory card will automatically be terminated after 300 seconds of recording When recording manually do not change the settings in the Setting Page Doing so...

Страница 188: ... icon Memory Card Recording button Recorded Video Utility button Event Display button Control for Admin button Audio Transmission button VB Viewer Operation Range If you have set view restrictions with the View Restriction Setting Tool P 206 the VB Viewer can only be used within the view restrictions Camera Control Privilege Status Indicator Depending on the camera control privilege status the cam...

Страница 189: ... control privileges If you click the Obtain Release Camera Control Privileges button while privileges are not assigned and are put in the queue for privileges the camera control privilege indicator will display the remaining time Control privileges obtained Camera control privilege indicator appears in blue The center of the Obtain Release Camera Control Privileges button is blue Control privilege...

Страница 190: ...190 ...

Страница 191: ...hapter Admin Tools Use the Admin Tools included on the camera to configure the various monitoring methods used by the camera There are also tools for checking camera operation and managing recorded video ...

Страница 192: ...s you to see at a glance which part of the entire area the Viewer is displaying video from or has made settings in View Restriction Setting Tool P 206 This tool limits the range that can be captured by the camera You can visually configure settings with the preview frame on the panorama screen using the mouse Intelligent Function Setting Tool P 210 This tool configures settings for writing to a lo...

Страница 193: ...ttons will be disabled except for the Recorded Video Utility and Log Viewer A user authentication window appears The Admin Tools top page will appear The tool will launch Note The first time you launch any of the tools in the Admin Tools it may take about 5 to 10 seconds for the software to download to the computer When accessing via SSL encrypted communication download time will take longer about...

Страница 194: ...ct ratio in Basic Settings Video Settings All Videos Video Size Set black bars will appear on the top and bottom of the video display area 2 Switch Mouse Operation Button When you click this button mouse operations for icons and in the video display area change as follows 3 Switch Screen Size Button Each time you click this button the screen size of the video display area switches between 320 x 24...

Страница 195: ...perations Click the Control for Admin button P 195 in the viewer area to display the Control for Admin panel The Control for Admin panel operates in the same way as Control for Admin of the Admin Viewer P 158 You can configure the following items in Control for Admin panel of the Admin Tools R11 R10 Smart Shade Control You can configure Smart Shade Control settings P 159 Haze Compensation You can ...

Страница 196: ...y masks are applied to all video transmitted from the camera live video uploaded video recorded video and video recorded to a memory card Privacy masks are not available in the following situations While the camera is launched after being turned on For camera video in the Camera Angle Setting Tool While a panorama image is being created Intelligent Function detection also works in the privacy mask...

Страница 197: ...rivacy mask registration area Important Set the privacy mask area to a slightly larger size than the area you want to hide You can only set privacy masks in the optical zoom range Privacy masks cannot be set in the digital zoom range P 148 3 Select the color for the privacy mask area with Color 4 Click Quick add Preview Frame R11 R10 ...

Страница 198: ...ge Flip setting in Camera Camera Settings Installation Conditions on the setting page If you reconfigure privacy mask settings after you changed the Camera Camera Settings Camera Control Image Stabilizer on the setting page reconfigure all privacy mask positions and sizes After registering a privacy mask pan tilt and zoom the camera to confirm the areas you want to mask do not become visible when ...

Страница 199: ...acy masks not selected are displayed with a crossed out frame 4 Maximum Wide Angle Area This is the visible area when the camera is at maximum wide angle This is only displayed when a privacy mask area is being dragged Change Mask Position and Size You can use the mouse to move or resize the preview frame or change values in Detailed Settings P 200 Note To discard changes and restore settings save...

Страница 200: ...cy Mask Position and Size The position and size settings for the selected privacy mask appear here You can also directly enter the setting values 4 Preview settings Click this to preview the settings entered in 1 and 3 in the video display area and privacy mask registration area The preview results are not saved to the camera Enable disable a Privacy Mask Select the check box to enable the setting...

Страница 201: ...triction Setting Tool P 206 Create a Panorama Image Once you have created and saved a panorama image to the camera it can be used by the tools Panorama Creation Tool Important If the privacy mask settings were changed using the Privacy Mask Setting Tool it is recommended that you recreate the panorama image to reflect the new privacy mask settings in the panorama image R11 R10 VB Viewer Panorama D...

Страница 202: ... a panorama image is being captured the Image Stabilizer is temporarily disabled The following users will be disconnected while creating a panorama image All users except for administrators Users not connected via RTP When a small value is entered for Maximum Frame Rate Video Transmission P 73 in Video Settings JPEG in the Setting Page panorama capture is slowed down Recapture a part of the image ...

Страница 203: ...tart Panorama Creation again The created panorama image will not appear in other tools yet A confirmation message will appear The panorama image is saved to the camera and appears in other tools 4 Click Finish Panorama Creation 5 Click Save to camera 6 Click OK ...

Страница 204: ...a image saved in the camera is deleted Save Load Panorama Image File You can save recorded panorama images as image files and open image files as panorama images Only JPEG images can be used Save an Image File 1 Click Clear 2 Click Save to camera 3 Click OK 1 Click Save to file 2 Select the folder you want to save the image file in and enter the file name in the displayed dialog box ...

Страница 205: ...Admin Tools 6 205 Load an Image File 3 Click Save 1 Click Load from file 2 Select the image file you want to use from the dialog box that appears 3 Click Open ...

Страница 206: ...When accessed via RM Lite For presets or functions that move to preset positions Note Even when view restrictions are set an area outside the view restriction may still appear momentarily when the camera is controlled near the boundary of the view restriction Configure View Restrictions There are two ways to configure view restriction settings Use the panorama screen view restriction preview frame...

Страница 207: ...ry fields The settings are saved to the camera Note The panorama screen may be slightly different from the actual image After you have configured view restrictions be sure to use the VB Viewer to confirm they have been reflected correctly View restrictions are not applied to the video display area of this tool nor in the Admin Viewer Important If you have changed how the camera is installed recapt...

Страница 208: ...tly input values into value input boxes You can confirm the loaded setting values were updated in the panorama screen The settings are saved to the camera Note The controllable range and range that can be captured are as follows The pan and tilt ranges vary depending on the zoom ratio view angle 1 Select Apply the view restriction 2 Use the viewer area to adjust the camera angle set the upper lowe...

Страница 209: ...sable in the Setting Page P 78 Lower Limit Left Limit or Right Limit has been entered for View Restriction Settings When Camera Camera Settings Installation Conditions Image Flip is set to Enable in the Setting Page P 78 Lower Limit Left Limit or Right Limit has been entered for View Restriction Settings Save settings is clicked when View Restriction Settings is enabled Under the above conditions ...

Страница 210: ...s not suitable for applications where high reliability is required If constant and maximum reliability is required for surveillance it is not recommended that you use this function Canon shall assume no liability for any accident loss or other undesirable outcomes resulting from Intelligent Function operations Admin Viewer RM Viewer Camera E mail Notification Network Video Recording on Storage Ser...

Страница 211: ...ation Removed Object Detection Detect objects that have been removed This can be used to detect actions such as the taking away of valuables Removed object detection is triggered when an object is removed from the detection area for a specified duration Background Video Generated Moving object enters leaves area Change in Designated Area Analysis Moving Object Detected Detection begins when a movi...

Страница 212: ...rson or moving object crosses a specified line This determines that an object is passing when the decision point of the object detection frame crosses a detection line Background Video Generated Tampering Video Changes Analysis Camera Tampering Detected Detection begins when the ratio of change in a video exceeds a specified amount Detected Background Video Generated Passing Video Changes Analysis...

Страница 213: ...ects when volume level exceeds or falls below a reference volume Scream Detection Detects screams or cries from people Notes on Intelligent Function Settings and Operations When setting the Intelligent Function do an actual detection tracking test to confirm that detection will be performed correctly If a sudden change in lightness or darkness occurs within the entire screen proper detection may n...

Страница 214: ... objects and changes on the screen may not be detected tracked Partial or entire changes in brightness on the screen may trigger detection tracking When there are multiple overlapping objects there may be a change in detection For example objects passing may either not be detected or the timing of detection may be incorrect When there are large numbers of objects in the scene objects may not be pr...

Страница 215: ...s and configure Auto Tracking settings When Video Detection is selected please refer to Intelligent Function Setting Tool Video Detection P 216 to configure video detection settings When Auto Tracking is selected please refer to Intelligent Function Setting Tool Auto Tracking P 230 to configure Auto Tracking settings Important Video Detection and Motion Detection are exclusive of each other Only t...

Страница 216: ...iguring Video Detection The following are the basic steps for configuring video detection For details on settings for each type of detection please refer to Configure Detection Criteria Detection Criteria Tab P 219 For details on how to adjust presets please refer to Register Presets P 170 Note You can select presets that meet the following conditions Intelligent Function Setting Tool Video Detect...

Страница 217: ...te You can register up to 15 detection settings The added detection setting will appear in the Detection Setting List and Detect Criteria tab To disable detection settings clear this check box 2 Click Add in Detection Setting List 3 Select Detection Setting Number 1 to 15 and Detection Type for the detection setting to be added 4 Click OK 5 Select Enable these detection settings ...

Страница 218: ... video detection in the Event tab P 227 The settings are saved to the camera Note To restore settings click Restore Settings before saving This discards the settings you have specified and restores the settings saved in the camera 6 Configure the detection criteria 7 Configure event settings 8 Click Save settings 9 To register multiple detection settings repeat steps 2 to 8 ...

Страница 219: ...r a free shape polygon Note You cannot select Area Shape for camera tampering detection Use Rectangular Configure the detection area by moving resizing or changing the shape of the rectangle that appears in the video display area Drag the area to move it and drag the vertices to resize it Use Polygonal Click the video display area to place a vertex for the polygon at the clicked position Place the...

Страница 220: ...etect a moving object in as a detection area This determines how large the moving object must be in relation to the detection area you set in step 2 for motion detection to be triggered When the setting values or slider is changed an indicator frame representing the object size is displayed for one second in the center of the video display area allowing you to check the size ratio while specifying...

Страница 221: ...a detection area This determines how large the abandoned object must be in relation to the detection area you set in step 2 for abandoned object detection to be triggered When the setting values or slider is changed an indicator frame representing the object size is displayed for one second in the center of the video display area allowing you to check the size ratio while specifying the setting Co...

Страница 222: ...for each object Temporarily remove the target object for removed object detection from the video display area Click Restart intelligent function P 235 The background image is generated Return the target object to its original position Click Quick setting An outline of the object is drawn using a polygon with up to 32 vertices If there are multiple objects detected the outline is drawn around the o...

Страница 223: ...nd in the center of the video display area allowing you to check while specifying the setting Detection Status for Camera Tampering Detection All moving objects detected are shown with contour lines If an object is smaller than Change Ratio its contour lines are white If the obscured area in the video exceeds Change Ratio contour lines take on the same color as the detection area indicating that d...

Страница 224: ...termined by setting the passing direction and object decision point In the video display area click the start point of the detection line Click another location The passing detection line will be set between the start point and next point you clicked To configure a polygonal detection line click the vertices of the line in order Contours of Moving Object Detected as Tampering 1 Follow the steps be...

Страница 225: ... moving object Set the size ratio of moving objects for the entire screen If the moving object exceeds the set value for Object Size it will be targeted for passing detection When the setting values or slider is changed an indicator frame representing the object size is displayed for one second in the center of the video display area allowing you to check the size ratio while specifying the settin...

Страница 226: ...ects for the entire screen When the setting values or slider is changed an indicator frame representing the object size is displayed for one second in the center of the video display area allowing you to check the size ratio while specifying the setting Important Perform a detection test after configuring passing detection to make sure the detection frame of a moving object continues to be display...

Страница 227: ...ed upon detection of changes in a subject This will also explain the Event tab in Auto Tracking 1 Specify Operation Timing Multiple Selections Possible ON Event Operation When selected the operations set in 3 are performed when detected mode is triggered OFF Event Operation When selected the operations set in 3 are performed when detected mode ends Important After the Triggered Detection is set pl...

Страница 228: ...tings Sound Clip Name Select the sound clip to be played back You must register the sound clip with Video and Audio Audio Settings Sound Clip Upload P 88 in the Setting Page in advance Volume Set the volume for the sound clip 6 External Device Output Operations External Device Output for ON Event Select this to start or pause output to an external device when the detected mode is triggered and to ...

Страница 229: ...f the selected detection setting The camera tampering detection area cannot be deleted Copy detection criteria settings Copy the detection criteria of the selected detection setting to the clipboard Paste detection criteria settings Paste the copied detection criteria from the clipboard to the detection setting being configured Pasting is possible only if the source and the target are the same det...

Страница 230: ...ll be moved to the selected preset position The camera angle will also be moved to the selected preset position after Auto Tracking ends Note You can select presets that meet the following conditions Presets configured within the view restrictions Presets with Show in viewers selected in the Preset Registration tab P 171 Presets with pan tilt and zoom setting values no empty entries configured in ...

Страница 231: ...owing you to check the size ratio while specifying the setting After the subject is in detected mode the camera tracks it for the specified time When selected the camera zooms in on the moving object and automatically tracks it 3 Configure the detection area in the video display area 4 Configure the size the moving object needed to trigger detection in Object Size in the Tracking Conditions tab 5 ...

Страница 232: ...ject is smaller than Object Size its contour lines are white If the moving object is larger than Object Size its contour lines take on the same color as the detection area indicating that detected mode has been triggered In detected mode auto tracking starts and a polygon frame appears on the target object The camera will pan tilt or zoom during auto tracking so the target object always appears at...

Страница 233: ...tial camera position when Specify the initial camera position has been selected If camera control privileges were revoked the camera will move after camera control privileges are released Tracking start conditions are enabled after the camera moves back to the initial position Disable Auto Tracking You can disable Auto Tracking by restarting the Intelligent Function Setting Tool and selecting Vide...

Страница 234: ... for Detection Areas Detection Lines Detection Results Display Options Configure whether or not detection areas lines and detection results appear in the video display area Video Detection You can select the following for either Detection Area Line or Detection Results Selected Detection Settings Only Show the detection areas lines or detection results only for those detection settings selected in...

Страница 235: ...ction Area or Detection Results Restart Intelligent Function If the background video has changed while you were specifying settings or detection results are not as specified restart the Intelligent Function R11 R10 1 If you have not yet obtained the camera control privileges click the Obtain Release Camera Control Privileges button and obtain the control privileges 2 Click Restart intelligent func...

Страница 236: ... to load a log file from the memory card or get a new list of log files follow the steps below to download The Download dialog box appears The logs in the camera memory or on the memory card will be displayed as a list The selected log file will be downloaded and the source for the log is displayed as follows Camera internal memory for camera built in memory Log Viewer Log Viewer Screen 1 Click Do...

Страница 237: ...guage Also the date is shown in the yyyy mm dd or mm dd format while the time is shown in the hh mm ss format y m d h m and s indicate year month day hour minute and second respectively Logs cannot be deleted in the Log Viewer Save Open a Log File You can save the log file as a text file to a computer You can also load log files that are saved on a computer to the Log Viewer Save to Computer The S...

Страница 238: ...ype Select Error Warning or Information for the level if logs are filtered by their levels To use the module output by the log for filtering select Application HTTP Server or System Application HTTP Server and System support the List of Log Messages P 256 Specify code Logs will be filtered by log code Only logs whose code contains the entered characters are shown If A0 is entered for example logs ...

Страница 239: ... a date and time are entered logs generated on or before the specified date and time are shown Only shows logs matching the specified conditions 2 Click Apply filter Important The logs saved in the camera will be deleted in the following cases When Reboot or Restore Default Settings in Maintenance Tool on the Setting Page are run Factory default settings are restored with the reset switch on the c...

Страница 240: ...at Displays the format of a recorded video JPEG or H 264 3 Recording Type Displays the types of recorded video Upload Video failed to upload from the camera Manual Manually recorded video Timer Video recorded using the timer Event Video recording triggered by an event Recording Mode Stream Video that has failed video distribution when using RM recording mode stream ONVIF Video recorded with ONVIF ...

Страница 241: ...d inserted in the camera Narrow Down the Number of Videos Use Filter to narrow down the number of videos that appear in the video list to the ones you need 1 Date Time Specify start date time When this checkbox is selected and a date and time are entered videos recorded on or after the specified date and time are shown Specify end date time When this checkbox is selected and a date and time are en...

Страница 242: ...files in the download folder prior to the change to the new download folder to change their status to Downloaded Downloaded videos are stored in a folder that is automatically created within the specified destination folder and named using the camera IP address for example 192 168 100 1 Exit the Recorded Video Utility before using Explorer to browse the folders before and after the change and copy...

Страница 243: ...ct to delete the long it takes to delete the video For example if you delete an hour s worth of video it may only show as being one item in the video list it can take several minutes Delete Downloaded Video from a Computer The video is deleted from the computer Move Downloaded Video to a Different Computer Folder 1 Select a video to delete in the video list 2 Click Delete from Camera 1 Select a Do...

Страница 244: ... QuickTime 7 7 and Windows Media Player 11 12 For the Windows Vista operating system or earlier use QuickTime However playback when using this software is not guaranteed Recorded JPEG video whose video size was changed during recording and exported to a mov file cannot be played back by Windows Media Player Use QuickTime to play it back Play Back Video Video selected in the video list can be playe...

Страница 245: ... frames that are being displayed 3 Playback Interval Real Time JPEG video is played back in real time interval according to the recording time The preceding JPEG video appears in an empty frame Real Time can be selected only for playback of downloaded videos Equal Interval JPEG video is played back at a 1 second interval 4 Playback Controls Controls used for playback Note Not Downloaded or Partial...

Страница 246: ...ted site and protected mode is enabled playback of H 264 video will be disabled The Software Product License Agreement dialog box appears The H 264 decoder is downloaded from the camera The first frame and information for the selected video will appear in Playback Videos Move to first frame Move to previous frame Fast reverse Playback Pause Fast forward Move to next frame Move to last frame 1 Sele...

Страница 247: ...back Note For Not Downloaded or Partially Downloaded video if a file is played back while still downloading playback may momentarily pause when switching files depending on the network environment Not Downloaded or Partially Downloaded videos may not be played back in the order they were recorded 1 Slider Drag the slider to change playback position 2 Control Buttons The function of each button is ...

Страница 248: ...lay it back Note The downloaded H 264 video file will have the mov extension When the data size for mov files is 1 MB or greater they are split into several files If mov files are split into several files only the initial few seconds of the first file can be played back The downloaded video files can be played back using QuickTime 7 7 and Windows Media Player 11 12 For the Windows Vista operating ...

Страница 249: ...ter provides supplementary information on camera functions and explains the measure to take when trouble occurs or a message appears during camera use It also explains how to reset the camera to the factory default setting state ...

Страница 250: ...ory Card Memory Card Operations Overwrite videos P 132 is set to Enable old video can be deleted to save new video When it is set to Disable use Recorded Video Utility to delete unnecessary video Data Downloaded with Recorded Video Utility When the video data of the memory card is downloaded to a computer or other device using Recorded Video Utility it is saved under a folder structure and file na...

Страница 251: ... video files were created because recording continued for several seconds or more a new file name with different values for 2 and the sequential number ending will be used In the above example if recording starts at 16 06 19 and the new file is switched to 4 seconds later the file name will be as follows 20140910070623 070619 M000000002 mov Since this is a continuation of the recording that starte...

Страница 252: ...n Detection Setting 14 175 Intelligent Function Detection Setting 15 201 Linked Event 1 202 Linked Event 2 203 Linked Event 3 204 Linked Event 4 N Reason for capture character string External input device name alphanumeric characters Intelligent Function Detection Setting name NULL blank entry or interval timer test O Reason for capture ON OFF OFF ON X Width of image Number of pixels in horizontal...

Страница 253: ...fied below HTTP Upload P 97 Parameter query string All modifiers can be used FTP Upload P 99 Subdirectory Name to Create Only the modifiers y m d w H h n can be used File Name to Create Only the modifiers y m d w H M S s n can be used E mail Notification P 102 Message Body All modifiers can be used ...

Страница 254: ... 1X on the Setting Page with the system administrator The Admin Tools will not launch The Admin Viewer will not launch If the message Your web browser is not supported is displayed use Internet Explorer 8 or later If the message Application could not be started Install NET Framework x x x is the version is displayed install the corresponding version of NET Framework or enable settings P 24 If the ...

Страница 255: ...server settings contact your System Administrator Video cannot be recorded on an memory card To record video to an memory card when an event occurs check the Video Record Action settings under Video Record Memory Card Video Record Setting in the Setting Page When Video Record Action is set to Upload change it to Record to Memory Card When recording mode stream video that could not be transmitted d...

Страница 256: ... settings S302 Meaning An error generated while the system was saving a setting Setting could not be saved Countermeasure Provide enough memory space by deleting unnecessary files in the user memory area etc Description Can t update files of system settings S303 Meaning An error generated while the system was saving a setting Setting could not be saved Countermeasure Provide enough memory space by...

Страница 257: ...ra is faulty Arrange for servicing Description FAN 1 failure S330 1 Fan number Meaning Detected that the fan is not rotating or the rotation speed has significantly decreased Countermeasure If the problem persists after rebooting the fan may have failed Arrange for servicing Description HEATER 1 failure S331 1 Heater number Meaning An abnormality was detected when using the heater Countermeasure T...

Страница 258: ...tx 2 Error type open write flush 3 Error number Meaning Detected an error in the audio device Countermeasure If the problem persists please arrange for servicing Description wvaudio initialization error 1 B402 1 Error number Meaning The audio server could not be initialized The audio server stops Countermeasure If the problem persists after rebooting the camera is faulty Arrange for servicing Desc...

Страница 259: ...rmeasure If the problem persists after rebooting the camera is faulty Arrange for servicing Description video 1 fatal error 2 V403 1 Video number 2 Error number Meaning The video input function was stopped because an error that does not permit recovery of the video input system was detected Countermeasure If the problem persists after rebooting the camera is faulty Arrange for servicing Descriptio...

Страница 260: ...L_QUEUE RECVQ_META SENDQ_MEDIA Meaning A communication error occurred between modules Countermeasure If the problem persists after repeated attempts and rebooting the camera may be faulty Arrange for servicing Description cannot get parameter 1 R302 1 user_account User account IP_address IP address of the camera profile_media_configuration MediaCon figuration information RTSP_port_number RTSP port...

Страница 261: ...ied to the heater unit S231 Meaning A heater unit is attached but not supplied with a 24 V AC power source Countermeasure The 24 V AC power source required to operate the heater unit is not being supplied Check the connections Description a request for 1 timed out after writing d seconds H201 1 Request URI d 360 Timeout time Meaning Disconnected due to HTTP server timeout 360 sec Description user ...

Страница 262: ...Denial type 41 42 4a Meaning Connection was initially permitted but the setting has subsequently been changed to prohibit access thereby triggering a forced disconnection the denial type is the same with B102 Description cannot notify 1 event 2 B201 1 Event type ald 2 Error number Meaning Failed to notify event Description cannot recv event 1 B202 1 Error number Meaning Failed to receive event Des...

Страница 263: ...203 Meaning Insufficient memory card capacity Description Invalid file 1 was removed M204 1 Name of removed file Meaning An invalid file was removed Description 1 checking management file M205 1 Start Finish Meaning The memory card may have been removed without being unmounted Start finish checking management information file Description Invalid db information 1 2 was removed M206 1 Name of manage...

Страница 264: ... 3 H144 1 URL XSS vulnerability countermeasure implementation process equivalent to ftpd 2 User Name 3 IP address Meaning A wrong password was specified in user authentication Description 1 webview W001 1 Starting or stopping Meaning wvhttp server webview has started or stopped Description 1 2 host Host user User prio Priority W030 1 W WebView session V Session less video client N Session less eve...

Страница 265: ...rting cameraappl C002 Meaning The camera application started Description 1 video V001 1 Starting or stopping Meaning The video server was started stopped Description starting intelligent V020 Meaning Intelligent service was started Description shutdown intelligent V021 Meaning Intelligent service was shut down Description 1 uploader A004 1 Starting or stopping Meaning The uploader was started or s...

Страница 266: ...upload is invalid The PASV mode was forcibly set Description http notice image mode invalid uploader set image forcibly A136 Meaning The notification only image mode setting in connection with HTTP upload is invalid The image mode was forcibly set Description mode invalid uploader set none forcibly A137 Meaning The e mail notification setting is invalid Email notification was forcibly disabled Des...

Страница 267: ...count of Metadata stream 7 Total distribution count of AudioBackChannel Meaning RTSP TEARDOWN request was received Description start multicast profile 1 num_of_sessions 2 V 3 A 4 M 5 BC 6 R005 1 Client IP address 2 Profile name of requested MulticastStreaming START 3 Total distribution count of Video stream 4 Total distribution count of Audio stream 5 Total distribution count of Metadata stream 6 ...

Страница 268: ...for RTSP is invalid 401 RTSP authentication failure or missing valid authentication information 457 Playback time for RTSP is invalid 501 An invalid RTSP option was used 503 Failure to offer service due to insufficient resources The number of maximum RTP sessions has passed the limit Meaning RTSP connection has failed ...

Страница 269: ...reception failed You are not connected to the camera An attempt was made to operate the camera when the camera was not connected Please get camera control privileges An attempt was made to operate the camera without camera control privileges Another user is already connected as an administrator The Admin Viewer is already connected to the camera The viewer is already connected in another window Th...

Страница 270: ... settings will be discarded and restored to factory default settings after the camera is rebooted Administrator password of the basic settings LAN IPv4 IPv6 Date and Time Host access restrictions for security SSL TLS 802 1X Restoring Factory Default Settings with the Reset Switch on the Camera If you have forgotten or do not know the IP address of the camera or your Administrator password you cann...

Страница 271: ... address are restored to the default settings so you will not be able to continue operation from the computer that was connected Use Camera Management Tool to set a suitable IP address for the operating environment P 37 R11 R10 M641 M640 M741 M740 1 Hold down the reset switch while pressing the restart switch with a pointed object 2 Release the restart switch after at least 3 seconds while still h...

Страница 272: ...er cable The LED will flash When the LED stops flashing the reset procedure is complete R11 1 Turn the camera off by disconnecting the power cable 2 Hold down the reset switch and connect the power cable Continue to hold the reset switch for five seconds or longer 3 Release the reset switch Restart Switch LED ...

Страница 273: ... NTP Server Time zone GMT 09 00 Osaka Sapporo Tokyo Daylight Saving Time Disable All Videos Video Size Set 1280x720 640x360 320x180 JPEG Video Quality 320x180 6 Video Quality 640x360 6 Video Quality 1280x720 6 Video Quality Digital PTZ 6 Video Size video Transmission 320x180 Maximum Frame Rate Video Transmission 30 0 Video Size Upload Memory Card 320x180 H 264 1 Video Size 320x180 Bit Rate Control...

Страница 274: ...ation 4 Haze Compensation Disable Item Setting R11 R10 R11 R10 M741 M740 R11 R10 R11 R10 M641 M741 R11 R10 M641 M741 R11 R10 M641 M741 R11 R10 M641 M741 Haze Compensation Level 2 Day Night Day Mode Use Infrared Day Night Operation Specified Area Area 1 Pink Disable Area 2 Purple Disable Area 3 Blue Disable Area 4 Cyan Disable Area 5 Green Disable Area 6 Yellow Disable Area 7 Orange Disable Area 8 ...

Страница 275: ...dress 0 0 0 0 Multicast Port Number 0 Multicast TTL 1 Item Setting R11 R10 M641 M640 M741 M740 R11 M641 M741 R11 M641 M741 Audio Transmission Disable RTP Streaming 2 Video Size 320x180 JPEG Frame Rate 10 Multicast Address 0 0 0 0 Multicast Port Number 0 Multicast TTL 1 Audio Transmission Disable RTP Streaming 3 Video Size 320x180 JPEG Frame Rate 15 Multicast Address 0 0 0 0 Multicast Port Number 0...

Страница 276: ...ser Name POP Server Subject Message Body External Device Output 1 Operation Mode Normally Open Active Output Format Continuous Pulse Output Time sec 1 External Device Output 2 Operation Mode Normally Open Active Output Format Continuous Pulse Output Time sec 1 External Device Input External Device Input Event Enable External Device Input 1 Operation Mode Normally Open Active Event Operation Disabl...

Страница 277: ...t specified Video Record Disable E mail Notification Disable External Device Output Disable Item Setting R11 M641 M741 R11 R11 R11 R10 R11 R10 M641 M741 Day Night Mode Switching Disable Timer 2 Timer Event Disable 24 Hour Continuous Setting Disable Start Time 00 00 End Time 00 00 Repeat Interval None Operation Start Time Preset Not specified Video Record Disable E mail Notification Disable Externa...

Страница 278: ...peration ON Event Operation Disable Ongoing ON Event Operation Disable Item Setting R11 OFF Event Operation Disable Preset None Video Record Disable E mail Notification Disable External Device Output for ON Event Disable External Device Output for OFF Event Disable Audio Playback at ON Event Disable Audio Playback at OFF Event Disable Sound Clip Volume 50 Linked Event 3 Linked Event Disable Event ...

Страница 279: ...cked Audio Distribution Checked Guest User Camera Control Checked Video Distribution Checked Audio Distribution Checked IPv4 Host Access Restrictions Apply Host Access Restrictions Disable Default Policy Authorize Access Network Address Subnet 01 32 Yes 02 32 Yes 03 32 Yes Item Setting R11 R11 M641 M741 R11 M641 M741 04 32 Yes 05 32 Yes 06 32 Yes 07 32 Yes 08 32 Yes 09 32 Yes 10 32 Yes 11 32 Yes 1...

Страница 280: ...KE Pre Shared Key SA ESP Encryption Algorithm AES SA ESP Authentication Algorithm HMAC_SHA1_96 Item Setting SA ESP Encryption Key outbound SA ESP Authentication Key outbound SA ESP SPI outbound SA ESP Encryption Key inbound SA ESP Authentication Key inbound SA ESP SPI inbound SA AH Authentication Algorithm HMAC_SHA1_96 SA AH Authentication Key outbound SA AH SPI outbound SA AH Authentication Key i...

Страница 281: ...sk Length 16 Destination Prefix Length 16 IKE Pre Shared Key SA ESP Encryption Algorithm AES Item Setting SA ESP Authentication Algorithm HMAC_SHA1_96 SA ESP Encryption Key outbound SA ESP Authentication Key outbound SA ESP SPI outbound SA ESP Encryption Key inbound SA ESP Authentication Key inbound SA ESP SPI inbound SA AH Authentication Algorithm HMAC_SHA1_96 SA AH Authentication Key outbound SA...

Страница 282: ...282 SA AH SPI inbound Item Setting ...

Страница 283: ...a Control 118 138 Camera Control Privilege Status Indicator 188 Camera Control Privileges 142 Camera Management Tool 21 28 36 Camera Name 75 Camera Search Settings 36 Camera Tampering Detection 212 223 Certificate Information 124 Certificate Management 122 125 Client 124 Color Saturation 81 168 Context Menu 145 175 183 189 229 Control for Admin 158 195 Control Privileges 147 Custom Installation 29...

Страница 284: ...Information Message 269 Infrared 81 167 Infrared Filter 165 Infrared Illumination Strength 167 Infrared Strength 76 Initial Setting 36 79 159 270 Initial Setting Registration 159 Input Volume 87 Installation Guide 5 Intelligent Function Display Options 234 Operation Mode 214 Restart 235 Intelligent Function Setting Tool 210 Intrusion Detection 213 226 IPsec 126 IPv4 37 64 IPv4 Address 37 IPv6 65 J...

Страница 285: ...sk Setting Tool 196 Privilege 138 Privileged Camera Control 118 138 Pulse 104 R Reboot 134 Receive Audio 155 Reconnect 142 Recorded Video Utility 187 240 Recording Manually 186 Recording to Memory Card 186 Recreate Video Management Information 132 Reference Volume Level 107 Refresh Drive System 135 Removed Object Detection 211 222 Reset Switch 270 Restore Settings 135 Revert to Initial Settings 13...

Страница 286: ...ribution 118 138 Video Format 97 131 240 Video Quality 73 74 Video Record 106 108 109 111 115 Video Record Action 96 130 Video Record Setting 101 Video Saving 133 Video Server 91 Video Size 72 94 143 Video Size Set 72 View Restriction Setting Tool 206 Viewer Admin Viewer 138 147 RM Lite Viewer 22 VB Viewer 138 188 Viewer PTZ 151 Voice Activity Detection 92 Volume 106 228 Volume Detection 107 W War...

Страница 287: ...BIE 7048 000 CANON INC 2015 ...

Отзывы: