background image

58

Using the Software on the Macintosh 

Platform – Advanced Techniques

This chapter explains various ImageBrowser features. 
Proceed to this chapter once you have mastered the basic ImageBrowser procedures in the 

Using the Software on the Macintosh Platform 

 The Basics

 chapter.

The ImageBrowser Windows

This section describes the principal ImageBrowser windows: the Browser Window, Viewer 
Window and File Information Window.

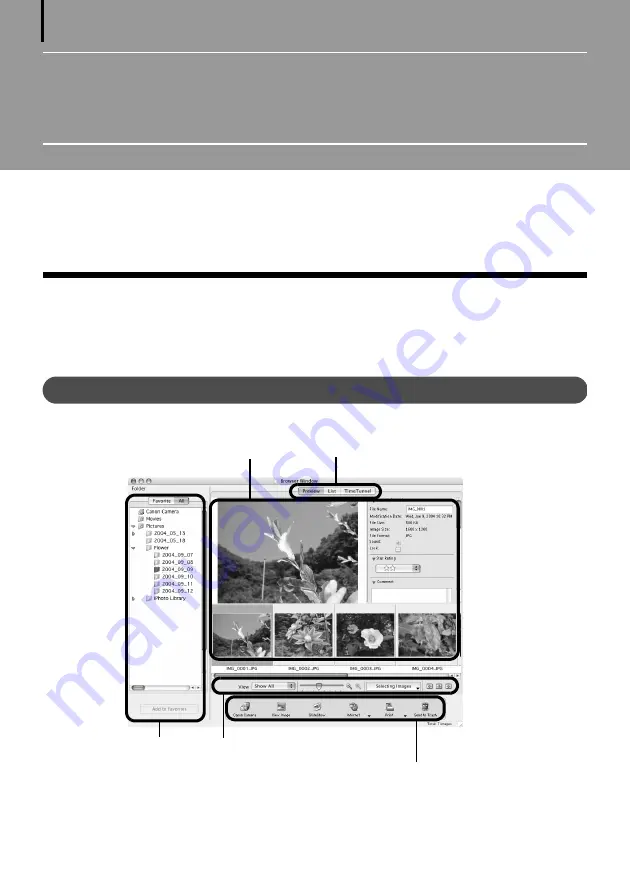
Browser Window

This window is for displaying and organizing images downloaded to the computer.

Explorer Panel (p. 59)

Browser Area (p. 59)

Display Mode (p. 60)

Display Control Panel (p. 61)

Control Panel (p. 61)

Содержание PowerShot G6

Страница 1: ......

Страница 2: ......

Страница 3: ......

Страница 4: ...mages Using camera Operations Direct Transfer Press the camera s button _ 11111 Starts to download images Lets you select and download images Finish I c Click Starts to download images By default all the images that have yet to be downloaded will download Downloading Images Using Computer Operations You can adjust the settings such as the type of image downloaded and the destination folder by clic...

Страница 5: ...nnect or stitch multiple images together into a seamless panoramic view II Printing Images with Different Layouts With PhotoRecord Windows 1 ImageBrowser Macintosh you can layout images as desired and then print them What you can do with ZoomBrowser EX Windows IlmageBrovvser Macintosh II Downloading Images to a Computer You can easily download images saved in the camera to a computer II Checking I...

Страница 6: ... Canon CDI E147 nwerShotG6 DIGITAL CAMERA Camera User Guide DiG C Please read the Read This First section page 5 Please also read the Software Starter Guide and the Direct Print User Guide Pict8ridge DPOF DIREG PRINT tI BUBBLE JET DIREG ...

Страница 7: ...ories is recommended This product is designed to achieve excellent performance when used with genuine Canon accessories Canon shall not be liable for any damage to this product and or accidents such as fire etc caused by the malfunction of non genuine Canon accessories e g a leakage and or explosion of a battery pack Please note that this warranty does not apply to repairs arising out of the malfu...

Страница 8: ...ase set the camera s video signal format to the one used in your region before using it with a TV monitor p 160 Language Setting Please see page 28 to change the language setting Trademark Acknowledgements Canon and PowerShot are trademarks of Canon Inc CompactFlash is a trademark of San Disk CorporatIon Macintosh Mac as and QuickTime are trademarks of Apple Computer Inc registered in the United S...

Страница 9: ...erations mode As in the example below the mode dial should be set to fillIID Q J P Tv Av or M Using the Built In Flash This mark denotes issues that may affect the camera s operation This mark denotes additional topics that complement the basic operating procedures ...

Страница 10: ...the Power On Off 29 Switching between Shooting and Playback 32 Using the LCD Monitor 33 Confirming information on the LCD Monitor 36 Using the Optical Viewfinder to Shoot 41 Using the Zoom Focal Length 42 Pressing the Shutter Button 43 Selecting Menus and Settings 45 Resetting the Settings to Default 54 Shooting Letting the Camera Select Settings 55 e IID Auto Mode 55 Reviewing an Image Right afte...

Страница 11: ...posure Setting AE Lock 105 Locking the Flash Exposure Setting FE Lock 107 Switching between Flash Adjustment Settings 109 Switching the Timing at which the Flash Fires 111 Shooting Images at Set Intervals Intervalometer 112 Shooting Problem Subjects for the Autofocus 114 Switching between Focus Settings 118 C1 C2 Saving Custom Settings 119 Using the ND Filter 120 Setting the Auto Rotate Function 1...

Страница 12: ...ctly from a CF Card 159 Viewin Ima es on a TV Set 160 Customizing the Camera My Camera Settings 161 Changing My Camera Settings 161 Registering the My Camera Settings 163 List of Error Message Codes 167 List of Messages 168 Troubleshooting 170 Appendix 175 Using the Wireless Controller 175 Attaching the Lens Hood LH DC30 Sold Separately 178 Using an Externally Mounted Flash Sold Separately 180 Usi...

Страница 13: ... or commercial properties by means of a camera or other device may contravene copyright or other legal rights even if the image was recorded for personal use Warranty Limitations This camera s warranty is only effective in the country of sale If a problem arises while the camera is in use abroad please convey it back to the country of sale before proceeding with a warranty claim to a Canon Custome...

Страница 14: ...lified service personnel authorized by your camera distributor or a Canon Customer Support Help Desk To avoid the risk of high voltage electrical shock do not touch the flash portion of the camera if it has been damaged Similarly never touch internal portions of the equipment that become exposed as a result of damage There is a risk of high voltage electrical shock Please take the first opportunit...

Страница 15: ...ounding area In dusty humid or greasy environments the dust that collects around the plug over long periods of time may become saturated with humidity and short circuit leading to fire Do not cut damage alter or place heavy items on the power adapter cord Any of these actions may cause an electrical short circuit which may lead to fire or electrical shock Do not handle the power cord if your hands...

Страница 16: ...cts Contact with the metallic components of other materials in waste containers may lead to fire or explosions Discard the batteries in specialized waste facilities if available in your area Use only recommended battery packs and battery chargers Use of batteries not expressly recommended for this equipment may cause explosions or leaks resulting in fire injury and damage to the surroundings Disco...

Страница 17: ...rs or clothing when shooting The flash may be damaged and emit smoke or noise In addition do not touch the surface of the flash after taking several pictures in rapid succession Either action could result in burns Do not operate the flash with dirt dust or other items stuck to its lens The resulting heat build up could damage the flash Ensure that the battery charger or compact power adapter is pl...

Страница 18: ...alable plastic bag and letting it adjust to temperature changes slowly before removing it from the bag If Condensation Forms Inside the Camera Stop using the camera immediately if you detect condensation Continued use may damage the equipment Remove the CF card and battery or a household power source from the camera and wait until the moisture evaporates completely before resuming use Extended Sto...

Страница 19: ...able IFC 400PCU supplied with the camera Direct Print Compatible Printers Sold Separately CP Printers Interface Cable IFC 400PCU supplied with the camera or the Direct Interface Cable DIF 100 supplied with CP 100 CP 10 Bubble Jet Printers Bubble Jet Direct Compatible Printers Please refer to your Bubble Jet printer user guide PictBridge Compliant Printers Interface Cable IFC 400PCU supplied with t...

Страница 20: ... record Blinking Green Recording to CF card Reading CF card Erasing from CF card Transmitting data during a computer connection Orange Ready to record flash on Blinking Orange Ready to record camera shake warning insufficient exposure Lower Indicator Yellow Macro mode Super Macro mode Manual focus mode Blinking Yellow Focusing difficulty although you can press the shutter button try using focus lo...

Страница 21: ...ial p 15 Backlight Button p 16 Power Mode Indicator p 29 RT SS VJ Mode Lever p 29 Top Flash Button p 64 Controls Back Macro Index Button p 74 75 126 Mode Dial p 14 AE Lock FE Lock Button p 105 107 FUNC Function I6if Single Image Erase Button p 45 140 DISPLAY Button p 34 Omni Selector Exposure T WB White Balance p 94 95 111 HcJ 7 MENU Button p 46 SET EEl AF Frame Selector Button p 90 MF Manual FOcu...

Страница 22: ... settings Auto 0 1 according to the image composition type l Portrait p 67 Landscape p 67 Night Scene p 68 Image Zone Stitch Assist p 69 Movie p 72 Creative Zone The user selects exposure aperture or other settings to achieve special effects P Program AE p 80 Tv Shutter Speed Priority AE p 82 Av Aperture Priority AE p 85 M Manual Exposure p 87 C1 Custom 1 p 119 C2 Custom 2 p 119 14 ...

Страница 23: ...Turn Turning the Main Dial In Shooting Mode Selects aperture value and shutter speed p 82 85 87 Selects menu settings by pressing the FUNC button p 45 Selects exposure compensation and white balance p 94 95 Manually sets the focus p 115 Click Clicking the Main Dial In Shooting Mode Fixes menu items set by pressing the FUNC button p 45 Switches between shutter speeds and aperture values in M mode p...

Страница 24: ...ISO 000 s S 00 0 t3 m ID H WBt Ll 2J 1m 2 1 1 2 2 1 1 J button Icons Indication Reference pages J J J Evaluative Metering Spot Metering 92 Center Weighted Average Metering Shutter Speed Movie Shooting Time 72 82 87 Q BBBB White Balance ISO Speed Photo Effect 95 98 99 Bracket 101 103 B B Aperture Setting 85 87 o 00 AiAF 89 0 Center point II Compression 60 Lk M S Resolution Not displayed with RAW 60...

Страница 25: ...ngs 95 H WB Ll lm Bracket 101 103 3 Flash Exposure Compensation 109 Flash Output Adjustment Exposure Compensation LevellAEB Levell 94 101 109 2 1 1 2 Flash Exposure Compensation Levell Flash Output Adjustment Level Turns off in Super Macro mode The Super Macro mode icon appears on the LCD monitor p 75 1IIIll llllle O iDl6IlD 6ll1 r 1 l The diagram above shows all the icons appearing at once L jJ N...

Страница 26: ...ign the edge of the battery pack with the line on the battery charger then slide the battery in the direction of the arrow Battery charger model names and types vary by region For CG 580 Plug the battery charger into a power outlet For CB 5L Attach the power cord to the battery charger and plug the other end into a power outlet The charge indicator blinks while the battery pack is charging and lig...

Страница 27: ...may cause a poor contact between the battery pack and camera Polish the terminals with a tissue or a dry cloth before charging or using the battery pack Do not cover the battery charger with anything such as a tablecloth cushion or blanket when it is charging Heat will build up internally and possibly lead to fire Do not charge batteries other than Battery Pack BP 511A BP 511 BP 512 or BP 514 with...

Страница 28: ...r affect performance you are recommended to use the battery pack in the camera until the Lb symbol displays and to store it at normal temperature 30 CI 86 OF or lower If you do not use the battery pack for long periods of time charge it fully and discharge it fully in the camera at least once a year before returning it to storage e The camera consumes the battery charge when the power is on even w...

Страница 29: ...arge the battery pack before using it for the first time p 18 Check that the power is off p 29 and slide the battery cover in the direction of the arrow Insert the battery pack The terminal side of the battery pack should face downward Insert the battery pack all the way in until the battery lock clicks To remove the battery pack push the battery lock Terminals Slide the battery cover closed 21 ...

Страница 30: ...d Do not shake the camera Do not turn off the power or open the battery cover or CF card slot cover Remove the battery pack when the camera is not in use o ee lIl l See Battery Performance p 196 Battery Status Symbols The following icons indicate the battery status on the display panel These icons will not appear while the camera is powered with a compact power adapter Sufficient battery charge Lo...

Страница 31: ...utton and pull the card out Slide the CF card slot cover closed Glilillll e fGO l illll e Ofb When the indicator next to the viewfinder blinks green the camera is writing reading erasing or transmitting an image to or from the card Do not perform the following or image data may be lost or corrupted Do not shake the camera Do not turn off the power or open the battery cover or CF card slot cover Yo...

Страница 32: ...ne and allow it to adjust slowly to the new temperature If condensation forms on the CF card put it aside until the water droplets have evaporated completely Place the CF card in the supplied case for storage Do not use or store CF cards in the following types of locations Locations subject to dust or sand Locations subject to high humidity and high temperatures Microdrives are a recording medium ...

Страница 33: ...ustrated on the left Pull the strap tight in the buckle so that it does not slip Perform the same steps on the other side of the camera p 11 OOIit Avoid waving the camera about or catching it on other items U when suspending it from the strap 13 l IllI e IDIjj6 0 e I lll ll J rE l Attach the lens cap cord to the strap Lj Remove the lens cap before turning on the camera s power 25 ...

Страница 34: ... Set up menu Pressing the JUMP button or turning the zoom lever also switches between menus Press the or arrow on the omni selector to select Datel Time then press the SET button The factory default for the date format may differ from that shown here in some regions 5 Set the date and time Press the or arrow on the omni selector to select a field to change Press the or arrow on the omni selector t...

Страница 35: ...telTime cannot be inserted in the actual image even if the DatelTime have been set For printing images with the date on them refer to the Direct Print User Guide or Software Starter Guide Replacing the Date Battery p 191 27 ...

Страница 36: ...g the zoom lever also switches between menus Press the A or T arrow on the omni selector to select Language and press the SET button Press the A T or arrow on the omni selector to select a language Press the SET button After adjusting the settings press the MENU button to close the menu window o 0 0 0 e 0 0 e I5 l In playback mode you can change the language by holding the UJ SET button while you ...

Страница 37: ...turned on in 0 or E release the lever The mode lever returns to its original position center Power Mode Indicator The power mode indicator remains lit while the power of the camera is on The power mode indicator indicates the state of the camera as follows 0 l1iGGlOef il IIIII I q e l You will hear a start up sound and see the start up image when LiJ the power comes on To change the start up sound...

Страница 38: ...n on the camera with the lens cap on If this occurs remove the lens cap and turn the camera off and back on Be careful not to touch the lens when shooting Please also refrain from forcing the lens with fingers or other objects It could lead to malfunctions or damage the camera If this occurs turn the camera off and back on Powering the Camera in Playback Mode Open the LCD monitor and turn the mode...

Страница 39: ... the camera Press any button except the mode lever to turn the LCD monitor back on This time can be changed p 52 Playback Mode Powers down approximately 5 minutes after the last control is accessed on the camera Printer Connection Mode Powers down approximately 5 minutes after the last control is accessed on the camera Please note that the camera continues to consume a minimal amount of power even...

Страница 40: ...ing Mode Playback Mode Open the LCD monitor and turn the mode lever to Playback while pressing the release button p 30 The camera switches to Playback mode In this case the lens does not retract If the mode lever is turned to Playback again the lens retracts Playback Mode Shooting Mode Remove the lens cap and press the shutter button halfway or turn the mode lever to 0 Shooting while pressing the ...

Страница 41: ...CD monitor can be used in the following cases when you want to check your composition as you shoot when you want to playback the images you have shot when you want to operate the camera menus The LCD monitor can also be positioned as below The monitor can be opened through 180 degrees and then rotated 180 degrees to face outwards in the same direction as the lens In this position icons and message...

Страница 42: ...h time you press the DISPLAY button the information view switches as follows On No Information On Information View Off t I Depending on the LCD monitor s position the information view may not display iI Ii I e IOOl l You can check detailed information about the image you just shot without switching the camera to Playback mode To do so while the image is being reviewed on the LCD monitor right afte...

Страница 43: ...ress the DISPLAY button the information view mode cycles as follows Single Image Playback p 124 Standard Information View Detailed Information View No Information t I Index Playback p 126 Standard Information View No Information 35 ...

Страница 44: ... appears on the LCD monitor after metering preparations are complete Set the flash to On or A Auto or affix the camera to a tripod to shoot GIIt eeo After you takea photo by fUlly pressing the shutter button the L iJ image displays on the LCD monitor for approximately two seconds or the review duration you set from 2 to 10 seconds If you press the SET button or button while the image is displayed ...

Страница 45: ...sion Settings Flash Exposure Compensation Flash Output Photo Effect White Balance WB ISO Speed Bracket Drive Mode Exposure Compensation AF Frame Spot Metering Frame Shutter Speed _ I m l m l m l m l 50 100 200 400 2 2 L M1 M2 M3 S mJ mJ fj Resolution Settings p 60 File Format Flash Red eye Reduction Macro Mode Super Macro Mode p 62 p 64 p 65 p 74 75 Light Metering Mode Auto Rotate Shooting Mode p ...

Страница 46: ...n to the above the messages AF frame Spot Metering Frame shutter speed aperture value MF indicator when manual focus is selected and zoom bar during the zoom operation are shown as in the upper screen example Playback Mode In standard display mode the following information appears Image Number and Total Display Image Total File Number Shooting Date Time l 1 Compression Settings p 60 L M1 M2 M3 S R...

Страница 47: ...ocus p 115 116 e In addition to the above the shutter speed aperture setting movie length histogram and overexposure warning appear The following information may also appear with some image files An audio file other than a wave file or a file with an unrecognized format is attached A JPEG file with format not conforming to Design rule for Camera File System Standards p 195 1 File with unrecognized...

Страница 48: ... right the brighter the image If the image is dark adjust the exposure compensation to a positive number Similarly adjust the exposure compensation to a negative number if the image is bright p 94 ams I Dark Image Balanced Image Bright Image Overexposure Warning In the following conditions overexposed portions of the image blink e When an image just shot is being reviewed on the LCD monitor I nfor...

Страница 49: ...tment Lever e Image Seen in Viewfinder VS Recorded Image LiI Please note that the actual image may differ from the image seen in the optical viewfinder due to the physical separation between the viewfinder and lens This is called the parallax phenomenon and is more noticeable the closer the subject is to the lens In some cases portions of images shot up close that appear in the viewfinder will not...

Страница 50: ...s the size of the subject wide angle The zoom bar appears during the zoom operation Zoom Bar Digital Zoom An image already zoomed with the optical zoom lens can be further zoomed digitally up to an approximate factor of 16 p 77 The factor displays after the zoom operation 0 0 0 0 The digital zoom cannot be used with certain Shooting modes p 206 0 0 0 0 15 1 The more the image is zoomed digitally t...

Страница 51: ...cators Blinking Yellow Focusing difficulty single beep sounds Use the focus lock or focus manually to shoot when the indicator blinks yellow p 114 115 The AF frame appears as follows when the LCD monitor is on Green Metering complete Yellow Focusing difficulty The AF frame does not appear when the focus area is set to be selected automatically AiAF p 89 AF Frame Pressing Fully Pressing fully relea...

Страница 52: ...he shutter sound option is on There is no shutter sound in Movie mode Shots cannot be taken while the flash is charging AF assist Beam The AF assist beam will sometimes emit when the shutter button is pressed halfway to assist focusing in certain conditions i e dark conditions The AF assist beam can be turned off p 49 If animals are your subject turn off the beam when shooting in the dark to avoid...

Страница 53: ...r to Q 2 Press the DISPLAY button to turn on the LCD monitor 3 Press the FUNC button 4 Press the or arrow on the omni selector to select a function item S Press the or arrow on the omni selector to select setting contents 6 Press the FUNC button In Steps 5 and 6 you can also use the main dial STurn 6Click W 6FUNC c 45 ...

Страница 54: ...Selecting Menus and Settings continued Selecting Settings by Pressing the MENU Button In Q Shooting Mode Rec Menu p 48 When Shooting mode is tmID In E Playback Mode Play Menu p 50 46 ...

Страница 55: ...osed by pressing the shutter button halfway In Playback mode the menu closes when the shutter button is pressed halfway and the camera switches to shooting mode 1 Press the MENU button 2 Press the or arrow on the omni selector to switch between menu tabs 3 Press the or T arrow on the omni selector to select a menu item then press the or arrow on the omni selector to select setting contents 4 Press...

Страница 56: ... default settings Rec Menu Menu Item Setting Content Reference Page Flash Sync Sets the timing at which the flash fires 111 1st curtain 2nd curtain Sets whether or not the flash will fire with a Slow Synchro slow shutter speed 66 On OW Sets whether or not the flash is adjusted Flash Adjust automatically 109 Auto Manual Sets whether or not the red eye reduction Red eye lamp fires when the flash fir...

Страница 57: ...y Shift dial is set to Tv or Av and a shutter speed 86 or aperture value has been set On OW Sets whether or not the focusing point is MF Point Zoom magnified when using the manual focus 116 On Off Sets the frequency of autofocus activation Continuous continuous autofocusing or AF Mode Single autofocused only when the shutter 118 button is pressed halfway Contin uous Single Sets whether or not the ...

Страница 58: ...ize of the file will depend on the selected resolution Shoots automatically at set intervals Intervatometer 2 to 100 shots 112 1 to 60 min Saves settings selected in the Rec menu Save Settings and the Function menu to the mode dial s 119 C1 or C2 mode Default setting g Play Menu Menu Item Setting Content Reference Page Protect Protects images from accidental erasure 139 Rotate Rotates images 90 or...

Страница 59: ...s pressed regardless of the setting CDStart up Vol Adjusts the Start up Sound volume when 29 53 the camera powers up Adjusts the Operation Sound volume of Operation Vol operation buttons other than the shutter 53 button Adjusts the sound volume of the Selftimer Selftimer Vol Sound informing you that the photo will be 53 76 0 taken in 2 seconds c Adjusts the Shutter Sound volume when 3 Shutter Volu...

Страница 60: ...ile numbers are assigned to File No Reset images when new CF cards are inserted 122 On OW Sets whether or not images shot with the Auto Rotate camera held vertically are automatically 121 rotated in the display On Off Sets the format of the displayed distance Distance Units units of the MF indicator 115 116 m cm or ftlin Sets the language used in the menus and messages on the LCD monitor English I...

Страница 61: ...ent Reference Page Theme Selects a common theme for each My 161 Camera settings item Start up Image Sets the start up image when you turn on 161 the camera Start up Sound Sets the start up sound when you turn on 161 the camera Sets the sound when the omni selector or Operation Sound any button other than the shutter button is 161 operated Selftimer Sound Sets the sound informing you that the photo...

Страница 62: ...The screen on the right appears while resetting The normal screen resumes when resetting is complete To cancel resetting select Cancel instead of OK 0 0 0 0 The following settings cannot be reset to default LiI The DatelTime Language and Video System options in the Wmenu p 52 White balance data set with the custom white balance function p 96 Newly registered My Camera settings p 163 When the camer...

Страница 63: ...r button and let the camera do everything else 1 Check that the camera is in Shooting mode p 30 2 Turn the mode dial to tNID 3 Aim the camera at the subject Use the zoom lever to achieve the desired composition relative subject size on the LCD monitor 5 Press the shutter button halfway 250 0 p 43 L The camera focuses on the subject Two L J beeps will sound when the camera has U finished metering a...

Страница 64: ...yellow The AF frame s will also be displayed in yellow when the center point AF frame is selected AF Frame 6 Press the shutter button all the way p 43 You will hear the sound of the shutter when the shutter activates If the LCD Monitor is on the images you have just shot will be displayed on the monitor for around two seconds f I OeS IIll COeffIJilleG l See page 206 for settings that can be change...

Страница 65: ...e to display even after the shutter button is released To let the camera return to Shooting mode press the shutter button halfway 9 e 0 llIti161lD lltCil e 0 ri l You can perform the following while images are displayed L iJ Erasing images individually p 140 Displaying images in Detailed Display mode p 36 Magnifying Images p 125 Changing the recording format p 58 Attaching sound memos p 133 Not av...

Страница 66: ...ting Another picture can be taken by pressing the shutter button even while the last is displayed Changing the Recording Format Right after Shooting By following the instructions below you can save images shot in the JPEG format in the RAW format p 62 right after shooting You can easily process images saved in the RAW format using a computer to edit the resolution photo effect and white balance wi...

Страница 67: ...ooting screen To cancel recording the image in the RAW format perform one of the actions below Select Cancel and press the SET button Press the button e e e e e e e e e 15 1 The above operations cannot be performed if the image was LiJ shot with the digital zoom or when Im n is already selected as the recording format 59 en j o 9 S co I r CD S co s CD Q 3 CD Q en CD CD n en CD S co en ...

Страница 68: ... prints Print A4 size 210 x 297 mm 8 3 x M2 M 2048 x 1536 pixels 11 7 in prints Medium 2 Print letter size 216 x 279 mm 8 5 x 11 in prints M3 Print postcard size 148 x 100 mm 1600 x 1200 pixels 6 x 4 in prints Medium 3 Print L size 119 x 89 mm 4 7 x 3 5 in prints 5 5 Send images as e mail attachments Small 640 x 480 pixels Low Shoot more images Paper sizes vary according to region The icons in the...

Страница 69: ...rrow on the omni selector You can shoot the image right after selecting settings by pressing the shutter button This screen will appear again once the image is shot Resolution Excluding Number of shots remaining Only displayed when the resolution compression or file format is selected In the case of a movie clip the remaining shooting time in seconds appears 5 Press the FUNC button or click the ma...

Страница 70: ...n similar to those recorded with non compression file formats such as RGB TIFF The file size of RAW image is also very compact at around one quarter of the size of RGB Tl FF images Standard uncompressed files formats such as RGB TIFF are processed by the camera meaning that if you make further adjustments with image editing software image quality may be affected Images in RAW format cannot be open...

Страница 71: ...fter selecting settings by pressing the shutter button The previous screen wili appear again once the image is shot Press the FUNC button or click the main dial e e e IE I It is possible to select the resolution for JPEG thumbnails LjI contained within RAW format image files This is useful when displaying enlarged RAW format images with the camera or when checking either the focus or for camera sh...

Страница 72: ...e reduction always fire Flash on The flash always fires Flash off The flash does not fire No icon appears on the display panel For information on the external flash see page 180 Press the button to switch between flash modes The selected flash mode appears on the display panel It will also be displayed on the LCD Monitor if the monitor is on You can switch between settings by pressing the button S...

Страница 73: ...n appears on the LCD monitor if it is set to Information View display When shooting with the red eye reduction function the subjects must look right at the red eye reduction lamp for this mode to be effective Try asking them to look directly at the lamp Even better results can be obtained by shooting with the lens set to a wide angle increasing the lighting in indoor settings or approaching closer...

Страница 74: ... Flash Adjust is set to Auto the flash fires twice A pre flash will fire and will be followed by the main flash The pre flash is used by the camera to obtain the sUbject s exposure data so that the main flash can be set to the optimal intensity for the shot The fastest shutter speed for flash synchronization is 1 250 second The camera automatically resets the shutter speed to 1 250 second if a fas...

Страница 75: ...ubject s body fills most of the viewfinder or LCD monitor The background gets increasingly indistinct the more you adjust the focal length toward telephoto Landscape Mode Use this mode to shoot expansive landscape scenes J s o sa 5 cc I r CD 5 cc st CD Q 3 CD ID J CD CD 1 J CD 5 cc en Turn the mode dial to Shooting procedures are the same as for the fD mode p 55 o 0 0 0 0 ri I See page 206 for set...

Страница 76: ...o Shooting procedures are the same as for the U mode p 55 o 0 0 e e e o Always use a tripod to prevent camera shake in this mode r5 1 See page 206 for settings that can be changed in this mode l II Warn people to stay still for a few seconds after the flash fires because of the slow shutter speed Since a slow shutter speed is often selected using the mode in daylight will produce an effect similar...

Страница 77: ... Vertical C J o sa S co I r CD S co r CD Q 3 CD D3 C CD CD l C CD S co en e e e 0 e 0 0 0 0 0 Ii l Please use the bundled PhotoStitch program to merge the LlJ images on a computer Framing a Subject PhotoStitch detects the overlapping portions of adjoining images and merges them When composing shots try to include a distinctive item landmark etc in the overlapping portions 69 ...

Страница 78: ...rightness is too great For good results pan swivel the camera to take successive shots To shoot close ups slide the camera over the subject keeping it parallel as you move Shooting Images can be shot in the following 5 sequences in Stitch Assist mode o Horizontally left to right S Horizontally right to left o Vertically bottom to top o Vertically top to bottom Clockwise starting at the top left Tu...

Страница 79: ...e second image so that it overlaps the first Minor discrepancies in the overlap can be corrected with the software An image can be retaken Press the A T or arrow on the omni selector to return to that frame 0 0 0 fE l See page 206 for settings that can be changed in this mode LiJ A custom white balance setting p 96 cannot be set in c Q mode To use a custom white balance setting first set it in ano...

Страница 80: ...g a red circle appears in the upper right of the LCD monitor Press the shutter button all the way to stop recording the movie The maximum length of individual movie clips is 30 seconds at the IR setting 10 frames second and 3 minutes at the IE and iii settings 15 frames second The data reflects Canon s testing standard The clip will end automatically after this time elapses or when the CF card bec...

Страница 81: ...hooting While shooting be careful not to touch any camera buttons other than the shutter button since the sound of the button being pressed will be recorded on your movie The AE AF white balance and zoom settings are set and locked to the settings of the first frame If the upper indicator blinks green after a shot this indicates that the movie is being written to the CF card You cannot shoot again...

Страница 82: ... monitor on 0 0 0 r5 l Always use the LCD monitor to compose images in macro mode L iJ Shooting with the viewfinder is possible though the parallax phenomenon may cause images composed with the optical viewfinder to be off center When the lens is zoomed out to the wide angle end the recordable area is 75 x 50 mm 3 0 in x 2 0 in at the closest focal distance and at telephoto end it is 56 x 42 mm 2 ...

Страница 83: ...vious setting when you cancel Super Macro mode on appears on the LCD monitor The zoom position moves within the recordable area You can cancel the super macro mode by pressing the button again J r o 9 5 ec I r CD I 5 ec s CD o Q 3 CD ID J CD ro J CD I 5 ec en 000 0 0 Be careful not to bang the lens against the subject when shooting in Super Macro mode Super Macro mode does not work properly when a...

Страница 84: ...n is pressed all the way The blinking gets faster two seconds before the shutter activates When Il is selected the self timer lamp blinks fast from the beginning The shutter activates in two seconds You can change the self timer sound by changing the setting in Selftimer Sound in the 1m My Camera menu p 53 Setting the Number of Seconds until Shooting You can set the number of seconds from the time...

Страница 85: ...ss the MENU button Press the zoom lever toward The lens will zoom to the maximum optical telephoto setting and stop Release the lever and press it toward tJ again to further zoom the image digitally Press the zoom lever toward to zoom back out Digital zoom cannot be used if the LCD Monitor is off or if RAW format or Super Macro mode are selected III elmages become coarser the more they are digital...

Страница 86: ...not check images while shooting continuously 1In the Rec menu select Cont Shooting See Selecting Menus and Settings p 46 Select or and press the MENU button Turning the camera off restores the standard shooting mode However the selected continuous shooting option will remain effective the next time continuous shooting is activated Press the button Press the button several times until or appears on...

Страница 87: ...ted flash 5 Press the shutter button all the way to shoot Shooting will stop when the shutter button is released The shooting speed is as follows When is selected Approx 1 2 frames per second When is selected Approx 2 0 frames per second Large Fine mode with LCD monitor off These figures reflect Canon s testing standard The actual figures will vary according to the shooting conditions and settings...

Страница 88: ...utomatically set the shutter speed and aperture value to match the brightness of the scene 1 Turn the mode dial to P 2 Shoot the image The shutter speed and aperture value will be set automatically and shown on the display panel The shutter speed and aperture will also be displayed on the LCD Monitor if the monitor is on The correct exposure has been set if the shutter speed and aperture value app...

Страница 89: ...erture value show in red on the LCD monitor Use the following methods to obtain the correct exposure and make them show in white Use the flash Change the light metering mode Change the ISO speed setting Differences between the P and a Modes The following settings can be adjusted in P mode but not in tmID mode Exposure Compensation Bracket Mode AE Lock Built In Flash Flash on Slow Synchro 2nd curta...

Страница 90: ...82 Turn the main dial and select a shutter speed Shoot the image The correct exposure has been set if the shutter speed and aperture value show in white on the LCD monitor If the aperture value is shown in red on the LCD monitor the image is underexposed insufficient light or overexposed too much light Adjust the shutter speed using the main dial until the aperture value display turns to white If ...

Страница 91: ...t can be changed in this mode L iJ Please note that camera shake becomes a factor at slow shutter speeds If the camera shake warning III appears on the LCD monitor secure the camera to a tripod before shooting The fastest shutter speed that can be used effectively with the flash is 1 250 second If you try to select a speed faster than 1 250 second the camera automatically resets the shutter speed ...

Страница 92: ...s indicate the decimal place so that 0 3 indicates 0 3 second and 2 indicates 2 seconds 15 13 10 8 6 5 4 3 2 2 5 2 1 6 1 3 1 0 8 0 6 0 5 0 4 0 3 4 5 6 8 10 13 15 20 25 30 40 50 60 80 100 125 160 200 250 320 400 500 640 800 1000 1250 1600 2000 The display of shutter speeds from 1 4 to 1 2000 second differs between the display panel and LCD monitor 84 Shutter Speed Display Panel LCD Monitor 15 sec 0...

Страница 93: ...e displayed on the LCD Monitor if the monitor is on 2 Turn the main dial and select an aperture value 2 1 1 2 3 Shoot the image The correct exposure has been set if the shutter speed and aperture value show in white on the LCD monitor If the shutter speed is shown in red on the LCD monitor the image is underexposed insufficient light or overexposed too much light Adjust the aperture value using th...

Страница 94: ...fore be changed automatically to match the synchronized flash speed even if its value was set previously Aperture Setting Display The larger the aperture value the smaller the lens aperture F2 0 F4 0 F2 2 F4 5 F2 5 F5 0 F2 8 F5 6 F3 0 F6 3 F3 2 F7 1 F3 5 F8 0 The display of aperture settings differs between the display panel and LCD monitor Aperture Value Display Panel LCD Monitor F2 5 2 5 F2 5 F8...

Страница 95: ...perture value Clicking the main dial switches between the shutter speed and the aperture value setting 3 Turn the main dial and select a shutter speed or an aperture value M Manually Setting the Shutter Speed and Aperture 4 Shoot the image Displays in red When you press the shutter button halfway the exposure compensation bar appears on the display panel and a number on the LCD monitor indicates t...

Страница 96: ...ue and shutter speed see page 83 84 If you wish to change the exposure adjust the shutter speed or the aperture using the main dial The brightness of the LCD monitor matches the selected shutter speed and aperture value If the flash is set to Flash on with red eye reduction or Flash on or you have attached an external flash the LCD Monitor will always appear bright 88 ...

Страница 97: ... points to focus according to the shooting conditions With the digital zoom the center point AF frame is always selected Press the EEl button The AF mode selection will appear in the Display Panel If the LCD Monitor is on the AF frame will be displayed in green Select the auto selection or center point AF frame using the main dial You can select either AiAF auto selection or center point AF using ...

Страница 98: ...nt for focusing accurately on an off center subject to obtain the composition you desire However the AF frame is fixed to center point when an image is shot using the viewfinder with the LCD monitor off or when the digital zoom is used even if you previously set the AF frame to the position you desire Press the DISPLAY button to turn the LCD monitor on Press the EEl button The AF frame appears in ...

Страница 99: ...E button e geoeeO 0e ieilltl The AF frame can also be moved in the macro mode L jJ The AF frame can be set in both the macro mode and the standard mode The AF frame cannot be moved in the super macro mode and while manual focus is being used p 115 When Spot AE Point is selected as the light metering mode you can use the selected AF frame as the Spot AE Point p 92 For an explanation of the AF frame...

Страница 100: ...settings to the correct exposure for the main sUbject This mode is particularly well suited for backlit conditions and general photography J Center Weighted Averages the exposure from the entire image Averaging but places more weight on the subject at the center Spot AE Point Meters the area within the spot AE point frame e Center Locks the spot metering frame to the center of the LCD monitor AF P...

Страница 101: ... be displayed on the LCD Monitor if the monitor is on If you have selected e Spot AE Point go to step 3 If you have selected Evaluative Metering or Center Weighted Averaging shoot the image menu select Select Center or AF Point Spot AE Point Frame option then press the MENU button When Spot AE Point is set to Center the spot AE point frame appears at the center of the LCD monitor When Spot AE Poin...

Страница 102: ...y panel It will also be displayed on the LCD Monitor if the monitor is on 2 Select a setting using the main dial or the or arrow on the omni selector The settings can be adjusted in 1 3 stops in the range of 2 stops to 2 stops You can shoot the image right after selecting settings by pressing the shutter button The menu displays again after the shot allowing you to change the settings easily 2 1 1...

Страница 103: ...rescent lighting For recording under daylight fluorescent or mi H Fluorescent H daylight fluorescent type 3 wavelength fluorescent lighting wa Flash For flash photography 1dt 1 J Custom1 For setting a custom value with a white sheet of paper etc to obtain the optimal white Ll2 Custom2 balance for the conditions There are two custom values custom1 and custom2 The icons in parentheses are the ones o...

Страница 104: ...e photo effect is set to Sepia or BIW t ASetting a Custom White Balance Shoot after reading the white balance data in 1J Custom1 or j Custom2 in the following cases since the white balance may not be correctly adjusted in _ Auto Shooting Close ups Shooting subjects of monotone color such as sky sea or forest Shooting with a peculiar source of light such as a mercury vapor lamp Press WB T on the om...

Страница 105: ...white balance may not be obtained when the exposure is incorrect image is completely black or white Use the LCD Monitor and zoom in to the maximum telephoto setting Set the digital zoom to Off A mode other than Q J is selected In c Q mode white balance data cannot be read The ISO speed is set to the same setting to shoot the image The flash is set to U Flash On or Flash Off Use the same flash sett...

Страница 106: ...tting is displayed The ISO speed setting menu appears on the LCD monitor the desired setting using the main dial or the or arrow on the omni selector You can shoot the image right after selecting settings by pressing the shutter button The menu displays again after the shot allowing you to change the settings easily Press the FUNC button or click the main dial 0 Higher ISO speeds increase the imag...

Страница 107: ...ack and white 1t 6 Custom Effect You can freely set the contrast sharpness and color saturation The icons in parentheses are the ones on the display panel Press the DISPLAY button to turn the LCD monitor on Photo Effect settings can be changed even if the LCD monitor is off However the Custom Effect settings cannot be changed Press the FUNC button and select IJ LCD monitor or IJFF Display Panel us...

Страница 108: ...to adjust the degree of brightness Select from Weak 0 Neutral and Strong Sharpness This function allows you to adjust how sharply outlines are defined Select from Weak 0 Neutral and Strong Saturation This function allows you to adjust the color depth Select from Low 0 Neutral and High You can shoot the image right after selecting settings by pressing the shutter button The menu displays again afte...

Страница 109: ...ompensation settings p 94 to extend the adjustment range The images are shot in the following order Standard exposure underexposure and overexposure Press the DISPLAY button to turn the LCD monitor on You can also use the Display Panel icons to activate AEB mode although you cannot adjust the AEB settings without using the LCD Monitor Press the FUNC button and select LCD monitor or IR DFF Display ...

Страница 110: ...xpand or contract the range using the main dial or the or arrow on the omni selector Use to expand the range and to contract it The camera returns to the Step 3 screen if you press the SET button You can shoot the image right after selecting settings by pressing the shutter button The menu displays again after the shot allowing you to change the settings easily Press the FUNC button or click the m...

Страница 111: ...out using the monitor but you cannot adjust the bracketing range Press the FUNC button and select LCD monitor or _ DFF Display Panel using the or T arrow on the omni selector The current setting is displayed The Bracket setting menu appears on the LCD monitor Select LCD monitor or _ F b Display Panel using the main dial or the or arrow on the omni selector then press the SET button The range canno...

Страница 112: ...ou press the SET button You can shoot the image right after selecting settings by pressing the shutter button The menu displays again after the shot allowing you to change the settings easily Press the FUNC button or click the main dial Select DFF in Step 3 to cancel Focus BKT mode The Focus BKT mode is not available when shooting with the flash on The camera will revert to shooting only one image...

Страница 113: ...h to lock the exposure setting and press the shutter button halfway Selecting an AF Frame p 89 Switching between Light Metering Modes p 92 While pressing the shutter button halfway press the button The exposure setting locks AE lock and the icon appears on the LCD monitor Using any button or lever other than the main dial and backlight button cancels the AE lock AE Lock Icon Recompose the image an...

Страница 114: ... the DISPLAY button to turn the LCD monitor on 3 Focus on the subject on which you wish to lock the exposure Press the shutter button halfway In Tv and Av modes the Safety Shift function works if Safety Shift is set to On p 86 4 Press the button The exposure setting will lock and the icon will appear on the LCD monitor 5 Turn the main dial until the desired shutter speed or aperture value is reach...

Страница 115: ... metering frame on the subject on which you wish to lock the flash exposure setting and press the shutter button halfway 4 While pressing the shutter button halfway press the button The exposure setting locks FE lock and the icon appears on the LCD monitor The flash will fire a pre flash and lock the flash exposure to the required intensity to illuminate the subject Each time you press the button ...

Страница 116: ...ng FE Lock continued The FE lock only functions with the built in flash an externally L iJ mounted EX series Speedlite a Macro Ring Lite or a Macro Twin Lite The FE lock function is not available when Flash Adjust Is set to Manual 108 ...

Страница 117: ...just Flash Output eWhen Flash Adjust is set to Auto settings can be adjusted in 1 3 stop increments in the range of 2 stops to 2 stops eyou can combine flash exposure compensation with the camera s exposure compensation function for ambient light to achieve creative effects eln M mode or when Flash Adjust is set to Manual the flash output can be controlled in three steps starting from FULL when sh...

Страница 118: ...ation using the main dial or the or arrow on the omni selector You can shoot the image right after selecting settings by pressing the shutter button The menu displays again after the shot allowing you to change the settings easily e g Flash Adjust set to Auto e g M mode or Flash Adjust set to Manual Press the FUNC button or click the main dial To cancel the compensation return the setting to J 110...

Страница 119: ...g The flash fires right before the shutter closes regardless of the shutter speed Compared with the 1st curtain the flash fires later and this allows you to shoot images in which for example a car s taillights seem to trail off behind P w i Image shot with the 1st curtain setting Image shot with the 2nd curtain setting From the L 1 Rec menu select 1st curtain or 2nd curtain in Flash Sync 111 ...

Страница 120: ... images can be shot Since the camera may shoot continuously for an extended period of time the use of the separately sold Compact Power Adapter CA 560 is recommended p 189 Select Intervalometer from the L J Rec menu See Selecting Menus and Settings p 46 Select an interval using the OlIIIII or arrow on the omni selector If you press the or arrow on the omni selector continuously the interval time i...

Страница 121: ... camera automatically powers down regardless of the power saving function settings If the below operations are accessed while the interval shooting is in process the interval shooting session will be canceled Turning the mode dial or pressing the shutter button halfway while the camera is waiting to shoot the next image Opening the CF card slot cover or battery cover Switching to Playback mode Tur...

Страница 122: ...rst aim the camera at an object at a similar distance lock the focus focus lock or autofocus AF lock and recompose the image with the desired subject You can also use manual focus Shooting with Focus Lock 1Aim the AF frame at an object at a similar distance to the subject you wish to shoot 2 Press the shutter button halfway to lock the focus The AE setting will also lock when you do this The expos...

Страница 123: ... and the MF button are released The AF lock will cancel if the MF button is pressed again 4 Recompose the image and press the shutter button all the way to shoot the image e l 1I111i1lbIlleeO llOeo rs l The AF lock function is convenient because you can let go of the LiJ shutter button to recompose the image Moreover the focus remains locked after the picture is taken allowing you to capture a sec...

Страница 124: ...uideline only Adjust the focus by turning the main dial until the image appears focused on the LCD monitor In Tv Av or M mode you can switch between the manual focus aperture value and shutter speed selection by clicking the main dial A green appears at the left of selectable items Pressing the MF button a second time cancels the manual focus mode Using the Manual Focus in Combination with the Aut...

Страница 125: ... focusing manually Cancel the manual focus mode then change the AF frame setting lID lID lID lID lID You can use manual focus in the macro focal distance p 74 In L jJ this case the fine scale is adopted You can change the MF indicator displayed distance units p 52 117 ...

Страница 126: ...lowing you to shoot without missing opportunities This is the default setting Single The camera only focuses when the shutter button is pressed halfway conserving battery power In the L J Rec menu select AF Mode See Selecting Menus and Settings p 46 Select Continuous or 1511nallel and press the MENU button 0 0 0 0 e 0 0 1 1 When the LCD monitor is off the setting locks in the Single LjJ mode 118 ...

Страница 127: ... remembered Turn the mode dial to P Tv Av M C1 or C2 When you wish to re save partially modified settings except shooting mode that were previously saved in the C1 or C2 mode select C1 or C2 Set the setting contents you wish to save Settings that can be saved to the mode Shooting mode P Tv Av M Items that can be set in P Tv Av and M modes Shooting menu settings Zoom location Manual focus location ...

Страница 128: ...on 2 3 Select NO Filter in the L J Rec menu See Selecting Menus and Settings p 46 Select On and press the MENU button NO appears on the LCD monitor oe 1Il 0 o Always use a tripod to prevent camera shake in this mode lIli l IeeG fi OIllC6Cl01ill Standard brightness is decreased to approximately 1 8 when the LiJ ND filter is on For example if the appropriate aperture value is 8 it becomes 2 8 when t...

Страница 129: ...rmal B Camera on right end r J Camera on left end 0 0 0 0 e e e 0 0 0 This function may not operate correctly when the camera is pointed straight up or down Check that the correct camera orientation icon e g m is displayed and if it is not then set the Auto Rotate function to Off Even if the Auto Rotate function is set to On the orientation of images downloaded to a computer will depend upon softw...

Страница 130: ...age to be shot is memorized so that images recorded to a new CF card start from the next number In the W Set up menu select File No Reset See Selecting Menus and Settings p 46 Select On or Off and press the MENU button 0 rE I Setting the File No Reset to Off is useful for avoiding file L iJ name duplication when images are downloaded to a computer About File and Folder Numbers Images are assigned ...

Страница 131: ...t mode are always saved into the same folder a folder may contain more than 100 images The number of images may also exceed 100 if a folder contains images copied from a computer or images shot with other cameras Please note however that the images in folders containing 2001 or more images cannot be replayed in this camera 123 ...

Страница 132: ...revious image and to move to the next Holding or moves more rapidly between images but the images will not appear as clearly Turn the main dial to the left to move to the previous image and to the right to move to the next You can also switch images by pressing the JUMP button p 127 Press the DISPLAY button to show the data for the displayed image p 36 Press the 161 button to quickly delete the di...

Страница 133: ... times approx 5 times and 10 times in order Also the magnified image can be reduced to approx 5 times 2 5 times and normal size in order by pressing the E button repeatedly while holding the SET button Movie frames and index playback images cannot be magnified You can magnify an image while it is displayed on the LCD monitor in Shooting mode immediately after the image is shot p 57 You can use the...

Страница 134: ...elected Image Change the image selection by turning the main dial or using the or arrow on the omni selector Pressing the arrow in this row displays the previous set of nine images Pressing the T arrow in this row displays the next set of nine images Press the button Index playback cancels and the display reverts to single image playback You can cancel index playback by pressing the zoom lever tow...

Страница 135: ...al or using the or arrow on the omni selector Single Image Playback The 10th image ahead or behind is displayed Display the first or last image by pressing the or arrow on the omni selector while h lding the SET button Index Playback The previous or next 9 images are displayed Display the first or last 9 images by pressing the or arrow on the omni selector while holding the SET button Jump Bar Jum...

Страница 136: ...r arrow on the omni selector and press the SET button The movie images and sound will play Movie Playback Panel g Exit Returns to the screen in Step 1 a Play Plays back the movie images and sounds Btl First Frame Shows the first frame IIII Previous Frame Rewinds if the SET button is held down IIlJ Next Frame Fast forwards if the SET button is held down mI Last Frame Shows the last frame Edit Edits...

Страница 137: ...ay experience frame dropping and audio breakup when playing back a movie on a computer with insufficient system resources The volume at which movies play back can also be adjusted in the Set up menu Please adjust the audio sound level on the TV when viewing movie files on a TV ilO I 9 You may not be able to play back or edit movies that have been shot with another camera 129 ...

Страница 138: ...od using the or arrow on the omni selector iii Cut beginning Deletes frames in the first half of the movie iii Cut end Deletes frames in the second half of the movie Exit Reverts to the movie playback panel Movie Editing Panel Movie Editing Bar Select the range you wish to delete using the or arrow on the omni selector Editing position 5 Select a Play using the or arrow on the omni selector and pr...

Страница 139: ...ted New File Saves the edited movie under a new file name The original data is not deleted When there is not enough space left on the CF card only the overwrite function is available e e e e e e Protected movies cannot be edited It may take approximately 3 minutes to save an edited movie If the battery pack runs out of charge partway through edited movie clips cannot be saved When editing movies u...

Страница 140: ...original each time the SET button is pressed Press the MENU button The Play menu appears again Press the MENU button again to close the menu e e e e e 0 e e e e e 0 Movie images cannot be rotated When images are downloaded to a computer the orientation of images rotated by the camera will depend upon the software used to download the images e e e e r5 1 Images can be magnified when rotated p 125 I...

Страница 141: ... to start recording To stop recording press the SET button To restart recording press the SET button again You can add as many sound memos as you like until their total time reaches 60 seconds Press the t button to end the sound memo settings Sound Memo Panel Playing back the Sound Memos Select D in step 2 above Images with sound memos are displayed with the r mark standard display or detailed dis...

Страница 142: ... record or play such images the Incompatible WAVE format message will display Incompatible sound files can be deleted with this camera Sound memos for protected images cannot be erased p 139 1 1 IiI 61 9J III til 61 iii Ill o r5 l The volume can be adjusted in the Set up menu p 51 L iJ If you set Mute to On in the Set up menu p 51 no sound is reproduced however you can resume the sound and adjust ...

Страница 143: ...ress the or T arrow on the omni selector to select Program Press the or arrow to select between All Images or anyone of slide Show 1 Show 3 Press the or T arrow on the omni selector to select Start and press the SET button The slide show will start and automatically stop when the show is done Pausing and Resuming a Slide Show Press the SET button to pause the show Press it again to resume Fast For...

Страница 144: ...images may be marked per slide show Images display in the order of their selection Display the slide show menu p 135 Press the arrow on the omni selector to select Program Press the ollIIII or arrow to select Show 1 Show 2 or Show 3 A check mark will appear beside a show already containing images Press the T and or arrow on the omni selector to choose Select and press the SET button Mark images to...

Страница 145: ... all You can select images using the main dial or the or arrow on the omni selector and change the settings using the or T arrow on the omni selector after Mark all or Clear all has been selected 5 Press the MENU button The image selection screen will close Adjusting the Play Time and Repeat Settings You can change the play time for all the images in a show and have the show repeat itself continuo...

Страница 146: ...Repeat using the or T arrow on the omni selector Repeat Select On or Off Select a setting using the selector PlayTime Select a play time or arrow on the omni ri l The display interval may vary somewhat for some images L iJ Slide shows can be easily edited on a computer with the supplied ZoomBrowser EX or ImageBrowser software programs 138 ...

Страница 147: ... on protected images To remove the protection press the SET button again in protection mode You can make the selection of images easier by toggling between single image playback and index playback with the button Press the MENU button The protect window closes 0 000 Please note that formatting initializing a CF card erases all data including protected images p 141 and other file types Please check...

Страница 148: ...sing select Cancel and press the SET button Protected images cannot be erased with the erase function p 139 Erasing All Images In the g Play menu select Erase all and press the SET button See Selecting Menus and Settings p 46 The Erase all images message appears Press the or arrow on the omni selector to select OK and press the SET button To cancel instead of erasing select Cancel and press the SE...

Страница 149: ...To cancel formatting instead select Cancel and press the SET button The capacity of the CF card displayed after formatting will be less than the rated capacity written on the label of the CF card This is not a malfunction of the CF card or camera Ii l If the camera does not work properly the inserted CF card may I jJ be malfunctioning Reformatting the CF card may solve the problem When a non Canon...

Страница 150: ...ow many copies you want DPOF 2 Print Settings and then take the CF card to a participating photo lab that supports DPOF to have them printed out later 1 This camera complies with the industry standard PictBridge therefore you can connect the camera to non Canon PictBridge compliant printers and print images 2 Digital Print Order Format This manual explains the DPOF print settings For information o...

Страница 151: ...t printers Card Photo Printer Bubble Jet Printer Direct Print Compatible Printing For details see the Direct Print user Guide Also refer to your printer s manual Printers that Can Be Used with this Camera Canon Direct Print Compatible CP Printers See the System Map Direct Print Compatible Bubble Jet Printers For more information visit your nearest Canon retailer 143 ...

Страница 152: ...n using a photo developing service Refer to the Direct Print User Guide for instructions on how to select print settings from the printer The A mark may appear on images that have had print marks set by another DPOF compliant camera These settings will be overwritten by any print marks set by your camera The output of some digital printers or photo lab services may not reflect the specified print ...

Страница 153: ...playback 3 images Press the button to switch between single image playback and index playback All the Images on a CF Card Press the button to switch to index playback 3 images You can set one copy of each image to print by pressing the SET button then selecting Mark all using the or arrow on the omni selector and pressing the SET button again When the print type is set to Standard or Both the sett...

Страница 154: ...o be assigned to images with the supplied software programs ZoomBrowser EX or ImageBrowser on a computer Setting the Print Style The following print settings can be selected Ii Standard Prints one image per page mJ Index Prints the selected images together at a Print Type reduced size in an index format Ii mJ Both Prints the images in both the standard and index formats Date Adds the date to the p...

Страница 155: ...t to Index the Date and File No cannot be set to On at the same time If Print Type is set to Both or Standard then the date and the file no can both be set to On at the same time However the information that can be printed may depend on the type of printer e e e ri l The date prints as the date and time in the format specified in the UJ Set Date Time menu p 26 Resetting the Print Settings The prin...

Страница 156: ...Print Settings DPOF Print Settings continued 148 ...

Страница 157: ......

Страница 158: ...ton to switch to index playback 3 images Then press the SET button and select Mark all using the A or T arrow on the omni selector and press the SET button again If you select Clear all instead of Mark all you can remove marks from all the images You can select images using the main dial or the or arrow on the omni selector and change the settings using the A or T arrow on the omni selector after ...

Страница 159: ...ations after you have installed the appropriate software the computer settings only need to be adjusted for the first download See Downloading via a Camera to Computer Connection p 152 and Downloading Images by Direct Transfer p 156 With this method you download images using computer commands without installing any software See Downloading via a Camera to Computer Connection p 152 software install...

Страница 160: ...nterface USB Canon Utilities ZoomBrowser EX 250 MB or more Free Hard Disk Including the PhotoRecord printing program Space PhotoStitch 40 MB or more Canon Camera TWAIN Driver 25 MB or more Canon Camera WIA Driver 25 MB or more Display 1 024 x 768 pixels High Color 16 bit or better Macintosh OS Mac as X vi 0 1 5 vi 0 3 Computer Model The above as should be pre installed on computers with built in U...

Страница 161: ...ction Please refer to your computer s manual for information regarding the location of the USB port You are recommended to use a fully charged battery pack or Compact Power Adapter CA 560 sold separately to power the camera when connecting to a computer p 18 189 All procedures performed with a connection to a USB 2 0 compliant board are not guaranteed 1 Install the driver and the software applicat...

Страница 162: ...ide is up then insert it into the DIGITAL terminal securely Interface cable Connect the supplied interface cable to the computer s USB port and the camera s DIGITAL terminal When the connection to the computer is complete the power mode indicator will light yellow USB port Windows Proceed to step 3 p 155 Macintosh Refer to the Software Starter Guide and download images 154 ...

Страница 163: ...ear click the Start menu followed by Programs or All Programs Canon Utilities CameraWindow and CameraWindow The windows shown below will display Using the software and computer to download images See the Software Starter Guide Using the Camera to Download Images Direct Transfer Function See Downloading Images by Direct Transfer p 156 155 o J J CD n 5 cc ...

Страница 164: ...lect Transfers and saves single images to the computer Transfer as you view and select them Transfers and saves single images to the computer Wallpaper as you view and select them The transferred images display on the computer desktop Use the supplied interface cable to connect the computer s USB port to the camera s DIGITAL terminal See step 2 on page 154 Confirm that the Direct Transfer menu is ...

Страница 165: ...eappear or using the or arrow on the sellec tor and press the SET button Select images to download using the or arrow on the omni selector or main dial and press the SET button The images will download Press the MENU button The Direct Transfer menu will display again o 0 e 0 0 0 e e e e 0 0 0 e Only JPEG format images can be downloaded as wallpaper for the computer After images are transferred the...

Страница 166: ...n Digital Camera Solution Disk This is useful for downloading images to a computer in which the software is not installed However please note that there are certain limitations to downloading images with this method For more details please refer to the For W ndows XP and Mac as x Users leaflet Use the supplied interface cable to connect the computer s USB port to the camera s DIGITAL terminal See ...

Страница 167: ... PC card reader or PC card slot Refer to your card adapter s or card reader s manual for information regarding the connection between the computer and card adapter or card reader 2 Double click the icon of the drive with the CF card Depending on the operating system a window opens automatically 3 Copy images from the card into a folder of your choice on the hard disk The images are stored in the x...

Страница 168: ... or p 30 The image will appear on the TV Shoot or play back images as usual ilQ IJiI O O GG oJiI ri l No image will appear on the LCD monitor when the camera is L iI connected to a TV monitor The video output signal can be switched NTSC or PAL to accommodate different regional standards p 52 The default setting will vary between regions NTSC Japan U S A Canada Taiwan etc PAL Europe Asia excluding ...

Страница 169: ...he 8 option features science fiction related images and sounds The Ell option features animals Changing My Camera Settings a menu item using or T arrow on the omni selector then select setting content using the or arrow on the omni selector Q 3 Turn on the camera and press button The L J Rec or g Play menu appears W l menu using the arrow on the J omni selector Pressing the JUMP button also switch...

Страница 170: ...nu closes when the shutter button is pressed halfway and the camera switches to shooting mode llI86 11 91 80 r e If you select Theme in Step 3 you can select a consistent L iJ theme for each of the My Camera Settings If Mute in the iii Set up menu is set to On no sound is reproduced except for the error warning signal regardless of the selected My Camera settings p 51 The Start up image displays 1...

Страница 171: ...ult values you will LiI need to use a computer Use the bundled software program ZoomBrowser EX or ImageBrowser to upload the default settings to your camera Registering CF Card Images and Sounds and press i i W6W i m iM W r i i i ii iMli i U i i 0 Q 3 CD 03 en 5 ec en the menu item you to register using the or arrow on the omni selector then select 8 or Em using the or arrow on the omni selector I...

Страница 172: ...S M W t 7 4rf W JMZi 1f x W W tt i r i Sa Select the image you wish to register using the or arrow or on the omni selector d the or arrow on the omni selector then press the SET button Recording starts Recording stops when the set amount of time has passed Start up Sound 1 second Operation Sound 0 3 second Selftimer Sound 2 seconds Shutter Sound 0 3 second the omni selector and press the SET butto...

Страница 173: ...less of the below formats except RAW images movies and sounds recorded using the Sound Memo function Start up Image Recording image format JPEG Base line JPEG Sampling rate 4 2 0 or 4 2 2 Image size 320 x 240 pixels File size 20 KB or less Recording format Quantization bit Sampling frequency Recording time WAVE monaural 8 bit 11 025 kHz and 8 000 kHz s o Ql 3 CD 03 en CD S to CIJ 11 025 kHz 8 000 ...

Страница 174: ...seconds before the photo is taken You could also record cheerful music to bring out the natural smiles of your subjects or so they can strike a pose fitting the music In these ways you can customize your camera by creating and adding new My Camera settings See the supplied Software Starter Guide for more information on creating and adding My Camera files 166 ...

Страница 175: ...ck the image in playback made Message Codes Ph Playing back image PC Connected to computer in PC connection mode Adequate battery charge Lb CF LEns Inl Low battery charge Charge the battery as soon as possible to use for any length of time Battery charge low camera will not operate Immediately recharge or replace the battery pack with a charged one No CF card in camera CF card battery cover is ope...

Страница 176: ...ated because there is a file with the same name as the directory that the camera is attempting to create or the highest possible file number has already been reached In the Set up menu please set File No Reset to On After you save all the images you wish to retain onto a computer format the CF card p 141 Please note that formatting will erase all the existing images and other data Battery charge i...

Страница 177: ...Cannot attach sound memos to the image because the image has some sound file recorded in an inappropriate format You attempted to erase a protected image Too many images have been marked with print settings transfer settings or slide show settings Cannot process any more You attempted to set the print settings for a non JPEG file Couldn t save the print transfer or slide show settings Slide show s...

Страница 178: ... e Switch the camera to Shooting record or computer printer mode connection mode See Switching between Shooting and Playback p 32 e During a computer or printer connection disconnect the interface cable before switching the camera to shooting mode Flash is charging eWait until the upper indicator Blinking on LCD lights orange signaling that the monitor flash is charged then press the shutter butto...

Страница 179: ...the CF card slot cover battery cover opened and battery cover then turn off while camera was the camera recording to CF card warning signal Battery pack Battery pack capacity e Replace the battery pack with consumed qUickly reduced because of a new one disuse for one year or more after being fully charged Battery life exceeded e Replace the battery pack with a new one Battery pack will Battery lif...

Страница 180: ...ere is at least range 50 cm 1 6 ft between the camera lens and subject Use the Macro mode to shoot close ups between 5 and 50 em 2 0 in and 1 6 ft at maximum wide angle and 15 and 50 em 5 9 in and 1 6 ft at maximum telephoto You can also use Super Macro mode when the distance to the subject is 5 to 20 cm 2 0 to 7 9 in wide angle end to 86 mm Zoom position 35mm film equivalent Subject is hard to fo...

Страница 181: ...ounted flash with a large output Raise the ISO sensitivity and then shoot See Changing the ISO Speed p 98 The NO filter is On _Set NO Filter to Off See Using the NO Filter p 120 Subject in Subject too close Adjust the flash output with the recorded image is causing flash to be too flash exposure compensation too bright bright function p 109 Subject bright in Set the exposure comparison to the comp...

Страница 182: ...constitute a image the air This occurs malfunction more frequently in the following conditions When shooting at the wide angle end When shooting with a high aperture value in the aperture priority AE mode Flash will not fire Flash set to Off eSetthe flash to On mage not showing Incorrect video system e Set the video system to the on TV setting appropriate setting NTSC or PAL for your TV p 52 Shoot...

Страница 183: ...intestinal wall Negative Terminal Removing the Battery Place your fingertip on CD and press it in the direction of the arrow while placing another fingertip on and removing the battery holder 2 Place the battery in the battery holder with the negative terminal facing up Then replace the battery holder into the wireless controller Removing the Battery To remove the battery pull it in the direction ...

Страница 184: ...e front remote sensor 2 In this case aim the wireless controller toward the side remote sensor 1 0 Shooting Press the Q1 I button on the camera until the icon appears in the display panel then shoot the image r 6 J I CD Compose the image with the zoom buttons C Press the shutter button 0 l TI The camera will shoot the image eI after the time set in Wireless Delay in the Rec menu has z 0 DISPLAY el...

Страница 185: ...e QlIO The operable range of the wi reless controller will shorten under the following circumstances When the wireless controller is used at an angle to the remote sensor When strong light strikes the camera When the battery is weak Gelll l IiIIOeo oelll l l 61i11 The movie editing and printing functions are not available L iJ When you fix the camera to a tripod and shoot still images aim the remo...

Страница 186: ...ies sold separately to the camera The LH DC30 consists of an adapter component and a hood component At the time of purchase the adapter and the hood are joined together Turn in the direction of the arrow to separate the two components Turn off the camera Then press and hold the ring release button and remove the outer ring on the lens Attach the adapter to the camera by aligning the part of the ad...

Страница 187: ...n and turn the adapter in the opposite direction shown GlIIlllflll ls I e If you use the built in flash when the lens hood is attached a portion of the flash will be blocked by the lens hood and appears dark If you use the viewfinder when the lens hood is attached a portion of the view will be blocked by the lens hood 0 5 0 0 1I041l4 l0 When you are not using the lens hood it can be stowed as L iJ...

Страница 188: ... the M mode or when Flash Adjust is set to Manual Other flashes may fire manually or not fire at all Please check the manual for your flash Certain functions noted in the manuals for the Canon Speedlite 220EX 420EX 550EX 580EX the Macro Ring Lite MR 14EX and Macro Twin Lite MT 24EX cannot be performed when mounted on this camera Please read this guide before using one of these flashes on the camer...

Страница 189: ...en a Speedlite 550EX 580EX a Macro Ring Lite MR 14EX or a Macro Twin Lite MT 24EX is mounted on the camera you can adjust the flash output from either the flash or the camera The flash setting overrides the camera setting when both are set To set it from the flash you are recommended to use the flash s manual mode You can also adjust the flash output even when the camera is set to the E TTL automa...

Страница 190: ...le in M mode Flash Sync 1 st curtain 2nd curtain 2nd curtain priority with Speedlite 550EX or 580EX Daylight Synchro Slow Synchro Flash Exposure Compensation When Speedlite 550EX or 580EX is used if flash exposure adjustments are made both from the camera and the flash the 550EX s or 580EX s flash exposure compensation setting takes precedence when the flash is set to E TTL mode The camera s flash...

Страница 191: ...gether with the Macro Ring Lite MR 14EX or Macro Twin Lite MT 24EX the Close up Lens 2500 should be attached first followed by the Macro Lite Adapter 58C sold separately 3 Release buttons Attach the controller to the camera s hot shoe Macro Ring Lite MR 14EX Press and hold the release buttons on both sides of Macro Ring Lite MR 14EX and fit it into the conversion lens adapter Macro Twin Lite MT 24...

Страница 192: ...automatic flash exposure compensation mode just by setting the camera s shooting mode to P Av or Tv You are recommended to set the aperture in Av or M mode for full fledged macro flash photography The following functions can be used with Macro Ring Lite MR 14EX or Macro Twin Lite MT 24EX mounted E TTL Automatic Flash Exposure Compensation FE Lock Flash Sync 1 st curtain 2nd curtain The flash s 2nd...

Страница 193: ...he wide converter tele converter or close up lens is firmly screwed onto the adapter Injury from glass shards can occur if the lens loosens and falls off Never aim the wide converter tele converter or close up lens directly at the sun or bright lights Wide Converter WC DC58N This 58 mm threaded diameter magnifying conversion lens is for taking wide angle shots The lens changes the focal length of ...

Страница 194: ...ed by the wide converter or tele converter Use the wide converter lens with the focal length set to the maximum wide angle setting Use the tele converter lens with the focal length set to the maximum telephoto setting At other zoom settings the image will not appear correctly Close up Lens 2500 58 mm This lens with a 58 mm threaded diameter makes macro shooting easier With the camera in macro mode...

Страница 195: ... using the Viewfinder to shoot a portion of the image in the viewfinder may appear to be blocked by the wide converter or tele converter Set the focal length of the camera s lens to telephoto when using the close up lens Mounting the Lenses Turn the power off and press the ring release button and remove the ring from around the lens on the camera body Attach the conversion lens adapter to the came...

Страница 196: ...at the images will not merge properly with the PhotoStitch program on a computer when they are shot in mode with a conversion or close up lens To protect the conversion lenses hold them with one hand while you screw them on the camera with the other hand Completely remove all dust and dirt from conversion lenses with a lens blower brush before use The camera may focus on any dirt that remains Exer...

Страница 197: ...power adapter and plug it into a power outlet 2 Open the terminal cover and connect the DC plug of the compact power adapter to the camera s DC IN terminal Always disconnect and unplug the compact power adapter after use 0 0G e l Ielililllee0 1fI ll l I Always turn the camera s power off before connecting or disconnecting the compact power adapter Only use the Compact Power Adapter CA 560 with cam...

Страница 198: ...t the same time from a car s cigarette lighter socket It is also possible to charge up to 2 battery packs at the same time from a power outlet if you connect Compact Power Adapter CA 560 sold separately or Compact Power Adapter CA 570 sold separately to Battery Charger CG 570 Battery Pack BP 511A Battery Pack BP 511 Battery Pack BP 512 and Battery Pack BP 514 can be charged with these combinations...

Страница 199: ...the camera at the point of manufacture not when you make the purchase l le Ij e O OJ l If Be particularly careful to keep the date batteries out of the reach of children Seek medical assistance immediately if a child swallows a battery since corrosive battery fluids could damage the stomach or intestinal wall 3 4 Negative Terminal ep Battery holder 1 Turn off the power and open the battery cover p...

Страница 200: ...lass lens wiper First use a lens blower brush to remove dust and dirt then remove any remaining dirt by wiping the lens lightly with a soft cloth Never use synthetic cleansers on the camera body or lens If dirt remains contact the nearest Canon Customer Support Help Desk as listed on the separate Canon Customer Support leaflet Use a lens blower brush to remove dust and dirt If necessary gently wip...

Страница 201: ... T mm 35mm film equivalent 35 W 140 T mm f 2 0 W f 3 0 T Approx 4 1x Up to approx 16x in combination with the optical zoom Real image zoom viewfinder Picture coverage approx 80 Dioptric adjustment 3 to 1 m 1 dpt equivalent 2 0 inch low temperature poly crystalline silicon TFT color LCD approx 118 000 pixels Picture coverage 100 TTL autofocus continuous or single AF lock and Manual focus are availa...

Страница 202: ...he following external flashes is recommended Canon Speedlite 220EX 420EX 550EX 580EX Macro Ring Lite MR 14EX and Macro Twin Lite MT 24EX Flash Exposure Compensation Shooting Modes Continuous Shooting Interval Shooting Self timer 2 0 stops in 1 3 stop increments FE Lock Slow synchro and 1st curtain 2nd curtain flash are available Auto Creative zone Program Shutter speed priority Aperture priority M...

Страница 203: ...00 x 1200 pixels Small 640 x 480 pixels Movies 640 x 480 pixels 30 sec r 320 x 240 pixels 3 min 160 x 120 pixels 3 min Iil 10 frames second ml mJ 15 frames second The data in parentheses refer to the maximum movie length per shooting Playback Modes Direct Print Display Languages My Camera Settings Single histogram displayable Index 9 thumbnail images Magnified approx 10x max in LCD monitor Sound m...

Страница 204: ...digital camera supports Exif 2 2 also called Exif Print Exif Print is a standard for enhancing the communication between digital cameras and printers By connecting to an Exif Print compliant printer the camera s image data at the time of shooting is used and optimized yielding extremely high quality prints Battery Performance Number of Images Shot Playback Based on the CIPA LCD Monitor Off Time st...

Страница 205: ...ery tenth shot Power is left off for a sufficient amount of time then the power is turned back on and the testing procedure is repeated The included memory card is used The LCD monitor is turned on for the CIPA standard Until the battery returns to normal temperature Playback Normal temperature 23 C 2 C 73 of 3 6 OF normal relative humidity 50 20 continuous playback at 3 seconds per image e llII B...

Страница 206: ... 92 sec 186 sec 374 sec 743 sec Movie 320 x 240 pixels m 91 sec 183 sec 368 sec 735 sec 1453 sec 160 x 120 pixels m241 sec 486 sec 973 sec 1954 sec 3906 sec The maximum number of Images that can be recorded may be affected by the resolution of the JPEG thumbnails The display panel can only display 3 digits Any value exceeding 999 will appear as 999 These figures reflect standard shooting condition...

Страница 207: ...0 x 1200 pixels 1002 KB 558 KB 278 KB S 640 x 480 pixels 249 KB 150 KB 84 KB RAW 3072 x 2304 pixels 7096 KB 640 x 480 pixels 660 KB sec Movie m 320 x 240 pixels 330 KB sec IIml 160 x 120 pixels 120 KB sec AC 100 V 240 V 50 60 Hz 22 VA 100 V 30 VA 240 V Rated output Operating temperatures Dimensions Weight DC 8 4 V 1 2 A 0 40 C 32 104 OF 91 x 31 x 67 mm 3 6 x 12 x 2 6 in Approx 115 9 4 1 oz 199 ...

Страница 208: ... 21 mm 1 5 x 2 2 x 0 8 in Approx 82 g 2 9 oz Power supply Operating temperatures Dimensions Weight Lithium button battery CR2025 0 40 C 32 104 OF 35 x 6 5 x 56 6 mm 1 4 x 0 3 x 2 2 in Approx 10 g 0 4 oz Card slot type Dimensions Weight Rated output Operating temperatures Dimensions Weight 200 Type I 36 4 x 42 8 x 3 3 mm 1 4 x 1 7 x 0 1 in Approx 10 g 0 4 oz ...

Страница 209: ...end of lens Thread diameter Dimensions Weight Focusing range from end of lens Thread diameter Dimensions Weight Infinity 3 elements in 3 groups 160 cm infinity 5 2 ft infinity when attached to PowerShot G6 at telephoto end 58 mm Standard filter threads Conversion Lens Adapter LA DC58D is required to install the lens on a PowerShot G6 Diameter 75 mm 3 0 in Length 50 mm 2 0 in Approx 185 g 6 5 oz 10...

Страница 210: ...t Power Adapter _ 189 Compression 60 Computer System Requirements 152 Continuous Shooting 48 78 Contrast 100 202 Conversion Lens Adapter 182 185 Creative Zone 14 Custom Settings 119 D Date Battery 191 DatelTime 26 52 Default Setting 48 54 Design rule for Camera File system 195 Digital Zoom 42 49 77 Display Detailed 39 Off 52 Standard 38 Display Panel 16 167 Distance Units of the MF Indicator 52 DP...

Страница 211: ...9 92 M Macro Mode 74 Macro Ring Lite 182 Macro Twin Lite 182 Magnifying Images 125 177 Manual Exposure 87 Manual Focus 49 115 Menu My Camera 53 Play 50 Rec 48 Selecting Menus and Settings 45 Setup 51 J Jump 127 N ND Filter 49 120 Night Scene Mode 68 o Operation Sound 51 53 161 Overexposure Warning 40 P Photo Effect 99 Playback 124 Auto Playback Slide Show 135 Movies 128 177 Single Image 124 TV 160...

Страница 212: ... Reduction 48 65 Remote Sensor 11 176 Reset 54 Reverse Display 33 50 Review 49 57 58 Rotate 50 132 S Safety Shift 49 82 85 86 Saturation 100 Save Settings 50 Self Timer 48 76 Sound 51 53 161 Sharpness 100 Shooting Checking Images Reviewing 49 57 Using a TV for Viewing 160 Shooting Mode 30 32 Functions Available 206 Shutter Button 43 176 Shutter Sound 43 53 56 161 Volume 51 ShutterSpeed 80 82 85 87...

Страница 213: ...hich can be determined by turning the equipment off and on the user is encouraged to try to correct the interference by one or more of the following measures Reorient or relocate the receiving antenna Increase the separation between the equipment and receiver Connect the equipment into an outlet on a circuit different from that to which the receiver is connected Consult the dealer or an experience...

Страница 214: ... 0 0 Flash Adjust 1st curtain 0 0 0 0 0 Flash Sync 2nd curtain Single Shot 0 0 0 0 0 1 r g 0 0 0 0 0 0 0 High Speed 78 Drive Mode Continuous 0 0 0 0 0 0 0 Mode Self Timer tffi 0 0 0 0 0 0 0 0 0 0 10 sec 76 Self Timer 2 0 0 0 0 0 0 0 0 0 0 2 sec Intervalometer 112 AiAF Auto 0 0 0 0 0 0 0 0 0 0 89 AF Frame Center Point 0 0 0 0 0 0 0 0 Manual 0 0 0 0 90 AiAF Auto 0 0 0 0 0 0 0 89 AF Frame Center Poin...

Страница 215: ...ble 1 Setting can only be selected for the first image Setting selection is not possible Area Setting remains in effect even when the camera is off The default for the settings changed by the menu and button operations can be restored all at once except for Date Time Language and Video System p 54 1 Can only be used with manual focus 2 Cannot be adjusted when the photo effect is set to Sepia or 81...

Страница 216: ...Canon CDI E147 01O 0704CH10 2004 CANON INC PRINTED IN JAPAN ...

Страница 217: ...enclosed CD ROM before connecting the camera to your computer with this cable STOP1 Veillez ainstaller Ie pilote a partir du CD fourni avant de brancher Ie cable de connexion de I appareil photo numerique aI ordinateur iATENCION AsegOrese de haber instalado el driver que contiane el CD ROM antes de conectar la camara al ordenador con este cable ...

Страница 218: ...de before using the software By using the software you agree to be bound by the terms of the agreement Software Starter Guide For the Canon Digital Camera Solution Disk Version 20 ENGLISH Windows Macintosh Windows Macintosh You must install the software bundled on the Canon Digital Camera Solution Disk before connecting the camera to the computer Install the software Connect the camera to the comp...

Страница 219: ...rved SAFETY PRECAUTIONS Warnings This symbol indicates topics that could lead to death or serious injury if ignored or handled incorrectly Warnings Do not play the supplied CD ROM s in any CD player that does not support data CD ROMs Playing the CD ROM s in an audio CD player music player could damage the speakers It is also possible to suffer from hearing loss from listening with headphones to th...

Страница 220: ...n of this Agreement You must reproduce and include the copyright notice on the back up copy 3 SUPPORT AND UPDATES Neither Canon nor its subsidiaries dealers or distributors will be responsible for providing maintenance or support for use of the SOFTWARE No updates fixes or support will be made available for the SOFTWARE 4 LIMITED WARRANTY AND LIMITATION OF LIABILITY It is your responsibility to ch...

Страница 221: ...e null and void with respect to the jurisdiction of that court or tribunal and all the remaining provisions of this Agreement shall remain in full force and effect 9 CONTROLLING LAW The terms of this Agreement as it relates to purchases of the Software in the United States of America shall be governed and construed in all respects in accordance with the laws and regulations of the State of New Yor...

Страница 222: ... Images 21 Using the Software on the Windows Platform Advanced Techniques 26 The ZoomBrowser EX Windows 26 ZoomBrowser EX Features 32 Checking Images before Downloading 34 Replaying Movies 36 Editing Movies 37 Converting RAW Images 38 Operating the Shutter Remotely 41 Merging Panoramic Images PhotoStitch 44 Enjoy Customizing Your Camera with the My Camera Settings 45 Using the Software on the Maci...

Страница 223: ...PowerShot G6 98 PowerShot S70 98 Index 99 Using the PDF Manuals The following PDF format manuals hereafter PDF manuals are provided to explain the features and procedures for using ZoomBrowser EX and ImageBrowser ZoomBrowser EX Software User Guide Windows ImageBrowser Software User Guide Macintosh Adobe Reader or Adobe Acrobat Reader must be installed to read the aforementioned PDF manuals If one ...

Страница 224: ...s required to use the software About this Guide The explanations in this guide are based on Windows XP and Mac OS X v10 3 If you are using another version of these operating systems the actual screen contents and procedures may vary slightly from those shown The following terms are used in this guide Mac OS X is used for Mac OS X v10 1 5 v10 3 Memory card is used for CF cards SD cards and PC cards...

Страница 225: ...ke a Pro 4 It s so Simple Make Prints Right at Home Like a Pro See your Camera User Guide for shooting instructions Just install the software once at the beginning Shoot the images Install the software on the computer Windows p 10 Macintosh p 49 ...

Страница 226: ...5 Download images to the computer Print the images Connect the camera to the computer Windows p 15 Macintosh p 51 Windows p 21 Macintosh p 55 p 97 ...

Страница 227: ...th the diverse layouts available in PhotoRecord Windows and ImageBrowser Macintosh The examples shown are from PhotoRecord Windows Stitch a Panorama Together Create a panoramic image from a series of images with PhotoStitch Confirm all your images in one glance with index contact sheet printing Make your own photo album of precious moments ...

Страница 228: ...nd edit movies link movies and stills that have been downloaded to your computer add background music superimpose titles and other text and apply various effects to the movies Convert a RAW Format Image RAW images are extremely high quality images that are free of the resolution loss associated with compression processing However since RAW images are created with a special image format it is neces...

Страница 229: ...igital Camera Solution Disk Macintosh software cannot be used on disks formatted in the UFS Unix File System format OS Windows 98 Second Edition SE Windows Me Windows 2000 Service Pack 4 Windows XP including Service Pack 1 Computer Model The above OS should be pre installed on computers with built in USB ports CPU Pentium 500 MHz or higher processor RAM Windows 98 SE Windows Me 128 MB or more Wind...

Страница 230: ...ve OS should be pre installed on computers with built in USB ports CPU PowerPC G3 G4 G5 RAM 256 MB or more Interface USB Free Hard Disk Space Canon Utilities ImageBrowser 200 MB or more PhotoStitch 40 MB or more Display 1 024 x 768 pixels 32 000 Colors or better ...

Страница 231: ...o Prepare Your camera and computer Canon Digital Camera Solution Disk Interface cable supplied with the camera Installation Procedures 1 Confirm that the camera is NOT connected to the computer If it is disconnect the cable The software cannot be properly installed if the camera is connected to the computer at the start 2 Close any programs that are running You must install the software before you...

Страница 232: ... automatically Windows XP 1 Select My Computer from the Start menu 2 Right click the CD ROM icon and select Open 3 Double click the Setup exe icon Windows 2000 Windows Me Windows 98 SE 1 Double click the My Computer icon on the desktop 2 Right click the CD ROM icon and select Open 3 Double click the Setup exe icon Some computers may not display the exe file name extension as shown above Follow any...

Страница 233: ...ons to proceed The items displayed here differ according to the software installed When Custom Installation is Selected The USB driver the software for connecting is required when the camera is connected to the computer with an interface cable Ensure that you select a USB driver from below the appropriate one for your operating system Windows 2000 Windows 98 SE Canon Camera TWAIN Driver Windows Me...

Страница 234: ...e camera to the correct mode for connecting Users of Windows XP and Windows 2000 must log in as an Administrator computer system administrator after restarting to carry out the subsequent procedures If you installed a USB driver so far the required files have only been copied to your computer You must now connect the camera to the computer with the interface cable to complete the installation and ...

Страница 235: ...rompted to do so by a message A dialog allowing you to set the default settings will display after installation See Using the Software on the Windows Platform The Basics p 15 for the subsequent procedures This concludes the software and USB driver installation and the procedures for connecting the camera to the computer You may now download camera images to the computer p 15 See USB driver install...

Страница 236: ... a camera to computer connection see below or a memory card reader p 19 Camera to Computer Connection 1 Attach the supplied interface cable to the computer s USB port and the camera s DIGITAL Terminal Prepare the camera for communication with the computer The Camera Control Window will appear Camera Control Window You can also display an index of the camera or memory card images to check them befo...

Страница 237: ...Computer Set the following settings the first time you connect the camera to the computer These procedures are not required from the second connection onward Select Canon CameraWindow when a dialog Events dialog similar to that on the right displays and click OK Your camera model name or Canon Camera will appear here Different programs may display according to your computer setup If this Events di...

Страница 238: ...or the Direct Transfer function the Direct Transfer settings menu will appear in the LCD monitor In addition the Print Share button will light if your camera is equipped with one See the Camera User Guide for instructions regarding Direct Transfer settings and procedures By default all the images that have yet to be downloaded will download To download images that have had their transfer settings ...

Страница 239: ...omputer 18 By default when downloading is complete the thumbnails tiny versions of the downloaded images display in ZoomBrowser EX s Main Window Thumbnail Shows the folder where the images are saved Next print out the images p 21 ...

Страница 240: ...ow will display 3 Click Starts to download images You can adjust the settings such as the type of image downloaded and the destination folder by clicking Preferences If the dialog above fails to appear click the Start menu and select Programs or All Programs followed by Canon Utilities Camera Window and Camera Window and proceed to Step 3 1 Place the memory card in an adapter if required The card ...

Страница 241: ... window Next print out the images p 21 By default all the images that have yet to be downloaded will download to the My Pictures folder To download images that have had their transfer settings set with the camera click Preferences and select Images whose transfer settings were specified with the camera as the image type to be downloaded See Memory Card Folder Structure p 87 for information about m...

Страница 242: ...kground of the selected image s will turn blue Movies cannot be printed With images shot by Exif 2 2 called Exif Print compatible cameras shooting information such as the shooting settings and mode can be included with the images This data is then used to correct the images to obtain better prints PhotoRecord automatically carries out image correction by default both with images shot with Exif 2 2...

Страница 243: ...ed image and the information selected in Step 3 in the Album window In addition the steps that will take you through the printing process will display on the left side Follow the steps in order to proceed From this point onward the procedures vary according to whether you select Full Page Print prints one image per page or Layout and Print prints an arrangement of images on each page You can add a...

Страница 244: ...m Type category 2 Click 3 Select Paper and select the paper size and orientation 3 Click 4 Print confirm the number of copies and other printing settings and click Print This will start printing To close PhotoRecord after printing is complete click Click Yes to save the album or No to close it without saving The ZoomBrowser EX window will reappear when the save procedure is complete ...

Страница 245: ...ct the paper size and orientation 3 Click Decorate Album and change the design of the image background and border as desired Click the Themes Backgrounds Photo Frames Text Frames or Clipart button to switch between selections Perform the procedures according to the instructions beside the symbol The Themes category provides consistent designs for use throughout an entire album You can also click A...

Страница 246: ...ry slightly according to the printer in use Album Type Description One Photo Per Page Prints one image on each sheet of paper One Photo Per Sheet Free Form Allows images to be freely positioned on the page and printed Contact Sheet Prints thumbnails of the images and their shooting data Exif data Fixed Size Photo Allows image heights and widths to be specified and prints Mosaic Lines up the specif...

Страница 247: ...s Platform The Basics chapter The ZoomBrowser EX Windows This section describes the principal ZoomBrowser EX windows the Main Window Viewer Window and Properties Window Main Window This window is for displaying and organizing images downloaded to the computer Folders Area p 27 Task Area p 27 Browser Area p 27 Function Buttons p 29 Switches between showing and hiding the Task Area and Folders Area ...

Страница 248: ...splay here The display style will vary according to your Display Mode selection You can sort the image order in the Browser Area by file name shooting date or other characteristics by clicking the Tools menu and selecting View and Sort by The following icons will display around images according to their attributes Images shot with the camera s Stitch Assist mode RAW images Movies Images with sound...

Страница 249: ...e folders at once If the displayed folder is at the highest level then all thumbnails in the lower level folders also display You can change the folder level folder depth by clicking the Tools menu and selecting Preferences The images within nested folders also display Preview Mode This mode displays the image at a larger size as well as the image information Positioning the mouse pointer over a t...

Страница 250: ...his feature filters your images by their Star Ratings displaying only those images in the Browser Area One of three Star Ratings can be assigned to an image in the Viewer Window the Properties Window or in the information column in the Preview Mode View Image Button Displays the selected image in the Viewer Window Slide Show Button Starts a slide show of the selected images Properties Button Displ...

Страница 251: ...Switches between images Full Screen Button Displays the image in the full screen mode Click the image or press any key on the keyboard to restore the normal display mode Synchronize Button Synchronizes the display settings when multiple images are displayed Star Rating Sets the Star Rating for an image Zoom Changes the image zoom setting Split Screen Button Displays multiple images at once This is...

Страница 252: ...ays detailed information about the shooting settings when the image was captured such as the shutter speed or exposure setting The camera model will determine what information is displayed Protect Prevents an image from being overwritten or deleted Comment You can type a comment here Keywords Sets the keywords used in searches Histogram A graph of the highlights and shadows distribution in an imag...

Страница 253: ... Browser Area Rename Multiple Files Changes the file names of the selected images in a single pass Classify into Folder Classifies images and saves them into a specified folder Search Performs image searches using criteria such as the Star Rating modification date shooting date comments or keywords Star Ratings comments and keywords can be set in the image information column in the Preview Mode or...

Страница 254: ... images to a CD R RW disk for backup Print Layout Print Allows you to arrange the selected images in an attractive layout and print them p 21 Contact Sheet Print Prints the selected images as a contact sheet index Internet Email Images Converts the selected images to the appropriate size for transmission by e mail You can also use it to automatically start an e mail program after conversion The Ba...

Страница 255: ... steps 1 2 in the Memory Card Connection section p 19 The Camera Control Window will display 2 Click Lets you select and download images The images in the camera or memory card will display in the Camera Browser Window as thumbnails tiny images 3 Select images to download To select multiple images click on the first image and then hold the Ctrl key down while clicking on successive images 4 Click ...

Страница 256: ...ading Images to the Computer There is no need to install ZoomBrowser EX with either method Windows XP Installation of USB Driver Not Required Your camera uses a standard image transfer protocol called Picture Transfer Protocol PTP With PTP and Windows XP all you need do is connect the camera to the computer with an interface cable to easily download images using the Scanners and Cameras Wizard or ...

Страница 257: ...hese procedures 1 Place the Canon Digital Camera Solution Disk in the CD ROM drive If the installer panel fails to appear automatically display it using the procedures in the How to Display the Installer Panel section p 11 2 Click the QuickTime Install button Follow the onscreen instructions to proceed with the installation Do not double click a movie file AVI extension in the Windows Explorer to ...

Страница 258: ...teps at the left of the window to edit the movie and save it QuickTime is required to play and edit movies Use the Installation Procedures for QuickTime section p 36 to install it Movies are saved as AVI files in the Motion JPEG MPEG format Click this button to play the movie being edited Follow these steps to proceed Storyboard Area Displays thumbnails of the selected images Links images in order...

Страница 259: ...AW Images The Main Window the Navigator window and the Image Quality Adjustment Window will display Use the buttons here to switch between images and display modes rotate images and set the conversion parameters Thumbnail Check Mark 3 Adjust the image quality as required in the Image Quality Adjustment Window This window is explained in the Functions of the Image Quality Adjustment Window section ...

Страница 260: ...camera used This section adjusts the white balance according to the light source and color temperature This section adjusts the digital exposure compensation photo effect contrast sharpness and saturation The effect of the settings above can be viewed immediately if you place a check mark here Tone Curve Tab You can set the levels for the RGB channels separately or together Advanced Adjustments Ta...

Страница 261: ...rred settings when you convert a RAW image You can also select preset color schemes such as Positive Film Furthermore you can add your own color schemes My Color to apply to other RAW images when they are being converted See the PDF manual for ZoomBrowser EX for more information p 2 ...

Страница 262: ...connecting The Camera Control Window will display 2 Open the lens cover or remove the lens cap on models equipped with them Proceed to the next step if your model does not have one 3 Click the Remote shooting tab 4 Click Starts Remote Shooting 5 Select a destination for the captured images and click OK Methods for connecting the camera to the computer and placing it in the correct mode for connect...

Страница 263: ... which images are captured You can add comments to images by placing a check mark here and typing text in the boxes below Viewfinder Display Click the Start Stop Viewfinder button while a connection to the camera is open to display the image appearing in the camera s viewfinder Slide this to zoom the camera in or out Set the basic camera settings here Rotation Settings Sets the rotation parameters...

Страница 264: ...formance cannot be guaranteed if the computer enters the standby mode If your camera is equipped with the Auto Rotate function and you set it to On the image will automatically be rotated and appear in the correct viewing orientation in the RemoteCapture Task window You can release the shutter by pressing the camera s shutter button or the keyboard s space key Other than the shutter button the cam...

Страница 265: ...m the camera In addition the symbol below displays by the image in the Browser Area Starting PhotoStitch 1 Click Edit in the ZoomBrowser EX s Main Window and click Stitch Photos 2 Click 1 Select Images and select several images in the Browser Area 3 Click 2 Open PhotoStitch Instructions 4 Merge the images following the instructions in the guidance panel at the top of the PhotoStitch window See the...

Страница 266: ...aying the My Camera Window 1 Attach the supplied interface cable to the computer s USB port and the camera s DIGITAL terminal and place the camera in the correct mode for connecting The Camera Control Window will display 2 Click the Set to Camera tab 3 Click Set My Camera Procedures for attaching the camera to the computer and placing it in the correct mode for connecting vary between camera model...

Страница 267: ...l Do not detach the interface cable turn the camera power off or disconnect the camera from the computer while the My Camera settings are being saved to the camera or the settings from the camera are being saved to the computer Tabs Click here to switch between adjusting the settings individually or in themed sets Displays the list of settings files saved onto the computer Add File Button Adds the...

Страница 268: ... s My Camera Settings to the Computer 1 Select the Setup as a theme tab in the My Camera window To set the start up image or sound individually click the Set individually tab and select it 2 Select the settings files from the Camera list that you wish to save to the computer 3 Click Save to PC 4 Add a name to the settings file you are saving and click OK This concludes the process of saving the My...

Страница 269: ...the Create a My Camera Sound button The My Camera Sound Maker program will start 3 Create a file following the instructions in the guidance panel Instructions 4 Click once you have saved the sound file to close My Camera Sound Maker This concludes the process of adding a sound file as a My Camera settings file to the computer You can add the file to the camera with the procedures described in the ...

Страница 270: ...g the software from the Canon Digital Camera Solution Disk Items to Prepare Your camera and computer Canon Digital Camera Solution Disk Interface cable supplied with the camera Installation Procedures 1 Close any programs that are running 2 Place the Canon Digital Camera Solution Disk in the computer s CD ROM drive 3 Double click the Canon Digital Camera Installer icon in the CD ROM window 4 Click...

Страница 271: ...cense agreement 7 Review the installation settings and click Next Follow the onscreen instructions to proceed 8 When the installation is over click OK 9 Click Exit in the installer panel and remove the disk from the CD ROM drive This concludes the software installation Continue by downloading images to the computer p 51 See Uninstalling the Software p 86 to delete the software installed with these...

Страница 272: ...ep is not required from the second connection onward You may not be able to download the camera images if there are more than approximately 1000 images in the camera Use a memory card reader to download in that case You can also display an index of the camera or memory card images to check them before downloading or download them selectively For instructions see Checking Images before Downloading ...

Страница 273: ... Settings OS X v10 1 1 Start Image Capture and select Other from the Hot Plug Action list box 2 Select CameraWindow in the program selection window CameraWindow is generally installed into the folder opened by selecting the Applications Canon Utilities and CameraWindow folders 3 Close Image Capture Procedures for attaching the camera to the computer and placing it in the correct mode for connectin...

Страница 274: ...the second connection onward 1 Insert the memory card into the reader Use a separately sold card adapter PCMCIA adapter if required See the manual for the memory card reader for details on how to connect and use the reader The Camera Control Window will appear Double click the Canon CameraWindow icon on the desktop if it does not appear Thumbnail 1 Place the memory card in an adapter if required T...

Страница 275: ...f the downloaded images will display in ImageBrowser s Browser Window when downloading is complete Continue by printing out an image p 55 By default all the images that have yet to be downloaded will download to the Pictures folder To download images that have had their transfer settings set with the camera click Preferences and select Images whose transfer settings were specified with the camera ...

Страница 276: ...the Print button and select Layout printing from the displayed menu This displays the Layout Options dialog and the Print window From this point onward the procedures vary according to whether you select Full Page Print prints one image per page or Layout and Print prints an arrangement of images on each page Movie images cannot be printed A blue frame displays around selected images Layout Option...

Страница 277: ...change the layout and add text in the Print window See Print Window Features p 57 for the procedures for changing layouts and adding text 4 Click the Print button in the Print window This will display the Print dialog 5 Click Print to start printing You can print the image thumbnail and shooting information by selecting Index printing in the Layout Options dialog Images shot with Exif 2 2 complian...

Страница 278: ...place check marks besides the desired items in the Items to Print in Caption category A PDF format manual for ImageBrowser is also available It provides further information about the program s features and procedures See Using the PDF Manuals p 2 Change the Image Size Drag the border to resize the image Change the default number of images printed per page Rotate the selected image Vertically and h...

Страница 279: ...he Using the Software on the Macintosh Platform The Basics chapter The ImageBrowser Windows This section describes the principal ImageBrowser windows the Browser Window Viewer Window and File Information Window Browser Window This window is for displaying and organizing images downloaded to the computer Explorer Panel p 59 Browser Area p 59 Display Mode p 60 Display Control Panel p 61 Control Pane...

Страница 280: ...on will display around images according to their attributes Images shot with the camera s Stitch Assist mode RAW images Movies Images with sound memo attachments Protected images Images shot with the camera s AEB function Methods for Registering a Favorite Folder If Favorite Folders is displayed click Add and select a folder If All Folders is displayed select a folder and click Add to Favorites Me...

Страница 281: ... larger size as well as the image information List Displays the images in the folder selected in the Explorer Panel section in rows and columns TimeTunnel Displays images in chronological order in a simulated time tunnel You can move along a timeline from the past to the present using the slider that appears at the window s right ...

Страница 282: ... images in the Browser Area Hide Buttons Left Hides the Explorer Panel Middle Hides the control panel Right Hides the image information in the Preview display mode Display Size Changes the size of the thumbnail in the Browser Area Filter Images This feature filters your images by their Star Ratings displaying only those images in the Browser Area One of three Star Ratings can be assigned to an ima...

Страница 283: ...ween images Zoom Changes the image zoom setting Full Screen Button Displays the image in the full screen mode Click the image or press any key on the keyboard to restore the normal display mode Synchronize Button Synchronizes the display settings when multiple images are displayed Star Ratings Menu Sets the Star Rating for an image Number of Displays Menu Displays multiple images at once This is h...

Страница 284: ...an image Shooting Information Displays detailed information about the shooting settings when the image was captured such as the shutter speed or exposure setting The camera model will determine what information is displayed Lock Prevents an image from being overwritten or deleted Comment You can type a comment here Keyword Sets the keywords used in searches Histogram A graph of the highlights and ...

Страница 285: ...ing Allows you to operate the camera shutter from the computer p 72 View Images Displays the selected image in the Viewer Window SlideShow Starts a slide show of the selected images Click the View menu and select Slide Show Options to set the slide show settings Internet Create Images for Email Converts the selected images to the appropriate size for transmission by e mail You can also use it to a...

Страница 286: ... Rename changes the files names of multiple images in a single pass Convert RAW Images File menu RAW image processing Converts RAW format images into the TIFF or JPEG formats You can adjust the image brightness contrast and color balance among other attributes during conversion p 70 Merge Panoramas Edit menu PhotoStitch Merges multiple images and creates a single large panoramic image p 75 Edit Mo...

Страница 287: ...p 51 or steps 1 2 in the Memory Card Connection section p 53 The Camera Control Window will display 2 Click Lets you select and download images The images in the camera or memory card will display in the Camera Browser Window as thumbnails tiny images 3 Select images to download To select multiple images click on the first image and then hold down the shift or command key while clicking on success...

Страница 288: ... also download images to the computer by dragging images displayed in the Camera Browser Window and dropping them onto the Browser Area or Explorer Panel in ImageBrowser Other Downloading Methods Your digital camera employs a standard image transfer protocol called Picture Transfer Protocol PTP With PTP you can use the programs supplied as standard software with Mac OS X such as iPhoto or Image Ca...

Страница 289: ...Replaying Movies 68 Replaying Movies 1 Double click an image with a movie icon in ImageBrowser s Browser Area The movie will appear in the Viewer Window Movie icon 2 Click the Play button ...

Страница 290: ...ovies or stills 2 Click the Edit menu and select Movie Edit 3 Follow the steps displayed in the middle of the window to edit the movie and save it Click this button to play the movie being edited Follow these steps to proceed Storyboard Area Displays thumbnails of the selected images Links images in order from left to right Click this button for detailed operational instructions Transition Effect ...

Страница 291: ...cessing The main window the Navigator window and the Image Quality Adjustment Window will display Use the buttons here to switch between images and display modes rotate images and set the conversion parameters Thumbnail Check Mark 3 Adjust the image quality as required in the Image Quality Adjustment Window This window is explained in the Functions of the Image Quality Adjustment Window section Se...

Страница 292: ...ou can add your own color schemes My Color to apply to other RAW images when they are being converted See the PDF manual for ImageBrowser for more information p 2 This section adjusts the white balance according to the light source and color temperature This section adjusts the digital exposure compensation photo effect contrast sharpness and saturation The effect of the settings above can be view...

Страница 293: ... DIGITAL terminal and place the camera in the correct mode for connecting The Camera Control Window will display 2 Open the lens cover or remove the lens cap on models equipped with them Proceed to the next step if your model does not have one 3 Click the Remote shooting tab 4 Click Starts Remote Shooting 5 Select a destination for the captured images and click Choose Procedures for attaching the ...

Страница 294: ...re captured You can add comments to images by placing a check mark here and typing text in the boxes below Viewfinder Display Click the Start Stop Viewfinder button while a connection to the camera is open to display the image appearing in the camera s viewfinder Slide this to zoom the camera in or out Set the basic camera settings here Rotation Settings Sets the rotation parameters for images aft...

Страница 295: ...g The device performance cannot be guaranteed if the computer enters the sleep mode If your camera is equipped with the Auto Rotate function and you set it to On the image will automatically be rotated and appear in the correct viewing orientation in the RemoteCapture Task window You can release the shutter by pressing the camera s shutter button or the keyboard s space key Other than the shutter ...

Страница 296: ...wnloaded from the camera In addition the symbol below displays by the image in the Browser Area Symbol displayed by images shot in Stitch Assist mode Starting PhotoStitch 1 Select a series of images in the ImageBrowser s Browser Area 2 Click the Edit menu and select PhotoStitch Instructions 3 Merge the images following the instructions in the guidance panel at the top of the PhotoStitch window See...

Страница 297: ... to the camera and vice versa Displaying the My Camera Window 1 Attach the supplied interface cable to the computer s USB port and the camera s DIGITAL terminal and place the camera in the correct mode for connecting The Camera Control Window will display 2 Click the Set to Camera tab 3 Click Set My Camera Procedures for attaching the camera to the computer and placing it in the correct mode for c...

Страница 298: ...gs type Displays the list of settings files saved onto the computer Add Button Adds the settings file to the list Play Button Plays the audio from the selected settings file Send to Trash Button Deletes a settings file from the computer Save to Camera Button Click here to save the settings onto the camera Delete Button Deletes a settings file from the camera Displays the settings in the camera Pla...

Страница 299: ...ettings to the Computer 1 Select the type of setting you wish to save to the computer from the Type list box 2 Select the setting in the Camera list that you wish to save to the computer 3 Click the button 4 Input a file name to the selected setting and click the OK button This concludes the process of saving the My Camera settings to the computer Repeat steps 1 4 as required My Camera settings ca...

Страница 300: ...e newly created data to the camera using the procedures described in the Saving the My Camera Settings to the Camera section p 78 Add an Original Sound File Use a program such as ArcSoft VideoImpression to change the file format to the WAV format after you have copied the sound file Then proceed with the steps as described in Create an Original Start up Image File and then Add It Record the sound ...

Страница 301: ... This topic explains the program features and installation procedures for the programs on these CD ROMs ArcSoft Camera Suite 2 1 CD ROM This CD ROM contains the following programs A symbol indicates it is supported a symbol that it is not The free hard disk space required to install ArcSoft Camera Suite 2 1 is 250 MB or more on a Windows system and 500 MB or more on a Macintosh system Compatible w...

Страница 302: ...d double click the ARCSOFT icon or right click it and select Open and double click the Setup exe icon Windows 2000 Windows Me and Windows 98 users should double click the My Computer icon on the desktop double click the ARCSOFT icon or right click it and select Open and double click the Setup exe icon Macintosh Installing ArcSoft PhotoStudio 1 Close all programs that are running 2 Place the ArcSof...

Страница 303: ...s for compiling a movie from multiple movie clips or stills and for editing out unwanted frames from movies Installing ArcSoft Camera Suite 1 3 Windows 1 Close all programs that are running 2 Place the ArcSoft Camera Suite CD ROM in the drive Follow the onscreen messages to install PhotoImpression and VideoImpression If they do not display automatically click the Windows Start menu select My Compu...

Страница 304: ...y Edit Image 2 Click 1 Select Images and select an image to edit 3 Click 2 Select Editing Tool and select Edit with external image editor 4 Select a program from the list and click 3 Finish ImageBrowser 1 After selecting an image to edit click the Edit menu and select a program to start Manual for the ArcSoft Camera Suite See inside the Manuals folder on each CD ROM for the manuals If you cannot s...

Страница 305: ...clicking the Start menu and selecting Control Panel and Add or Remove Programs With Windows 2000 Me 98 uninstall the program by clicking the Start menu and selecting Settings followed by Control Panel and Add Remove Programs You can remove other programs with the same procedures To uninstall CameraWindow be sure to follow the following procedures 1 Click the Start menu and select Programs or All P...

Страница 306: ...ra for communication with the computer For interface cable connection instructions see Information about Your Camera p 96 2 Click the Finish button if the Camera Control Window displays 3 Click the Start menu and select Settings followed by Control Panel 4 Double click the Scanners and Cameras icon or folder It is essential to note that you will not be able to download images if you uninstall the ...

Страница 307: ...6 with no substitutions Windows Me Substitute the following for the underlined portions of Step 6 Camera WIA Driver x x Uninstall WIA Driver The uninstall process will start To connect the camera to the computer and download after this point use the following procedures 1 Reinstall the driver 2 Connect the camera to the computer with the interface cable Uninstalling the Software Macintosh Uninstal...

Страница 308: ...in the name i e STA_0001 JPG STB_0002 JPG STC_0003 JPG All folders except the xxxCANON folders contain image settings files Do not open or delete them IMG_xxxx JPG JPEG format images _MG_xxxx JPG JPEG format images recorded in the Adobe RGB color space CRW_xxxx CRW RAW format images _RW_xxxx CRW RAW format images recorded in the Adobe RGB color space CRW_xxxx THM STx_xxxx JPG Stitch Assist mode im...

Страница 309: ...ed at both ends Is the camera set to the playback mode some models only Some models require the camera to be set to the playback mode to transfer data See Information about Your Camera p 98 for details Is the battery sufficiently charged Check the battery charge if you are powering the camera with a battery You are recommended to use a household power source AC adapter to power the camera when it ...

Страница 310: ...ne of the items in the Start by Checking This section p 88 Solution Resolve the problem Cause 2 The USB driver is not installed Windows only Solution Install it with the procedures in Installing the Software and USB Driver p 10 Cause 3 The USB driver is not correctly installed Windows only Solution Uninstall the driver p 85 before reinstalling it with the procedures in Installing the Software and ...

Страница 311: ...ndows XP and Windows 2000 Check to see if the camera is being recognized as an other device and delete the driver if it is 1 Windows XP Click the Start menu followed by Control Panel Performance and Maintenance and System Windows 2000 Click the Start menu and select Settings and Control Panel Double click the System icon 2 Click the Hardware tab followed by Device Manager 3 Click the symbol beside...

Страница 312: ...tart with CAP The represents a number such as 0 or 1 CAP files come in pairs of CAP inf and CAP pnf files For example CAP0 inf and CAP0 pnf Step 7 and above are not required for Windows XP If the Inf Folder Is Not Visible in the Winnt Folder Use the following procedures to show all files and folders 1 Open the Winnt folder 2 Click the Tools menu and select Folder Options 3 Click the View tab 4 In ...

Страница 313: ...and delete the driver if it is 1 Click the Start menu and select Settings followed by Control Panel Double click the System icon This will display the System Properties window 2 Click the Device Manager tab 3 Click the symbol beside the Other devices and or Imaging devices category Your camera model name or Canon Camera will display in these categories if it is being recognized as an other device ...

Страница 314: ...f the Other devices or Imaging devices categories do not appear or your camera model name or Canon Camera does not appear Proceed to Step 6 temporarily quit the procedures and investigate the other potential causes If the Inf Folder Is Not Visible in the Windows Folder Use the following procedures to show all files and folders 1 Windows 98 SE Click the View menu and select Folder Options Windows M...

Страница 315: ...nd Appearance and Themes With Windows 2000 Windows Me or Windows 98 SE click the Start menu and select Settings followed by Control Panel 2 Click the Display icon followed by the Settings tab Advanced button and Troubleshoot tab With Windows 2000 click the Display icon followed by the Settings tab Advanced button and Troubleshoot tab With Windows Me or Windows 98 SE click the Display icon followed...

Страница 316: ...s point and click the Start button e g C Program Files Canon ZoomBrowser EX Database My Database zbd This will display the titles and comments input in the earlier versions in the comments section of ZoomBrowser EX 5 If You Had Images in a Folder Below the Program Files Folder Image files in the Program Files folder or a subfolder cannot be displayed in ZoomBrowser EX 5 from that location To displ...

Страница 317: ...e capabilities of your camera model Information Common to All Models See the respective page for your camera model for information specific to that model p 98 Programs and Compatible Operating Systems The CD ROM labeled Canon Digital Camera Solution Disk is provided with all models It contains the following programs Program Compatible Operating System Windows Macintosh 98 SE Me 2000 XP OS X ZoomBr...

Страница 318: ...e camera If this occurs disconnect the other devices from the computer and try reconnecting the camera Do not connect two or more cameras at the same time to the same computer via the USB interface The connections may not operate correctly Never allow the computer to go into standby sleep mode while a camera is connected via the USB interface If it does happen never disconnect the interface cable ...

Страница 319: ...res for the programs on the disk Non Supported Programs and Features All programs and features are supported PowerShot S70 How to Connect the Camera to a Computer and Prepare to Transfer Data 1 Attach the supplied interface cable to the computer s USB port and the camera s DIGITAL terminal The camera and computer will automatically set themselves to the correct mode for communicating when they are...

Страница 320: ... Windows 35 Direct Transfer Function 17 Display Control Panel Macintosh 58 61 Windows 26 29 Display Mode Macintosh 58 60 Windows 26 28 Downloading Images Macintosh 51 Windows 15 E E mail 7 Events Dialog 16 89 Exif 2 2 Exif Print Macintosh 56 Windows 21 F Favorite Folder Macintosh 59 Windows 27 File Information Window 63 Folders Area 26 27 Full Page Print Macintosh 56 Windows 23 Function Buttons 26...

Страница 321: ...roperties Window 31 PTP Picture Transfer Protocol Macintosh 67 Windows 35 Q QuickTime Windows 36 48 R Remote Shooting Macintosh 72 Windows 41 Replaying Movies Macintosh 68 Windows 36 S Save Folder for Images Macintosh 67 Windows 35 Scanners and Cameras Wizard 35 Searching Images Macintosh 65 Windows 32 Star Rating Macintosh 61 62 63 Windows 29 30 31 Stitch Assist Mode Macintosh 75 Windows 44 Syste...

Страница 322: ...101 MEMO ...

Страница 323: ...102 MEMO ...

Страница 324: ... Limited Warranty supplied with your camera ArcSoft Customer Support North America 46601 Fremont Blvd Fremont CA 94538 Tel 510 440 9901 Mon Fri 8 30 AM 5 30 PM PST E mail support arcsoft com Other Regions Please see the ArcSoft web site http www arcsoft com maininternational html ...

Страница 325: ...CDI E150 010 xx04xxxx 2004 CANON INC PRINTED IN JAPAN ...

Страница 326: ... e c Guide d utilisation de I impression directe Imprimer au moyen d une connexion directe appareil p t irl lPr irl l nt Guia del usuario de impresi6n directa Impresi6n mediante una conexi6n directa entre una camara una imr frA nr 1 6 I P IS d Exi Print DIREa BUBBLE JET Ie n ge DPOF PRINT D1REG ...

Страница 327: ...Canon Direct Print User Guide Printing Using a Direct Camera Printer Connection ENGl2lSttI ...

Страница 328: ...n Canon PictBridge Compliant camera please refer to the camera s user guide 2 CP 100 CP 10 Direct Interface Cable OIF 100 Supplied with the printer 3 Please also refer to the user guide that came with your printer PictBridge Compliance This camera complies with the industry standard PictBridge This allows you to also connect your camera to non Canon PictBridge compliant printers and print images w...

Страница 329: ...ble Jet Printers Non Canon PictBridge Compliant Printers 3 4 DPrinting with Non Canon Printers Printing Selected Images with DPOF ettlr g5 This option allows you to select images for print settings such as the number of copies camera DPOF print settings This is very convenient when you want to print several images at once or have them printed at a photo lab Digital Print Order Format 3 ...

Страница 330: ...or Bubble Jet Direct Compatible Printers 31 ra Printing with Non Canon Printers Only for PictBridge Compliant Printers 33 Settings that Can Be Set with the Camera 34 Trademark Acknowledgements Canon and PowerShot are trademarks of Canon Inc Other names and products not mentioned above may be registered trademarks or trademarks of their respective companies Copyright 2004 Canon Inc All rights reser...

Страница 331: ...e Printer Please refer to page 6 to correctly connect your camera For details regarding the printer connection settings refer to the user guide that came with it II Printing Use the camera controls to select settings and start printing Some printers may be equipped with an operation panel but printing cannot be performed from the panel Printing operations may vary depending on your printer model P...

Страница 332: ...nnect the camera to the printer using the following procedures Please refer to your printer user guide for details about the printer connection Once the camera and printer are ready for printing the m or rzI icon appears on the camera s LCD monitor Printing procedures differ according to the icon that appears on the LCD monitor p 2 Before You Connect the Camera Prepare the printer Refer to the pri...

Страница 333: ... playback Language settings that use the SET button and the MENU button Disconnecting the Camera and the Printer 1 Detach the cable from the printer 2 Turn the camera s power off 3 Detach the cable from the camera When you detach the cable hold the plug and do not pull by the cable 7 I ...

Страница 334: ...r of the LCD monitor Display the images you wish to print and press the 1tV button If you wish to change the print settings see Print after Changing the Print Settings below Print after Changing the Print Settings You can change the print settings before printing the Display the images you wish to print and press the SET button The print order screen appears Setting the Print Style p 10 Setting th...

Страница 335: ...of an image If you are printing more than one copy or more than one image you can cancel the rest of the printing by pressing the SET button Once the current print is finished a confirmation dialog appears Select OK and press the SET button Printing Errors An error message appears if an error occurs for some reason during the printing process Select Stop or Resume and press the SET button See List...

Страница 336: ...image per page 8 1 Multiple 2 Prints eight copies of the same Image image on one page OlD Photo Prints a specified print size p 14 _ Borders e Borderless Prints right to the edges of the page _ Bordered Prints with a border Date On Adds the date to the print Off Prints without the date 1 Icon varies depending on the image to be printed 2 This option can only be selected when printing on card size ...

Страница 337: ...you to I check the portion that will be cropped If you select an image which has had the shooting date embedded in it using a camera with the Postcard Print mode Date in the Style menu will be set to Off If you set Date to On dates will appear twice on the printed image When printing multiple prints the borders and the date cannot be set Images are printed without any date or borders Practically a...

Страница 338: ...sly selected portion The trimming setting screen differs depending on the camera model Ensure that the screen appears before selecting settings Changing the Size of the Trimming Frame Press the zoom lever or the zoom button to adjust the size of the trimming frame The trimming frame can be changed to a minimum selection of approximately half the displayed image in width and height or a maximum sel...

Страница 339: ...celed with the following operations When you set the trimming settings for another image When you close the Print mode when you turn the camera power off change the camera mode or detach the connection cable The date or part of the date in images shot in Date Stamp mode with a camera that has the Postcard Print mode may not be printed properly depending on the trimming setting The selected image p...

Страница 340: ...ation requiring the photo The print size can be specified for only L Large resolution images in the camera connected to the printer ib I In the print order screen select Style and press the SET button Y x x t Select Image then select 10 Photo Specify the print size by selecting the length of the long side first then the short side then press the SET button See the table below for the selectable co...

Страница 341: ...ng the MENU button cancels the settings The print size setting only applies to one image The print size setting is canceled with the following operations When you set the print size settings for another image When you set the trimming settings for another image When you close the Print mode when you turn the camera power off change the camera mode or detach the connection cable The shape of the tr...

Страница 342: ...tton instead of the SET button movie print begins At this time you cannot select the Onl Off setting on the caption Only for cameras with a 1tV button WN W_ W _ h x w w _ _ W _w m mlfnecessary serwii Captio YMtoM On or Off If you set a Caption to On you can print the file number and the elapsed time of the frame at the same time e The number of printed movie frames per sheet of paper is determined...

Страница 343: ...image will start to print and when it is completely finished the display will revert to the standard playback mode If the MENU button is pressed the display will revert to the Print Order screen in Step 2 and printing will not take place o To print the date set the Date setting in print order menu in Step 2 to On You cannot set the date to print with the Style menu in Step 3 When the print type is...

Страница 344: ...he image for which the print settings were set has been deleted before restarting If there was very little free space on the memory card when the printing was canceled If these circumstances apply you can select OK in the print order menu and reprint starting from the first image If printing is canceled because the camera battery is depleted you are recommended to power the camera with a compact p...

Страница 345: ...ridge has not been inserted or has run out of ink Wrong paper size is loaded in the printer Wrong ink cassette size is loaded in the printer The ink cassette is experiencing a problem The paper and ink are from different sets The paper jammed during printing Paper was changed after the print menu was displayed The printer s battery pack s depleted The printer is experiencing a data transmission er...

Страница 346: ...ft corner of the LCD monitor Display the images you to print and press the V button If you wish to change the print settings see Print after Changing the Print Settings Print after Changing the Print Settings You can change the print settings before printing M ake s re th at B i i spiay s inthe upper left corner of the LCD monitor If j appears on the LCD monitor please refer to j Printing with Bub...

Страница 347: ...es or images recorded in the RAW format It may not be possible to play back or print images shot with a different camera Cancel Printing To cancel printing between images press the SET button A confirmation dialog will display Select OK and press the SET button The printer will stop printing the current image and eject the paper Printing Errors An error message appears if an error occurs for some ...

Страница 348: ... Jet printer The Date Print Effect paper setting Paper Size Paper Type and Layout options are available The setting contents of the Default option differ depending on the Bubble Jet printer model For details please refer to the Bubble Jet printer user guide Setting the Date Printing Option t J Y 0 W W w y Y x 1 11 0 Y x w 1 I Y I t l 0 l t l Y x t Yf l V Select and set On Off or Default If you sel...

Страница 349: ...f Prints without any effects VIVID Prints more vibrant colors such as the green of trees or the blue of the sea or sky than the On option NR Prints with a noise reduction effect VIVID NR Prints using both the VIVID and NR options Default Print settings differ according to your Bubble Jet printer model Select E1 and choose a print effect option Setting the Number of Copies n SeXiect iXj an ci set t...

Страница 350: ...he camera model Ensure that the screen appears before selecting settings Trim the image Changing the Size of the Trimming Frame Press the zoom lever or the zoom button to adjust the size of the trimming frame The trimming frame can be changed to a minimum selection of approximately half the displayed image or a maximum selection that is virtually the same size as the image Expanding the trimming f...

Страница 351: ... in Date Stamp mode with a camera that has the Postcard Print mode may not be printed properly depending on the trimming setting The selected image paper size and border settings determine the shape of the trimming frame Please use the LCD monitor to set the trimming settings The trimming frame may not display correctly on a TV screen Selecting the Paper Settings Select Paper Settings and press th...

Страница 352: ...m _ m n w _ X _h _ m w m M m m x m Select a layout The following print effects can be selected Borderless Prints right to the edges of the page Bordered Prints with a border Default Print settings differ according to your Bubble Jet printer model Select a layout and press the SET button This ends the paper settings operations The display returns to the print order screen With Bubble Jet printers e...

Страница 353: ...t and press the SET button Set the print effect and paper settings as required Setting the Print Effect p 23 Selecting the Paper Settings p 25 Page Layout cannot be set in the Paper Settings when Index is selected in the Set up option in Step 2 x W x x N Yo N Select Print and press the SET button e The image will start to print and when it is completely finished the display will revert to the stan...

Страница 354: ...en deleted before restarting If there was very little free space on the memory card when the printing was canceled If these circumstances apply you can select OK in the print order menu and reprint starting from the first image If printing is canceled because the camera battery is depleted you are recommended to power the camera with a compact power adapter sold separately If you are using a batte...

Страница 355: ...f ink or there is no ink tank in the printer The ink tank needs to be replaced soon Prepare a new ink tank If you select Continue in the error screen you can restart printing You can restart printing by pressing the RESUME CANCEL button on Bubble Jet Printer Please request replacement of the waste tank waste ink absorber from the shop where you purchased the printer or your nearest Canon Customer ...

Страница 356: ...ize than the specified paper size is set to the printer Select Continue on the error screen to display the paper size setting screen Correct the paper size using the screen only the selectable paper sizes appear on the screen Check that the correct paper size is selected If this error message appears even when the correct paper size is set turn off the printer then turn it on again If the error pe...

Страница 357: ...ormat elt may not be possible to play back or print images shot with a different camera Printing e To cancel printing between images printed press the SET button A confirmation dialog appears Select OK and press the SET button The printer will stop printing the current image and eject the paper Printing Errors e An error message appears if an error occurs for some reason during the printing proces...

Страница 358: ...hout the date The 10 photo print fu nction cannot be used If you select an image which has had the shooting date embedded in it using a camera with the Postcard Print mode Date in the Style menu will be set to Off If you set Date to On dates will appear twice on the printed image See page 17 To print the date set the Date setting in the print order menu in Step 2 to On You cannot set the date to p...

Страница 359: ...edures in the section ra Printing with Bubble Jet Printers For PictBridge Compliant Printers p 20 to print your images However please note that some menus and precautions differ as listed below See page 23 Setting the Print Effect VIVID NR and VIVID NR are not available See page 25 Selecting the Paper Settings A3 13 x 19 and 5 x 7 or 13 x 18cm are not available I l Please also refer to the user gu...

Страница 360: ...or during a connection Print Options Selectable with the Camera CP Printers Bubble Jet Printers Number of Prints 1 to 99 0 0 1 image 0 Image Multiple 0 ID Photo 0 Card 1 Card 2 Style Paper Card 3 Letter LTR 0 orA4 Bordered 0 0 Borders Borderless 0 0 Date 0 0 Trimming 0 0 Movies Movie Print 0 The paper size is set with the printer 34 ...

Страница 361: ...Jet printers Print Options Selectable with the Camera Off Date On Default Off On Default Print Effect VIVID NR VIVID NR Number of Prints 1 to 99 Trimming 4 x 6 5 x 7 or 13 x 18 em 8 5 x 11 or A4 Paper Size A3 13 x 19 or A3 Default Paper Settings Photo Paper Type Default Fast Photo Borderless Layout Bordered Default Paper sizes vary accordmg to region 35 I ...

Страница 362: ...Canon CDI M148 010 DPUG4 0704CH7 55 2004 CANON INC PRINTED IN JAPAN IMPRIME AU JAPaN ...

Страница 363: ...excelente rendimiento si se utiliza con accesorios originales de Canon Canon no sera responsable de ningun dana en el producto ni accidentes como fuego etc provocados por un funcionamiento incorrecto de accesorios que no sean originales de Canon por ejemplo fugas y o explosiones de la baterfa Tenga en cuenta que esta garantfa no se aplica a reparaciones como consecuencia de un funcionamiento incor...

Страница 364: ...ing it into a memory card direct print compatible Bubble Jet printer For instructions on how to insert the CF card see the user guide supplied with the Bubble Jet printer 6 Separately sold Compact Power Adapter CA 560 or CA 570 can be used to charge the battery pack from a household power source CF Card 3 FC 32M FC 64M FC 128M FC 256MH FC 512MSH TV Video CF Card Reader I Audio Video in Terminal Ar...

Страница 365: ...erter close up lens Macro Ring Lite MR 14EX and Macro Twin Lite MT 24EX to the camera Lens Hood LH DC30 Attaching the Lens Hood to the camera reduces the unwanted glare which may occur when shooting a backlit subject or when using wide angle settings Digital Camera Lens Cap Neck Strap NS DC3 Battery Charger CG 580 or Battery Charger CB 5L Battery Pack BP 511 A Terminal Cover for Battery Pack BP 51...

Страница 366: ...scratches during shipment Remove it before using the camera EI panel informativo esta recubierto por una fina pelicula plastica que 10 protege contra aranazos durante eJ transporte Quftela antes de usar la camara CDX M006 0 1A 0704CH10 2004 CANON INC PRINTED IN JAPAN IMPRESQ EN JAPON ...

Страница 367: ... display as BMP files but they cannot be opened or downloaded Please note however that RAW images with sound memo attachments will not display Movies exceeding 210 MB cannot be downloaded MacOSX Mac OS X v10 1 v10 2 v10 3 You may not be able to download the camera images if there are more than approximately 1000 images in the camera Use a memory card reader to download in that case Images shot wit...

Страница 368: ...Canon PictBridge I hDIREG PRINT ...

Страница 369: ...ur computer Print j5hare button only available on 5500 5410 SD110 A75 and A310 as of Spring 2004 CP CP Printers only Bj BJ Printers only CP BJ CP Printers and BJ Printers Fast Easy to Use Photo Quality Prints Edge to edge True Borderless Printing For more information www usa canon comjconsumer USA www canon cajdigitalphotography Canada www canon com mx Mexico CDX E016 Specifications subject to cha...

Страница 370: ...s to receive the notifications Protect your product We will keep the model number and date of purchase of your new Canon product on file to help you refer to this information in the event of an insurance claim such as loss or theft Receive information on new products and promotions Upon your request we will send you information on Canon new products and promotions CDX M003 01 K 0604CH200 2003 CANO...

Страница 371: ...Sie diesen Zettel sicher auf da wichtige Information enthalten sind IlTDJ La garantia del producto 0 productos es valida solo en el pais que aparece escrito en su certificado de garantia Guarde este impreso en lugar segura ya que contiene informacion importante ID IrI La garantie de ce ou ces produits n est valide que dans Ie pays indique sur votre certificat de garantie Veuillez conserver cette f...

Страница 372: ...el 08705143 723 Calls may be recorded Fax 08705 143340 Canon Communication Image France S A Tel 01 41 99 70 70 Fax 01 41 99 79 50 Canon Deutschland GmbH Customer Hotline 02151 349 555 Canon Italia S p A Pronto Canon 0282492000 E mail supporto canon it Canon Belgium N V S A Helpdesk 0900 10627 Tel 02 722 04 11 Fax 02 721 32 74 Canon Luxembourg S A Tel 352 48 47 961 Fax 352 48 47 96232 Canon Nederla...

Страница 373: ...852 2739 0802 Fax 852 2369 7701 Canon Marketing Services NO 1 Ja lanKiiang TilTlor 09 00 Pacific Tech Centre Singapore 159303 Phone 65 7998888 Fax 65 273 3317 Canon Marketing Malaysia Sdn Bhd Wisma General Lumber Block D Peremba Square Saujana Resort Section U2 40150 Shah Alam Selangor Darul Ehsan Malaysia Phone 60 3 7446000 60 3 745 0055 Fax 60 3 745 0505 Canon Marketing Thailand Co Ltd 10th Floo...

Страница 374: ... 087 823 4681 T 760 0027 rLiffi l 1BJ4 1 0 Jm il lllTt J 1 F TEL 092 411 4173 T 812 00 17 1ilIOJm1W jl H 1 2 1 t V J R ffi1ffi t 1 F TEL 043 211 9032 T 261 8711 f m epill 7 2 ff7 J R Jc t Lt 1 F TEL 06 6941 1076 T 540 0003 BZfficp Jgep R 2 5 3 L ij t A t ltlj if t zt sij t zt fjmRt 5 ij t7t mQR12 miRij t zt gtl QRt 5 83ij t zt L if t zt rLiij t Z12 QR12 5 EJ il t 5 iZ 8 1 l t 5 FY I it t 17 J R xt...

Страница 375: ...non Canada or an authorized PowerShot Digital Camera service provider Without limiting the foregoing water damage sand corrosion damage battery leakage dropping the PowerShot Digital Camera scratches abrasions or damage to the PowerShot Digital Camera body lenses or LCD display or damage to accessories mentioned in the first paragraph above will be presumed to have resulted from misuse abuse or fa...

Страница 376: ...ng the Canon U S A Customer Care Center at 1 800 828 4040 or Canon Canada Customer Information Centre at 1 800 0K CANON 1 800 652 2666 It is your responsibility to properly package and send the defective PowerShot Digital Camera together with a copy of your dated proof of purchase a dated bill of sale is sufficient a complete explanation of the problem and a return address to the authorized PowerS...

Отзывы: