Manually park the Shuttle
When to do
The error messages ‘
MANUALLY PARK SHUTTLE
’ and ‘
SHUTTLE NOT PARKED
’ are displayed.
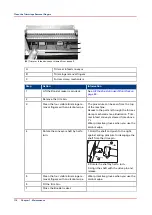
Illustration
B
A
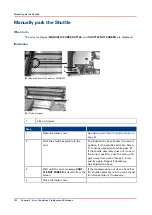
[39] Shuttle Assembly Position - CORRECT
1
[40] Pick-up fingers
1
Pick-up fingers
Step
1
Open the folder cover.
See
Open and Close the Folder Cover on
2
Push the shuttle-assembly to the
end.
The illustration above shows the correct
position for the shuttle assembly. Screw
‘A’ must be aligned with white gear ‘B’.
If the shuttle assembly does not move to
the correct position, push the pick-up fin-
gers away from each other by 2-3 mm
and try again. Repeat if necessary.
See illustration above.
3
Wait until the error message
SHUT‐
TLE NOT PARKED
is cleared from the
screen.
If the message does not clear, check that
the shuttle assembly is in the correct posi-
tion. Repeat Step 2 if necessary.
4
Close the folder cover.
Manually park the Shuttle
102
Chapter 6 - Error Conditions, Problems and Solutions
Содержание Oce BLM550+
Страница 1: ...Operation guide Océ BLM550 ...
Страница 5: ...Chapter 1 Preface ...
Страница 8: ...Notes for the reader 8 Chapter 1 Preface ...
Страница 9: ...Chapter 2 Introduction to the Booklet maker ...
Страница 16: ...The mains input panel of the optional Book Stacker 16 Chapter 2 Introduction to the Booklet maker ...
Страница 17: ...Chapter 3 How to run the Booklet maker ...
Страница 26: ...Run the job 26 Chapter 3 How to run the Booklet maker ...
Страница 27: ...Chapter 4 The User Interface ...
Страница 40: ...The MENU Window 40 Chapter 4 The User Interface ...
Страница 41: ...Chapter 5 Standard Tasks ...
Страница 59: ...Chapter 6 Error Conditions Problems and Solutions ...
Страница 108: ...Change the fuses of the optional Book Stacker 108 Chapter 6 Error Conditions Problems and Solutions ...
Страница 109: ...Chapter 7 Maintenance ...
Страница 131: ...Appendix A Specifications ...
Страница 134: ...Specifications 134 Appendix A Specifications ...
Страница 135: ...Appendix B Declaration of Conformity ...
Страница 137: ......

