"Profiles" Cannot Be Selected or Edited
439
441
442
Clearing Paper Jams (Paper Drawer)
443
Clearing Paper Jams (Output Area)
445
Clearing Paper Jams (Inside the Rear Cover)
446
Indicators on the Printer Are On/Blinking
447
A Message Appears in the Printer Status Window
449
When <Service Error> Is Displayed
454
456
458
460
462
Streaks (lines) Appear in Gradated Portions
463
Thin Lateral Streaks (Lateral Lines) Appear
464
465
Printed Pages Have White Specks
466
Colors Are Uneven or Not Printed Smoothly
467
The Toner Does Not Fix onto the Paper Well
469
The Printed Paper Has Smudge Marks
470
Smudge Marks of Spattering Toner Appear around the Text or Patterns
471
The Back of the Printed Paper Has Smudge Marks
472
The Overall Print Result Is Dark
473
Residual Images Appear on Non-printed Areas
474
White Dust Is Attached to the Printed Transparencies
475
The Overall Print Result Is Faint
476
477
478
Data Is Not Printed in the Correct Color (Specified Color) Due to Color Mismatches
479
Thin Lines or Fill Patterns Are Not Printed with the Specified Colors or Do Not Appear At All
481
Shaded Patterns Are Not Printed in the Correct Color (Specified Color)
482
Photographs and so on Are Printed in Different Colors from Those Displayed on the Monitor
483
484
485
Adjusting the Color and so on for Printing
486
The Printing Position Is Skewed
487
A Portion of the Page Is Not Printed (Printed Data Lies Outside Paper)
488
490
The Next Page Is Printed from Halfway across the Previous Page
491
Blank Paper Is Output (Nothing Is Printed on the Paper)
492
The Overall Surface of the Paper Is Printed in a Particular Color
493
The Flap of the Printed Envelope Sticks
494
Multiple Sheets of Paper Are Fed at a Time
495
Printed Bar Codes Cannot Be Scanned
496
497
498
Points to Make Full Use of the Printer
499
Basic Operations/Various Information for Windows
501
㻢㻌㻛㻌㻡㻝㻠
Содержание LBP7100Cn
Страница 1: ......
Страница 7: ...For Windows 8 Server 2012 Users 512 For Macintosh Users 513 Office Locations 514...
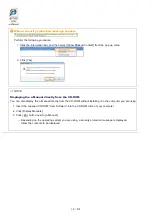
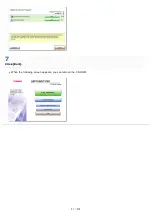
Страница 21: ...7 Click Exit When the following screen appears you can remove the CD ROM...
Страница 38: ...If the laser beam should escape and enter your eyes exposure may cause damage to your eyes...
Страница 81: ......
Страница 83: ...It takes approximately 60 seconds...
Страница 88: ......
Страница 102: ...Close the covers and insert the paper drawer after you finish checking Next install the printer Installing the Printer...
Страница 105: ...0F40 02E Installing the Printer Driver Uninstalling the Printer Driver Driver Installation...
Страница 119: ......
Страница 121: ...2 Click Next Proceed to the Printer Information Screen...
Страница 124: ......
Страница 132: ...17 Click Exit When the following screen appears you can remove the CD ROM...
Страница 153: ......
Страница 156: ...3 Click OK If you cannot cancel a job You cannot cancel the job whose pages are in the process of printing...
Страница 174: ...3 Click OK For details on the basic printing procedure see Basic Printing Procedure...
Страница 178: ...For details on the basic printing procedure see Basic Printing Procedure...
Страница 180: ...Click OK For details on the basic printing procedure see Basic Printing Procedure...
Страница 183: ...3 Click OK Then the Page Setup sheet reappears...
Страница 187: ...Color 3 Click OK For details on the basic printing procedure see Basic Printing Procedure...
Страница 196: ...3 Click OK For details on the basic printing procedure see Basic Printing Procedure...
Страница 198: ...4 Click OK For details on the basic printing procedure see Basic Printing Procedure...
Страница 204: ...Low...
Страница 214: ...changed 4 Confirm the settings then click OK The printer folder reappears...
Страница 223: ...If you do not know which port you are using see Basic Operations Various Information for Windows...
Страница 249: ......
Страница 255: ......
Страница 265: ...4 Click Edit 5 Specify the dedicated port settings 1 Specify the dedicated port settings 2 Click OK...
Страница 268: ...4 Click Edit 5 Specify the waiting time until connected to the network 1 Specify the waiting time 2 Click OK...
Страница 277: ...WPA WPA2 PSK Settings Displays the WPA WPA2 PSK setting WEP Settings Displays the WEP setting...
Страница 282: ...6 Click Close 7 Click Apply 8 Click OK NOTE...
Страница 286: ......
Страница 303: ...9 Click Finish...
Страница 317: ...2 Click OK...
Страница 319: ...4 Change the display language 1 Select a display language 2 Click OK...
Страница 323: ......
Страница 353: ......
Страница 355: ...4 Click Edit 5 Configure the SNMPv1 protocol...
Страница 362: ...4 Click Generate Key 5 Specify a key to be created...
Страница 366: ...4 Click Register Key and Certificate 5 Click Install...
Страница 370: ...1 Select Security Settings 2 Click CA Certificate Settings 4 Click Register CA Certificate 5 Click Install...
Страница 372: ...8 Click Register...
Страница 378: ......
Страница 384: ...4 Click Initialize 5 Click OK to initialize the key and certificate CA certificate...
Страница 389: ......
Страница 392: ...2 Click IEEE 802 1X Settings 4 Click Edit 5 Select the Use IEEE 802 1X check box...
Страница 393: ...6 Enter a login name 7 Select the Use TLS check box...
Страница 397: ...4 Click Edit 5 Select the Use IEEE 802 1X check box...
Страница 401: ......
Страница 429: ...3 Click Next 4 Manually specify the port using Port Printer Information Screen...
Страница 436: ...7 Disconnect the USB cable from the computer then restart Windows...


