Adding a port
When an incorrect port was selected while installing a printer driver from the Windows printer folder, add a
new port. There are two types of port: "MFNP Port" and "Standard TCP/IP Port." Select the port type
according to your environment.
MFNP Port
(only for IPv4 environment)
This is a port that allows the IP address of the machine to be detected automatically.
Even if the IP address of the machine is changed, the connection is maintained,
provided that the machine and the computer are in the same subnet. You do not need
to add a new port every time the IP address is changed. If you are using the machine
in an IPv4 environment, you should normally select this type of port.
You can add an MFNP port only when you installed the printer driver from the
supplied DVD-ROM, or when you downloaded and installed the printer driver from the
Canon website.
Standard TCP/IP Port
This is a standard Windows port. When you use this type of port, you need to add a
new port every time that the IP address of the machine is changed. Select this type of
port when you are using the machine in an IPv6 environment and when you cannot
add an MFNP port.
Adding an MFNP port
1
Click [Add Port].
2
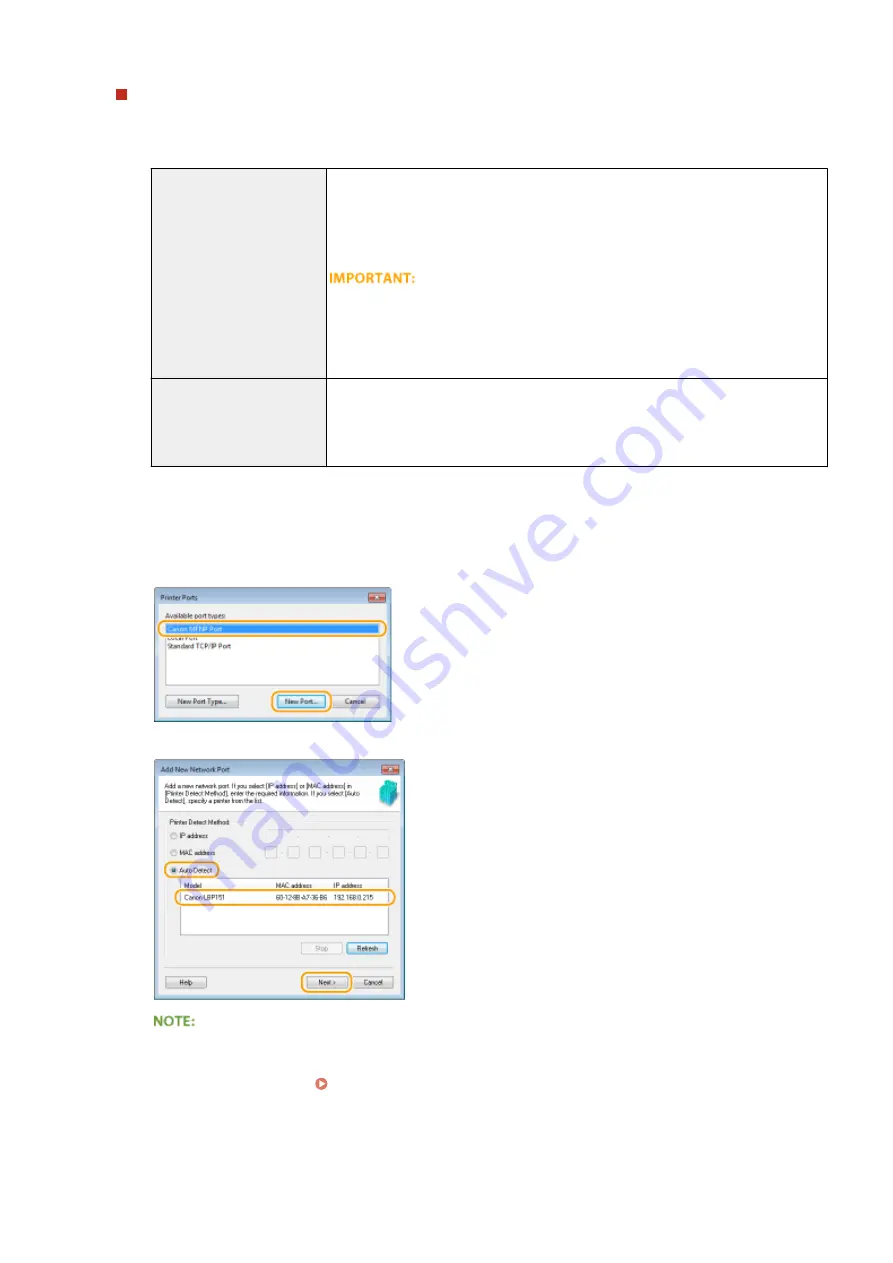
Select [Canon MFNP Port] in [Available port types] and click [New Port].
3
Select [Auto Detect] and select the machine when it is detected, and then click [Next].
If the machine is not detected
Click [Refresh]. If the problem persists, select [IP address] or [MAC address], enter the IP address or MAC
address of the machine ( Viewing Network Settings(P. 104) ) and then click [Next].
Network
111
Содержание i-SENSYS LBP151dw
Страница 1: ...i SENSYS LBP151dw User s Guide USRMA 0641 00 en Copyright CANON INC 2015 ...
Страница 24: ...ACT indicator Flashes when data is sent and received via wired LAN Basic Operations 19 ...
Страница 25: ...Interior 0YFA 00A Paper output guide Open to remove jammed paper Clearing Paper Jams P 213 Basic Operations 20 ...
Страница 73: ...LINKS Basic Printing Operations P 45 Printing Dates and Page Numbers P 67 Printing Watermarks P 69 Printing 68 ...
Страница 119: ...3 Click OK 4 Click Close Network 114 ...
Страница 124: ...LINKS Configuring Ethernet Settings P 116 Setting a Wait Time for Connecting to a Network P 120 Network 119 ...
Страница 164: ...The machine does not support use of a certificate revocation list CRL Security 159 ...
Страница 189: ...LINKS Remote UI Screens P 178 Using the Remote UI 184 ...
Страница 217: ...Troubleshooting 212 ...
Страница 260: ...4 Replace the toner cartridge 5 Close the top cover Maintenance 255 ...
Страница 264: ...Output example PCL Font List Maintenance 259 ...
Страница 273: ...Maintenance 268 ...
Страница 287: ...For more information about this function see Basic Printing Operations P 45 Appendix 282 ...
Страница 310: ...4 Click Next The uninstall begins 5 Click Exit 6 Click Back Exit Appendix 305 ...
Страница 311: ...Appendix 306 ...
Страница 319: ...Manual Display Settings 0YFA 05Y Appendix 314 ...
Страница 327: ...Appendix 322 ...


