


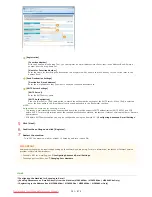


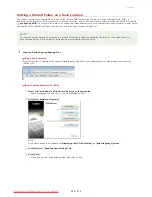


[SMTP Server Address]
Enter up to 48 characters for the SMTP server name/address.
[E-Mail Address]
Enter up to 120 characters for the e-mail address that you want to use for the machine.
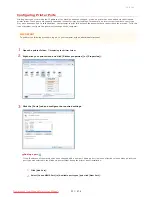
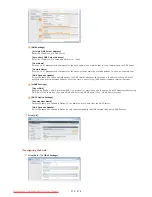
Setting up POP before SMTP and encrypted communication with the POP server
POP before SMTP authentication prevents unauthorized users from using e-mail by performing user authentication on the POP
server. Communication with the POP server can be encrypted if it supports SSL.
[Use POP Authentication Before Sending]
To enable authentication on the POP3 server, select the check box and enter up to 64 characters in the [User Name] text box.
[Set/Change Password]
To specify or change the password, enter up to 32 characters in the [Password] text box.
[POP Server]
Enter up to 48 characters for the POP3 server name/address.
[Use SSL]
Select the check box to use SSL for encrypting communication with the POP3 server. Select the check box for [Confirm
Certificate] or [Add CN to Verification Items] depending on your needs.
[Use APOP Authentication]
Select the check box to use APOP to encrypt the password during the authentication process.
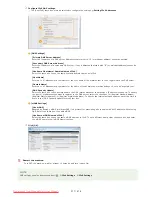
[Clear Mail Box]
When a transmission error occurs, an error notification may be sent to the address specified in [E-Mail Address]. Depending on the
e-mail service you are using, these error notifications may eventually fill your mail box in the server to its capacity if you do not
delete them. Select the check box to clear the mail box.
IMPORTANT:
Selecting the [Clear Mail Box] check box
All the e-mails in the inbox on the server are deleted as soon as [OK] is clicked in step 6. If an e-mail address for everyday use
is specified in [E-Mail Address], be careful not to delete unread e-mails. To lessen the risk of deleting unread e-mails, use an e-
mail account exclusively for the machine.
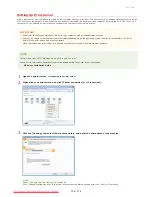
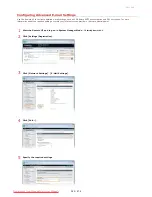
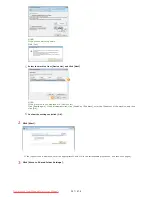
Setting up SMTP authentication or encrypted communication with the SMTP server
SMTP authentication (SMTP AUTH) uses a user name and password to authorize users to send e-mails. Communication with the
SMTP server can be encrypted if it supports SSL.
[Use SMTP Authentication (SMTP AUTH)]
To enable authentication on the SMTP server, select the check box and enter up to 64 characters in the [User Name] text box.
[Set/Change Password]
To specify or change the password, enter up to 32 characters in the [Password] text box.
[Use SSL]
Select the check box to use SSL for encrypting communication with the SMTP server. Select the check box for [Confirm Certificate
for SMTP Sending] or [Add CN to Verification Items] depending on your needs.
Click [OK].
6
㻟㻢㻟㻌㻛㻌㻢㻣㻢
Downloaded from ManualsPrinter.com Manuals
Содержание Color imageCLASS MF8580Cdw
Страница 1: ...Downloaded from ManualsPrinter com Manuals...
Страница 46: ...Continue to Selecting the Receive Mode LINKS Sending Faxes Downloaded from ManualsPrinter com Manuals...
Страница 48: ...LINKS Receiving Faxes Downloaded from ManualsPrinter com Manuals...
Страница 76: ...Paper Downloaded from ManualsPrinter com Manuals...
Страница 106: ...the hook Downloaded from ManualsPrinter com Manuals...
Страница 113: ...LINKS Basic Copy Operations Downloaded from ManualsPrinter com Manuals...
Страница 118: ...LINKS Basic Copy Operations Adjusting Color Balance Adjusting Sharpness Downloaded from ManualsPrinter com Manuals...
Страница 162: ...LINKS Receiving Faxes Checking Status and Log for Sent and Received Documents Downloaded from ManualsPrinter com Manuals...
Страница 169: ...LINKS Receiving Faxes Downloaded from ManualsPrinter com Manuals...
Страница 183: ...To specify multiple destinations repeat steps 3 and 4 Downloaded from ManualsPrinter com Manuals...
Страница 188: ...Downloaded from ManualsPrinter com Manuals...
Страница 199: ...LINKS Printing a Document Downloaded from ManualsPrinter com Manuals...
Страница 210: ...LINKS Printing a Document Printing Borders Printing Dates and Page Numbers Downloaded from ManualsPrinter com Manuals...
Страница 269: ...Configuring Scan Settings in ScanGear MF Downloaded from ManualsPrinter com Manuals...
Страница 287: ...Downloaded from ManualsPrinter com Manuals...
Страница 332: ...LINKS Connecting to a Wireless LAN MF8580Cdw MF8280Cw Only Downloaded from ManualsPrinter com Manuals...
Страница 341: ...LINKS Setting IPv6 Addresses Viewing Network Settings Configuring WINS Downloaded from ManualsPrinter com Manuals...
Страница 353: ...LINKS Setting Up Print Server Downloaded from ManualsPrinter com Manuals...
Страница 378: ...LINKS Setting IPv4 Address Setting IPv6 Addresses Viewing Network Settings Downloaded from ManualsPrinter com Manuals...
Страница 413: ...LINKS Specifying IP Addresses for Firewall Rules Downloaded from ManualsPrinter com Manuals...
Страница 455: ...Downloaded from ManualsPrinter com Manuals...
Страница 495: ...Yellow 17 Levels Magenta 17 Levels Cyan 17 Levels Black 17 Levels Downloaded from ManualsPrinter com Manuals...
Страница 656: ...Downloaded from ManualsPrinter com Manuals...
Страница 669: ...Downloaded from ManualsPrinter com Manuals...
Страница 677: ...Downloaded from ManualsPrinter com Manuals...
Страница 687: ...5 Read the License Agreement and click Yes 6 Click Next Downloaded from ManualsPrinter com Manuals...
Страница 726: ...The icon is added to the printer folder Downloaded from ManualsPrinter com Manuals...
Страница 731: ...Downloaded from ManualsPrinter com Manuals...
Страница 733: ...Downloaded from ManualsPrinter com Manuals...