Part 1: Product Specifications
BJC-3000
1-10
4. INSTALLATION
Refer to the User's Manual for detailed installation procedures.
4.1 Installation Location
Allow enough space for the printer to be used with ease.
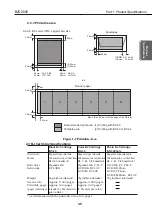
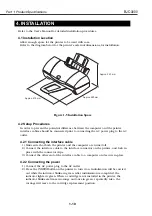
Refer to the diagram below for the printer's external dimensions for installation.
4.2 Setup Procedures
In order to prevent the potential difference between the computer and the printer,
interface cables should be connected prior to connecting the AC power plug to the AC
outlet.
4.2.1 Connecting the interface cable
1) Make sure that both the printer and the computer are turned off.
2) Connect the interface cable to the interface connector on the printer, and lock in
place with the connector clips.
3) Connect the other end of the interface cable to a computer and secure in place.
4.2.2 Connecting the power
1) Connect the AC power plug to the AC outlet.
2) Press the
POWER button
on the printer to turn it on. Initialization will be carried
out while the indicator blinks in green. After initialization is completed, the
indicator lights in green. When a cartridge is not installed in the printer, the
indicator blinks six times in orange and once in green, repeatedly. Also, the
carriage will move to the cartridge replacement position.
Approx. 418 mm
Approx. 480mm
Approx. 243 mm
Figure 1-5 Installation Space
Содержание BJC-3000 Series
Страница 2: ...0899 SC 0 30 0 ...
Страница 3: ......
Страница 12: ...VIII This page intentionally left blank ...
Страница 14: ......
Страница 28: ......
Страница 48: ...Part 2 Maintenance BJC 3000 2 20 This page intentionally left blank ...
Страница 50: ......
Страница 62: ...Part 3 Operation BJC 3000 3 12 This page intentionally left blank ...
Страница 64: ......
Страница 88: ......
Страница 95: ......
Страница 112: ...Part 5 Appendix BJC 3000 5 24 This page intentionally left blank ...
Страница 118: ......
Страница 119: ...PRINTED IN JAPAN IMPRIME AU JAPON CANON INC The printing paper contains 70 waste paper ...


