background image

2013 Portable Spa

LTR20131000, Rev. E

Appendix

www.calspas.com

60

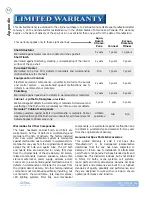
This Limited Warranty is extended to the original purchaser of a Cal Spa brand portable spa manufactured after 

January 1, 2013 and installed for residential use in the United States of America and Canada. This warranty 

begins on the date of delivery of the spa, but in no event later than one year from the date of manufacture.

This warranty applies only to these eight spa lines:

Aqua, 

Resort, 

Xtream, 

Zone

Connect

Escape, 

Diamond, 

Fitness

Shell Structural

Warranted against water loss due to defects in the spa shell.

5 years

7 years

10 years

Shell Finish

Warranted against blistering, cracking, or delaminating of the interior 

surface of the spa shell.

2 years

5 years

7 years

Pure Heat

™ 

Heater

Warranted  to  be  free  from  defects  in  materials  and  workmanship. 

(Optional feature for Connect)

N/A

7 years

7 years

Equipment and Controls

Electrical equipment components – specifi cally limited to the pumps 

and  control  system  –  are  warranted  against  malfunctions  due  to 

defects in workmanship or materials.

2 years

3 years

5 years

Plumbing

Warranted against leaks due to defects in workmanship or materials.

2 years

3 years

5 years

Cabinet - synthetic, fi berglass, or wicker

Warranted against defects in workmanship or materials. Normal wear and 

weathering of the fi nish will occur naturally over time and are not defects.

1 year

1 year

5 years

Hercules™ Cabinets and panels

Lifetime guarantee against defects in workmanship or materials. Normal 

wear and weathering of the fi nish will occur naturally over time and are not 

defects. Applies to Xtream series only.

Lifetime 

guarantee

N/A

N/A

  Limited Warranty

Warranties for Other Components

The  fuses,  headrests,  cabinet  fi nish,  and  fi lters  are 

warranted to be free of defects in workmanship and 

material at the time of delivery. The factory installed 

Pure  Cure  water  purifi cation  system  is  warranted 

against malfunction due to defects in workmanship or 

material for one year from the original date of delivery 

except  the  UV  bulb  and  quartz  tube.  The  UV  bulb 

and  quartz  tube  are  warranted  for  ninety  (90)  days 

from the original date of the spa delivery. All stereo-

related  components  (receiver,  speakers,  sub-woofer, 

stereo  media  locker,  power  supply,  wireless  remote 

control etc.) are warranted against malfunction due to 

defects in workmanship or material for one year from 

the original date of delivery. All other factory-installed 

components not mentioned specifi cally, including, but 

not  limited  to  the  wood  frame,  jets,  diverter  valves, 

LED  lighting  systems,  fi lter  lids,  and  mechanical 

components,  are  warranted  against  malfunction  due 

to defects in workmanship and material for two years 

from the original date of delivery.

Genuine Cal Spas Parts & Accessories

This  Limited  Warranty  is  void  if  Cal  Spas  (the 

“Manufacturer”)  or  its  designated  representative 

determines  that  the  spa  has  been  subjected  to 

damage  or  failure  due  to  installation  of  aftermarket 

parts that are not genuine Cal Spas branded parts and 

accessories. This disclaimer includes, but is not limited 

to  fi lters,  UV  bulbs,  ozone  systems,  salt  systems, 

repair parts and other accessories. Genuine Cal Spas 

brand parts and accessories  are built to our highest 

standards of quality, durability and performance, and 

they  are  designed  to  work  with  your  Spa  to  ensure 

optimal performance and function.

Содержание F1239

Страница 1: ...LTR20131000 Rev E 9 18 13 ...

Страница 2: ...reamer Waterfall 29 Adjustable Therapy System 30 Wireless Spa Monitor 30 Water Clarity The Key to Clear Water 31 Testing and Adjusting Spa Water 32 Sanitation 33 Bather Load 34 Pure XL and Pure Cure Water Sanitizers35 Ozonator 35 Filter Cleaning 35 Cal Clarity II Bromine Generator 36 Maintenance Schedule 38 Troubleshooting Water Clarity Problems 39 Jet Removal and Replacement 40 Cleaning and Maint...

Страница 3: ...e hyperthermia Hyperthermia occurs when the internal temperature of the body reaches a level 3 F to 6 F above the normal body temperature of 98 6 F or 2 C to 4 C above 37 C While hyperthermia has many health benefits it is important not to allow your body s core temperature to rise above 103 F 39 5 C Symptoms of excessive hyperthermia include dizziness lethargy drowsiness and fainting The effects ...

Страница 4: ...hen entering or exiting the spa or hot tub WARNING Do not use drugs or alcohol before or during the use of a spa or hot tub to avoid unconsciousness and possible drowning WARNING Do not use a spa or hot tub immediately following strenuous exercise WARNING Prolonged immersion in a spa or hot tub may be injurious to your health CAUTION Maintain water chemistry in accordance with manufacturer s instr...

Страница 5: ...t If you live in a region where it snows in the winter or rains frequently place the spa near a house entry By doing this you will have a place to change clothes and not be uncomfortable Consider Your Privacy In a cold weather climate bare trees won t provide much privacy Think of your spa s surroundings during all seasons to determine your best privacy options Consider the view of your neighbors ...

Страница 6: ... support the spa We strongly recommend that a qualified licensed contractor prepare the foundation for your spa If you are installing the spa indoors pay close attention to the flooring beneath it Choose flooring that will not be damaged or stained If you are installing your spa on an elevated wood deck or other structure it is highly recommended that you consult a structural engineer or contractor ...

Страница 7: ... wiring requirements Wire runs over 85 feet must increase wire gauge to the next lower number For example A normal 50 amp GFCI with four 6 AWG copper wires run over 85 feet would require you to go to four 4 AWG copper wires 240 Volt Electrical Installation GFCI and Wiring Requirements Single voltage systems except Ultimate Fitness see next page Control System GFCI Required Wires Required VS300 One...

Страница 8: ...r 8 AWG copper wires Note Fitness Spa model F1770 has two equipment packs and requires two separate electrical services Install each electrical service as described above and as shown below Electrical Installation for 11 kW Heater This applies to Fitness spas with the 11 kW heater only Two electrical services are required to heat the swim side of the Fitness Spa RED AC WHT AC J53 J23 J19 J43 J48 K...

Страница 9: ...2013 Portable Spa LTR20131000 Rev E Preparing for Your New Portable Spa www calspas com 7 GFCI Wiring Diagram ...

Страница 10: ...le polling Pump 1 is one speed See page 16 for description of circulation pump operation See table at right A10 See table at right Note Arrow indicates factory default setting Number of high speed pumps that can be run before heater is disabled A5 OFF OR before heater runs at 120VAC A5 ON No of Pumps A7 A10 0 OFF OFF 1 ON OFF 2 OFF ON 3 ON ON High Power Configuration DIP Switch Definitions for 510...

Страница 11: ... not bury the power cord If your cord becomes damaged replace it before next usage All 120V spas must have a GFCI This can be either a 15 amp GFCI receptacle or a 15 amp GFCI cord and plug kit as shown CKIT110 P N ELE09700086 Testing the GFCI Test the GFCI plug prior to first use and periodically when the spa is powered Plug in the 1 GFCI into the power outlet The i n d i c a t o r should turn on ...

Страница 12: ... too low or too high your spa will not operate properly Always fill the spa through the filter canister Failure to do so may cause air to be trapped in the filtration system and prevent the pumps from operating properly Unscrew the cartridge and remove it After you remove the filter remove the plastic wrapper and soak it in water for 30 minutes before you replace it A dry filter can allow air into the ...

Страница 13: ...utton again to turn off the pump The c pump should be left off for 10 to 15 seconds Repeat steps a through c until water is flowing through d all the jets and all air is removed from the plumbing Let the spa heat up 7 When the spa has finished priming the heater will activate Put the cover on and let the spa run for two hours Adjust water chemistry 8 After the spa has run for two hours test and ad...

Страница 14: ...ed for 10 seconds Press the JETS button again to turn off the pump 4 The pump should be left in the off position for 10 to 15 seconds Repeat steps 1 through 4 until water is flowing 5 through all the jets and all air is removed from the plumbing Note If you press the Temp button any time during Priming Mode it will exit that mode and begin Standard Mode Using a Phillips screwdriver remove the fron...

Страница 15: ...ming mode When the control panel displays PR do the following Press the 1 JETS button to turn on the pump and let it run for 10 seconds The pump should be running in low speed Press the 2 JETS buttons again and let the pump run in high speed for 10 seconds Press the 3 JETS button again to turn off the pump The pump should be left in the off position for 10 to 15 seconds Repeat steps 1 through 3 un...

Страница 16: ...V while spas configured for high power will operate continuously at 220V When only one pump is running the heater will operate at 220V When two or three pumps are running the heater will automatically switch to operate at 110V The heater light will tell you when it is operating and what voltage it is using See the Heater Light section above For spas configured for high power operation the heater w...

Страница 17: ...st two minutes Switching Heating Modes Press Temp button followed by the Light button Press the same sequence to switch to the next mode Temperature Adjustment Range 80 F to 104 F 26 C to 40 C The electronic control panel displays the actual water temperature in degrees Fahrenheit The displayed temperature will only be current after the pump has been running for at least two minutes To set the tem...

Страница 18: ...pump After 4 hours High speed pumps After 15 minutes Optional circulation pump After 15 minutes Optional turbo After 15 minutes Spa light After 4 hours Setting Filtration Cycles Your spa is programmed to filter twice a day The first cycle will begin six minutes after the spa is turned on and the second cycle 12 hours later The factory has programmed the cycle to last for two hours but this can be ...

Страница 19: ...3 JETS 1 button again to turn off the pump The pump should be left in the off position for 10 to 15 seconds Repeat steps 1 through 3 until water is flowing 4 through all the jets and all air is removed from the plumbing When the spa has finished priming the heater will be activated and the water temperature will be maintained in standard mode The spa will heat to 100 F 37 5 C at start up until the...

Страница 20: ...on Use the UP and DOWN buttons to adjust time See the next page for more detailed instructions Standard Economy Sleep and Standby Modes Mode Prog This button is used to switch between standard economy and sleep modes Press MODE PROG to enter mode 1 programming Press the DOWN button to cycle through to the 2 desired mode Press MODE PROG to confirm selection 3 StandardMode Standardmodemaintainsthede...

Страница 21: ...down the time of day will need to be reset for filter cycles to run according to your desired programming Clean up Cycle When the pump or blower is turned on by a button press a clean up cycle begins 30 minutes after the pump or blower is turned off or times out The pump and the ozone generator will run for one hour Ozone This is an optional feature On most systems the ozone generator if installed...

Страница 22: ...temperature either switch to Standard mode or turn Jets 1 on for at least two minutes 3 Power has been cut off to the spa 3 The control panel will be disabled until power returns Spa settings and time of day will be preserved for 30 days with a battery back up BUF Internal problem detected Repair required Contact your dealer or service organization dr Insufficient water detected in heater Spa will...

Страница 23: ...fter spa has cooled turn off power for approximately 30 seconds and then turn power back on If display message is repeated then shut the power off to the spa and call your dealer or service organization Pr When your spa is first actuated it will go into priming mode The priming mode will last for up to four minutes and then the spa will begin to heat and maintain the water temperature in the Stand...

Страница 24: ...ol will enter Priming Mode which lasts 4 to 5 minutes The Priming Mode screen will appear which will only show pump icons The system will automatically return to normal heating and filtering at the end of the priming mode During the priming mode the heater is disabled to allow the priming process to be completed without the possibility of energizing the heater under low flow or no flow conditions Not...

Страница 25: ...ous times Some of these messages must be dismissed by the user see page 17 Set 104 F 8 32 PM Ozone Filter 1 Spa Shortcuts Settings High Range 102 F Ready in Rest Mode Heating Water Temperature Messages Desired Temperature Temperature Range Left Right Up Down andSelectButtons Pump and Heat Menus Lock Indicator Status Spa Screen The Spa Screen shows all available equipment to control as well as othe...

Страница 26: ...ecific Temp Ranges may be determined by the Manufacturer Freeze Protection is active in either range Heat Mode Ready vs Rest In order for the spa to heat a pump needs to circulate water through the heater The pump that performs this function is known as the heater pump The heater pump can be either a 2 speed pump Pump 1 or a circulation pump If the heater pump is a 2 Speed Pump 1 READY Mode will ci...

Страница 27: ...shut down power to the spa Utilities This menu feature is for system information only and is used mainly for repair and troubleshooting Preferences This allows you to set the following preferences for system operation Change the temperature between Fahrenheit and Celsius Change the clock between 12 hour and 24 hour display Turn periodic reminded like CLEAN FILTER on or off Information This menu fe...

Страница 28: ...ater may be dry Possible dry heater or not enough water in the heater to start it The spa is shut down for 15 min Press any button to reset the heater start up See Flow Related Checks below The heater is dry There is not enough water in the heater to start it The spa is shut down After the problem has been resolved you must clear the message to restart heater start up See Flow Related Checks below...

Страница 29: ...s of the module Setting up the WiFi Interface Connection for the Smart Phone App It will take several seconds for the wireless connection to the spa to be available To speed up this process a static IP address can be assigned to the iPhone iPod Touch or iPad for the point to point network On the WiFi Networks page touch the blue right arow next to the BWGSpa_XXXXXX entry to display the 1 address s...

Страница 30: ...able jet to the left counter clockwise will decrease the amount of water flow through the jet Rotating the face of an adjustable jet to the right clockwise will increase the amount of water flow through the jet See example shown below Neck jets adjust in the opposite directions counter clockwise to increase clockwise to decrease Press the LIGHT button on the topside control panel to turn the spa l...

Страница 31: ... venturis are the 1 knobs located around the top of your spa Each one will let you add a mixture of air with the jet pressure This is accomplished by rotating the air venturi knob to the left counterclockwise to increase the amount of airflow through the jets To decrease the amount of airflow through the jets rotate the handle to the right clockwise Hydro Streamer Waterfall Your spa may include tw...

Страница 32: ... turn the pulse mode off and return to normal pump operation press the PULSE MODE button a second time Up This button allows the user to cycle up from one through seven massage modes one at a time Each mode offers a different pulsating massage Some modes are faster than others so just cycle through them to find the massage you like best Down This button allows the user to cycle down through all se...

Страница 33: ...it alit esto dolut dio dole niam quat am vel etue vendiam quis duip ea ating et utem quam sendit velesequisit am dunt niscil ilit alit non umsan utatin utat num voloreril in ut pratie dionull umsandio consed dolumsandit at Rat consequi tinim ilisi bla feuis euguerc ilisi Em verit iliqui endiam nulluptat lamcore minibh elestio num sandip eraesectem diatio ercing ea cortis delissed dunt utpatisi Ut ...

Страница 34: ...er It is the measure of the ability of the water to resist changes in pH level The recommended total alkalinity is 80 120 ppm If the TA is too low the pH level will fluctuate widely from high to low Low TA can be corrected by adding an alkalinity increaser If the TA is too high the pH level will tend to be too high and may be difficult to bring down High TA can be corrected by adding an alkalinity...

Страница 35: ...mperature of the spa causes it to dissolve too quickly It will cause damage to your spa and will void your warranty Whichever plan you decide on follow it completely and don t take shortcuts It will provide you with clean safe clear spa water with a minimum of effort Spa owners with an ozonator still need to use a chemical sanitizer See page 35 for instructions on usage Using Bromine as a Sanitize...

Страница 36: ...ll periodically need to shock the water Shocking the water helps remove burned out chemicals bacteria and other organic material from your spa s water and improves your sanitizer s effectiveness Do not use chlorinating shock which will damage your spa s jets and pump seals Only use an oxidizer shock It can be used with either chlorine or bromine sanitizers Add one ounce of oxidizer shock once a we...

Страница 37: ...d be deep cleaned periodically to dissolve scale and particles that get lodged deep within the filter fibers and impede the filtration process Even if the filter looks clean scale and particles can clog the fibers and prevent water from flowing through the filter resulting in the most common spa problem no heat caused by a dirty filter We recommend you clean your filter once a month and replace it...

Страница 38: ... II system The red ON light should appear steady If it blinks make sure the jets are running Press and hold the 5 Prog button for two seconds When the flashing number appears press the Prog button a second time An animation will appear then a number showing the total dissolved solids TDS level will be shown Add Bromicharge to the spa water Use the 6 table below to determine how much you should use...

Страница 39: ...additive used with the Cal Clarity II It can be added anywhere in the spa by simply pouring it from the container Do not breathe or get into your eyes Operating Modes Maintenance Mode Maintenance Mode is the everyday mode and is automatically on when the system is activated Its primary function is to keep the bromine level at a stable and acceptable range when the spa is not being used Boost Mode ...

Страница 40: ...spa with a multi purpose cleaner for spas Polish the acrylic surface with a surface protectant for spas Clean and treat spa cover pillows and Cal Select cabinet if equipped with a vinyl cleaner for spas Refill your spa following the section Filling and Powering Up Your Portable Spa on page 10 If you are using the Cal Clarity II Automatic Bromine Generator add new sodium bromide to the water Once a...

Страница 41: ...efill the spa Organic buildup scum ring around spa Buildup of oils and dirt Wipe off scum with clean rag if severe drain the spa use a spa surface and tile cleaner to remove the scum and refill the spa Algae Growth High pH Low sanitizer level Shock spa with sanitizer and adjust pH Shock spa with sanitizer and maintain sanitizer level Eye Irritation Low pH Low sanitizer level Adjust pH Shock spa wi...

Страница 42: ... unscrew from the fitting until it is free To replace the jet place it in the fitting and turn it clockwise until it is snug in place Do not overtighten the jet Spa Cover Important Keep the spa covered when not in use Covered spas will use less electricity in maintaining your set temperature Covering your spa will protect your spa s finish from the sun s ultraviolet rays You are required to keep t...

Страница 43: ...uld like the water to drain to Pull the hose outward about to start water 7 flow Push inward to shut off water flow For spas with cabinet mounted drain Unscrew the cap 4 Hook up the female end of a garden hose to the 5 drain fitting Turn off the power at the breaker 1 Remove all filters 2 Pull the knob out about 2 until it snaps into 3 place Let spa drain completely 8 Push the hose inward about in...

Страница 44: ...ove drain plugs from the front of the pumps 5 Disconnect the unions from both sides of the pump 6 Blow any remaining water out of the jets and equipment 7 area with the wet dry vacuum Cover your spa with a good spa cover and an all weather 8 tarp to ensure that neither rain nor snow enters the spa NOTE All manifolds are plumbed in series directly to the main drain see example at right making it ea...

Страница 45: ...sive filtration times or by water replacement See the section Water Clarity for more information on cleaning your filter Cleaning Your Spa Spa Cover and Pillows Due to the constant punishment your spa cover and pillows receive you should protect them by applying a vinyl and leather cleaner as part of your monthly maintenance plan Use a product that is specifically designed to protect spa covers an...

Страница 46: ... lamp end remove the lamp socket 3 from 5 the end now exposed Remove the lamp from the chamber 6 Remove the O ring 5 from the end of the quartz thimble 6 7 Remove the quartz thimble 8 To reinstall the replacement UV lamp follow these steps in reverse When replacement UV lamp has been installed conduct a final leak check Restore power to the spa at the GFCI 1 Turn on the pump and let water run for ...

Страница 47: ...very precaution to keep this system dry Water damage is not covered by Cal Spas or the manufacturer s warranty Using the Entertainment System Operating the CD Player The manufacturer s operating instructions are delivered with your spa We strongly recommend that you read these instructions prior to operating this unit Press the POWER button on the unit or the remote control to turn the system on T...

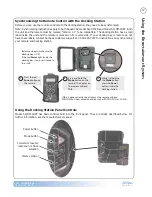
Страница 48: ...re coming in contact with this or any electronic option Always close the protective door Although the marine grade entertainment system is encased in a plastic housing with weather seals the system is water resistant and NOT waterproof You must take every precaution to keep this system dry Water damage is not covered by Cal Spas or the manufacturer s warranty Note The system includes an MP3 dockin...

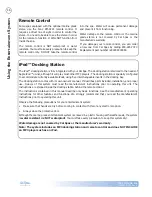
Страница 49: ...tion Before you can use the remote control with the docking station they need to be synchronized Note Synchronizing instructions apply to both Aquatic AV model AQ DM 4B and model AQ DM 4UBT Both the unit and the remote must be marked Version 1 1 to be compatible The docking station has a small label inside the unit and the remote is marked on its reverse side If your docking bay or remote do not h...

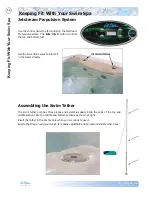
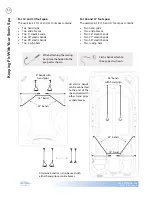
Страница 50: ... jets Assembling the Swim Tether The swim tether pole has three pieces and assembles easily Slide the ends of the top and middle sections into the middle and bottom sections as shown at right Insert the tether in the anchor hole when you are ready to use it Buckle the strap around your waist It is easily adjustable and can accommodate most sizes Jetstream Propulsion System Use the air venturi valv...

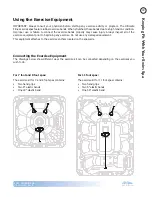
Страница 51: ...ay cause injury Always inspect all of the exercise equipment prior to beginning any exercise Do not use any damaged equipment This equipment attaches to the exercise anchors located on the spa walls For 7 foot and 8 foot spas The exercise kit for 7 and 8 foot spas contains Two hand grips Two 6 elastic bands One 18 elastic band For 11 foot spas The exercise kit for 11 foot spas contains Two hand gr...

Страница 52: ...he end of the spa and used with either hand grips or ankle braces 6 bands with hand grips 18 band 25 bands 18 band 25 bands 56 bands with hand grips For 12 and 14 foot spas The exercise kit for 12 and 14 foot spas contains Two hand grips Two ankle braces Two 6 elastic bands Two 18 elastic bands Two 25 elastic bands Two rowing bars For 16 and 17 foot spas The exercise kit for 16 and 17 foot spas co...

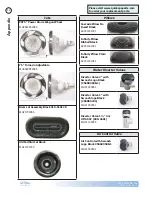
Страница 53: ...ith 2013 all spa models use screw in jet inserts where removable jets are used The River Jet and Old Faithful jets do not have removable jet inserts Spas built before 2013 use snap in jet inserts ELE 2 Euro No Eyeball PLUCS2295028S ED 2 Euro Directional PLUCS2295058S NJD 2 Directional Neck Jet 100 Shut Off PLUCS2255048S MED 3 Micro XL Directional PLUCS2125038S mfd 3 Micro Flow Directional PLUCS229...

Страница 54: ...low No Insert Black ACC01401031 Infinity Pillow Ribbed Black ACC01401051 Infinity Pillow Plain Black ACC01401061 Water Diverter Valves Diverter Valve 2 with Swoosh Logo Black CS6003038 1 PLU21300461 Diverter Valve 1 with Swoosh logo Black CS6004231 PLU21300451 Diverter Valve 1 On Off ASSY 600 4601 PLU21100045 Air Control Valve Air Control with Swoosh Logo Black CS6603508 1 PLU21300501 Please visit...

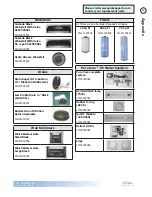
Страница 55: ...tom Drain Filtration Return Assembly PLU21400215 Weir Skimmers Weir Skimmer Gate Small Black PLU21600284 Weir Skimmer Gate Large Black PLU21600294 Filters All filters are anti bacterial threaded cartridges 25 Sq Ft FIL11100303 50 Sq Ft FIL11100202 75 Sq Ft FIL11100212 Pure Cure UV Water Sanitizer Pure Cure complete system LIT16000380 Germicidal UV lamp T515 LIT16000381 Rubber O ring D24 5 LIT16000...

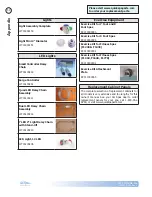
Страница 56: ...rcise Equipment Exercise Kit for 7 Foot and 8 Foot Spas EXC10000003 Exercise Kit for 9 Foot Spas EXC10000004 Exercise Kit for Fitness Spas F1239 F1439 EXC10000002 Exercise Kit for Fitness Spas F1418 F1640 F1770 EXC10000001 Exercise Kit Attachment Plate EXC11000065 Replacement Cabinet Panels The complete selection of replacement cabinets for all models is very extensive and too lengthy for this own...

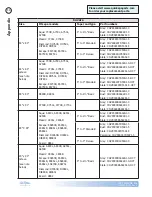
Страница 57: ...illed with 2 lb foam Covers Size Fits spa models Taper and type Part numbers 54 x 78 Z522L 4 to 2 Basic Gray COV5478BAS42G1 0 Rust COV5478BAS42R1 0 Slate COV5478BAS42S1 0 64 x 84 Z536L 4 to 2 Basic Gray COV6484BAS42G1 0 Rust COV6484BAS42R1 0 Slate COV6484BAS42S1 0 72 x 72 triangle A621T Z628T 4 to 2 Basic Gray COV7272TRBAS42G1 0 Rust COV7272TRBAS42R1 0 Slate COV7272TRBAS42S1 0 Palomino COV7272TRBA...

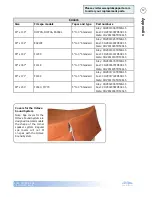
Страница 58: ... OCT Rust COV8484STD53R1 5 OCT Slate COV8484STD53S1 5 OCT 90 x 90 R890B R890L 4 to 2 Basic Gray COV9090BAS42G1 0 Rust COV9090BAS42R1 0 Slate COV9090BAS42S1 0 91 x 91 X750B X750L X770B X770L Gray COV8484BAS42G1 0 Rust COV8484BAS42R1 0 Slate COV8484BAS42S1 0 93 X 93 Aqua A830L A830B A850L A850B Classic C836L C836B Escape ES850B ES850L ES861B ES861L ES864B ES864L Diamond DI860B DI860L DI880B DI880L R...

Страница 59: ... Slate COV93141STD53S1 5 93 x 167 F1418 5 to 3 Standard Gray COV93167STD53G1 5 Rust COV93167STD53R1 5 Slate COV93167STD53S1 5 93 x 171 F1439 5 to 3 Standard Gray COV93171STD53G1 5 Rust COV93171STD53R1 5 Slate COV93171STD53S1 5 93 x 200 F1640 F1770 5 to 3 Standard Gray COV93200STD53G1 5 Rust COV93200STD53R1 5 Slate COV93200STD53S1 5 Covers for the Octave Sound System Note Spa covers for the Octave ...

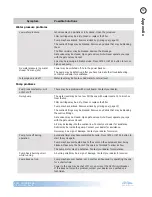
Страница 60: ...essages on page 20 Heat problems Spa water does not get hot Spa may be in Economy Mode Set the spa to Standard Mode The filter may be dirty or may need to be replaced Clean or replace the filter The water level may be too low Fill the spa with water level at 4 to 6 inches from the top The temperature is not turned up high enough Raise temperature on topside control Cover the spa The cover will kee...

Страница 61: ...spa with water level at 4 to 6 inches from the top Filter cartridge may be dirty Clean or replace the filter Pump may have airlock Remove airlock by priming spa page 12 The suction fittings may be blocked Remove any debris that may be blocking the suction fittings Gate valves may be closed Open gate valves Note Never operate your spa with the gate valves closed Air may be leaking into the suction ...

Страница 62: ... Applies to Xtream series only Lifetime guarantee N A N A Limited Warranty Limited Warranty Warranties for Other Components The fuses headrests cabinet finish and filters are warranted to be free of defects in workmanship and material at the time of delivery The factory installed Pure Cure water purification system is warranted against malfunction due to defects in workmanship or material for one ...

Страница 63: ...ined in the owner s manual provided with the spa including but not limited to the failure to maintain proper water chemistry and chemical balance and the use of abrasive or improper cleaners or non genuine parts and accessories This Limited Warranty does not provide coverage for the insulating cover any item attached to or installed on the spa after the date of manufacture or for gaining access to...

Страница 64: ..._____________________________________________________________________ Dealer s Phone Number _________________________________________________________________ Dealer s Address _______________________________________________________________________ Registering your new Cal Spas product is quick and easy It is important that you register your Cal Spas product as soon as possible By taking just a few ...

Отзывы: