Chapter 12: Configuring QoS on the SSR
204
CoreWatch User’s Manual
–
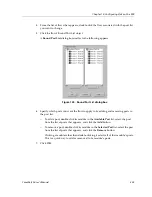
To delete interfaces, select them in the
Selected Interfaces
list and click the
Delete
button.
7.
Click
OK
.
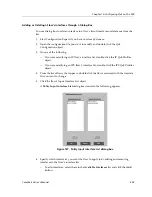
Dragging an Interface to Apply a Flow to the Interface
You can add an interface to a QoS profile’s list of interfaces by dragging the interface to
the flow. This will apply the flow to the interface. To apply a flow by dragging an interface
to a QoS profile flow:
1.
Start Configuration Expert if you have not already done so.
2.
Open the configuration file you want to modify and double-click that file’s QoS
Configuration object. Then do one of the following:
–
If you want to apply a flow to an IP interface, double-click the IP QoS Profiles
object.
–
If you want to apply a flow to an IPX interface, double-click the IPX QoS Profiles
object.
3.
Double-click the Routing Configuration object. Then do one of the following:
–
If you are applying an IP flow to an IP interface, double-click the IP Routing
Configuration object. Then double-click the IP Interface Configuration object.
–
If you are applying an IPX flow to an IPX interface, double-click the IPX Routing
Configuration object. Then double-click the IPX Interface Configuration object.
4.
Double-click the object in which the desired interface is located.
If you are applying the flow to an IP interface, the interface is located in either the IP
interfaces bound to Ports or IP interfaces bound to VLAN object.
If you are applying the flow to an IPX interface, the interface is located in either the IPX
interfaces bound to Ports or IPX interfaces bound to VLAN object.
5.
From the list of interfaces that appears, select the one you want to add to the flow.
6.
Drag the selected interface to the desired QoS profile flow
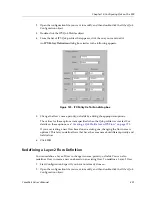
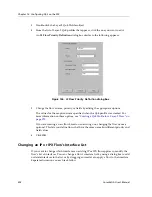
Changing a Layer-2 Port List
If you want to change which ports an existing Layer-2 flow applies to, modify the flow’s
list of ports. To do so, take the following steps:
1.
Start Configuration Expert if you have not already done so.
2.
Open the configuration file you want to modify and then double-click that file’s QoS
Configuration object.
3.
Double-click the Layer-2 QoS Profiles object.
Содержание SSR-GLX19-02
Страница 1: ...CoreWatch User s Manual 9032564 04...
Страница 2: ...Notice 2 CoreWatch User s Manual...
Страница 20: ...Preface 20 CoreWatch User s Manual...
Страница 64: ...Chapter 5 Changing System Settings 64 CoreWatch User s Manual...
Страница 86: ...Chapter 6 Configuring SSR Bridging 86 CoreWatch User s Manual...
Страница 106: ...Chapter 7 Configuring VLANs on the SSR 106 CoreWatch User s Manual...
Страница 206: ...Chapter 12 Configuring QoS on the SSR 206 CoreWatch User s Manual...
Страница 246: ...Chapter 13 Configuring Security on the SSR 246 CoreWatch User s Manual...
Страница 274: ...Chapter 15 Configuring BGP on the SSR 274 CoreWatch User s Manual Figure 184 BGP Peer Group Definition panel Options tab...
Страница 363: ...CoreWatch User s Manual 363 Chapter 16 Configuring Routing Policies on the SSR 9 Click OK...
Страница 364: ...Chapter 16 Configuring Routing Policies on the SSR 364 CoreWatch User s Manual...
Страница 370: ...Chapter 17 Checking System Status 370 CoreWatch User s Manual...
Страница 390: ...Chapter 18 Monitoring Real Time Performance 390 CoreWatch User s Manual...
Страница 396: ...Chapter 19 Checking the Status of Bridge Tables 396 CoreWatch User s Manual...
Страница 430: ...Chapter 20 Checking the Status of Routing Tables 430 CoreWatch User s Manual...
Страница 442: ...Chapter 22 Obtaining Reports 442 CoreWatch User s Manual...
Страница 456: ...Appendix B CoreWatch Menus 456 CoreWatch User s Manual...

