31
A 8
5.4
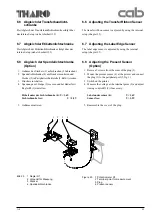
Wechsel Etikettenlichtschranke
WARNUNG!
Lebensgefahr durch Strom-
schlag! Netzstecker ziehen!
Wechsel Etikettenlichtschranke:
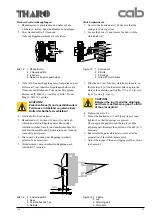
1. Deckel öffnen, Druckkopf öffnen, Versteifung nach
unten klappen. Etiketten und Transferband aus dem
Drucker entfernen.
2. Gehäuse abschrauben.
3. Stecker (1) des Kabels der Etikettenlichtschranke
von der Leiterplatte abziehen.
4. Kabelhalter (2) und (3) öffnen und Kabel der
Etikettenlichtschranke herausziehen.
5. Spindel (5) solange entgegen dem Uhrzeigersinn
drehen, bis sich die Etikettenlichtschranke (4)
abnehmen lässt.
6. Neue Etikettenlichtschranke einbauen.
7. Abgleich der Lichtschranke durchführen
(Internes Setup).
5.4
Replacing the label edge sensor
WARNING!
Mortal danger by electric shock!
Unplug power cord!
Replacing label edge sensor:
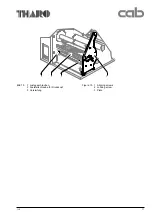
1. Open cover , open printhead, swing the plate (13)
downwards. Remove label stock and transfer ribbon
from the printer.
2. Remove housing.
3. Remove the plug (1) of the label sensor cable from the
PCB A8.
4. Open the cable clamps (2) and (3) and pull the label
sensor cable out of the clamps.
5. Loosen the sensor (4) by turning the spindle (5)
counterclockwise. Remove the sensor.
6. Reassemble in reverse order.
7. Adjust the label edge sensor by using the internal setup.
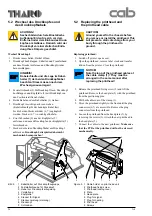
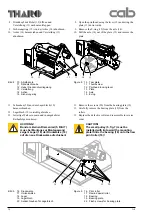
Bild 10
1 Stecker der Etikettenlichschranke
2 Kabelhalter
3 Kabelhalter
4 Etikettenlichtschranke
5 Spindel der Etikettenlichtschranke
Figure 10
1
Plug of label edge sensor
2
Cable holder
3
Cable holder
4
Label edge sensor
5
Spindle for label edge sensor
1
2
3
4
5
Содержание A8
Страница 75: ...Index 1 00 02 29 A 8 B Anlage B Blockschaltbild Appendix B Block Diagram ...
Страница 85: ...Index 1 00 02 29 A 8 D1 Anlage D Belegungsplan Leiterplatte A8 Appendix D Layout Diagram PCB A8 ...
Страница 87: ...Index 1 00 02 29 A 8 E Anlage E Steckerplan A8 Appendix E Connector Diagram A8 ...
Страница 91: ...A 8 F4 ...


