background image

Accessing the engineer controls

Before programming the panel, please refer to pages 14 and 15 for an overview of the various engineering 
functions available and the effect their implementation will have on the way the system operates.

To gain access to the panel’s engineer functions, remove the panel lid using the Torx key provided and press the 
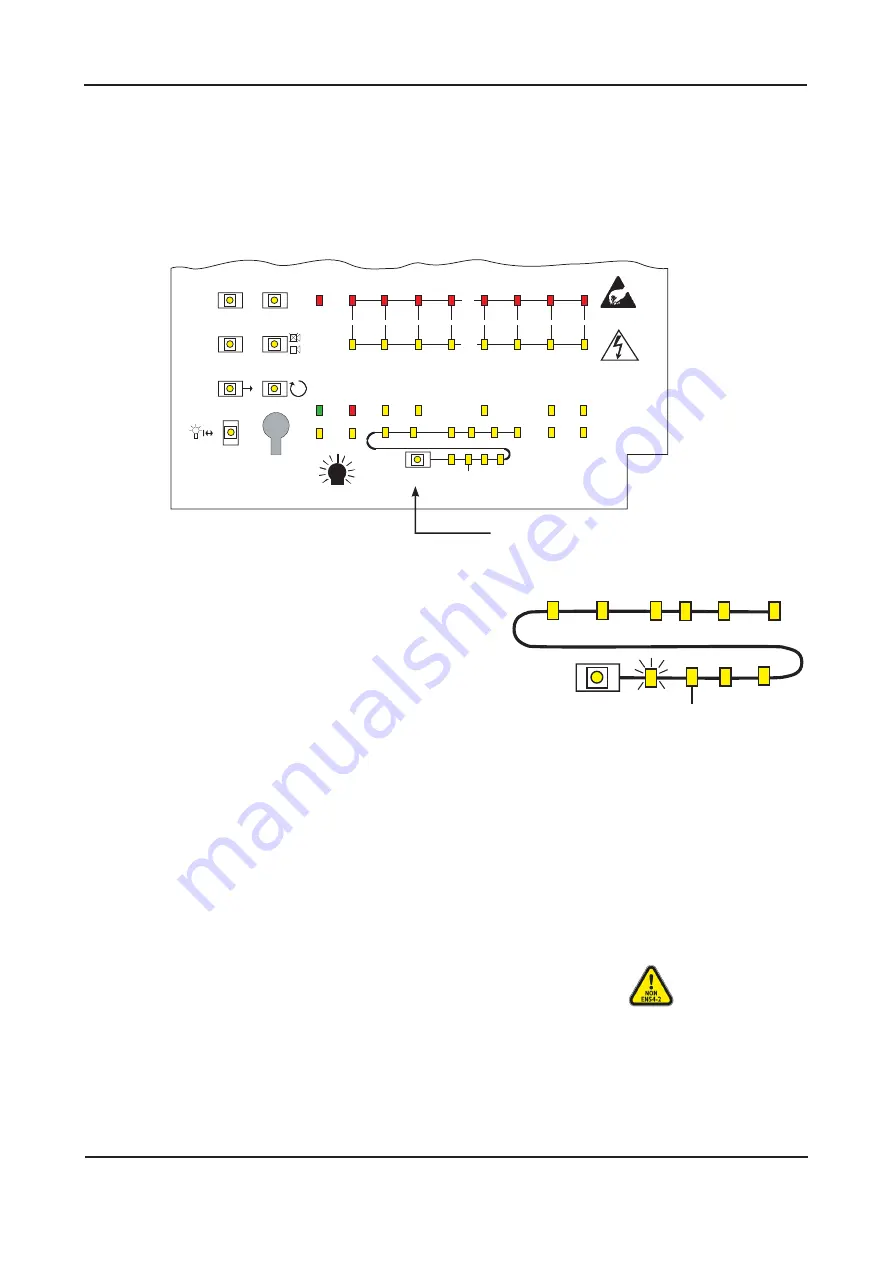
ACCESS LEVEL THREE FUNCTIONS button on the Main Control PCB (see figure 12 below).

Figure 12 : Location of the panel’s programming tools on the Main Control PCB

When the ACCESS LEVEL THREE FUNCTIONS button is pressed for 
the first time, the Accessed light will be lit steady and the first 
engineer function (COINCIDENCE) will be selected and indicated 
by its yellow light flashing (see right).

Every time the ACCESS LEVEL THREE FUNCTIONS button is pressed 
the next engineer function is selected.
Note: The engineer functions are graphically linked on the Main 
Control PCB by an ‘S’ shaped line (see right). Pressing the ACCESS 
LEVEL THREE FUNCTIONS button after the last selection (SOUNDER 
STATUS) returns to the first function (COINCIDENCE).
To exit access level 3 at any time, press the ESCAPE ACCESS button.

Notes:
1.  Access level 3 functions that are relevant to zones temporarily use the Zone Fault lights to show which zones  
 

have been programmed for that function. This means any fault or disablement indication is suppressed until  


the programming of the relevant function is complete.

2.  When the panel’s lid is removed, it is still possible to access the panel’s authorised user control, i.e. access    
 

level 2. This is done by entering the 2 1 4 3 entry code or, by turning the keyswitch to the ‘I’ position). 


For detailed information on the authorised user controls, please refer to the separate User Manual / Log Book.

3.  ‘SYSTEM FAULT’, ‘REPEATER FAULT’, ‘HEAD OUT’, ‘OPEN CIRCUIT’ and ‘SHORT CIRCUIT’ options are for fault  
 

diagnosis purposes, as detailed on pages 18 to 22.

To program coincidence (Note: This function is non-compliant with EN54-2)

1.  Press the ACCESS LEVEL THREE FUNCTIONS button until the COINCIDENCE light flashes (any pairs of zones that are already  
 

programmed for coincidence will have their Zone Fault lights lit steady).

2.  To change the coincidence configuration press the NEXT OPTION button (Fault lights for zones 1 and 2 will flash slower  
 

than COINCIDENCE light if NOT programmed for coincidence, or at the same rate if they are).

3.  If required, toggle between the two states by pressing the ENABLE/DISABLE button.
4.  Confirm your selection by pressing the NEXT OPTION button. This will move to the next pair of zones (if available).
5.  Repeat steps 3 and 4 until the process is complete.
6.  To finish the function, press the ESCAPE ACCESS button, or move onto the next programming function by pressing the    
 

ACCESS LEVEL THREE FUNCTIONS button.

LPCB APPROVED CFP ALARMSENSE 2/4/8 ZONE FIRE ALARM PANEL

INSTALLATION & MAINTENANCE MANUAL • Approved Document No. DFU7002020 Rev 4 • Page 16 of 24

SW4

SW3

SW8

SW1

SW2

SW7

SW6

SW5

     ACCESS

LEVEL THREE

  FUNCTIONS

  OPEN

CIRCUIT

DELAYS TEST

ACCESSED

TEST

 PSU

FAULT

GENERAL

 FAULT

DELAY MINUTES

0

1

2

3

CAUTION  - RISK OF EXPLOSION IF

INCORRECT TYPE OF BATTERIES FITTED.

DISPOSE OF USED BATTERIES ACCORDING

TO THE MANUFACTURERS INSTRUCTIONS.

4

NONLATCHING

5 6

7

 FAULT

OUTPUT

STATUS

SUPPLY

OK

REMOTE

 OUTPUT

   AUX

OUTPUT

STATUS

COINCIDENCE

8

REPEATER

   FAULT

 SHORT

CIRCUIT

SILENCE

INTERNAL

SOUNDER

OUTPUTS

DELAYED

SOUNDER

 STATUS

REMOTE

OUTPUT

STATUS

  GENERAL

DISABLEMENT

GENERAL

FIRE

9

10

SYSTEM

  FAULT

NEXT OPTION

CODE ENTRY(3)

ENABLE/DISABLE

LAMP TEST

CODE ENTRY(4)

CODE ENTRY(1)

CODE ENTRY(2)

ESCAPE ACCESS

SILENCE/

RESOUND

SOUNDERS

RESET

FAULT

ZONE1

ZONE4

ZONE2

ZONE3

ZONE8

ZONE7

ZONE6

ZONE5

FIRE

VR1

REMOVING THIS CIRCUIT

BOARD EXPOSES HAZARDOUS

VOLTAGES -  PLEASE REFER TO

INSTALLATION INSTRUCTIONS

WARNING

SENSITIVE TO STATIC

ELECTRICITY -  OBSERVE

PRECAUTIONS BEFORE

HANDLING

I

O

ACCESS LEVEL 2

  HEAD

OUT

DELAYS

TEST

NONLATCHING

COINCIDENCE

ACCESS

LEVEL THREE

FUNCTIONS

OPEN

CIRCUIT

SHORT

CIRCUIT

REPEATER

FAULT

SYSTEM

FAULT

SW8

CFP ALARMSENSE PANEL CONTROLS

HEAD

OUT

SOUNDER

STATUS

ACCESS LEVEL THREE FUNCTIONS button

Содержание AlarmSense CFP702-2

Страница 1: ...LPCB APPROVED CFP 2 4 8 ZONE FIRE ALARM CONTROL PANEL CFP702 2 2 Zone CFP702 2 2 Zone CFP704 2 4 Zone CFP708 2 8 Zone installation maintenance manual Approved Document No DFU7002020 Rev 4...

Страница 2: ...non latching zones delays test sounder status 16 17 Fault Diagnosis 18 Fault indications 18 Zone faults 19 Power supply faults 19 System faults 21 Repeater faults 22 Conventional sounder faults 22 Re...

Страница 3: ...lause 7 11 A delay facility selectable on a zone by zone basis is provided to delay the alarm sounders remote fire and or auxiliary outputs Test condition Clause 10 0 A zone test facility is provided...

Страница 4: ...this document A basic understanding of fire alarm system components and their use is assumed We strongly recommend that a suitably qualified and competent person is consulted in connection with the d...

Страница 5: ...of any personal electro static charge by momentarily touching any sound connection to safety earth e g a radiator Always handle PCBs by their sides and avoid touching the legs of any components PCBs s...

Страница 6: ...switched fused spur at 3 A or a 6 A Type B circuit breaker to IEC EN 60898 1 The Mains supply MUST be exclusive to the panel and be reliably earthed at the indicated earthing post Hint As an alternat...

Страница 7: ...e programmed into the panel using the Sounder Status function see Page 17 for details Also there are limitations on the number of sounders which can be used please refer to page 8 for important advice...

Страница 8: ...d supplying the panel s battery charging circuit and any output relays which may be fitted As a safe margin and to allow for these other loads the total sounder loading for the panel should not exceed...

Страница 9: ...limiting fuse which trips if one or more of the loads are shorted This affects all loads and results in appropriate faults being reported at the panel The current consumed by this output must be consi...

Страница 10: ...connected directly to this connector block and NOT to the base earth distribution post which is provided for making off zone circuit and conventional sounder circuit screens The Power Supply PCB s ea...

Страница 11: ...HR R V V 0V 1A 250 R 1A R Incoming Mains Cable This cable MUST be segregated from other cables Good quality cable glands MUST always be fitted Battery Connector CONN2 Leads supplied in the panel s acc...

Страница 12: ...lihood of incorrect connection Figure 10 Main Control PCB layout INSTALLATION MAINTENANCE MANUAL Approved Document No DFU7002020 Rev 4 Page 12 of 24 LPCB APPROVED CFP ALARMSENSE 2 4 8 ZONE FIRE ALARM...

Страница 13: ...All screens should be adequately insulated and connected between the nut and washers on the base earth distribution post see right using suitable eyed crimp connectors Do not disturb the lower nut th...

Страница 14: ...el only The programming of coincidence double knock Note This function is non compliant with EN54 2 The setting up zones for non latching operation Note This function is non compliant with EN54 2 The...

Страница 15: ...alse alarm pressing the CONTROL PANEL RESET button at access level 2 during the delay period will return the system to normal Important note If link PLK1 is fitted on the Main Control PCB see right tr...

Страница 16: ...non compliant with EN54 2 1 Press the ACCESS LEVEL THREE FUNCTIONS button until the COINCIDENCE light flashes any pairs of zones that are already programmed for coincidence will have their Zone Fault...

Страница 17: ...LEVEL THREE FUNCTIONS button To program zones into test 1 Press the ACCESS LEVEL THREE FUNCTIONS button until the TEST light flashes any zones that are already programmed for test will have their Zon...

Страница 18: ...correct this fault see page 19 section 1 1 Supply Present This light should be lit green at all times If off see power supply faults page 19 section 1 2 Power Supply Fault This light flashes yellow w...

Страница 19: ...rs this confirms there is a wiring fault 2 Refit and double check the wiring and the end of line capacitor on the zone Trace the fault with consideration for the type of fault indicated see above Note...

Страница 20: ...power supply fault will automatically be cleared Depending on battery size and the depth of discharge this may take several hours If the batteries are in poor condition they must be replaced If the b...

Страница 21: ...d System Fault lights will be cycle continuously plus the panel s internal sounder will activate Suggested action Press the panel s RESET button and if still in access level 3 the ESCAPE ACCESS button...

Страница 22: ...ulty and must be replaced 3 If a sounder circuit fault is detected correct the fault and reconnect the sounder circuit The sounder fault will automatically clear within 60 seconds Note If the sounder...

Страница 23: ...pecification on page 24 for quiescent consumption of AlarmSense devices A The total alarm current of the sounders plus any other devices connected to other alarm outputs See Zone Circuit specification...

Страница 24: ...ored for open and short circuit YES Reverse voltage DC monitoring Indicated by common fault Alarm voltage 27VDC maximum 20VDC minimum final battery voltage Sounder circuit fuses Each circuit protected...

Отзывы: