Brother MFC-8530DN Скачать руководство пользователя страница 37

1

2

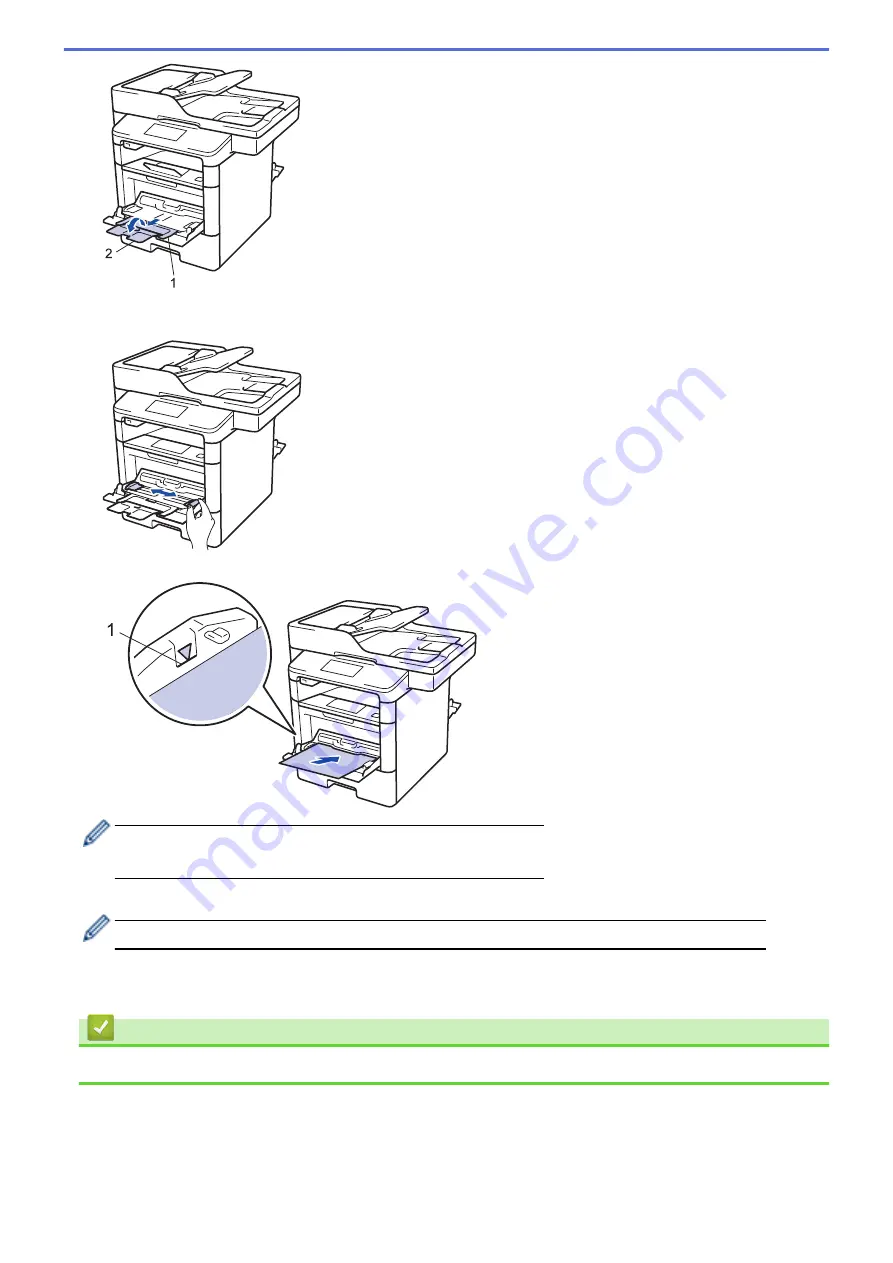
5. Slide the MP tray paper guides to fit the width of the paper that you are using. If the paper guide on the right

side has a lever, press it and slide the paper guide.

6. Load paper or labels in the MP tray.

1

Make sure the paper is below the maximum paper mark (1).

Load paper into the MP tray with the printing surface face up.

7. Send your print job to the machine.

Change your print preferences in the Print screen before sending the print job from your computer.

8. Close the paper stopper.
9. Close the back cover (the face up output tray) until it locks in the closed position.

  Related Information

Load and Print Using the Multi

purpose Tray (MP Tray)


31

Содержание MFC-8530DN

Страница 1: ...530DN MFC 8535DN MFC 8540DN CAUTION Before using this product read carefully these instructions for correct operation Keep the User s Guide in a secure place for future reference 2015 Brother Industries Ltd All rights reserved ...

Страница 2: ...nting 37 Change the Check Paper Size Setting 38 Recommended Print Media 39 Load Documents 40 Load Documents in the Automatic Document Feeder ADF 41 Load Documents on the Scanner Glass 43 Unscannable and Unprintable Areas 44 Using Special Paper 45 Print 46 Print from Your Computer Windows 47 Print a Document Windows 48 Print More Than One Page on a Single Sheet of Paper N in 1 Windows 50 Print as a...

Страница 3: ... 114 Scan to SharePoint 120 Web Services for Scanning on Your Network Windows Vista SP2 or greater Windows 7 and Windows 8 125 Change Scan Button Settings from ControlCenter4 Windows 130 Change Scan Button Settings from ControlCenter2 Macintosh 133 Configure Certificate for Signed PDF 137 Disable Scanning from Your Computer 138 Scan from Your Computer Windows 139 Scan Using ControlCenter4 Home Mod...

Страница 4: ...elephones 253 Multi line Connections PABX 258 Fax Reports 259 Print a Fax Journal 260 PC FAX 261 PC FAX for Windows 262 PC FAX for Macintosh Sending only 286 Print Data Directly from a USB Flash Drive 289 Compatible USB Flash Drives 290 Print Data Directly from a USB Flash Drive or Digital Camera Supporting Mass Storage 291 Create a PRN File for Direct Printing Windows 293 Network 294 Get Started ...

Страница 5: ...e Operation Mode in ControlCenter4 Windows 435 Scan Using ControlCenter4 Home Mode Windows 437 Scan Using ControlCenter4 Advanced Mode Windows 438 Set Up the Brother Machine Using ControlCenter4 Windows 439 Create a Custom Tab Using ControlCenter4 Advanced Mode Windows 441 ControlCenter2 Macintosh 443 Scan Using ControlCenter2 Macintosh 444 Set Up the Brother Machine Using ControlCenter2 Macintosh...

Страница 6: ...m Unit 503 Clean the Machine 506 Clean the Scanner 508 Clean the Touchscreen LCD 509 Clean the Corona Wire 510 Clean the Drum Unit 512 Clean the Paper Pick up Rollers 515 Check the Remaining Life of Parts 517 Pack and Ship Your Machine 518 Machine Settings 520 Change Machine Settings from the Control Panel 521 In the Event of Power Failure Memory Storage 522 General Settings 523 Save Your Favourit...

Страница 7: ...Home Before You Use Your Brother Machine Before You Use Your Brother Machine Applicable Models Definitions of Notes Trademarks Important Note 1 ...

Страница 8: ...ore You Use Your Brother Machine Applicable Models Applicable Models This User s Guide applies to the following models MFC 8530DN MFC 8535DN MFC 8540DN Related Information Before You Use Your Brother Machine 2 ...

Страница 9: ...f product functionality NOTE NOTE specifies the operating environment conditions for installation or special conditions of use Tips icons indicate helpful hints and supplementary information Electrical Hazard icons alert you to possible electrical shock Fire Hazard icons alert you to the possibility of a fire Hot Surface icons warn you not to touch hot machine parts Prohibition icons indicate acti...

Страница 10: ...ed States and or other countries Wi Fi CERTIFIED Wi Fi Wi Fi Alliance Wi Fi Direct and Wi Fi Protected Access are registered trademarks of Wi Fi Alliance WPA WPA2 Wi Fi Protected Setup and Wi Fi Protected Setup logo are trademarks of Wi Fi Alliance Android Google Play and Google Chrome are trademarks of Google Inc Use of these trademarks is subject to Google Permissions Mopria is a trademark of Mo...

Страница 11: ...ws XP Home Edition Windows Server 2003 in this document represents Windows Server 2003 Windows Server 2003 x64 Edition Windows Server 2003 R2 and Windows Server 2003 R2 x64 Edition Windows Server 2008 in this document represents Windows Server 2008 and Windows Server 2008 R2 Unless otherwise specified the screens in this manual are from Windows 7 and OS X v10 9 x Screens on your computer may vary ...

Страница 12: ...achine Introduction to Your Brother Machine Before Using Your Machine Control Panel Overview Touchscreen LCD Overview How to Navigate the Touchscreen LCD Settings Screen Overview Setting the Home Screen Access Brother Utilities Windows 6 ...

Страница 13: ...ng printing from your computer However when the machine is copying or receiving a fax on paper it pauses the printing operation and then continues printing when copying or fax receiving has finished Firewall Windows If your computer is protected by a firewall and you are unable to network print network scan or PC FAX you may need to configure the firewall settings If you are using the Windows Fire...

Страница 14: ...the Touchscreen 3 Touchpanel Back Press to go back to the previous menu Home Press to return to the Home screen While the machine is in Sleep Mode the Home icon blinks Cancel Press to cancel an operation available when lit Dial Pad Numerical buttons Press the numbers on the Touchpanel to dial telephone or fax numbers and to enter the number of copies 4 Power On Off Turn the machine on by pressing ...

Страница 15: ...alled the Ready Mode screen When displayed this screen indicates that your machine is ready for the next command If Active Directory Authentication or LDAP Authentication is enabled the machine s control panel will be locked The available features vary depending on your model Function screens The Function screens provide access to features such as Fax Copy and Scan Shortcuts screen Create Shortcut...

Страница 16: ...3 Settings Press to access the Settings menu If Setting Lock has been turned on a lock icon appears on the LCD You must unlock the machine to change settings 4 Fax mode setting Press to change the Fax receive mode The machine will transfer the received fax data to the designated computer and the fax data will not remain in your machine in the PC Fax mode Machine will print received faxes if you tu...

Страница 17: ...he number of new faxes you received into the memory appears at the top of the screen Warning icon The warning icon appears when there is an error or maintenance message press to view it and then press to return to Ready Mode NOTE This product adopts the font of ARPHIC TECHNOLOGY CO LTD Related Information Introduction to Your Brother Machine 11 ...

Страница 18: ...ample the LCD Backlight setting is changed from Light to Med IMPORTANT DO NOT press the LCD with a sharp object such as a pen or stylus It may damage the machine NOTE DO NOT touch the LCD immediately after plugging in the power cord or turning on the machine Doing this may cause an error 1 Press Settings 2 Press All Settings 3 Swipe up or down or press a or b to display the General Setup option an...

Страница 19: ...6 Press Med 7 Press Related Information Introduction to Your Brother Machine 13 ...

Страница 20: ...ccess the Toner menu 2 Network For wired network models Press to set up a network connection 3 Date Time Displays the date and time set on the machine Press to access the Date Time menu 4 Screen Settings Press to access the Screen Settings menu 5 All Settings Press to access a menu of all machine settings 6 Tray Setting Press to change the paper size and paper type settings 7 Fax Preview Display t...

Страница 21: ...tcuts 5 Shortcuts 6 Shortcuts 7 or Shortcuts 8 When the machine is idle or you press the Touchscreen will return to the screen you set 1 Press Settings Screen Settings Home Screen 2 Swipe up or down or press a or b to display the screen settings and then press the setting you want 3 Press The machine will go to your chosen Home screen Related Information Introduction to Your Brother Machine 15 ...

Страница 22: ...erver 2008 R2 Click Start All Programs Brother Brother Utilities Windows 8 and Windows Server 2012 Tap or click Brother Utilities either on the Start screen or the desktop Windows 8 1 and Windows Server 2012 R2 Move your mouse to the lower left corner of the Start screen and click if you are using a touch based device swipe up from the bottom of the Start screen to bring up the Apps screen When th...

Страница 23: ...Related Information Introduction to Your Brother Machine Uninstall the Brother Software and Drivers Windows 17 ...

Страница 24: ...tilities either on the Start screen or the desktop Windows 8 1 and Windows Server 2012 R2 Move your mouse to the lower left corner of the Start screen and click if you are using a touch based device swipe up from the bottom of the Start screen to bring up the Apps screen When the Apps screen appears tap or click Brother Utilities 2 Click the drop down list and then select your model name if not al...

Страница 25: ...Home Paper Handling Paper Handling Load Paper Paper Settings Recommended Print Media Load Documents Unscannable and Unprintable Areas Using Special Paper 19 ...

Страница 26: ...Home Paper Handling Load Paper Load Paper Load and Print Using the Paper Tray Load and Print Using the Multi purpose Tray MP Tray 20 ...

Страница 27: ... Print Using the Paper Tray Load and Print Using the Paper Tray Load Plain Paper Letterhead Coloured Paper Thin Paper and Recycled Paper in the Paper Tray Load Thick Paper in the Paper Tray Printing Problems Error and Maintenance Messages 21 ...

Страница 28: ...d paper type settings if needed following the LCD instructions When you load a different size and type of paper in the tray you must change the Paper Size and Paper Type settings in the machine or on your computer also 1 Pull the paper tray completely out of the machine 2 Press and slide the paper guides to fit the paper Press the green release levers to slide the paper guides 3 Fan the stack of p...

Страница 29: ...r tray at the same time Doing this may cause the paper to jam or misfeed When you use Letterhead or Preprinted paper for 2 sided printing change the machine s setting by completing the following step Press Settings All Settings Printer 2 sided Single Image 2 sided Feed 5 Make sure the paper is below the maximum paper mark b b b Overfilling the paper tray will cause paper jams 6 Slowly push the pap...

Страница 30: ...7 Lift the support flap to prevent paper from sliding off the output tray Related Information Load and Print Using the Paper Tray 24 ...

Страница 31: ...wing the LCD instructions When you load a different size and type of paper in the tray you must change the Paper Size and Paper Type settings in the machine or on your computer also 1 Pull the paper tray completely out of the machine 2 Press and slide the paper guides to fit the paper Press the green release levers to slide the paper guides 3 Fan the stack of paper well 4 Load paper in the paper t...

Страница 32: ...achine s back cover the face up output tray 8 Open the paper stopper 9 Send your print job to the machine Change your print preferences in the Print dialog box before sending the print job from your computer 10 Close the paper stopper 11 Close the back cover the face up output tray until it locks in the closed position Related Information Load and Print Using the Paper Tray 26 ...

Страница 33: ...en envelopes letterhead coloured paper thin paper thick paper thicker paper recycled paper Bond paper labels or up to 50 sheets of plain paper in the MP tray Load Paper in the Multi purpose Tray MP Tray Load and Print Thick Paper and Labels Using the MP Tray Load and Print on Envelopes Using the MP Tray Printing Problems Error and Maintenance Messages 27 ...

Страница 34: ...u must change the Paper Size and Paper Type settings in the machine or on your computer also 1 Lift the support flap to prevent paper from sliding off the face down output tray 2 Open the MP tray and lower it gently 3 Pull out the MP tray support 1 and unfold the flap 2 1 2 4 Slide the MP tray paper guides to fit the width of the paper you are using If the paper guide on the right side has a lever...

Страница 35: ... Orientation for Letterhead and Preprinted Paper For 1 sided printing face up top edge first For automatic 2 sided printing long edge binding face down bottom edge first When you use Letterhead or Preprinted paper for 2 sided printing change the machine s setting by completing the following step Press Settings All Settings Printer 2 sided Single Image 2 sided Feed Related Information Load and Prin...

Страница 36: ...rom the MP tray through to the back of the machine Use this paper feed and output method when you print on thick paper or labels When you load a different size and type of paper in the tray you must change the Paper Size and Paper Type settings in the machine or on your computer also 1 Open the machine s back cover the face up output tray 2 Open the paper stopper 3 On the front of the machine open...

Страница 37: ...e paper is below the maximum paper mark 1 Load paper into the MP tray with the printing surface face up 7 Send your print job to the machine Change your print preferences in the Print screen before sending the print job from your computer 8 Close the paper stopper 9 Close the back cover the face up output tray until it locks in the closed position Related Information Load and Print Using the Multi...

Страница 38: ...press the corners and sides of the envelopes to make them as flat as possible When you load a different size and type of paper in the tray you must change the Paper Size and Paper Type settings in the machine or on your computer also 1 Open the machine s back cover the face up output tray 2 Open the paper stopper 3 On the front of the machine open the MP tray and lower it gently 4 Pull out the MP ...

Страница 39: ...o 10 envelopes in the MP tray with the printing surface face up Make sure the envelopes are below the maximum paper mark 1 Loading more than 10 envelopes may cause paper jams 7 Send your print job to the machine Change your print preferences in the Print dialog box before sending the print job from your computer Settings Options for Envelopes Paper Size Com 10 DL C5 Monarch Media Type Envelopes En...

Страница 40: ...8 Close the paper stopper 9 Close the back cover the face up output tray until it locks in the closed position Related Information Load and Print Using the Multi purpose Tray MP Tray 34 ...

Страница 41: ...Home Paper Handling Paper Settings Paper Settings Change the Paper Size and Paper Type Select the Tray to Be Used For Printing Change the Check Paper Size Setting 35 ...

Страница 42: ...n or press a or b to display the paper tray options and then press the option you want 3 Swipe up or down or press a or b to display the paper type options and then press the option you want 4 Press 5 Swipe up or down or press a or b to display the Paper Size option and then press Paper Size 6 Swipe up or down or press a or b to display the paper tray options and then press the option you want 7 S...

Страница 43: ... until it is empty and then from Tray 1 4 Press When you make a copy using the ADF and give priority to multiple trays the machine looks for the tray with the most suitable paper and pulls paper from that tray When you make a copy using the scanner glass your document is copied from the higher priority tray even if more suitable paper is in another paper tray MFC models Use the following sizes of ...

Страница 44: ...machine s Check Size setting the machine displays a message when you remove a paper tray or load paper using the MP tray asking if you changed the paper size and paper type The default setting is On 1 Press Settings All Settings General Setup Tray Setting Check Size 2 Press On or Off 3 Press Related Information Paper Settings 38 ...

Страница 45: ...mmended Print Media To get the best print quality we recommend using the paper listed in the table Paper Type Item Plain Paper APP Blue Flag Ship 70 g m2 APP Gold Flag Ship 80 g m2 Advanced Agro Double A 80 g m2 Related Information Paper Handling 39 ...

Страница 46: ...ad Documents Load Documents You can send a fax make copies and scan from the Automatic Document Feeder ADF and from the scanner glass Load Documents in the Automatic Document Feeder ADF Load Documents on the Scanner Glass 40 ...

Страница 47: ... NOT leave thick documents on the scanner glass If you do this the ADF may jam DO NOT use paper that is curled wrinkled folded ripped stapled paper clipped pasted or taped DO NOT use cardboard newspaper or fabric To avoid damaging your machine while using the ADF DO NOT pull on the document while it is feeding Document Sizes Supported Length 147 3 to 355 6 mm Width 105 to 215 9 mm Weight 64 to 90 ...

Страница 48: ...Related Information Load Documents 42 ...

Страница 49: ...ngth Up to 300 mm Width Up to 215 9 mm Weight Up to 2 kg To use the scanner glass the ADF must be empty 1 Lift the document cover 2 Place the document on the scanner glass face down 3 Place the corner of the page in the upper left corner of the scanner glass 4 Close the document cover If the document is a book or is thick gently press on the document cover Related Information Load Documents 43 ...

Страница 50: ...ng 1 3 2 4 Do not attempt to scan copy or print into these areas your output will not reflect anything in these areas Usage Document Size Top 1 Bottom 3 Left 2 Right 4 Fax Sending Letter Legal 3 mm 4 mm A4 3 mm ADF 1 mm Scanner Glass 3 mm Copy 1 Letter Legal 4 mm 3 mm A4 4 mm 3 mm Scan Letter 3 mm 3 mm A4 3 mm Approximately 3 mm Legal Approximately 3 mm Approximately 3 mm Print Letter Legal 4 2 mm...

Страница 51: ... IMPORTANT Some types of paper may not perform well or may cause damage to your machine DO NOT use paper that is highly textured that is extremely smooth or shiny that is curled or warped that is coated or has a chemical finish that is damaged creased or folded that exceeds the recommended weight specification in this guide with tabs and staples with letterheads using low temperature dyes or therm...

Страница 52: ...Home Print Print Print from Your Computer Windows Print from Your Computer Macintosh Print One Page Duplicates on Different Types of Paper Cancel a Print Job Test Print 46 ...

Страница 53: ...ndows Print on Both Sides of the Paper Windows Print as a Booklet Windows Secure Print Windows Use a Macro from Your Computer Windows Use a Preset Print Profile Windows Change the Default Print Settings Windows Print a Document Using the BR Script3 Printer Driver PostScript 3 Language Emulation Windows Monitor the Status of the Machine from Your Computer Windows Print Settings Windows 47 ...

Страница 54: ...ize 5 In the Orientation field select the Portrait or Landscape option to set the orientation of your printout If your application contains a similar setting we recommend that you set the orientation using the application 6 Type the number of copies 1 999 you want in the Copies field 7 Click the Media Type drop down list and then select the type of paper you are using 8 To print multiple pages on ...

Страница 55: ...Related Information Print from Your Computer Windows Print Settings Windows 49 ...

Страница 56: ... select the Portrait or Landscape option to set the orientation of your printout If your application contains a similar setting we recommend that you set the orientation using the application 4 Click the Multiple Page drop down list and then select the 2 in 1 4 in 1 9 in 1 16 in 1 or 25 in 1 option 5 Click the Page Order drop down list and then select your page order 6 Click the Border Line drop d...

Страница 57: ...or preferences button The printer driver window appears 3 Click the Multiple Page drop down list and then select the 1 in 2x2 Pages 1 in 3x3 Pages 1 in 4x4 Pages or 1 in 5x5 Pages option 4 Select the Print cut out line check box if needed Print cut out line Prints a faint cut out line around the printable area so that you can easily cut it out 5 Change other printer settings if needed 6 Click OK 7...

Страница 58: ...ck the printing properties or preferences button The printer driver window appears 3 In the Orientation field select the Portrait or Landscape option to set the orientation of your printout If your application contains a similar setting we recommend that you set the orientation using the application 4 Click the 2 sided Booklet drop down list and then select the 2 sided or 2 sided Manual option Opt...

Страница 59: ...Option for Portrait Description Long Edge Left Long Edge Right Short Edge Top Short Edge Bottom Option for Landscape Description Long Edge Top Long Edge Bottom 53 ...

Страница 60: ...settings if needed 10 Do one of the following For automatic 2 sided printing click OK again and then complete your print operation For manual 2 sided printing click OK again and follow the on screen instructions If the paper is not feeding correctly it may be curled Remove the paper straighten it and put it back in the paper tray Related Information Print from Your Computer Windows Print Settings ...

Страница 61: ...ing function it is possible there may be paper jams or poor print quality 1 Select the print command in your application 2 Select Brother XXX XXXX where XXXX is the name of your model and then click the printing properties or preferences button The printer driver window appears 3 In the Orientation field select the Portrait or Landscape option to set the orientation of your printout If your applic...

Страница 62: ...re of the smaller individual booklet sets without having to change the order of the printed pages You can specify the number of sheets in each smaller booklet set from 1 15 This option can be helpful when folding a printed booklet that has a large number of pages 8 Select the Binding Offset check box if you want to specify the offset for binding in inches or millimetres 9 Click OK 10 Change other ...

Страница 63: ...Print check box 6 Type your four digit password in the Password field and then click OK You must set a separate password for each document 7 Click OK 8 Complete your print operation 9 On the machine s control panel swipe left or right or press d or c to display the Secure Print option and then press Secure Print 10 Swipe up or down or press a or b to display user names and then press your user nam...

Страница 64: ...ton 7 Enter Macro ID and Macro Name you want to use 8 Select Insert Macro Command 9 Select the page to overlay the macro data Option Description All Pages Lets you insert the macro onto all pages Page Lets you insert the macro onto a specific page Select this option and then enter a page number within the range 1 to 255 Add to Top of Page Send the macro data to the top of the page Add to End of Pa...

Страница 65: ...nces button The printer driver window appears 3 Click the Print Profiles tab 4 Select your profile from the print profile list The profile settings are shown on the left side of the printer driver window 5 Do one of the following If the settings are correct for your print job click OK To change the settings go back to the Basic or Advanced tab change settings and then click OK To display the Print...

Страница 66: ... Create or Delete Your Print Profile Windows Print Settings Windows 60 ...

Страница 67: ...d tab and configure the print settings you want for the new Print Profile 4 Click the Print Profiles tab 5 Do one of the following To create a new print profile a Click Add Profile The Add Profile dialog box appears b Type the new profile name in the Name field c Click the icon you want to use to represent this profile from the icon list d Click OK The new Print Profile name is added to the list i...

Страница 68: ... group click View devices and printers For Windows Server 2012 Move your mouse to the lower right corner of your desktop When the menu bar appears click Settings and then click Control Panel In the Hardware group click View devices and printers For Windows Server 2012 R2 Click Control Panel on the Start screen In the Hardware group click View devices and printers 2 Right click the Brother XXX XXXX...

Страница 69: ...rol Panel In the Hardware and Sound group click View devices and printers For Windows Server 2012 Move your mouse to the lower right corner of your desktop When the menu bar appears click Settings and then click Control Panel In the Hardware group click View devices and printers For Windows Server 2012 R2 Click Control Panel on the Start screen In the Hardware group click View devices and printers...

Страница 70: ...CD ROM select Custom in Select Machine section and then check PS Driver check box 1 Select the print command in your application 2 Select Brother XXX XXXX BR Script3 where XXXX is the name of your model and then click the printing properties or preferences button The printer driver window appears 3 Click the Layout Paper Quality or Secure Print tab to change basic print settings Click the Layout o...

Страница 71: ...s and then click the drop down list and select your model name if not already selected Click Tools in the left navigation bar and then click Status Monitor Windows 8 1 Move your mouse to the lower left corner of the Start screen and click if you are using a touch based device swipe up from bottom of the Start screen to bring up the Apps screen When the Apps screen appears tap or click Brother Util...

Страница 72: ...pies Type the number of copies 1 999 that you want to print in this field Collate Select this option to print sets of multi page documents in the original page order When this option is selected one complete copy of your document will print and then reprint according to the number of copies you choose If this option is not selected then each page will print according to the number of copies chosen...

Страница 73: ...rent from the fills and patterns you see on your computer screen Improve Thin Line Select this option to improve the image quality of thin lines Use System Halftone Select this option to use Windows to express halftones TrueType Mode Mode Select how the fonts are processed for printing 7 Multiple Page Select this option to print multiple pages on a single sheet of paper or print one page of your d...

Страница 74: ...he document pages to fit a specified paper size When you select this option select the paper size you want from the drop down list Free Select this option to enlarge or reduce the document pages manually When you select this option type a value into the field 2 Reverse Print Select this option to rotate the printed image 180 degrees 3 Use Watermark Select this option to print a logo or text on you...

Страница 75: ...u have stored in your machine s memory as an overlay on the print job Density Adjustment Specify the print density Improve Print Output Select this option to reduce the amount of paper curling and improve the toner fixing Skip Blank Page Select this option to allow the printer driver to automatically detect blank pages and exclude them from printing Print Text in Black Select this option when you ...

Страница 76: ... on Both Sides of the Paper Macintosh Print More Than One Page on a Single Sheet of Paper N in 1 Macintosh Secure Print Macintosh Print a Document Using the BR Script3 Printer Driver PostScript 3 language emulation Macintosh Monitor the Status of the Machine from Your Computer Macintosh Print Options Macintosh 70 ...

Страница 77: ...he number of copies you want in the Copies field 5 Click the Paper Size pop up menu and then select your paper size 6 Select the Orientation option that matches the way you want the document to print 7 Click the application pop up menu and then select Print Settings The Print Settings options appear 8 Click the Media Type pop up menu and then select the type of paper you are using 9 Change other p...

Страница 78: ...ollowing a Click the application pop up menu and then select Layout The Layout setting options appear b In the Two Sided section select the Short Edge binding or Long Edge binding option c Change other printer settings if needed d Click Print 5 For manual 2 sided printing do the following a Click the application pop up menu and then select Paper Handling The Paper Handling options appear b In the ...

Страница 79: ...Related Information Print from Your Computer Macintosh Print Options Macintosh 73 ...

Страница 80: ...Brother XXX XXXX where XXXX is your model name 3 Click the application pop up menu and then select Layout The Layout setting options appear 4 Click the Pages per Sheet pop up menu and then select the number of pages to print on each sheet 5 Select the Layout Direction option 6 Click the Border pop up menu and then select your border line type 7 Change other printer settings if needed 8 Click Print...

Страница 81: ...ptions appear 4 Select the Secure Print check box 5 Type your user name job name and a four digit password 6 Click Print 7 On the machine s control panel swipe left or right or press d or c to display the Secure Print option and then press Secure Print 8 Swipe up or down or press a or b to display user names and then press your user name The LCD displays the list of secured jobs for your name 9 Sw...

Страница 82: ...n your Macintosh 1 Make sure you have loaded the correct size paper in the paper tray 2 From an application such as Apple TextEdit click the File menu and then select Print 3 Select your machine 4 Type the number of copies you want in the Copies field 5 Click the Paper Size pop up menu and then select your paper size 6 Select the Orientation option that matches the way you want the document to pri...

Страница 83: ...tility button Status Monitor starts Troubleshooting Click the Troubleshooting button to access the troubleshooting website Visit the Genuine Supplies website Click the Visit the Genuine Supplies website button for more information on Brother genuine supplies Updating the machine s status To view the latest machine status while the Status Monitor window is open click the icon You can set the interv...

Страница 84: ... Printing Problems 78 ...

Страница 85: ...ither choose from standard paper sizes or create a custom paper size 2 Orientation Select the orientation portrait or landscape of your printout If your application contains a similar setting we recommend that you set the orientation using the application 3 Scale Type a value into the field to enlarge or reduce the pages in your document to fit the selected paper size 79 ...

Страница 86: ...rder Select the type of border to use when printing multiple pages on a single sheet of paper 4 Two Sided MFC 8530DN MFC 8535DN MFC 8540DN Select whether to print on both sides of the paper 5 Reverse page orientation Select this option to rotate the printed image 180 degrees 6 Flip horizontally Select this option to reverse the printed image on the page horizontally from left to right 80 ...

Страница 87: ...es to Print Select which pages you want to print even pages or odd pages 3 Page Order Select the page order 4 Scale to fit paper size Select this option to enlarge or reduce the pages in your document to fit the selected paper size 5 Destination Paper Size Select the paper size to print on 6 Scale down only Select this option if you want to reduce the pages in your document when they are too large...

Страница 88: ...or purpose 4 Advanced Toner Save Mode Select this feature to conserve toner by using less toner to print documents printouts appear lighter but are still legible Graphics Quality Select either Graphics or Text for the best print quality based on the type of document you are printing Improve Print Output Select this option to reduce the amount of paper curling and improve the toner fixing Density A...

Страница 89: ...e documents do not print until you enter a password on the machine s control panel Related Information Print from Your Computer Macintosh Print a Document Macintosh Print on Both Sides of the Paper Macintosh Print More Than One Page on a Single Sheet of Paper N in 1 Macintosh 83 ...

Страница 90: ...achine will always make copies automatically Windows The carbon copy function also allows you to select a different printing macro for each page 1 Press Settings All Settings Printer Carbon Menu Carbon Copy On 2 Swipe up or down or press a or b to display the Copies option and then press the Copies option 3 Enter the number of copies you want and then press OK 4 Swipe up or down or press a or b to...

Страница 91: ...Home Print Cancel a Print Job Cancel a Print Job 1 Press To cancel multiple print jobs press and hold for about four seconds Related Information Print Printing Problems 85 ...

Страница 92: ...est Print If there are problems with print quality follow these instructions to do a test print 1 Press Settings All Settings Printer Print Options Test Print Yes 2 Press Related Information Print Improve the Print Quality 86 ...

Страница 93: ...Home Scan Scan Scan Using the Scan Button on Your Brother Machine Scan from Your Computer Windows Scan from Your Computer Macintosh Configure Scan Settings Using Web Based Management 87 ...

Страница 94: ...le Text File OCR Scan to Email Attachment Send Scanned Data to an Email Server Scan to FTP Scan to SSH FTP SFTP Scan to Network Windows Scan to SharePoint Web Services for Scanning on Your Network Windows Vista SP2 or greater Windows 7 and Windows 8 Change Scan Button Settings from ControlCenter4 Windows Change Scan Button Settings from ControlCenter2 Macintosh Configure Certificate for Signed PDF...

Страница 95: ...e network swipe up or down or press a or b to display the computer where you want to send data and then press the computer name If the LCD prompts you to enter a PIN for the computer enter the four digit PIN on the LCD and then press OK 7 Do one of the following To change the scan settings press Options and then go to the next step To use the default scan settings press Start The machine starts sc...

Страница 96: ...e Background Colour available only for the Colour and Grey options To save the settings as a shortcut press Save as Shortcut 10 Press OK 11 Press Start The machine starts scanning If you are using the machine s scanner glass follow the Touchscreen instructions to complete the scanning job Related Information Scan Using the Scan Button on Your Brother Machine Change Scan Button Settings from Contro...

Страница 97: ... the network swipe up or down or press a or b to display the computer where you want to send data and then press the computer name If the LCD prompts you to enter a PIN for the computer enter the four digit PIN on the LCD and then press OK 7 Do one of the following To change the scan settings press Options and then go to the next step To use the default scan settings press Start The machine starts...

Страница 98: ... Colour available only for the Colour and Grey options To save the settings as a shortcut press Save as Shortcut 10 Press OK 11 Press Start The machine starts scanning If you are using the machine s scanner glass follow the Touchscreen instructions to complete the scanning job Related Information Scan Using the Scan Button on Your Brother Machine Change Scan Button Settings from ControlCenter4 Win...

Страница 99: ...ions To set your own default settings after making changes to settings press the Set New Default option and then press Yes To restore the factory settings press Factory Reset and then press Yes Press Start to start scanning without changing additional settings 5 To scan both sides of the document MFC 8540DN Press 2 sided Scan and then select the document type Option Description 2 sided Scan Long E...

Страница 100: ...f you are using the machine s scanner glass follow the Touchscreen instructions to complete the scanning job IMPORTANT The LCD displays a message while reading the data DO NOT unplug the power cord or remove the USB flash drive from the machine while it is reading the data You could lose your data or damage the USB flash drive Related Information Scan Using the Scan Button on Your Brother Machine ...

Страница 101: ... 5 Press to OCR 6 If the machine is connected over the network swipe up or down or press a or b to display the computer where you want to send data and then press the computer name If the LCD prompts you to enter a PIN for the computer enter the four digit PIN on the LCD and then press OK 7 Do one of the following To change the scan settings press Options and then go to the next step To use the de...

Страница 102: ... Colour available only for the Colour and Grey options To save the settings as a shortcut press Save as Shortcut 10 Press OK 11 Press Start The machine starts scanning If you are using the machine s scanner glass follow the Touchscreen instructions to complete the scanning job Related Information Scan Using the Scan Button on Your Brother Machine Change Scan Button Settings from ControlCenter4 Win...

Страница 103: ...to the middle of the Touchscreen and is highlighted in blue 5 Press to E mail 6 If the machine is connected over the network swipe up or down or press a or b to display the computer where you want to send data and then press the computer name If the LCD prompts you to enter a PIN for the computer enter the four digit PIN on the LCD and then press OK 7 Do one of the following To change the scan set...

Страница 104: ...e Background Colour available only for the Colour and Grey options To save the settings as a shortcut press Save as Shortcut 10 Press OK 11 Press Start The machine starts scanning If you are using the machine s scanner glass follow the Touchscreen instructions to complete the scanning job Related Information Scan Using the Scan Button on Your Brother Machine Change Scan Button Settings from Contro...

Страница 105: ... Server The icon moves to the middle of the Touchscreen and is highlighted in blue 5 Press to E mail Server 6 Do one of the following to enter the destination email address To enter the email address manually press Manual and then enter the email address using the keyboard on the LCD When finished press OK If the email address is stored in the machine s address book press Address Book and then sel...

Страница 106: ... Background Colour available only for the Colour and Grey options To save the settings as a shortcut press Save as Shortcut This function may not be available depending on your machine conditions 11 Press OK 12 Press Start The machine starts scanning If you are using the machine s scanner glass follow the Touchscreen instructions to complete the scanning job Related Information Scan Using the Scan...

Страница 107: ...TP Scan to FTP Scan documents directly to an FTP server when you need to share the scanned information For added convenience configure different profiles to save your favourite Scan to FTP destinations Set up a Scan to FTP Profile Upload Scanned Data to an FTP Server 101 ...

Страница 108: ...nabled in whichever browser you use If a different web browser is used make sure it is compatible with HTTP 1 0 and HTTP 1 1 1 Start your web browser Type http machine s IP address in your browser s address bar where machine s IP address is the IP address of the machine or the print server name For example http 192 168 1 2 No password is required by default If you have previously set a password ty...

Страница 109: ...ser name up to 32 characters that has permission to write data to the FTP server 10 In the Password field type the password up to 32 characters associated with the user name you entered in the Username field Type the password again in the Retype password field 11 In the Store Directory field type the path to the folder on the FTP server where you want to send your scanned data Do not type a slash ...

Страница 110: ...ize from the list This is necessary to make sure the scanned file is the correct size 16 Click the File Size drop down list and then select your file size from the list 17 Click the Remove Background Color drop down list and then select the level from the list You can use this feature to remove the background colour of documents to make the scanned data more legible 18 Set the Passive Mode option ...

Страница 111: ...FTP server profiles you have set up using Web Based Management are listed Swipe up or down or press a or b to select one of the FTP server profiles listed and then press the profile you want If the profile is not complete for example if the logon account name and password are missing or if the quality or file type is not specified you will be prompted to enter any missing information 7 Press Start...

Страница 112: ... version of an FTP server For added convenience configure different profiles to save your favourite Scan to SFTP destinations Set up a Scan to SFTP Profile Create a Client Key Pair Using Web Based Management Export a Client Key Pair Using Web Based Management Import a Server Public Key Using Web Based Management Upload Scanned Data to an SFTP Server 106 ...

Страница 113: ...ys enabled in whichever browser you use If a different web browser is used make sure it is compatible with HTTP 1 0 and HTTP 1 1 1 Start your web browser Type http machine s IP address in your browser s address bar where machine s IP address is the IP address of the machine or the print server name For example http 192 168 1 2 No password is required by default If you have previously set a passwor...

Страница 114: ... address for example 192 23 56 189 9 In the Username field type the user name up to 32 characters that has permission to write data to the SFTP server 10 In the Auth Method field select Password or Public Key 11 Do one of the following When you select Password type the password up to 32 characters associated with the user name you typed in the Username field Type the password again in the Retype p...

Страница 115: ... drop down list and then select the file type you want to use for the scanned document If you choose the User Select option the machine will prompt users to select a setting each time they use the scan profile 17 Click the Document Size drop down list and then select your document size from the list This is necessary to make sure the scanned file is the correct size 18 Click the File Size drop dow...

Страница 116: ...http brnxxxxxxxxxxxx The NetBIOS name can be found in the Network Configuration Report For Macintosh access Web Based Management by clicking the machine s icon on the Status Monitor screen 3 No password is required by default Type a password if you have set one and then click 4 Click the Network tab 5 Click the Security tab 6 Click Client Key Pair in the left navigation bar 7 Click Create New Clie...

Страница 117: ...r example http SharedPrinter If you enable a NetBIOS name you can also use the node name For example http brnxxxxxxxxxxxx The NetBIOS name can be found in the Network Configuration Report For Macintosh access Web Based Management by clicking the machine s icon on the Status Monitor screen 3 No password is required by default Type a password if you have set one and then click 4 Click the Network ta...

Страница 118: ...f the IP address For example http SharedPrinter If you enable a NetBIOS name you can also use the node name For example http brnxxxxxxxxxxxx The NetBIOS name can be found in the Network Configuration Report For Macintosh access Web Based Management by clicking the machine s icon on the Status Monitor screen 3 No password is required by default Type a password if you have set one and then click 4 C...

Страница 119: ...er profiles you have set up using Web Based Management are listed Swipe up or down or press a or b to select one of the SFTP server profiles listed and then press the profile you want If the profile is not complete for example if the logon account name and password are missing or if the quality or file type is not specified you will be prompted to enter any missing information 7 Press Start The ma...

Страница 120: ...Windows Scan to Network Windows Scan documents directly to a CIFS server on your local network For added convenience you can configure different profiles to save your favourite Scan to Network destinations Set up a Scan to Network Profile Upload Scanned Data to a CIFS Server 114 ...

Страница 121: ...abled in whichever browser you use If a different web browser is used make sure it is compatible with HTTP 1 0 and HTTP 1 1 1 Start your web browser Type http machine s IP address in your browser s address bar where machine s IP address is the IP address of the machine or the print server name For example http 192 168 1 2 No password is required by default If you have previously set a password typ...

Страница 122: ...anned document will be the file name prefix you select followed by the last six digits of the flatbed ADF scanner counter and the file extension for example Estimate_098765 pdf 10 Click the Quality drop down list and then select a quality setting If you choose the User Select option the machine will prompt users to select a setting each time they use the scan profile 11 Click the File Type drop do...

Страница 123: ...work Folder Path field If the user name is part of a domain enter the user name in one of the following styles user domain domain user 19 In the Password field type the password up to 32 characters associated with the user name you entered in the Username field Type the password again in the Retype password field 20 To set the Kerberos Server Address manually in the Kerberos Server Address field t...

Страница 124: ... 1 Start your web browser Type http machine s IP address in your browser s address bar where machine s IP address is the IP address of the machine or the print server name For example http 192 168 1 2 No password is required by default If you have previously set a password type it and then press 2 Click the Administrator tab 3 Click the Date Time menu in the left navigation bar 4 In the Date field...

Страница 125: ...Press to Network 6 Swipe up or down or press a or b to select one of the network server profiles listed and then press the profile you want If the profile is not complete for example if the logon account name and password are missing or if the quality or file type is not specified you will be prompted to enter any missing information 7 Press Start The machine starts scanning If you are using the m...

Страница 126: ...arePoint Scan documents directly to a SharePoint server when you need to share the scanned information For added convenience configure different profiles to save your favourite Scan to SharePoint destinations Set up a Scan to SharePoint Profile Upload Scanned Data to a SharePoint Server 120 ...

Страница 127: ...s are always enabled in whichever browser you use If a different web browser is used make sure it is compatible with HTTP 1 0 and HTTP 1 1 1 Start your web browser Type http machine s IP address in your browser s address bar where machine s IP address is the IP address of the machine or the print server name For example http 192 168 1 2 No password is required by default If you have previously set...

Страница 128: ...px 9 Click the File Name drop down list and then select a file name prefix from the preset names provided or from user defined names The file name used for the scanned document will be the file name prefix you select followed by the last six digits of the flatbed ADF scanner counter and the file extension for example Estimate_098765 pdf 10 Click the Quality drop down list and then select a quality...

Страница 129: ...t Auto NTLMv2 Kerberos or Basic from the Auth Method menu If you choose Auto the authentication method will be detected automatically 18 In the Username field type the user name up to 96 characters that has permission to write data to the folder specified in the SharePoint Site Address field If the user name is part of a domain enter the user name in one of the following styles user domain domain ...

Страница 130: ...server profiles you have set up using Web Based Management are listed Swipe up or down or press a or b to select one of the SharePoint server profiles listed and then press the profile you want If the profile is not complete for example if the logon account name and password are missing or if the quality or file type is not specified you will be prompted to enter any missing information 7 Press St...

Страница 131: ... and Windows 8 The Web Services protocol enables Windows Vista SP2 or greater Windows 7 and Windows 8 users to scan using a Brother machine on the network You must install the driver via Web Services Use Web Services to Install Drivers Used for Scanning Windows Vista Windows 7 and Windows 8 Scan Using Web Services from the Brother Machine Windows Vista SP2 or greater Windows 7 and Windows 8 Config...

Страница 132: ...on Right click the machine you want to install Windows 7 Click Start Control Panel Network and Internet View network computers and devices The machine s Web Services Name appears with the printer icon Right click the machine you want to install Windows 8 Move your mouse to the lower right corner of your desktop When the menu bar appears click Settings Change PC settings Devices Add a device The ma...

Страница 133: ...Related Information Web Services for Scanning on Your Network Windows Vista SP2 or greater Windows 7 and Windows 8 127 ...

Страница 134: ... with spaces if the language settings of your OS and your Brother machine are different 1 Load your document 2 Press Scan 3 Swipe left or right to display WS Scan 4 Press WS Scan The icon moves to the middle of the Touchscreen and is highlighted in blue 5 Press WS Scan 6 Swipe up or down or press a or b to display the scan options and then press the type of scan 7 Swipe up or down or press a or b ...

Страница 135: ...ofiles button The Scan Profiles dialog box appears Windows 7 and Windows 8 Right click the machine icon and then select Scan profiles The Scan Profiles dialog box appears 3 Select the scan profile you want to use 4 Make sure the scanner selected in the Scanner list is a Brother machine that supports Web Services for scanning and then click the Set as Default button 5 Click Edit The Edit Default Pr...

Страница 136: ...s from ControlCenter4 Windows 1 Click the ControlCenter4 icon in the task tray and then click Open 2 Click the Device Settings tab 3 Click the Device Scan Settings button The Device Scan Settings dialog box appears 4 Click the tab for the Scan to action you want to change Image OCR E mail or File 5 Change the settings as needed 6 Click OK 130 ...

Страница 137: ...rd Scan Yes Yes Yes Yes Default Yes Yes Yes Yes File Type Select the file type you want to use for the scanned data Target Application Select the destination application from the drop down list OCR Language Set the OCR language to match the language of the scanned document s text File Name Click Change to change the file name s prefix Destination Folder Click the folder icon to browse and select t...

Страница 138: ... the scanned image will be divided into two A5 size documents Brightness Set the Brightness level by dragging the slider to the right or left to lighten or darken the image If the scanned image is too light set a lower brightness level and scan the document again If the image is too dark set a higher brightness level and scan the document again You can also type a value into the field to set the B...

Страница 139: ...nu bar click Go Applications Brother and then double click the ControlCenter icon The ControlCenter2 screen appears 2 Hold the control key on your keyboard and click the scan destination Image OCR E mail or File whose settings you want to change 3 Click the Device Button tab The settings for the scan destination that you selected appear The following example shows the Scan to Image settings 133 ...

Страница 140: ...arget Application E mail Application Select which application is used to open scanned data Only applications installed on your computer can be selected Add Add an application to the pop up menu Type the application name in the Application Name field up to 30 characters and select your preferred application by clicking the Browse button Select the File Type option from the pop up menu Delete Delete...

Страница 141: ...emory and has the longest transfer time Auto Use for any type of document This mode automatically picks an appropriate colour depth for the document Document Size Select the exact size of your document from the Document Size pop up menu If you select 1 to 2 A4 the scanned image will be divided into two A5 size documents ID Card Scan Select this check box to scan both sides of an identification car...

Страница 142: ...e numbers of total pages saved and blank pages skipped on your computer screen MFC 8540DN Restore Defaults Select this option to restore all settings to their factory setting values Related Information Scan Using the Scan Button on Your Brother Machine Scan Photos and Graphics Save Scanned Data to a Folder as a PDF File Scan to an Editable Text File OCR Scan to Email Attachment 136 ...

Страница 143: ... your computer 1 Start your web browser Type http machine s IP address in your browser s address bar where machine s IP address is the IP address of the machine or the print server name For example http 192 168 1 2 No password is required by default If you have previously set a password type it and then press 2 Click the Administrator tab 3 Click the Signed PDF menu in the left navigation bar The ...

Страница 144: ...http machine s IP address in your browser s address bar where machine s IP address is the IP address of the machine or the print server name For example http 192 168 1 2 No password is required by default If you have previously set a password type it and then press 2 Click the Scan tab 3 Click the Scan from PC menu in the left navigation bar 4 In the Pull Scan field click Disabled 5 Click Submit R...

Страница 145: ...d documents on your Brother machine Use the software applications provided by Brother or use your favourite scanning application Scan Using ControlCenter4 Home Mode Windows Scan Using ControlCenter4 Advanced Mode Windows Scan Using Presto PageManager or Other Windows Applications Scan Using Windows Photo Gallery or Windows Fax and Scan 139 ...

Страница 146: ...Use ControlCenter4 Home Mode to access your machine s main features Scan Using ControlCenter4 Home Mode Windows Save Scanned Data to a Folder as a PDF File Using ControlCenter4 Home Mode Windows Scan Both Sides of a Document Automatically Using ControlCenter4 Home Mode Windows Scan Settings for ControlCenter4 Home Mode Windows 140 ...

Страница 147: ...t the Document Type 5 Change the document s Scan Size if needed 6 Click Scan The machine starts scanning and the scanned image appears in the image viewer 7 Click the left or right arrow buttons to preview each scanned page 8 Crop the scanned image if needed 9 Do one of the following Click Save to save scanned data Click Print to print scanned data Click Open with an Application to open scanned da...

Страница 148: ...ype Using ControlCenter4 Home Mode Windows Change Scan Size Using ControlCenter4 Home Mode Windows Crop a Scanned Image Using ControlCenter4 Home Mode Windows Print Scanned Data Using ControlCenter4 Home Mode Windows Scan to an Application Using ControlCenter4 Home Mode Windows 142 ...

Страница 149: ... Mode Windows Select the Document Type option that matches the type of original you want to scan Option Description Photo 600 x 600 dpi 24bit Color Text and Graph 300 x 300 dpi 24bit Color Monochrome Text 200 x 200 dpi Black White Custom 300 x 300 dpi 24bit Color as default Select the scan settings you want from the Custom Settings button Related Information Scan Using ControlCenter4 Home Mode Win...

Страница 150: ...me but produce a finer scanned image Scan Type Select from a range of scan colour depths Auto Use for any type of document This mode automatically picks an appropriate colour depth for the document Black White Use for text or line art images Gray Error Diffusion Use for photographic images or graphics Error Diffusion is a method for creating simulated grey images without using true grey dots Black...

Страница 151: ... to scan both sides of the document When using the Automatic 2 sided Scan feature you must select the Long edge binding or Short edge binding option depending on the layout of your original to make sure the data file you create appears correctly MFC 8540DN ID Card Scan Select this check box to scan both sides of an identification card onto one page Advanced Settings Configure advanced settings by ...

Страница 152: ...olCenter4 Home Mode Windows Change Scan Size Using ControlCenter4 Home Mode Windows Change Scan Size Using ControlCenter4 Home Mode Windows For faster scan speeds select the exact size of your document from the Scan Size drop down menu Related Information Scan Using ControlCenter4 Home Mode Windows 146 ...

Страница 153: ...splays the scanned image so that the entire image fits in the window 3 Zoom In Zooms in on the scanned image 4 Zoom Out Zooms out of the scanned image 5 Crop and Edit Removes the outer parts of the image Click the Crop and Edit button and then change the frame to contain the area you want to keep after cropping 6 Page Counter Indicates the page number of the scanned page currently shown in the ima...

Страница 154: ...c Zooms out of the image d Rotates the image counter clockwise 90 degrees e Rotates the image clockwise 90 degrees f Click and drag the frame to adjust the area to be cropped 3 Click OK The edited image appears in the image viewer Related Information Scan Using ControlCenter4 Home Mode Windows 148 ...

Страница 155: ...ies using the printer driver features that are available in ControlCenter4 1 Scan a document 2 Click Print a Shows which images are currently selected and how many copies of each image will print b Click the Properties button to change specific printer settings c Select the Paper Size Media Type and Layout options The current settings are enclosed in a blue square 3 Configure the print settings an...

Страница 156: ...nter4 1 Load your document 2 Click the ControlCenter4 icon in the task tray and then click Open 3 Click the Scan tab 4 Select the Document Type 5 Change the size of your document if needed 6 Click Scan The machine starts scanning and the scanned image appears in the image viewer 7 Click the left or right arrow buttons to preview each scanned page 8 Crop the scanned image if needed 9 Click the Open...

Страница 157: ...e setting for ControlCenter4 1 Load your document 2 Click the ControlCenter4 icon in the task tray and then click Open 3 Click the Scan tab 4 Select the Document Type 5 Change the size of your document if needed 6 Click Scan The machine starts scanning and the scanned image appears in the image viewer 7 Click the left or right arrow buttons to preview each scanned page 8 Click Save The Save dialog...

Страница 158: ...st click and then type the password 10 To change the file name click the Change button if needed 11 Click the folder icon to browse and select the folder where you want to save your scanned documents 12 Click OK The scanned document is saved to the destination folder as a PDF Related Information Scan Using ControlCenter4 Home Mode Windows 152 ...

Страница 159: ...n the ADF To scan both sides of a document automatically you must use the ADF not the flatbed scanner glass 2 Click the ControlCenter4 icon in the task tray and then click Open 3 Click the Scan tab 4 Under Document Type select Custom and then click the Custom Settings button The Custom Scan Settings dialog box appears 5 Select the 2 sided Scanning check box 6 Select the Long edge binding or Short ...

Страница 160: ...Click the left or right arrow buttons to preview each scanned page 11 Do one of the following Click Save to save scanned data Click Print to print scanned data Click Open with an Application to open scanned data in another application Click Send E mail to attach scanned data to an email Click OCR to convert your scanned document to an editable text file Related Information Scan Using ControlCenter...

Страница 161: ...mended for scanning and sharing documents PDF Multi Page pdf recommended for scanning and sharing documents PDF A Single Page pdf recommended for scanning and sharing documents PDF A Multi Page pdf recommended for scanning and sharing documents High Compression PDF Single Page pdf High Compression PDF Multi Page pdf Secure PDF Single Page pdf Secure PDF Multi Page pdf Searchable PDF Single Page pd...

Страница 162: ...ed documents Show Folder Select this option to automatically display the destination folder after scanning File size Adjust the data compression ratio of the scanned image Change the file size by moving the File size slider to the right or left Custom Settings Select the Custom option click the Custom Settings button and then change settings Scan Size Select the exact size of your document from th...

Страница 163: ... Graphics Using ControlCenter4 Advanced Mode Windows Save Scanned Data to a Folder as a PDF File Using ControlCenter4 Advanced Mode Windows Scan Both Sides of a Document Automatically Using ControlCenter4 Advanced Mode Windows Scan Both Sides of an ID Card Using ControlCenter4 Advanced Mode Windows Scan to Email Attachment Using ControlCenter4 Advanced Mode Windows Scan to an Editable Text File OC...

Страница 164: ...can Photos and Graphics Using ControlCenter4 Advanced Mode Windows Send scanned photos or graphics directly to your computer Select Advanced Mode as the mode setting for ControlCenter4 1 Load your document 2 Click the ControlCenter4 icon in the task tray and then click Open 3 Click the Scan tab 4 Click the Image button The scan settings dialog box appears 158 ...

Страница 165: ...nge the file name click Change To change Destination Folder click the folder icon To preview and configure the scanned image select the PreScan check box 6 Click Scan The machine starts scanning The image opens in the application you have selected Related Information Scan Using ControlCenter4 Advanced Mode Windows 159 ...

Страница 166: ... Advanced Mode Windows Save Scanned Data to a Folder as a PDF File Using ControlCenter4 Advanced Mode Windows Scan documents and save them to a folder on your computer as PDF files Select Advanced Mode as the mode setting for ControlCenter4 1 Load your document 2 Click the ControlCenter4 icon in the task tray and then click Open 3 Click the Scan tab 160 ...

Страница 167: ...down list click and then type the password 6 Click the folder icon to browse and select the folder where you want to save your scanned documents 7 Change the scan settings such as file format file name resolution and colour if needed To preview and configure the scanned image select the PreScan check box 8 Click Scan The machine starts scanning The file is saved in the folder you selected Related ...

Страница 168: ...documents in the ADF To scan both sides of a document automatically you must use the ADF not the flatbed scanner glass 2 Click the ControlCenter4 icon in the task tray and then click Open 3 Click the Scan tab 4 Click the button for the setting you want to change Image OCR E mail or File The scan settings dialog box appears 5 Select the 2 sided Scanning check box 6 Select the Long edge binding or S...

Страница 169: ...ge the file name click Change To change Destination Folder click the folder icon 8 Click Scan The machine starts scanning You have now changed the default settings for your selected Scan to action These settings will be used the next time one of the scan options Image OCR E mail or File is selected for this action Related Information Scan Using ControlCenter4 Advanced Mode Windows 163 ...

Страница 170: ... Card Using ControlCenter4 Advanced Mode Windows Scan Both Sides of an ID Card Using ControlCenter4 Advanced Mode Windows Select Advanced Mode as the mode setting for ControlCenter4 1 Place an ID card on the scanner glass 2 Click the ControlCenter4 icon in the task tray and then click Open 3 Click the Scan tab 164 ...

Страница 171: ...7 Change the scan settings such as file format file name scan location resolution and colour if needed 8 Click Scan The machine starts scanning one side of the identification card 9 After the machine has scanned one side turn over the identification card and then click Continue to scan the other side 10 Click Finish Related Information Scan Using ControlCenter4 Advanced Mode Windows 165 ...

Страница 172: ...Select Advanced Mode as the mode setting for ControlCenter4 The Scan to Email feature does not support Webmail services Use the Scan to Image or Scan to File feature to scan a document or a picture and then attach the scanned file to an email message The machine scans to your default email client 1 Load your document 2 Click the ControlCenter4 icon in the task tray and then click Open 3 Click the ...

Страница 173: ...Change To change Destination Folder click the folder icon To preview and configure the scanned image select the PreScan check box 6 Click Scan The machine starts scanning Your default email application opens and the scanned image is attached to a new blank email message Related Information Scan Using ControlCenter4 Advanced Mode Windows 167 ...

Страница 174: ... Windows Your machine can convert characters in a scanned document to text using optical character recognition OCR technology You can edit this text using your preferred text editing application ABC ABC Select Advanced Mode as the mode setting for ControlCenter4 1 Load your document 2 Click the ControlCenter4 icon in the task tray and then click Open 3 Click the Scan tab 4 Click the OCR button The...

Страница 175: ...ck Change To change Destination Folder click the folder icon To preview and configure the scanned image select the PreScan check box 6 Click Scan The machine scans the document converts it to editable text and then sends it to your default word processing application Related Information Scan Using ControlCenter4 Advanced Mode Windows 169 ...

Страница 176: ...g Yes Yes Yes Yes 2 sided Scanning Yes Yes Yes Yes ID Card Scan Yes Yes Yes Yes Advanced Settings Yes Yes Yes Yes Default Yes Yes Yes Yes File Type Select the file type you want to use for the scanned data For Image Email and File Windows Bitmap bmp JPEG jpg recommended for most users when scanning pictures TIFF Single Page tif TIFF Multi Page tif Portable Network Graphics png PDF Single Page pdf ...

Страница 177: ...nned documents Show Folder Select this option to automatically display the destination folder after scanning Show Save As Window Select this option to specify the scanned image s destination every time you scan File size Adjust the data compression ratio of the scanned image Change the file size by moving the File size slider to the right or left PreScan Select PreScan to preview your image and cr...

Страница 178: ...anning Select this option to scan multiple pages from the scanner glass or ADF After a page is scanned select either continue scanning or finish Use this method to scan more pages than the maximum ADF capacity 2 sided Scanning Select this check box to scan both sides of the document When using the Automatic 2 sided Scan feature you must select the Long edge binding or Short edge binding option dep...

Страница 179: ...Related Information Scan Using ControlCenter4 Advanced Mode Windows 173 ...

Страница 180: ...ed in the example on this page 1 Load your document 2 Start Presto PageManager Do one of the following Windows XP Windows Vista and Windows 7 Using your computer click Start All Programs Presto PageManager 9 xx Presto PageManager 9 xx where xx is the version of your program Windows 8 Right click on the Start screen Click the All apps icon that appears at the bottom of the screen and then click Pre...

Страница 181: ...w an image Automatic 2 sided scan is available from the ADF only 9 Click PreScan to preview your image and crop unwanted portions before scanning After you select a document size adjust the scanning area by holding down the left mouse button and dragging it over the portion you want to scan 10 Click Start The machine starts scanning Related Information Scan from Your Computer Windows TWAIN Driver ...

Страница 182: ...age Type Resolution Scan Type Photo Use for scanning photo images 300 x 300 dpi 24bit Color Web Use for attaching the scanned image to web pages 100 x 100 dpi 24bit Color Text Use for scanning text documents 200 x 200 dpi Black White 2 Resolution Select a scanning resolution from the Resolution drop down list Higher resolutions take more memory and transfer time but produce a finer scanned image 3...

Страница 183: ...e or decrease the Contrast level by moving the slider to the right or left An increase emphasises dark and light areas of the image while a decrease reveals more details in grey areas You can also type a value in the field to set the contrast level 7 Document Size Select the exact size of your document from a selection of preset scan sizes If you select Custom the Custom Document Size dialog box a...

Страница 184: ...Remove the base colour of documents to make the scanned data more legible Choose from three levels Related Information Scan Using Presto PageManager or Other Windows Applications 178 ...

Страница 185: ...Do one of the following Windows Photo Gallery Click File Import from Camera or Scanner Windows Fax and Scan Click File New Scan 3 Select the scanner you want to use 4 Click Import or OK The New Scan dialog box appears 5 Adjust the settings in the Scanner Setup dialog box if needed The scanner resolution can be set to a maximum of 1200 dpi If you want to scan at higher resolutions use the Scanner U...

Страница 186: ... Feeder as the Paper source option Brightness Set the Brightness level by dragging the slider to the right or left to lighten or darken the image If the scanned image is too light set a lower brightness level and scan the document again If the image is too dark set a higher brightness level and scan the document again Contrast Increase or decrease the Contrast level by moving the slider to the rig...

Страница 187: ...Related Information Scan Using Windows Photo Gallery or Windows Fax and Scan 181 ...

Страница 188: ...al ways you can use your Macintosh to scan photos and documents on your Brother machine Use the software applications provided by Brother or your favourite scanning application Scan Using ControlCenter2 Macintosh Scan Using Presto PageManager or other TWAIN Compliant Applications Macintosh 182 ...

Страница 189: ...s or other file formats Scan Using ControlCenter2 Macintosh Save Scanned Data to a Folder as a PDF File Using ControlCenter2 Macintosh Scan Both Sides of a Document Automatically Using ControlCenter2 Macintosh Scan Both Sides of an ID Card Using ControlCenter2 Macintosh Scan to Email Attachment Using ControlCenter2 Macintosh Scan to an Editable Text File OCR Using ControlCenter2 Macintosh 183 ...

Страница 190: ...g ControlCenter2 Macintosh Send scanned photos or graphics directly to your computer 1 Load your document 2 In the Finder menu bar click Go Applications Brother and then double click the ControlCenter icon The ControlCenter2 screen appears 3 Click the SCAN tab 4 Click the Image button The scan settings dialog box appears 184 ...

Страница 191: ...h resolution and colour if needed To change the file name or destination file path click Change 6 Click the Start Scanning button The machine starts scanning The scanned image opens in the application you have selected Related Information Scan Using ControlCenter2 Macintosh 185 ...

Страница 192: ...rolCenter2 Macintosh Save Scanned Data to a Folder as a PDF File Using ControlCenter2 Macintosh 1 Load your document 2 In the Finder menu bar click Go Applications Brother and then double click the ControlCenter icon The ControlCenter2 screen appears 3 Click the SCAN tab 4 Click the File button The scan settings dialog box appears 186 ...

Страница 193: ...p menu type your password in the Password and Re type Password fields and then click OK 6 Change the scan settings such as file name destination folder resolution and colour if needed 7 Click the Start Scanning button The machine starts scanning The file will be saved in the folder you selected Related Information Scan Using ControlCenter2 Macintosh 187 ...

Страница 194: ... menu bar click Go Applications Brother and then double click the ControlCenter icon The ControlCenter2 screen appears 3 Click the SCAN tab 4 Click the scan type button Image OCR E mail or File you want to use The scan settings dialog box appears 5 Select the 2 sided Scanning check box 6 Select the Long edge binding or Short edge binding option depending on the Original layout see table for layout...

Страница 195: ...the default settings for your selected Scan to action These settings will be used the next time this scan type Image OCR E mail or File is clicked for this action Related Information Scan Using ControlCenter2 Macintosh 189 ...

Страница 196: ... Macintosh Scan Both Sides of an ID Card Using ControlCenter2 Macintosh 1 Place an ID card on the scanner glass 2 In the Finder menu bar click Go Applications Brother and then double click the ControlCenter icon The ControlCenter2 screen appears 3 Click the SCAN tab 4 Click the File button The scan settings dialog box appears 190 ...

Страница 197: ...Configure other settings if needed 8 Click the Start Scanning button The machine starts scanning one side of the identification card 9 After the machine has scanned one side turn over the identification card and then click Continue to scan the other side 10 Click Finish Related Information Scan Using ControlCenter2 Macintosh 191 ...

Страница 198: ...ent The Scan to Email feature does not support Webmail services Use the Scan to Image or Scan to File feature to scan a document or a picture and then attach the scanned file to an email message 1 Load your document 2 In the Finder menu bar click Go Applications Brother and then double click the ControlCenter icon The ControlCenter2 screen appears 3 Click the SCAN tab 4 Click the E mail button The...

Страница 199: ...d colour if needed To change the file name or destination file path click Change 6 Click the Start Scanning button The machine starts scanning Your default email application opens and the scanned image is attached to a new blank email Related Information Scan Using ControlCenter2 Macintosh 193 ...

Страница 200: ...ition OCR technology You can edit this text using your preferred text editing application ABC ABC Macintosh Presto PageManager must be installed on your computer Download Presto PageManager from http nj newsoft com tw download brother PM9SEInstaller_BR_multilang2 dmg 1 Load your document 2 In the Finder menu bar click Go Applications Brother and then double click the ControlCenter icon The Control...

Страница 201: ... colour if needed To change the file name or destination file path click Change 6 Click the Start Scanning button The machine scans the document converts it to editable text and then sends it to your default word processing application Related Information Scan Using ControlCenter2 Macintosh 195 ...

Страница 202: ... TWAIN driver you must set it as the default driver To set the Brother TWAIN driver as the default driver do the following a Click the File menu and then select the Import from Scanner option b Select the Brother TWAIN option 2 Click the File menu and then select the Acquire Image Data option The scanner setup dialog box appears 3 Change the scan settings such as Resolution Scan Type or Adjust Ima...

Страница 203: ... TWAIN Driver Settings Macintosh 197 ...

Страница 204: ...ck White Use for text or line art images Gray Error Diffusion Use for photographic images or graphics Error Diffusion is a method for creating simulated grey images without using true grey dots Black dots are put in a specific pattern to give a grey appearance True Gray Use for photographic images or graphics This mode is more accurate because it uses up to 256 shades of grey 24bit Color Use to cr...

Страница 205: ...details in grey areas You can also type a value in the box to set the contrast Reduce Noise Improve and enhance the quality of your scanned images with this selection The Reduce Noise option is available when selecting the 24bit Color option and the 300 x 300 dpi 400 x 400 dpi or 600 x 600 dpi scan resolutions 5 2 sided Scanning If you select this check box the machine scans both sides of the docu...

Страница 206: ...Home Scan Configure Scan Settings Using Web Based Management Configure Scan Settings Using Web Based Management Set the Scan Job Email Report Using Web Based Management 200 ...

Страница 207: ... your browser s address bar where machine s IP address is the IP address of the machine or the print server name For example http 192 168 1 2 No password is required by default If you have previously set a password type it and then press 2 Click the Scan tab 3 Click the Scan Job e mail report menu in the left navigation bar 4 In the Administrator Address field type the email address 5 For the scan...

Страница 208: ...py Copy a Document Enlarge or Reduce Copied Images Make N in 1 Copies Using the Page Layout Feature Sort Copies Copy an ID Card Copy an ID Card or Bills Copy on Both Sides of the Paper 2 sided Copy Copy Options 202 ...

Страница 209: ... paper in the paper tray 2 Do one of the following Place the document face up in the ADF If you are copying multiple pages we recommend using the ADF Place the document face down on the scanner glass 3 Press Copy The LCD displays 4 Change the copy settings if needed Number of copies 203 ...

Страница 210: ... finished press OK After you have finished choosing new options you can save them by pressing the Save as Shortcut button Quick Copy Press to access the preset copy settings Current setting indications Press the following icons to change these settings for the next copy only Enlarge Reduce 2 sided Copy Density Tray Use 5 Press Start To stop copying press Related Information Copy 204 ...

Страница 211: ...6 Do one of the following If you select Enlarge or Reduce press the enlargement or reduction ratio you want to use If you select Custom 25 400 press backspace to erase the displayed percentage or press d to move the cursor and then enter an enlargement or reduction ratio from 25 to 400 Press OK If you selected 100 or Auto go to the next step Auto sets the machine to calculate the reduction ratio t...

Страница 212: ...cument onto one page of the copy If you are copying from the ADF insert the documents face up in the direction as shown below 2 in 1 Portrait 2 in 1 Landscape 4 in 1 Portrait 4 in 1 Landscape If you are copying from the scanner glass place the document face down in the direction as shown below 2 in 1 Portrait 2 in 1 Landscape 4 in 1 Portrait 4 in 1 Landscape 1 Load your document 206 ...

Страница 213: ... press the option you want 6 When finished press OK 7 Press Start If you placed the document in the ADF the machine scans the pages and starts printing 8 If you are using the scanner glass repeat the following steps for each page of the document Place the next page on the scanner glass and then press Continue to scan the page After scanning all the pages press Finish Related Information Copy 207 ...

Страница 214: ...s Options Stack Sort Sort 5 When finished press OK 6 Press Start If you placed the document in the ADF the machine scans the pages and starts printing 7 If you are using the scanner glass repeat the following steps for each page of the document Place the next page on the scanner glass and then press Continue to scan the page After scanning all the pages press Finish Related Information Copy 208 ...

Страница 215: ...ety Guide 1 Place your identification card face down near the upper left corner of the scanner glass 1 1 Distance 4 0 mm or greater top left 2 Swipe left or right or press d or c to display the 2 in 1 ID Copy option and then press 2 in 1 ID Copy 3 Enter the number of copies 4 Press Start The machine scans one side of the identification card 5 After the machine has scanned the first side turn over ...

Страница 216: ...lls Use the Billings Copy feature to copy an identification card and Bills with preset copy settings Copy an identification card only to the extent permitted under applicable laws For more information see the Product Safety Guide Related Information Copy 210 ...

Страница 217: ...oose To use the automatic 2 sided copy feature you must load your document in the ADF When you manually make 2 sided copies from a 2 sided document use the scanner glass Select A4 sized paper when using the 2 sided copy option Portrait 2 sided to 2 sided 1 2 1 2 1 sided to 2 sided Long Edge Flip 1 2 1 2 1 sided to 2 sided Short Edge Flip 1 2 1 2 Landscape 2 sided to 2 sided 1 2 1 2 1 sided to 2 si...

Страница 218: ... document follow these steps a To change the layout options press Layout and then press Long Edge Flip or Short Edge Flip b Press 1 sided 2 sided 6 When finished press OK 7 Press Start If you placed the document in the ADF the machine scans the pages and starts printing 8 If you are using the scanner glass repeat the following steps for each page of the document For a 2 sided document turn the she...

Страница 219: ...xt copy Auto Adjusts the copy size to fit on the paper size you have set Custom 25 400 Enter an enlargement or reduction ratio Density Increase the density to make the text darker Decrease the density to make the text lighter Contrast Increase the contrast to make an image clearer Decrease the contrast to make an image more subdued Stack Sort Select to stack or sort multiple copies Stack B B A B A...

Страница 220: ... 2 sided 1 2 1 2 The available options will vary depending on your model 2 sided Copy Page Layout available only for certain settings Select long edge binding or short edge binding Tray Use Select a paper tray for the next copy Save as Shortcut Add the current settings as a shortcut Related Information Copy 214 ...

Страница 221: ...Home Fax Fax Send a Fax Receive a Fax Voice Operations and Fax Numbers Telephone Services and External Devices Fax Reports PC FAX 215 ...

Страница 222: ...d a Fax Manually Send a Fax at the End of a Conversation Set the Fax Logic Sending and Receiving Sequence Send the Same Fax to More than One Recipient Broadcasting Send a Fax at a Specified Time Delayed Fax Cancel a Fax in Progress Check and Cancel a Pending Fax Fax Options 216 ...

Страница 223: ...e scanner glass 2 Press Fax 3 Enter the fax number Using the dial pad Press the digits to enter the fax number Using the Address Book Press Address Book and then do one of the following Swipe up or down or press a or b to display the number you want and then press it Press Search and then enter the name and press OK Press the name you want to dial When finished press Apply Using the call history 2...

Страница 224: ...nd sends the document If you placed the document on the scanner glass follow the instructions in the table Option Description Yes To scan the next page press the Yes option and then place the next page on the scanner glass Press OK to scan the page No After you have scanned the last page press the No option The machine sends the document To stop faxing press and then press Related Information Send...

Страница 225: ...g Edge or Short Edge depending on the layout of your document 1 Load your document 2 Press Fax Options 2 sided Fax 3 Do one of the following If your document is flipped on the Long edge press the 2 sided Scan Long Edge option If your document is flipped on the Short edge press the 2 sided Scan Short Edge option 4 Press OK 5 Enter the fax number 6 Press Fax Start Related Information Send a Fax 219 ...

Страница 226: ...he dialling ringing and fax receiving tones while sending a fax 1 Load your document 2 Press Fax 3 Press Hook and listen for a dial tone 4 Dial the fax number you want to call 5 When you hear the fax tone press Fax Start If you are using the scanner glass press Send Related Information Send a Fax 220 ...

Страница 227: ... can send a fax to the other party before you both hang up 1 Ask the other party to wait for fax tones beeps and then to press the Start or Send key before hanging up 2 Load your document 3 Press Fax Start If you are using the scanner glass press Send 4 Replace the handset of an external telephone Related Information Send a Fax 221 ...

Страница 228: ... Start to send a fax If you are a receiver press Fax Start to receive a fax If you set to Advanced Mode No matter you are a caller or receiver you can select you will send or receive a fax manually When you press Fax Start the machine will ask you Send Receive If you want to send a fax select Send If you want to receive a fax select Receive Even if you set either Easy Mode or Advanced Mode and if ...

Страница 229: ...press a or b to display the number you want to add to the broadcast Select the check boxes of the broadcast After you select all the numbers you want press OK Press Search in Address book Press the name and press OK Press the name and then press the number you want to add 4 When finished press OK 5 Press Fax Start After the broadcast is finished the machine will print a broadcast report to let you...

Страница 230: ...g you can cancel the fax currently being sent or the whole broadcast job 1 Press 2 Press 3 Do one of the following To cancel the entire broadcast press Entire Broadcast To cancel the current job press the name or number being dialled on the LCD To exit without cancelling press Related Information Send the Same Fax to More than One Recipient Broadcasting 224 ...

Страница 231: ...ry to be sent within the next twenty four hour period 1 Load your document 2 Press Fax Options Delayed Fax Delayed Fax 3 Press On 4 Press Set Time 5 Enter the time you want the fax to be sent in 24 hour format and then press OK For example enter 19 45 for 7 45 PM 6 Press OK 7 Enter the fax number 8 Press Fax Start 9 Press Related Information Send a Fax 225 ...

Страница 232: ... is dialling or sending a fax The LCD will display Cancel Job 3 Press an option in the table to cancel or continue the fax job in progress Option Description Yes The machine cancels sending the fax job No The machine exits from the process without cancelling the fax job Related Information Send a Fax 226 ...

Страница 233: ...hile it is stored and waiting in the memory 1 Press Settings All Settings Fax Remaining Jobs 2 Swipe up or down or press a or b to scroll through the waiting jobs and then press the job you want to cancel 3 Press Cancel 4 Press Yes to confirm or press No to exit without cancelling 5 When finished cancelling jobs press Related Information Send a Fax 227 ...

Страница 234: ... If your document is very light or very dark changing the contrast may improve the fax quality Delayed Fax Set the time of day the delayed faxes will be sent Overseas Mode Set to On if you have difficulty sending faxes overseas Glass Scan Size Adjust the scan area of the scanner glass to the size of the document Set New Default Save your settings as the default Factory Reset Restore all settings b...

Страница 235: ...Home Fax Receive a Fax Receive a Fax Receive Mode Settings 229 ...

Страница 236: ...se PC Fax Receive to Transfer Received Faxes to Your Computer Windows only Set the Number of Rings Before the Machine Answers Ring Delay Set Fax Detect Shrink Page Size of an Oversized Incoming Fax Set the 2 sided Printing for Received Faxes Set the Fax Receive Stamp Receive a Fax at the End of a Telephone Conversation 230 ...

Страница 237: ...ne Answering the call or if the caller wants to send you a fax press Fax Start under easy mode to receive faxes If your machine is connecting an external answering phone device you can use the external answering phone device to answer and talk 1 PC Fax Receive Machine automatically transfers received faxes to your computer running the PC Fax software The machine will transfer the received fax data...

Страница 238: ...ically receive any faxes that are sent to it There are three receive modes of this machine as below LCD Display Factory Setting Ring Delay Fax Auto Ring Delay four times Fax Manual PC Fax Receive 1 Press Settings All Settings Fax Setup Receive Receive Mode 2 Press Fax Auto Fax Manual or PC Fax Receive 3 Press Related Information Receive Mode Settings Telephone and Fax Problems 232 ...

Страница 239: ... your machine transfers your faxes to your computer automatically If you selected Backup Print On the machine will also print the fax 1 Press Settings All Settings Fax Setup Receive Receive Mode PC Fax Receive 2 Press OK and then following the LCD instruction Before you can set up PC Fax Receive you must install the MFL Pro Suite software on your computer Make sure your computer is connected and t...

Страница 240: ...r of times the machine rings before it answers in the Fax Auto Mode If you have external or extension telephones on the same line as the machine choose the maximum number of rings 1 Press Settings All Settings Fax Setup Receive Ring Delay 2 Swipe up or down or press a or b to select the number of rings you want and then press the number If you select 0 the machine will answer immediately and the l...

Страница 241: ...uttons in the following table to receive the fax If you answered at an extension or external telephone press 51 Applicable Models To receive the fax MFC 8530DN MFC 8535DN MFC 8540DN Fax Start and then Receive If this feature is set to On but your machine does not connect a fax call when you lift an extension or external telephone handset press the remote activation code 51 If you send faxes from a...

Страница 242: ... enable the auto reduction function the machine reduces each page of an incoming fax to fit on your paper The machine calculates the reduction ratio by using the page size of the fax and your Paper Size setting 1 Press Settings All Settings Fax Setup Receive Auto Reduction 2 Press On or Off 3 Press Related Information Receive Mode Settings 236 ...

Страница 243: ...received faxes on both sides of the paper when 2 sided is set to On Use A4 size paper 60 to 105 g m2 for this function When 2 sided printing is enabled incoming faxes are automatically reduced to fit the paper in the paper tray 1 Press Settings All Settings Fax Setup Receive 2 sided 2 Press On or Off 3 Press Related Information Receive Mode Settings 237 ...

Страница 244: ...he received date and time at the top centre of each received fax page Make sure you have set the current date and time on the machine The received time and date will not appear when using Internet Fax 1 Press Settings All Settings Fax Setup Receive Fax Rx Stamp 2 Press On or Off 3 Press Related Information Receive Mode Settings 238 ...

Страница 245: ... of the conversation the other party can send you a fax before you both hang up Your machine s ADF must be empty 1 Ask the other party to place the document in their machine and to press the Start or Send key 2 When you hear the CNG tones slowly repeating beeps press Fax Start If the machine is in Automatic Redial wait until it is finished and try again 3 When you set the Fax Mode option to Advanc...

Страница 246: ...Home Fax Voice Operations and Fax Numbers Voice Operations and Fax Numbers Voice Operations Store Fax Numbers Set up Groups for Broadcasting Combine Address Book Numbers 240 ...

Страница 247: ...Home Fax Voice Operations and Fax Numbers Voice Operations Voice Operations Send Tone Signals 241 ...

Страница 248: ...mple for telephone banking follow these steps If you have a Touch Tone service you will not need this feature to send tone signals 1 Press Fax 2 Press Hook 3 Press on the machine s LCD Any digits dialled after this will send tone signals When you are finished with the call the machine will return to the Pulse dialling service Related Information Voice Operations 242 ...

Страница 249: ...Home Fax Voice Operations and Fax Numbers Store Fax Numbers Store Fax Numbers Store Address Book Numbers Change or Delete Address Book Names or Numbers How to Enter Text on Your Brother Machine 243 ...

Страница 250: ...ess OK e Press pinyin f Enter the pinyin using the LCD up to 16 characters and then press OK g Press Address h Enter the fax or telephone number using the LCD up to 20 digits and then press OK To store an email address to use with Internet Fax or Scan to Email server press and enter the email address and press OK i Press OK To store another Address Book number repeat these steps 3 Press Related In...

Страница 251: ...tgoing Call history 1 Press Fax Call History Outgoing Call 2 Swipe up or down or press a or b to display the number you want and then press it 3 Press Edit Add to Address Book Name To delete the number press Edit Delete Press Yes to confirm 4 Enter the name using the LCD up to 16 characters 5 Press OK 6 Press OK to confirm the fax or telephone number you want to store 7 Press Related Information S...

Страница 252: ...s Name Enter the new name up to 16 characters using the LCD and then press OK To change the fax or telephone number press Address Enter the new fax or telephone number up to 20 digits using the LCD and then press OK Press OK to finish How to enter text To change a character press d or c to position the cursor to highlight the incorrect character and then press Enter the new character To delete num...

Страница 253: ... number of Group Maximum numbers in a large Group MFC 8530DN MFC 8535DN MFC 8540DN 20 groups 299 numbers 1 Press Fax Address Book 2 Do the following steps a Press Edit Setup Groups Name b Enter the Group name up to 16 characters using the LCD and then press OK c Press Add Delete d Add Address Book numbers to the Group by pressing them to display a red checkmark and then press OK e Read and confirm...

Страница 254: ...o display the Group you want and then press the Group name 3 Press Name 4 Enter the new Group name up to 16 characters using the LCD and then press OK How to change the stored name To change a character press d or c to position the cursor to highlight the incorrect character and then press Enter the new character 5 Press OK 6 Press Related Information Set up Groups for Broadcasting 248 ...

Страница 255: ...ps for Broadcasting Delete a Group Delete a Group 1 Press Fax Address Book Edit Delete 2 Swipe up or down or press a or b to display the Group you want and then press the Group name 3 Press OK 4 Press Related Information Set up Groups for Broadcasting 249 ...

Страница 256: ...down or press a or b to display the Add Delete option and then press Add Delete 4 Swipe up or down or press a or b to display the number you want to add or delete 5 Do the following for each number you want to change To add a number to the Group press the check box of the number to add a check mark To delete a number from the Group press the check box of the number to remove the check mark 6 Press...

Страница 257: ... Brother 2 You can use them both to dial 01632 960555 by using the following procedure 1 Press Fax Address Book 2 Swipe up or down or press a or b to display the number of Brother 1 3 Press the number 4 Press Apply 5 Press Address Book 6 Press OK 7 Swipe up or down or press a or b to display the number of Brother 2 8 Press the number 9 Press Apply 10 Press Fax Start The machine will dial 01632 960...

Страница 258: ...Home Fax Telephone Services and External Devices Telephone Services and External Devices External and Extension Telephones Multi line Connections PABX 252 ...

Страница 259: ...ne Services and External Devices External and Extension Telephones External and Extension Telephones Connect an External or Extension Telephone Operation from External and Extension Telephones Use the Remote Codes 253 ...

Страница 260: ...ect an External or Extension Telephone Connect an External or Extension Telephone You can connect a separate telephone to your machine as shown in the diagram below 1 1 Extension telephone 2 External telephone 3 Protective Cap 2 3 Related Information External and Extension Telephones 254 ...

Страница 261: ...ation Code 51 the machine starts to receive the fax If the machine answers a voice call and pseudo double rings for you to take over you can take the call at an extension telephone by pressing the Remote Deactivation Code 51 If you answer a call and no one is on the line You should assume that you re receiving a manual fax Press 51 and wait for the chirp or until the LCD displays Receiving and the...

Страница 262: ...Remote Activation Code 51 Wait for the chirping sounds and then replace the handset If you answer a fax call at the external telephone you can make the machine receive the fax by pressing the buttons in the following table When you set the Fax Mode option to Advanced Mode Applicable Models To make the machine receive the fax MFC 8530DN MFC 8535DN MFC 8540DN Fax Start and then Receive Related Infor...

Страница 263: ...try changing the three digit remote codes using the numbers 0 9 1 Press Settings All Settings Fax Setup Receive Remote Codes 2 Do one of the following To change the Remote Activation Code press Act Code Enter the new code and then press OK To change the Remote Deactivation Code press Deact Code Enter the new code and then press OK If you do not want to change the Codes go to the next step To turn ...

Страница 264: ...fax machine we cannot guarantee that the unit will operate correctly While it is often relatively simple to connect a fax machine to a PABX Private Automatic Branch Exchange we suggest that you contact the company that installed your telephone system and ask them to connect the fax machine for you Brother does not recommend the use of a PABX line PABX limitations in general can cause some function...

Страница 265: ...Home Fax Fax Reports Fax Reports The Transmission Verification Report and the Fax Journal are available to confirm the results of fax transmission Print a Fax Journal 259 ...

Страница 266: ...ournal at specific intervals 1 Press Settings All Settings Fax Report Setting Journal Period Journal Period 2 Press Every 50 Faxes or Off Every 50 Faxes The machine will print the Journal when the machine has stored 50 reception and transmission log data 3 Press Related Information Fax Reports 260 ...

Страница 267: ...Home Fax PC FAX PC FAX PC FAX for Windows PC FAX for Macintosh Sending only 261 ...

Страница 268: ...Home Fax PC FAX PC FAX for Windows PC FAX for Windows PC FAX Overview Windows Send a Fax Using PC FAX Windows Receive Faxes on Your Computer Windows 262 ...

Страница 269: ... PC FAX Overview Windows PC FAX Overview Windows Reduce paper consumption and save time by using Brother s PC FAX software to send faxes directly from your machine Configure PC FAX Windows Configure your PC Fax Address Book Windows 263 ...

Страница 270: ...ect your model name if not already selected Click PC FAX in the left navigation bar and then click Setup Sending The PC FAX Setup dialog box appears 2 Do one of the following Click the User Information tab and then type your user information in the fields Each Microsoft account can have its own customised User Information screen for custom fax headers and cover pages Click the Sending tab and then...

Страница 271: ... Transfer Faxes to Your Computer 265 ...

Страница 272: ...Book Windows Add edit and delete members and groups to personalise your Brother Address Book Add a Member to the Address Book Windows Create a Group in the Address Book Windows Edit Member or Group Information Windows Delete a Member or Group Windows Export the Address Book Windows Import Information to the Address Book Windows 266 ...

Страница 273: ...ing Windows XP Windows Vista and Windows 7 Click Start All Programs Brother Brother Utilities Click the drop down list and select your model name if not already selected Click PC FAX in the left navigation bar and then click Address Book Send Windows 8 Click Brother Utilities and then click the drop down list and select your model name if not already selected Click PC FAX in the left navigation ba...

Страница 274: ...3 Type the member s information in the corresponding fields Only the Name field is required 4 Click OK Related Information Configure your PC Fax Address Book Windows 268 ...

Страница 275: ... the drop down list and select your model name if not already selected Click PC FAX in the left navigation bar and then click Address Book Send Windows 8 Click Brother Utilities and then click the drop down list and select your model name if not already selected Click PC FAX in the left navigation bar and then click Address Book Send The Address Book dialog box appears 2 Click The Address Book Gro...

Страница 276: ...Members added to the group appear in the Group Members box 5 When finished click OK Each group can contain up to 50 members Related Information Configure your PC Fax Address Book Windows 270 ...

Страница 277: ...select your model name if not already selected Click PC FAX in the left navigation bar and then click Address Book Send Windows 8 Click Brother Utilities and then click the drop down list and select your model name if not already selected Click PC FAX in the left navigation bar and then click Address Book Send The Address Book dialog box appears 2 Select the member or group you want to edit 3 Clic...

Страница 278: ...your model name if not already selected Click PC FAX in the left navigation bar and then click Address Book Send Windows 8 Click Brother Utilities and then click the drop down list and select your model name if not already selected Click PC FAX in the left navigation bar and then click Address Book Send The Address Book dialog box appears 2 Select the member or group you want to delete 3 Click Del...

Страница 279: ...n click Address Book Send Windows 8 Click Brother Utilities and then click the drop down list and select your model name if not already selected Click PC FAX in the left navigation bar and then click Address Book Send The Address Book dialog box appears 2 Click the File menu and then select Export 3 Select one of the following Text The Select Items dialog box appears Go to step 4 vCard You must se...

Страница 280: ...CII file under the Divide Character section select the Tab or Comma option to separate the data fields 6 Click OK 7 Browse to the folder on your computer where you want to save the data type the file name and then click Save Related Information Configure your PC Fax Address Book Windows 274 ...

Страница 281: ... drop down list and select your model name if not already selected Click PC FAX in the left navigation bar and then click Address Book Send Windows 8 Click Brother Utilities and then click the drop down list and select your model name if not already selected Click PC FAX in the left navigation bar and then click Address Book Send The Address Book dialog box appears 2 Click the File menu and then s...

Страница 282: ...xt file 5 If you are importing an ASCII file under the Divide Character section select the Tab or Comma option to separate the data fields 6 Click OK 7 Browse to the folder where you want to import the data type the file name and then click Open Related Information Configure your PC Fax Address Book Windows 276 ...

Страница 283: ...ers on the dial pad to type the number and then click Add Send Address If you select the Dial Restriction check box a confirmation dialog box will appear for you to re type the fax number using the keyboard This feature helps to prevent transmissions to the wrong destination Click the Address Book button and then select a member or group from the Address Book If you make a mistake click All Clear ...

Страница 284: ...Receive Faxes on Your Computer Windows Receive Faxes on Your Computer Windows Use Brother s PC FAX software to receive faxes on your computer screen them and print only those faxes you want Receive Faxes Using PC FAX Receive Windows 278 ...

Страница 285: ...ive and store faxes in your Brother machine s memory The machine s LCD will display the number of stored faxes received When you start this application the software will transfer all received faxes to your computer at once You can enable the Backup Print option if you want the machine to print a copy of the fax before the fax is sent to your computer or before the computer is switched off You can ...

Страница 286: ... All Programs Brother Brother Utilities Click the drop down list and select your model name if not already selected Click PC FAX in the left navigation bar and then click Receive Windows 8 Click Brother Utilities and then click the drop down list and select your model name if not already selected Click PC FAX in the left navigation bar and then click Receive 2 Confirm the message and click Yes The...

Страница 287: ...s needed Preferences Configure to start PC FAX Receive automatically when you start Windows Save Configure the path to save PC FAX files and select the received document format Upload to Configure the path to the SharePoint server and select the option to upload automatically or manually available only for Administrators Device Select the Brother machine that you want to receive PC FAX Lock availa...

Страница 288: ...ctions for a network user then the machine should already be configured for your network 1 Double click the PC Fax Receive Ready icon in your computer task tray The PC FAX Receive window appears 2 Click Settings 3 Click Device Add 4 Select the appropriate connection method Select your machine from the automatic search results below Connected Brother machines will be displayed Select a device from ...

Страница 289: ... computer name that will appear on the machine s LCD type the new name in the Enter your PC display name Max 15 Characters field 6 Click OK Related Information Run Brother s PC FAX Receive on Your Computer Windows 283 ...

Страница 290: ...essages Windows Receiving Status Icon Indicated Status Standby mode No unread messages Receiving messages Messages received Unread messages 1 Double click the PC Fax Receive Ready icon in your computer task tray The PC FAX Receive window appears 2 Click any faxes in the list to view them 3 When finished click in the right top corner of the window to close it 284 ...

Страница 291: ...Receive is active and the PC Fax Receive Ready icon will remain in your computer task tray To close PC FAX Receive click the icon in the computer task tray and click Close Related Information Receive Faxes Using PC FAX Receive Windows 285 ...

Страница 292: ...g only PC FAX for Macintosh Sending only Use Brother s PC FAX software to send faxes directly from your Macintosh without printing them This feature helps reduce your paper consumption and save time Send Faxes from Your Application Macintosh 286 ...

Страница 293: ...eiving fax machine supports colour faxes 1 Create a document in a Macintosh application 2 From an application such as Apple TextEdit click the File menu and then select Print 3 Click the application pop up menu and then select the Send Fax option 4 Click the Output pop up menu and then select the Facsimile option 5 Type a fax number in the Input Fax Number field and then click Add The fax number i...

Страница 294: ...he Add button after entering the first fax number and type the next fax number The destination fax numbers will be listed in the Destination Fax Numbers field 6 Click Print to send the fax Related Information PC FAX for Macintosh Sending only 288 ...

Страница 295: ...from digital camera media or a USB flash drive or scan documents and save them directly to a USB flash drive Supported file types are PDF JPEG TIFF XPS and PRN Compatible USB Flash Drives Print Data Directly from a USB Flash Drive or Digital Camera Supporting Mass Storage Create a PRN File for Direct Printing Windows 289 ...

Страница 296: ...that use the USB mass storage standard Other USB devices are not supported Compatible USB Flash Drives USB Class USB Mass Storage Class USB Mass Storage Sub Class SCSI or SFF 8070i Transfer protocol Bulk transfer Only Format 1 FAT12 FAT16 FAT32 exFAT Sector size Max 4096 Byte Encryption Encrypted devices are not supported Related Information Print Data Directly from a USB Flash Drive 1 NTFS format...

Страница 297: ...digital camera is correctly connected If an error occurs the USB menu will not appear on the Touchscreen When the machine is in Deep Sleep mode the Touchscreen does not display any information even if you connect a USB flash drive to the USB direct interface Press the Touchscreen to wake up the machine 2 Press Direct Print If your machine has been set to Secure Function Lock On you may not be able...

Страница 298: ...settings may not appear 6 Press OK 7 Enter the number of copies you want 8 Press Start to print the data 9 Press IMPORTANT DO NOT remove the USB flash drive or digital camera from the USB direct interface until the machine has finished printing Related Information Print Data Directly from a USB Flash Drive 292 ...

Страница 299: ...our model and then select the print to file option 3 Complete your print operation 4 Enter the required information to save the file If the computer prompts you to enter a file name only you can also specify the folder where you want to save the file by typing the directory name for example C Temp FileName prn If a USB flash drive is connected to your computer you can save the file directly to the...

Страница 300: ...Home Network Network Get Started Network Management Software and Utilities Advanced Network Features Technical Information for Advanced Users 294 ...

Страница 301: ... to your network using the Brother installation CD ROM This section provides more information about network connection types introduces various methods to manage your network and explains some useful network features of your Brother machine Supported Basic Network Features 295 ...

Страница 302: ... X v10 10 x Printing Yes Yes Yes Scanning Yes Yes PC Fax Send Yes Yes PC Fax Receive Yes BRAdmin Light Yes Yes BRAdmin Professional 3 Yes Yes Web Based Management Yes Yes Yes Remote Setup Yes Yes Status Monitor Yes Yes Driver Deployment Wizard Yes Yes Go to your model s Downloads page on the Brother Solutions Center at support brother com to download the latest version of Brother s BRAdmin Light G...

Страница 303: ...gement Software and Utilities Configure and change your Brother machine s network settings using a management utility Learn about Network Management Software and Utilities Change Machine Settings from Your Computer Change Machine Settings Using Web Based Management 297 ...

Страница 304: ...k and device settings and update device firmware from a Windows computer on your LAN BRAdmin Professional 3 can also log activity of Brother devices on your network and export the log data in an HTML CSV TXT or SQL format For users who want to monitor locally connected machines install the Print Auditor Client software on the client computer This utility allows you to use BRAdmin Professional 3 to...

Страница 305: ...uration Report Configure Your Mail Server Settings Using Web Based Management Configure the Brother Machine for Email or Internet Fax I Fax I Fax Options Use the Send Fax to Server Feature Configure and Operate LDAP Search Synchronize Time with the SNTP Server Using Web Based Management 299 ...

Страница 306: ...ress If the IP Address on the Network Configuration Report shows 0 0 0 0 wait for one minute and try printing it again You can find your machine s settings such as the IP address subnet mask node name and MAC Address on the report for example IP address 192 168 0 5 Subnet mask 255 255 255 0 Node name BRN000ca0000499 MAC Address 00 0c a0 00 04 99 1 Press Settings All Settings Print Reports Network ...

Страница 307: ... your mail server 1 Start your web browser 2 Type http machine s IP address in your browser s address bar where machine s IP address is the machine s IP address For example http 192 168 1 2 3 No password is required by default Type a password if you have set one and then click 4 Click the Network tab 5 Click Protocol in the left navigation bar 6 In the POP3 IMAP4 SMTP field click Advanced Settings...

Страница 308: ...302 ...

Страница 309: ...st enter the full path of the mail folder using single byte characters only and then enter Inbox for the root mail folder 9 When finished click Submit The Test Send Receive E mail Configuration dialog box appears 10 Follow the instructions in the dialog box to test the current settings Related Information Advanced Network Features 303 ...

Страница 310: ...ur machine IP address If you are already using your machine on your network the machine s IP address has been configured correctly Email address SMTP POP3 IMAP4 server address port Authentication method Encryption method Server Certificate Verification Mailbox name and password If you are unsure of any of these items contact your system administrator Related Information Advanced Network Features F...

Страница 311: ...a the machine will be converted into a TIFF F format automatically If you want to send and receive messages to and from your machine your computer s email application must support Multipurpose Internet Mail Extensions MIME 2 4 4 4 3 3 1 1 Sender 2 Internet 3 Receiver 4 Email server I Fax supports sending and receiving documents in Letter or A4 format and in monochrome only MFC 8530DN MFC 8535DN MF...

Страница 312: ...structure of the LAN and how busy the circuit such as the Internet is may cause the system to take a longer time than usual to send an error mail When sending confidential documents we recommend using standard phone lines instead of the Internet due to its low level of security If the receiver s mail system is not MIME compatible you cannot use I Fax to send documents If possible find out in advan...

Страница 313: ...ernet Fax I Fax Before sending your I Fax use the control panel Web Based Management or Remote Setup to configure the following optional items E mail Subject E mail Message Size Limit Request Delivery Notification Send If you are unsure of any of these items contact your system administrator Related Information Configure the Brother Machine for Email or Internet Fax I Fax 307 ...

Страница 314: ...wing If Fax Preview is set to Off press Fax If Fax Preview is set to On press Fax and then press Sending Faxes 3 To change the fax sending settings press Options 4 Swipe up or down or press a or b to scroll through the fax settings When the setting you want appears press it and select your preference When you have finished changing settings press OK 5 Do one of the following Press and then enter t...

Страница 315: ... Polling can occur at set intervals for example you can configure the machine to poll the email server every ten minutes or you can manually poll the server If your machine starts to receive email data the LCD displays Receiving The email will be printed automatically If your machine is out of paper when receiving data the received data will be held in the machine s memory This data will be printe...

Страница 316: ...Related Information Configure the Brother Machine for Email or Internet Fax I Fax How Your Computer Receives an I Fax 310 ...

Страница 317: ...e Server Manually Poll the Server Manually 1 Press Settings All Settings Network E mail IFAX Manual POP3 Receive 2 Press Yes to confirm 3 The LCD displays Receiving and your machine will print the data from the email server Related Information Configure the Brother Machine for Email or Internet Fax I Fax 311 ...

Страница 318: ... your email application The incoming I Fax is attached to an email message that notifies you in its Subject line that your email server has received an I Fax You can either wait for your Brother machine to poll the email server or you can manually poll the email server to receive the incoming data Related Information Configure the Brother Machine for Email or Internet Fax I Fax How Your Brother Ma...

Страница 319: ... s control panel or Web Based Management to configure the following items Relay Broadcast Function Set the Relay Broadcast Function to On Relay Domain Configure your machine s domain name on the machine that will broadcast the document to the conventional fax machine If you wish to use your machine as a relay broadcast device you must specify the trusted domain name the portion of the name after t...

Страница 320: ...Related Information Configure the Brother Machine for Email or Internet Fax I Fax Relay Broadcast from Your Brother Machine Relay Broadcast from Your Computer 314 ...

Страница 321: ...Fax Preview is set to On press Fax and then press Sending Faxes 3 Press Options 4 Swipe up or down or press a or b to display the Broadcasting option 5 Press Broadcasting 6 Press Add Number 7 You can add email addresses to the broadcast in the following ways Press Add Number and press enter the email address and press OK Press Add from Address book Press the check box of the email address you want...

Страница 322: ...Related Information Relay Broadcast How to Enter Text on Your Brother Machine 316 ...

Страница 323: ...fax machine the method of entering the fax machine s fax number will vary depending on the mail application you are using 1 In your email application create a new mail message and type the email address of the relay machine and fax number of the first fax machine in the TO box The following is an example of how to enter the email address and fax number UKFAX brother co uk fax 123456789 E mail addr...

Страница 324: ...Home Network Advanced Network Features I Fax Options I Fax Options Internet Fax I Fax Verification Mail Error Mail 318 ...

Страница 325: ... and processed Verification Mail for receiving allows you to transmit a default report back to the sending station after successfully receiving and processing an I Fax or email To use this feature set the Notification options in the Setup Mail RX and Setup Mail TX options of your Brother machine s control panel menu Related Information I Fax Options Enable Send Notifications for TX Verification Ma...

Страница 326: ...Mail TX Notification 2 Select On or Off to enable or disable the Send Notification feature When Send Notification is On the fax includes an additional field named Message Disposition Notification MDN that contains message delivery information By default Send Notification is set to Off Your fax recipient s machine must support the MDN field in order to send a notification report 3 Press Related Inf...

Страница 327: ...ail Address Receive Notification MDN When Receive Notification is MDN a report to indicate successful reception and processing is sent back to the sender if the originating station sent a request confirmation to the MDN Message Disposition Notification field Receive Notification Off When Receive Notification is Off all forms of receive notification are disabled and no message is sent back to the s...

Страница 328: ...he Brother machine and the error message will be printed If there is an error while receiving an I Fax an error message will be printed for example The message being sent to the machine was not in a TIFF F format To receive the error mail and have it print on your machine in Setup Mail RX switch the Header option to All or to Subject From To Related Information I Fax Options 322 ...

Страница 329: ...s When the Fax to Server feature is set to On all automatic fax transmissions from the machine will be sent to the fax server for fax transmission You can send a fax directly from the machine using the manual fax feature when the Send to Server feature is on To use this function go to your model s Downloads page on the Brother Solutions Center at support brother com to update your machine s firmwa...

Страница 330: ...is fax and the syntax for the suffix would be the domain name of the fax server email gateway The suffix must also include the symbol at the beginning of the suffix The prefix and the suffix information must be stored in the machine before you can use the Fax to server function Destination fax numbers can be saved in the address book or entered using the dial pad up to 40 digit numbers For example...

Страница 331: ... suffix address for the fax server in your Brother machine 1 Press Settings All Settings Network Fax to Server 2 Press Fax to Server 3 Press On 4 Press Prefix 5 Enter the prefix using the Touchscreen and then press OK 6 Press Suffix 7 Enter the suffix using the Touchscreen and then press OK 8 Press Related Information Use the Send Fax to Server Feature 325 ...

Страница 332: ... Operate Fax to Server Operate Fax to Server 1 Place the document in the ADF or on the scanner glass 2 Enter the fax number 3 Press Fax Start The machine will send the message over a TCP IP network to the fax server Related Information Use the Send Fax to Server Feature 326 ...

Страница 333: ...ch to find fax numbers or email addresses The LDAP feature does not support simplified Chinese traditional Chinese or Korean The LDAP feature supports LDAPv3 The LDAP feature does not support SSL TLS MFC 8530DN MFC 8535DN MFC 8540DN To use this function go to your model s Downloads page on the Brother Solutions Center at support brother com to update your machine s firmware or the program in your ...

Страница 334: ...ion bar LDAP Search LDAP Server Address Port The default port number is 389 Search Root Authentication Username This selection will be available depending on the authentication method used Password This selection will be available depending on the authentication method used If the LDAP server supports Kerberos authentication we recommend selecting Kerberos for the Authentication settings It provid...

Страница 335: ...ly on the control panel for Kerberos authentication 1 Press to search 2 Enter the initial characters for your search using the LCD 3 Press OK The LDAP search result will be shown on the LCD the icon appears before the email local address book search results If there is no match on the server or the email local address book the LCD displays Results cannot be found for about 60 seconds 4 Swipe up or...

Страница 336: ...e server This is not the time displayed on the machine s LCD You can automatically or manually synchronize the machine s time with the Coordinated Universal Time UTC provided by the SNTP time server Configure Date and Time Using Web Based Management Configure the SNTP Protocol Using Web Based Management Configure the Store Print Log to Network Settings Using Web Based Management Change LDAP Config...

Страница 337: ...er s address bar where machine s IP address is the machine s IP address For example http 192 168 1 2 3 No password is required by default Type a password if you have set one and then click 4 Click the Administrator tab 5 Click Date Time in the left navigation bar Select the time difference between your location and UTC from the Time Zone drop down list For example the time zone for Eastern Time in...

Страница 338: ... 1 2 3 No password is required by default Type a password if you have set one and then click 4 Click the Network tab 5 Click Protocol in the left navigation bar 6 Select the SNTP check box to activate the settings 7 Restart your Brother machine to activate the configuration 8 Next to the SNTP check box click Advanced Settings and follow the instructions below Option Description Status Displays whe...

Страница 339: ...rver Port Secondary SNTP Server Port Type the port number 1 65535 The secondary SNTP server port is used as a backup to the primary SNTP server port If the primary port is unavailable the machine will contact the secondary SNTP port Synchronization Interval Type the number of hours between server synchronization attempts 1 168 hours 9 Click Submit Related Information Synchronize Time with the SNTP...

Страница 340: ...Home Network Technical Information for Advanced Users Technical Information for Advanced Users Reset the Network Settings to the Factory Settings 334 ...

Страница 341: ...ngs This resets all information such as the password and IP address You can also reset the print server to its factory settings using BRAdmin Light BRAdmin Professional 3 or Web Based Management 1 Press Settings All Settings Network Network Reset 2 Machine will reboot after resetting Press OK for 2 seconds to confirm appears Press OK for two seconds to confirm The machine will restart Related Info...

Страница 342: ...Home Security Security Lock the Machine Settings Network Security Features 336 ...

Страница 343: ... Settings Before turning on the machine s Access Lock make a careful note of your password If you forget the password you must reset all passwords stored in the machine by contacting your administrator or Brother customer service About Using Setting Lock 337 ...

Страница 344: ...Setting Lock Use the Setting Lock feature to block unauthorised access to machine settings When Setting Lock is set to On you cannot access the machine settings without entering the password Set the Setting Lock Password Change the Setting Lock Password Turn Setting Lock On 338 ...

Страница 345: ...ng Lock Password Set the Setting Lock Password 1 Press Settings All Settings General Setup Setting Lock 2 Enter a four digit number for the password 3 Press OK 4 When the LCD displays Verify re enter the password 5 Press OK 6 Press Related Information About Using Setting Lock 339 ...

Страница 346: ... Setting Lock Password 1 Press Settings All Settings General Setup Setting Lock Set Password 2 Enter the current four digit password 3 Press OK 4 Enter a new four digit password 5 Press OK 6 When the LCD displays Verify re enter the password 7 Press OK 8 Press Related Information About Using Setting Lock 340 ...

Страница 347: ...Turn Setting Lock On 1 Press Settings All Settings General Setup Setting Lock Lock Off On 2 Enter the current four digit password 3 Press OK To turn Setting Lock Off press on the LCD enter the current four digit password and then press OK Related Information About Using Setting Lock 341 ...

Страница 348: ...re Function Lock 3 0 Use Active Directory Authentication Use LDAP Authentication Manage Your Network Machine Securely Using SSL TLS Manage Your Network Machine Securely Using IPsec Send or Receive an Email Securely Use IEEE 802 1x Authentication for a Wired or a Wireless Network Store Print Log to Network 342 ...

Страница 349: ...security and encryption protocols available today These network features can be integrated into your overall network security plan to help protect your data and prevent unauthorised access to the machine We recommend disabling the Telnet FTP server and TFTP protocols Accessing the machine using these protocols is not secure Related Information Network Security Features 343 ...

Страница 350: ...restricting the functions available on your Brother machine Before Using Secure Function Lock 3 0 Configure Secure Function Lock 3 0 Using Web Based Management Scan Using Secure Function Lock 3 0 Configure Public Mode for Secure Function Lock 3 0 Additional Secure Function Lock 3 0 Features Register a new ID Card Using Machine s Control Panel 344 ...

Страница 351: ...nt Print includes print jobs sent via AirPrint and Brother iPrint Scan If you register users login names in advance the users will not need to enter their passwords when they use the print function Copy Scan Scan includes scan jobs sent via Brother iPrint Scan Send supported models only Receive supported models only USB Direct Print Scan to USB supported models only Page Limits Page Counters Card ...

Страница 352: ...cted Functions menu in the left navigation bar 9 In the User List Restricted Functions field type a group name or user name alphanumeric up to 15 digits 10 In the Print and the other columns select a check box to allow or clear a check box to restrict the function listed 11 To configure the maximum page count select the On check box in the Page Limits column and then type the maximum number in the...

Страница 353: ...ing only users who have the Scan check box selected will be able to scan Using the Scan feature for restricted users To scan using the machine s control panel Restricted users must enter their PINs on the machine s control panel to access Scan mode To scan from a computer Restricted users must enter their PINs on the machine s control panel before scanning from their computers If the PIN is not en...

Страница 354: ...nt and Brother iPrint Scan 1 Start your web browser 2 Type http machine s IP address in your browser s address bar where machine s IP address is the machine s IP address For example http 192 168 1 2 3 No password is required by default Type a password if you have set one and then click 4 Click the Administrator tab 5 Click the User Restriction Function menu in the left navigation bar 6 Select Secu...

Страница 355: ...urrent page counter including User List Restricted Functions information as a CSV file Card ID NFC ID supported models only Click the User List menu and then type a users Card ID in the Card ID NFC ID field You can use your ID card for authentication Last Counter Record Click Last Counter Record if you want the machine to retain the page count after the counter has been reset Counter Auto Reset Cl...

Страница 356: ...els MFC 8540DN 1 Touch the NFC logo on the machine s control panel with a registered ID Card 2 Press Register Card 3 Touch a new ID Card to the NFC logo The new ID Card s number is registered to the machine For the supported ID Card types go to the Brother Solutions Center at support brother com to see FAQs Troubleshooting 4 Press OK Related Information Secure Function Lock 3 0 350 ...

Страница 357: ...tication Use Active Directory Authentication Introduction to Active Directory Authentication Configure Active Directory Authentication Using Web Based Management Log On to Change the Machine Settings Using the Machine s Control Panel Active Directory Authentication 351 ...

Страница 358: ...mail address from the LDAP server based on your User ID when sending scanned data to an email server To use this feature select the On option for the Get Mail Address setting and LDAP kerberos authentication method Your email address will be set as the sender when the machine sends scanned data to an email server If the machine cannot locate your email address the machine s email address will be s...

Страница 359: ...be printed automatically This feature is available only for print data created by a Brother native printer driver Storage Fax RX Data Select this option to store incoming fax data You can print all incoming fax data after you log on to the machine Remember User ID Select this option to save your User ID Active Directory Server Address Type the IP address or the server name for example ad example c...

Страница 360: ...Related Information Use Active Directory Authentication 354 ...

Страница 361: ...ol Panel Active Directory Authentication When Active Directory Authentication is enabled the machine s control panel will be locked until you enter your User ID and password on the machine s control panel 1 On the machine s control panel use the Touchscreen to enter your User ID and Password 2 Press OK 3 When authentication is successful the machine s control panel will be unlocked Related Informa...

Страница 362: ...es Use LDAP Authentication Use LDAP Authentication Introduction to LDAP Authentication Configure LDAP Authentication Using Web Based Management Log On to Change the Machine Settings Using the Machine s Control Panel LDAP Authentication 356 ...

Страница 363: ... email address from the LDAP server based on your User ID when sending scanned data to an email server To use this feature select the On option for the Get Mail Address setting Your email address will be set as the sender when the machine sends scanned data to an email server If the machine cannot locate your email address the machine s email address will be set as the sender When LDAP Authenticat...

Страница 364: ... printed automatically This feature is available only for print data created by a Brother native printer driver Storage Fax RX Data Select this option to store incoming fax data You can print all incoming fax data after you log on to the machine Remember User ID Select this option to save your User ID LDAP Server Address Type the IP address or the server name for example ad example com of the LDAP...

Страница 365: ... Control Panel LDAP Authentication When LDAP Authentication is enabled the machine s control panel will be locked until you enter your User ID and password on the machine s control panel 1 On the machine s control panel use the Touchscreen to enter your User ID and Password 2 Press OK 3 When authentication is successful the machine s control panel will be unlocked Related Information Use LDAP Auth...

Страница 366: ...Manage Your Network Machine Securely Using SSL TLS Introduction to SSL TLS Certificates and Web Based Management Manage Your Network Machine Securely Using Web Based Management Manage Your Network Machine Securely Using BRAdmin Professional 3 Windows Print Documents Securely Using SSL TLS 360 ...

Страница 367: ...effective method of protecting data sent over a local or wide area network LAN or WAN It works by encrypting data such as a print job sent over a network so anyone trying to capture it will not be able to read it SSL TLS will work with other forms of security such as firewalls Related Information Manage Your Network Machine Securely Using SSL TLS Brief History of SSL TLS Benefits of Using SSL TLS ...

Страница 368: ...Banking and you see https and the little padlock icon in the web browser you are using SSL SSL grew to work with additional applications such as Telnet printer and FTP software in order to become a universal solution for online security Its original design intentions are still being used today by many online retailers and banks to secure sensitive data such as credit card numbers customer records ...

Страница 369: ...nauthorised users from reading data sent to the machine SSL s key selling point is that it can be used to print confidential data securely For example an HR department in a large company may be printing wage slips on a regular basis Without encryption the data contained on these wages slips can be read by other network users However with SSL TLS anyone trying to capture the data will see a confusi...

Страница 370: ...sed Management Certificates and Web Based Management You must configure a certificate to manage your networked Brother machine securely using SSL TLS You must use Web Based Management to configure a certificate Supported Security Certificate Features Create and Install a Certificate Manage Multiple Certificates 364 ...

Страница 371: ...ficate This print server issues its own certificate Using this certificate you can easily use the SSL TLS communication without creating or installing a different certificate from a CA Certificate from a Certificate Authority CA There are two methods for installing a certificate from a CA If you already have a certificate from a CA or if you want to use a certificate from an external trusted CA Wh...

Страница 372: ...es and Web Based Management Create and Install a Certificate Create and Install a Certificate Step by Step Guide for Creating and Installing a Certificate Create and Install a Self signed Certificate Create and Install a Certificate from a Certificate Authority CA Import and Export a CA Certificate 366 ...

Страница 373: ... use a certificate from a Certificate Authority CA These are a brief summary of the actions required based on the option you choose Option 1 Self Signed Certificate 1 Create a self signed certificate using Web Based Management 2 Install the self signed certificate on your computer Option 2 Certificate from a CA 1 Create a Certificate Signing Request CSR using Web Based Management 2 Install the cer...

Страница 374: ...Management Create and Install a Certificate Create and Install a Self signed Certificate Create and Install a Self signed Certificate Create a Self signed Certificate Install the Self signed Certificate for Windows users with Administrator Rights Import and Export the Self signed Certificate on your Brother Machine 368 ...

Страница 375: ...s Monitor screen 3 No password is required by default Type a password if you have set one and then click 4 Click the Network tab 5 Click the Security tab 6 Click Certificate 7 Click Create Self Signed Certificate 8 Enter a Common Name and a Valid Date The length of the Common Name is less than 64 bytes Enter an identifier such as an IP address node name or domain name to use when accessing this ma...

Страница 376: ...rver The self signed certificate is created and saved in your machine s memory To use SSL TLS communication the self signed certificate must be installed on your computer Related Information Create and Install a Self signed Certificate 370 ...

Страница 377: ...of the following Windows XP and Windows Server 2003 Start your web browser and then go to step 3 Windows Vista Windows 7 Windows Server 2008 Click Start All Programs Windows 8 Right click the Internet Explorer icon on the taskbar Windows Server 2012 and Windows Server 2012 R2 Click Internet Explorer and then right click the Internet Explorer icon that appears on the taskbar 2 Right click Internet ...

Страница 378: ...nue to this website not recommended Windows XP and Windows Server 2003 When the following dialog box appears click View Certificate and then go to step 6 5 Click Certificate Error and then click View certificate 372 ...

Страница 379: ...6 Click Install Certificate 7 When the Certificate Import Wizard appears click Next 8 Select Place all certificates in the following store and then click Browse 373 ...

Страница 380: ...ck Yes if the fingerprint thumbprint is correct The fingerprint thumbprint is printed on the Network Configuration Report 13 Click OK The self signed certificate is now installed on your computer and SSL TLS communication is available Related Information Create and Install a Self signed Certificate 374 ...

Страница 381: ...eate and Install a Self signed Certificate Import and Export the Self signed Certificate on your Brother Machine Import and Export the Self signed Certificate on your Brother Machine You can store the self signed certificates on your Brother machine and manage them by importing and exporting Import the Self signed Certificate Export the Self signed Certificate 375 ...

Страница 382: ... http SharedPrinter If you enable a NetBIOS name you can also use the node name For example http brnxxxxxxxxxxxx The NetBIOS name can be found in the Network Configuration Report For Macintosh access Web Based Management by clicking the machine s icon on the Status Monitor screen 3 No password is required by default Type a password if you have set one and then click 4 Click the Network tab 5 Click...

Страница 383: ...e the node name For example http brnxxxxxxxxxxxx The NetBIOS name can be found in the Network Configuration Report For Macintosh access Web Based Management by clicking the machine s icon on the Status Monitor screen 3 No password is required by default Type a password if you have set one and then click 4 Click the Network tab 5 Click the Security tab 6 Click Certificate 7 Click Export shown with ...

Страница 384: ...f you already have a certificate from an external trusted CA you can store the certificate and private key on the machine and manage them by importing and exporting If you do not have a certificate from an external trusted CA create a Certificate Signing Request CSR send it to a CA for authentication and install the returned certificate on your machine Create a Certificate Signing Request CSR Inst...

Страница 385: ...ssword if you have set one and then click 4 Click the Network tab 5 Click the Security tab 6 Click Certificate 7 Click Create CSR 8 Type a Common Name required and add other information about your Organization optional Your company details are required so that a CA can confirm your identity and verify it to the outside world The length of the Common Name must be less than 64 bytes Enter an identif...

Страница 386: ...ificate template to securely create the Client Certificate If you are creating a Client Certificate for an IEEE 802 1x environment with EAP TLS authentication we recommend using User for the certificate template For more information go to your model s page on the Brother Solutions Center at support brother com Related Information Create and Install a Certificate from a Certificate Authority CA 380...

Страница 387: ...he machine s IP address For example http 192 168 1 2 If you are using a Domain Name System or enable a NetBIOS name you can type another name such as SharedPrinter instead of the IP address For example http SharedPrinter If you enable a NetBIOS name you can also use the node name For example http brnxxxxxxxxxxxx The NetBIOS name can be found in the Network Configuration Report For Macintosh access...

Страница 388: ...tificate Create and Install a Certificate from a Certificate Authority CA Import and Export the Certificate and Private Key Import and Export the Certificate and Private Key Store the certificate and private key on your machine and manage them by importing and exporting them Import a Certificate and Private Key Export the Certificate and Private Key 382 ...

Страница 389: ...example http SharedPrinter If you enable a NetBIOS name you can also use the node name For example http brnxxxxxxxxxxxx The NetBIOS name can be found in the Network Configuration Report For Macintosh access Web Based Management by clicking the machine s icon on the Status Monitor screen 3 No password is required by default Type a password if you have set one and then click 4 Click the Network tab ...

Страница 390: ... If you enable a NetBIOS name you can also use the node name For example http brnxxxxxxxxxxxx The NetBIOS name can be found in the Network Configuration Report For Macintosh access Web Based Management by clicking the machine s icon on the Status Monitor screen 3 No password is required by default Type a password if you have set one and then click 4 Click the Network tab 5 Click the Security tab 6...

Страница 391: ...Using SSL TLS Certificates and Web Based Management Create and Install a Certificate Import and Export a CA Certificate Import and Export a CA Certificate You can import export and store CA certificates on your Brother machine Import a CA Certificate Export a CA Certificate 385 ...

Страница 392: ... name you can type another name such as SharedPrinter instead of the IP address For example http SharedPrinter If you enable a NetBIOS name you can also use the node name For example http brnxxxxxxxxxxxx The NetBIOS name can be found in the Network Configuration Report For Macintosh access Web Based Management by clicking the machine s icon on the Status Monitor screen 3 No password is required by...

Страница 393: ...Printer instead of the IP address For example http SharedPrinter If you enable a NetBIOS name you can also use the node name For example http brnxxxxxxxxxxxx The NetBIOS name can be found in the Network Configuration Report For Macintosh access Web Based Management by clicking the machine s icon on the Status Monitor screen 3 No password is required by default Type a password if you have set one a...

Страница 394: ...ored UP on Brother Machine Self signed Certificate or Certificate Issued by a CA 6 CA Certificate 9 We recommend storing one less certificate than allowed reserving an empty spot in case of certificate expiration When a certificate expires import a new certificate into the reserved spot and then delete the expired certificate This ensures that you avoid configuration failure When you use HTTPS IPP...

Страница 395: ...tab 2 Click the Protocol menu in the left navigation bar 3 Click HTTP Server Settings 1 Start your web browser 2 Type https Common Name in your browser s address bar where Common Name is the Common Name that you assigned to the certificate this could be your IP address node name or domain name 3 No password is required by default Type a password if you have set one and then click 4 You can now acc...

Страница 396: ...ork correctly since they authorize the read only access of version 1 and version 2c If you want to use all applications we recommend using SNMP v1 v2c read write access mode SNMPv3 read write access In this mode the print sever uses version 3 of the SNMP protocol If you want to manage the print server securely use this mode When you use SNMPv3 read write access mode note the following You can use ...

Страница 397: ...b Based Management with the HTTPS protocol if you use BRAdmin Professional 3 and Web Based Management together Use a different password in each group if you are managing a mixed group of older and newer print servers with BRAdmin Professional 3 This will ensure security is maintained on the newer print servers Older versions of BRAdmin refer to BRAdmin Professional older than Ver 2 80 and BRAdmin ...

Страница 398: ...tBIOS name can be found in the Network Configuration Report For Macintosh access Web Based Management by clicking the machine s icon on the Status Monitor screen 3 No password is required by default Type a password if you have set one and then click 4 Click the Network tab 5 Click Protocol Make sure the IPP check box is selected If the IPP check box is not selected select the IPP check box and the...

Страница 399: ...achine Securely Using IPsec Manage Your Network Machine Securely Using IPsec Introduction to IPsec Configure IPsec Using Web Based Management Configure an IPsec Address Template Using Web Based Management Configure an IPsec Template Using Web Based Management 393 ...

Страница 400: ...When the devices start communicating using IPsec keys are exchanged using Internet Key Exchange IKE first and then the encrypted data is transmitted using the keys In addition IPsec has two operation modes the Transport mode and Tunnel mode The Transport mode is used mainly for communication between devices and the Tunnel mode is used in environments such as a Virtual Private Network VPN For IPsec...

Страница 401: ...ype http machine s IP address in your browser s address bar where machine s IP address is the machine s IP address For example http 192 168 1 2 3 No password is required by default Type a password if you have set one and then click 4 Click the Network tab 5 Click the Security tab 6 Click the IPsec menu in the left navigation bar 7 In the Status field enable or disable IPsec 8 Select Negotiation Mo...

Страница 402: ...hen you select multiple check boxes the lower numbered check boxes have priority if the settings for the selected check boxes conflict 13 Click on the corresponding drop down list to select the Address Template that is used for the IPsec connection conditions To add an Address Template click Add Template 14 Click on the corresponding drop down list to select the IPsec Template that is used for the...

Страница 403: ...ete an Address Template When an Address Template is in use it cannot be deleted 7 Click the Address Template that you want to create The IPsec Address Template appears 8 In the Template Name field type a name for the template up to 16 characters 9 Select a Local IP Address option to specify the IP address conditions for the sender IP Address Specify the IP address Select ALL IPv4 Address ALL IPv6 ...

Страница 404: ... IP addresses for the IP address range If the starting and ending IP addresses are not standardized to IPv4 or IPv6 or the ending IP address is smaller than the starting address an error will occur IP Address Prefix Specify the IP address using CIDR notation For example 192 168 1 1 24 Because the prefix is specified in the form of a 24 bit subnet mask 255 255 255 0 for 192 168 1 1 the addresses 19...

Страница 405: ...tab 5 Click the Security tab 6 Click IPsec Template in the left navigation bar The Template List appears displaying 10 IPsec Templates Click the Delete button to delete an IPsec Template When an IPsec Template is in use it cannot be deleted 7 Click IPsec Template that you want to create The IPsec Template screen appears The configuration fields differ based on the Use Prefixed Template and Interne...

Страница 406: ...Related Information Manage Your Network Machine Securely Using IPsec IKEv1 Settings for an IPsec Template IKEv2 Settings for an IPsec Template Manual Settings for an IPsec Template 400 ...

Страница 407: ...anage Your Network Machine Securely Using IPsec Configure an IPsec Template Using Web Based Management IKEv1 Settings for an IPsec Template IKEv1 Settings for an IPsec Template Template Name Type a name for the template up to 16 characters 401 ...

Страница 408: ... DES 3DES AES CBC 128 or AES CBC 256 Hash Select MD5 SHA1 SHA256 SHA384 or SHA512 SA Lifetime Specify the IKE SA lifetime Type the time seconds and number of kilobytes KByte Encapsulating Security Protocol Select ESP AH or AH ESP ESP is a protocol for carrying out encrypted communication using IPsec ESP encrypts the payload communicated contents and adds additional information The IP packet is com...

Страница 409: ...rive other keys Therefore even if a key is compromised the damage will be limited only to the messages that were encrypted using that key Select Enabled or Disabled Authentication Method Select the authentication method Select Pre Shared Key or Certificates Pre Shared Key When encrypting communication the encryption key is exchanged and shared beforehand using another channel If you selected Pre S...

Страница 410: ...anage Your Network Machine Securely Using IPsec Configure an IPsec Template Using Web Based Management IKEv2 Settings for an IPsec Template IKEv2 Settings for an IPsec Template Template Name Type a name for the template up to 16 characters 404 ...

Страница 411: ...ceive open information that was generated using a random number and the secret key Select Group1 Group2 Group5 or Group14 Encryption Select DES 3DES AES CBC 128 or AES CBC 256 Hash Select MD5 SHA1 SHA256 SHA384 or SHA512 SA Lifetime Specify the IKE SA lifetime Type the time seconds and number of kilobytes KByte Encapsulating Security Protocol Select ESP ESP is a protocol for carrying out encrypted...

Страница 412: ...and shared beforehand using another channel If you selected Pre Shared Key for the Authentication Method type the Pre Shared Key up to 32 characters Local ID Type ID Select the sender s ID type and then type the ID Select IPv4 Address IPv6 Address FQDN E mail Address or Certificate for the type If you select Certificate type the common name of the certificate in the ID field Remote ID Type ID Sele...

Страница 413: ...Related Information Configure an IPsec Template Using Web Based Management 407 ...

Страница 414: ...d Template Select Custom Internet Key Exchange IKE IKE is a communication protocol that is used to exchange encryption keys in order to carry out encrypted communication using IPsec To carry out encrypted communication for that time only the encryption algorithm that is necessary for IPsec is determined and the encryption keys are shared For IKE the encryption keys are exchanged using the Diffie H...

Страница 415: ...lected in Internet Key Exchange IKE and ESP is selected in Protocol in Encapsulating Security The number of characters you can set differs depending on the setting you chose for Encryption in the Encapsulating Security section If the length of the specified code key is different than the selected encryption algorithm an error will occur DES 64 bits 8 bytes 3DES 192 bits 24 bytes AES CBC 128 128 bi...

Страница 416: ... CBC 128 or AES CBC 256 The encryption can be selected only when ESP is selected in Protocol Hash Select None MD5 SHA1 SHA256 SHA384 or SHA512 None can be selected only when ESP is selected in Protocol SA Lifetime Specify the IKE SA lifetime Type the time seconds and number of kilobytes KByte before the IPsec SA will expire Encapsulation Mode Select Transport or Tunnel Remote Router IP Address Spe...

Страница 417: ... Features Send or Receive an Email Securely Send or Receive an Email Securely Configure Email Sending or Receiving Using Web Based Management Send an Email with User Authentication Send or Receive an Email Securely Using SSL TLS 411 ...

Страница 418: ...ame For example http brnxxxxxxxxxxxx The NetBIOS name can be found in the Network Configuration Report For Macintosh access Web Based Management by clicking the machine s icon on the Status Monitor screen 3 No password is required by default Type a password if you have set one and then click 4 Click the Network tab 5 Click Protocol in the left navigation bar 6 In the POP3 IMAP4 SMTP field click Ad...

Страница 419: ... email notification email reports and I Fax We recommend using Web Based Management to configure the SMTP authentication Email Server Settings You must configure your machine s SMTP authentication method to match the method used by your email server For details about your email server settings contact your network administrator or Internet Service Provider ISP To enable SMTP server authentication ...

Страница 420: ...ve an email via an email server that requires secure SSL TLS communication To send or receive email via an email server that is using SSL TLS communication you must configure SMTP over SSL TLS POP3 over SSL TLS or IMAP4 over SSL TLS We recommend using Web Based Management to configure SSL TLS Verify Server Certificate Under SSL TLS if you choose SSL or TLS the Verify Server Certificate check box w...

Страница 421: ...415 ...

Страница 422: ...e Port value will be changed to match the protocol To change the port number manually type the port number after you choose SSL or TLS for the SSL TLS settings You must configure your machine s POP3 IMAP4 SMTP communication method to match the method used by your email server For details about your email server settings contact your network administrator or your ISP In most cases the secured webma...

Страница 423: ... Wired or a Wireless Network Use IEEE 802 1x Authentication for a Wired or a Wireless Network What Is IEEE 802 1x Authentication Configure IEEE 802 1x Authentication for a Wired or a Wireless Network Using Web Based Management Web Browser IEEE 802 1x Authentication Methods 417 ...

Страница 424: ...d for wired and wireless networks that limits access from unauthorised network devices Your Brother machine supplicant sends an authentication request to a RADIUS server Authentication server through your access point or HUB After your request has been verified by the RADIUS server your machine can access the network Related Information Use IEEE 802 1x Authentication for a Wired or a Wireless Netw...

Страница 425: ...using a Domain Name System or enable a NetBIOS name you can type another name such as SharedPrinter instead of the IP address For example http SharedPrinter If you enable a NetBIOS name you can also use the node name For example http brnxxxxxxxxxxxx The NetBIOS name can be found in the Network Configuration Report For Macintosh access Web Based Management by clicking the machine s icon on the Stat...

Страница 426: ...your machine to the IEEE 802 1x supported network After a few minutes print the Network Configuration Report to check the Wired IEEE 802 1x Status Option Description Success The wired IEEE 802 1x function is enabled and the authentication was successful Failed The wired IEEE 802 1x function is enabled however the authentication failed Off The wired IEEE 802 1x function is not available Related Inf...

Страница 427: ... PEAP creates an encrypted Secure Sockets Layer SSL Transport Layer Security TLS tunnel between a client and an authentication server for sending a user ID and password PEAP provides mutual authentication between the server and the client The Brother machine supports the following inner authentications PEAP MS CHAPv2 PEAP GTC EAP TTLS Extensible Authentication Protocol Tunneled Transport Layer Sec...

Страница 428: ...work Store Print Log to Network Store Log to Network Overview Configure the Store Print Log to Network Settings Using Web Based Management Use the Store Print Log to Network s Error Detection Setting Use Store Print Log to Network with Secure Function Lock 3 0 422 ...

Страница 429: ...that runs over TCP IP allowing computers on a network to share files over an intranet or the Internet The following print functions are recorded in the print log Print jobs from your computer USB Direct Print supported models only Copy Received Fax supported models only The Store Print Log to Network feature supports Kerberos authentication and NTLMv2 authentication You must configure the SNTP pro...

Страница 430: ...ication protocol which allows devices or individuals to securely prove their identity to network servers using a single sign on NTLMv2 is the authentication method used by Windows to log into servers Auto If you select Auto NTLMv2 will be used to the authentication method Kerberos Select the Kerberos option to use Kerberos authentication only NTLMv2 Select the NTLMv2 option to use NTLMv2 authentic...

Страница 431: ... Your settings will be submitted automatically 10 The machine will test your settings 11 If your settings are accepted Test OK appears on the screen If Test Error appears check all settings and then click Submit to display the Test page again Related Information Store Print Log to Network Synchronize Time with the SNTP Server Using Web Based Management Configure the SNTP Protocol Using Web Based M...

Страница 432: ...log cannot be stored to the server Even if you select the Cancel Print option your machine will print a received fax Ignore Log Print If you select the Ignore Log Print option the machine prints the documentation even if the print log cannot be stored to the server When the store print log function has recovered the print log is recorded as follows a If the log cannot be stored at the end of print...

Страница 433: ...nction Lock 3 0 When Secure Function Lock 3 0 is active the names of the registered users for copy Fax RX and USB Direct Print if available are recorded in the Store Print Log to Network report When the Active Directory Authentication is enabled logged on user name will be recorded in the Store Print Log to Network report Related Information Store Print Log to Network 427 ...

Страница 434: ...Home Mobile Web Connect Mobile Web Connect Print with AirPrint Print with Mopria Use Brother iPrint Scan Print and Scan Using Near Field Communication NFC 428 ...

Страница 435: ...ts AirPrint also lets you send faxes directly from your Macintosh computer without printing them requires OS X 10 8 5 or later 1 2 3 1 Wired network 2 Telephone line 3 Your Brother machine AirPrint also lets you scan documents to your Macintosh computer without installing a driver on the device requires OS X 10 9 or later For more information see the AirPrint Guide Go to your model s Manuals page ...

Страница 436: ...int without additional setup Many native Android apps including Google Chrome Gmail and Gallery support printing 1 2 3 1 Android 4 4 or later 2 Wired network 3 Your Brother machine You must download the Mopria Print Service from the Google Play Store and install it on your Android device Be sure to turn the service on before using this feature The network environment varies in some countries Mopri...

Страница 437: ... iPrint Scan allows you to use features of your Brother machine directly from your iPhone iPod touch iPad and iPad mini Download and install Brother iPrint Scan from the App Store For Windows Phone Devices Brother iPrint Scan allows you to use features of your Brother machine directly from your Windows Phone without using a computer Download and install Brother iPrint Scan from the Windows Phone S...

Страница 438: ... is NFC enabled you can print data photos PDF files text files web pages and email messages from the device or scan photos and documents to the device by touching it to the NFC logo on the left side of your machine s control panel You must download and install Brother iPrint Scan on your Android device to use this feature For more information see the Mobile Print Scan Guide for Brother iPrint Scan...

Страница 439: ...olCenter Use Brother s ControlCenter software utility to quickly access your frequently used applications Using ControlCenter gives you direct access to specific applications ControlCenter4 Windows ControlCenter2 Macintosh 433 ...

Страница 440: ...Change the Operation Mode in ControlCenter4 Windows Scan Using ControlCenter4 Home Mode Windows Scan Using ControlCenter4 Advanced Mode Windows Set Up the Brother Machine Using ControlCenter4 Windows Create a Custom Tab Using ControlCenter4 Advanced Mode Windows 434 ...

Страница 441: ...enter4 Windows Change the Operation Mode in ControlCenter4 Windows ControlCenter4 has two operation modes Home Mode and Advanced Mode You can change modes at any time Home Mode Advanced Mode Home Mode ControlCenter4 Home Mode lets you access your machine s main features easily 435 ...

Страница 442: ...omise one button scan actions To change operation mode 1 Click the ControlCenter4 icon in the task tray and then select Open 2 Click the Configuration button and then select Mode Select 3 The mode selection dialog box appears Select either the Home Mode or Advanced Mode option 4 Click OK Related Information ControlCenter4 Windows 436 ...

Страница 443: ...Use ControlCenter4 Home Mode to access your machine s main features Scan Using ControlCenter4 Home Mode Windows Save Scanned Data to a Folder as a PDF File Using ControlCenter4 Home Mode Windows Scan Both Sides of a Document Automatically Using ControlCenter4 Home Mode Windows Scan Settings for ControlCenter4 Home Mode Windows 437 ...

Страница 444: ... Graphics Using ControlCenter4 Advanced Mode Windows Save Scanned Data to a Folder as a PDF File Using ControlCenter4 Advanced Mode Windows Scan Both Sides of a Document Automatically Using ControlCenter4 Advanced Mode Windows Scan Both Sides of an ID Card Using ControlCenter4 Advanced Mode Windows Scan to Email Attachment Using ControlCenter4 Advanced Mode Windows Scan to an Editable Text File OC...

Страница 445: ... settings as needed Export Click to save the current configuration settings to a file Click Export to save your address book or all settings for your machine Import Click to import a file and read its settings Print Click to print the selected items on the machine You cannot print the data until it is uploaded to the machine Click Apply to upload the new data to the machine and then click Print OK...

Страница 446: ...uter is protected by a firewall and is unable to use Remote Setup you may need to configure the firewall settings to allow communication through port numbers 137 and 161 If you are using Windows Firewall and you installed the Brother software and drivers from the CD ROM the necessary firewall settings have already been set Related Information ControlCenter4 Windows Remote Setup Windows 440 ...

Страница 447: ...nd then click Open 2 Click the Configuration button and then select Create custom tab A custom tab is created 3 To change the name of a custom tab right click the custom tab and then select Rename custom tab 4 Click the Configuration button select Create custom button and then select the button you want to create The settings dialog box appears 5 Type the button name and then change the settings i...

Страница 448: ...Related Information ControlCenter4 Windows 442 ...

Страница 449: ...Home ControlCenter ControlCenter2 Macintosh ControlCenter2 Macintosh Scan Using ControlCenter2 Macintosh Set Up the Brother Machine Using ControlCenter2 Macintosh 443 ...

Страница 450: ...s or other file formats Scan Using ControlCenter2 Macintosh Save Scanned Data to a Folder as a PDF File Using ControlCenter2 Macintosh Scan Both Sides of a Document Automatically Using ControlCenter2 Macintosh Scan Both Sides of an ID Card Using ControlCenter2 Macintosh Scan to Email Attachment Using ControlCenter2 Macintosh Scan to an Editable Text File OCR Using ControlCenter2 Macintosh 444 ...

Страница 451: ...ter2 screen appears 2 Click the DEVICE SETTINGS tab 3 Click the Remote Setup button The Remote Setup Program screen appears 4 Configure the settings as needed Export Click to save the current configuration settings to a file Click Export to save your address book or all settings for your machine Import Click to import a file and read its settings Print Click to print the selected items on the mach...

Страница 452: ...rs enter the correct data again and then click OK Cancel Click to exit the Remote Setup Program without uploading data to the machine Apply Click to upload data to the machine without exiting the Remote Setup Program 5 When finished click OK Related Information ControlCenter2 Macintosh Remote Setup Macintosh 446 ...

Страница 453: ...wing The machine s power cord is connected correctly and the machine s power is on See the Quick Setup Guide All of the protective materials have been removed See the Quick Setup Guide Paper is loaded correctly in the paper tray The interface cables are securely connected to the machine and the computer Error and maintenance messages If you did not solve the problem with the checks identify the pr...

Страница 454: ...on Lock Settings Cartridge Error The toner cartridge is not installed correctly Remove the toner cartridge and drum unit assembly Take out the toner cartridge and put it back in the drum unit again Reinstall the toner cartridge and drum unit assembly in the machine If the problem continues contact Brother customer service or your local Brother dealer Comm Error Poor telephone line quality caused a...

Страница 455: ... out all jammed paper Jam Inside The paper is jammed inside the machine Open the front cover remove the toner cartridge and drum unit assembly and pull out all jammed paper Close the front cover Jam MP Tray The paper is jammed in the MP tray Remove all jammed paper from in and around the MP tray Press Retry Jam Rear The paper is jammed in the back of the machine Open the fuser cover and remove all...

Страница 456: ... paper in the paper tray indicated on the LCD Make sure the paper guides are set to the correct size If paper is in the tray remove it and load it again Make sure the paper guides are set to the correct size Do not overfill the paper tray No Response Busy The number you dialed does not answer or is busy Verify the number and try again No Toner The toner cartridge or the toner cartridge and drum un...

Страница 457: ...roblem continues contact Brother customer service Received Fax An unprinted received fax is waiting to print on the correct size paper To print the received fax load the correct size of paper in the tray indicated on the LCD Paper sizes available for fax printing are A4 Letter Legal Folio Mexico Legal and India Legal Replace Toner The toner cartridge is at the end of its life The machine stops all...

Страница 458: ...ays this message you can still print The toner cartridge is near the end of its life Order a new toner cartridge now so a replacement toner cartridge is available when the LCD displays Replace Toner Too Many Trays The number of installed Optional Trays exceeds the maximum number Reduce the number of Optional Trays Touchscreen Initialisation Failed The Touchscreen was pressed before the power on in...

Страница 459: ... Transfer Your Faxes or Fax Journal Report Replace Supplies Load and Print Using the Paper Tray Load and Print Using the Multi purpose Tray MP Tray Clean the Corona Wire 453 ...

Страница 460: ...our computer You can also transfer the Fax Journal report to see if there are any faxes you must transfer If there is an error message on the LCD after you transfer the faxes disconnect your Brother machine from the power source for several minutes and then reconnect it Related Information Error and Maintenance Messages Transfer Faxes to Another Fax Machine Transfer Faxes to Your Computer Transfer...

Страница 461: ... up your Station ID you cannot enter Fax Transfer mode 1 Press Settings All Settings Service Data Transfer Fax Transfer 2 Do one of the following If the LCD displays No Data there are no faxes left in the machine s memory Press Close Enter the fax number to which faxes will be forwarded 3 Press Fax Start Related Information Transfer Your Faxes or Fax Journal Report Set Your Station ID 455 ...

Страница 462: ...C FAX in the left navigation bar and then click Receive Windows 8 Click Brother Utilities and then click the drop down list and select your model name if not already selected Click PC FAX in the left navigation bar and then click Receive 2 Make sure you have set PC Fax Receive on the machine If faxes are in the machine s memory when you set up PC Fax Receive the LCD displays Send Fax to PC 3 Do on...

Страница 463: ... the Fax Journal Report to Another Fax Machine If you have not set up your Station ID you cannot enter fax transfer mode 1 Press Settings All Settings Service Data Transfer Report Transfer 2 Enter the fax number to which the Fax Journal will be forwarded 3 Press Fax Start Related Information Transfer Your Faxes or Fax Journal Report Set Your Station ID 457 ...

Страница 464: ...Home Troubleshooting Document Jams Document Jams Document is Jammed in the Top of the ADF Unit Document is Jammed under the Document Cover Remove Small Scraps of Paper Jammed in the ADF 458 ...

Страница 465: ...in the Top of the ADF Unit 1 Remove any paper from the ADF that is not jammed 2 Open the ADF cover 3 Pull the jammed document out to the left If the document rips or tears be sure you remove any debris or scraps to prevent future jams 4 Close the ADF cover 5 Press Related Information Document Jams 459 ...

Страница 466: ...the Document Cover 1 Remove any paper from the ADF that is not jammed 2 Lift the document cover 3 Pull the jammed document out to the right If the document rips or tears be sure you remove any debris or scraps to prevent future jams 4 Close the document cover 5 Press Related Information Document Jams 460 ...

Страница 467: ...Jammed in the ADF Remove Small Scraps of Paper Jammed in the ADF 1 Lift the document cover 2 Insert a piece of stiff paper such as cardstock into the ADF to push any small paper scraps through 3 Close the document cover 4 Press Related Information Document Jams 461 ...

Страница 468: ...hen you are adding new paper This helps prevent multiple sheets of paper from feeding through the machine at one time and prevents paper jams Paper is Jammed in the MP tray Paper is Jammed in the Paper Tray Paper is Jammed in the Back of the Machine Paper is Jammed inside the Machine Paper is Jammed in the 2 sided Tray 462 ...

Страница 469: ... machine s MP tray follow these steps 1 Remove the paper from the MP tray 2 Remove any jammed paper from in and around the MP tray 3 Fan the paper stack and then put it back in the MP tray 4 Reload paper in the MP tray and make sure the paper stays under the maximum paper height guides 1 on both sides of the tray 1 5 Press Retry to resume printing Related Information Paper Jams 463 ...

Страница 470: ...am in the paper tray follow these steps 1 Pull the paper tray completely out of the machine 2 Slowly pull out the jammed paper Pulling the jammed paper downward using both hands allows you to remove the paper more easily 3 Fan the stack of paper to prevent further jams and slide the paper guides to fit the paper size 4 Make sure the paper is below the maximum paper mark b b b 464 ...

Страница 471: ...5 Put the paper tray firmly back in the machine Related Information Paper Jams 465 ...

Страница 472: ...these steps 1 Leave the machine turned on for 10 minutes for the internal fan to cool the extremely hot parts inside the machine 2 Open the back cover 3 Pull the green levers at the left and right sides toward you to release the fuser cover WARNING HOT SURFACE The machine s internal parts will be extremely hot Wait for the machine to cool down before touching them 4 Use both hands to gently pull t...

Страница 473: ...5 Close the fuser cover 6 Close the back cover until it locks in the closed position Related Information Paper Jams 467 ...

Страница 474: ...de the machine follow these steps 1 Leave the machine turned on for 10 minutes for the internal fan to cool the extremely hot parts inside the machine 2 Open the front cover 3 Remove the toner cartridge and drum unit assembly WARNING HOT SURFACE The machine s internal parts will be extremely hot Wait for the machine to cool down before touching them 4 Pull out the jammed paper slowly 468 ...

Страница 475: ...5 Install the toner cartridge and drum unit assembly into the machine 6 Close the front cover Related Information Paper Jams 469 ...

Страница 476: ... is a jam in the 2 sided paper tray follow these steps 1 Leave the machine turned on for 10 minutes for the internal fan to cool the extremely hot parts inside the machine 2 Pull the paper tray completely out of the machine 3 At the back of the machine pull the 2 sided tray completely out of the machine 4 Pull the jammed paper out of the machine or out of the 2 sided tray 470 ...

Страница 477: ...e machine s internal parts will be extremely hot Wait for the machine to cool down before touching them 7 Use both hands to gently pull the jammed paper out of the back of the machine 8 Close the back cover until it locks in the closed position 9 Put the 2 sided tray firmly back in the rear of the machine 10 Put the paper tray firmly back in the front of the machine 471 ...

Страница 478: ...Related Information Paper Jams 472 ...

Страница 479: ...tings Control Panel In the Hardware and Sound group click View devices and printers Right click the Brother XXX XXXX Click See what s printing If printer driver options appear select your printer driver Click Printer in the menu bar and make sure that Use Printer Offline is not selected Windows Server 2012 R2 Click Control Panel on the Start screen In the Hardware group click View devices and prin...

Страница 480: ...e machine does not feed paper If there is paper in the paper tray make sure it is straight If the paper is curled straighten it Sometimes it is helpful to remove the paper turn the stack over and put it back in the paper tray Reduce the amount of paper in the paper tray and then try again Make sure MP Tray is not selected for Paper Source in the printer driver Clean the paper pick up rollers The m...

Страница 481: ... Toner Save may be turned on Turn off Toner Save mode in the machine s menu settings or the printer driver Clean the drum unit Clean the corona wire on the drum unit Replace the toner cartridge with a new toner cartridge Replace the drum unit with a new drum unit Grey background Check the machine s environment Conditions such as high temperatures and high humidity can increase the amount of backgr...

Страница 482: ...em especially if the machine has not been used for a long time Clean the drum unit The drum unit may be damaged Replace the drum unit with a new drum unit Lines across the page Clean the drum unit The drum unit may be damaged Replace the drum unit with a new drum unit White lines bands or ribbing across the page Check the machine s environment Conditions such as high humidity and high temperatures...

Страница 483: ...ay be damaged Replace the toner cartridge with a new toner cartridge The drum unit may be damaged Replace the drum unit with a new drum unit The fuser unit may be contaminated Contact Brother customer service White lines down the page Make sure foreign material such as a torn piece of paper sticky notes or dust is not inside the machine and around the toner cartridge and drum unit The toner cartri...

Страница 484: ...ver when you do not use our recommended print media Wrinkles or creases Make sure paper is loaded correctly Check the paper type and quality Turn over the stack of paper in the tray or rotate the paper 180 in the input tray Poor fixing Make sure the media type setting in the driver matches the type of paper you are using Choose Improve Toner Fixing mode in the printer driver If this selection does...

Страница 485: ...any to check the line Handling Incoming Calls Difficulties Suggestions Sending a Fax Call to the machine When your machine answers hang up Custom features on a single line If you have Call Waiting Voice Mail an answering machine an alarm system or other custom feature on a single telephone line with your machine it may create a problem sending or receiving faxes For Example If you subscribe to Cal...

Страница 486: ...as a chance to answer If you were not able to receive the fax then another device or subscriber service may be interfering with your fax reception or there may be a problem with your fax line Make sure your Brother machine s Fax Detect feature is turned On Fax Detect is a feature that allows you to receive a fax even if you answered the call on an external or extension telephone If you often get t...

Страница 487: ... may be dirty Clean the corona wire in the drum unit The sender s scanner may be dirty Ask the sender to make a copy to see if the problem is with the sending machine Try receiving from another fax machine Received faxes appear as split or blank pages Left and right margins are cut off or a single page is printed on two pages Turn on Auto Reduction Related Information Troubleshooting Set Dial Tone...

Страница 488: ...one Detection Set Dial Tone Detection Setting the Dial Tone to Detection will shorten the Dial Tone detect pause 1 Press Settings All Settings Initial Setup Dial Tone 2 Press Detection or No Detection 3 Press Related Information Telephone and Fax Problems 482 ...

Страница 489: ...for VoIP VoIP is a type of phone system that uses an Internet connection rather than a traditional phone line Telephone providers frequently bundle VoIP together with Internet and cable services 1 Press Settings All Settings Initial Setup Compatibility 2 Press the option you want Select High to set the modem speed to 33600 bps Select Normal to set the modem speed to 14400 bps Select Basic for VoIP...

Страница 490: ... Error Messages Use the Network Connection Repair Tool Windows Where Can I Find My Brother Machine s Network Settings My Brother Machine Cannot Print Scan or PC FAX Receive over the Network I Want to Check that My Network Devices are Working Correctly 484 ...

Страница 491: ...Contact your network administrator for the information on the DNS server settings The Brother machine cannot connect to the Kerberos server Contact your network administrator for the information on the Kerberos server settings File Access Error contact your administrator The Brother machine cannot access the destination folder for the Store Print Log to Network feature Make sure the stored directo...

Страница 492: ...r machine are correct in Web Based Management Internal Error The Brother machine s LDAP protocol is disabled Confirm your authentication method and then enable the necessary protocol setting in the Web Based Management The Brother machine s CIFS protocol is disabled Related Information Network Problems 486 ...

Страница 493: ...uble click XXX C where XXX is the name of your local disk drive Program Files x86 Browny02 Brother BrotherNetTool exe If the User Account Control screen appears do one of the following Windows Vista Click Allow Windows 7 Windows 8 Click Yes 3 Follow the on screen instructions 4 Check the diagnosis by printing the Network Configuration Report The Network Connection Repair Tool will start automatica...

Страница 494: ...ting Network Problems Where Can I Find My Brother Machine s Network Settings Where Can I Find My Brother Machine s Network Settings Print the Network Configuration Report Change Machine Settings from Your Computer 488 ...

Страница 495: ...FAX Rx type the information below In Name Type any description for example Brother PC FAX Rx In Port number Type 54926 In Protocol UDP is selected See the instruction manual that came with your third party Security Firewall Software or contact the software manufacturer Wired Your security software blocks your machine s access to the network Some security software might block access without showing...

Страница 496: ...ktop When the menu bar appears click Settings Control Panel In the Hardware group click View devices and printers Printers Windows Server 2012 R2 Click Control Panel on the Start screen In the Hardware group click View devices and printers OS X v10 8 5 Click System Preferences Print Scan OS X v10 9 x 10 10 x Click System Preferences Printers Scanners If you have checked and tried all of the above ...

Страница 497: ...k Status in the Network Configuration Report Print the Network Configuration Report and check that Ethernet Link Status is Link OK Wired Check that you can ping the Brother machine from your computer Ping the Brother machine from your computer using the IP address or the node name in the Windows command prompt or Macintosh Terminal application ping ipaddress or nodename Successful Your Brother mac...

Страница 498: ...Windows 8 and Windows Server 2012 Move your mouse to the lower right corner of your desktop When the menu bar appears click Settings Control Panel In the Hardware and Sound 1 group click View devices and printers For Windows Server 2012 R2 Click Control Panel on the Start screen In the Hardware group click View devices and printers 2 Right click the Brother XXX XXXX BR Script3 icon select Printer ...

Страница 499: ...rimary source in your scanning application For example in Presto PageManager click File Select Source and choose the Brother TWAIN driver TWAIN or ICA errors appear when starting to scan Macintosh Make sure the Brother TWAIN driver is selected as the primary source In PageManager click File Import from Scanner and choose the Brother TWAIN driver You can also scan documents using the ICA Scanner Dr...

Страница 500: ...Settings All Settings Machine Info 2 Press one of the following options Option Description Serial No Check your machine s serial number Firmware Version Check your machine s firmware version Page Counter Check the number of total pages the machine has printed Parts Life Check the percentage of the supplies life that remains available 3 Press Related Information Troubleshooting 494 ...

Страница 501: ...e of reset functions and then press the reset function you want to use 3 Machine will reboot after resetting Press OK for 2 seconds to confirm appears Press OK for two seconds to confirm The machine will restart 4 Press You can also reset the Network settings by pressing Settings All Settings Network Network Reset Related Information Troubleshooting Reset Functions Overview 495 ...

Страница 502: ...This function resets the following settings Address Book Addresses and Groups Programmed fax jobs in the memory Delayed Fax Station ID name and number Fax receive settings Remote Access Code and PC Fax Receive Windows only Report Setting Lock password 4 All Settings Reset Reset all the machine s settings back to the settings that were set at the factory All Settings Reset takes less time than Fact...

Страница 503: ...Home Routine Maintenance Routine Maintenance Replace Supplies Clean the Machine Check the Remaining Life of Parts Pack and Ship Your Machine 497 ...

Страница 504: ...0 pages based on 3 pages per job A4 letter simplex pages The number of pages may be affected due to a variety of factors including but not limited to media type and media size NOTE Be sure to seal up the used supplies tightly in a bag so that toner powder does not spill out of the cartridge Discard used consumable items according to local regulations keeping it separate from domestic waste If you ...

Страница 505: ...Toner cartridge Drum unit Related Information Routine Maintenance Replace the Toner Cartridge Replace the Drum Unit Error and Maintenance Messages Supplies 499 ...

Страница 506: ...on 2 Open the front cover 3 Remove the toner cartridge and drum unit assembly from the machine 4 Push down the green lock lever and take the toner cartridge out of the drum unit 5 Unpack the new toner cartridge 6 Remove the protective cover 7 Put the new toner cartridge firmly into the drum unit until you hear it lock into place 500 ...

Страница 507: ...de the drum unit by gently sliding the green tab from left to right and right to left several times Be sure to return the tab to the Home position a The arrow on the tab must be aligned with the arrow on the drum unit If it is not printed pages may have a vertical stripe 9 Install the toner cartridge and drum unit assembly back into the machine 10 Close the front cover of the machine 501 ...

Страница 508: ... toner cartridge is left unpacked for a long time the toner life will be shortened Brother strongly recommends you DO NOT refill the toner cartridge provided with your machine We also strongly recommend you continue to use only Brother Original replacement toner cartridges Use or attempted use of third party toner and or cartridges in the Brother machine may cause damage to the machine and or may ...

Страница 509: ...e is turned on 2 Open the front cover 3 Remove the toner cartridge and drum unit assembly from the machine 4 Push down the green lock lever and take the toner cartridge out of the drum unit 5 Unpack the new drum unit 6 Put the toner cartridge firmly into the new drum unit until you hear it lock into place 503 ...

Страница 510: ...rum unit assembly back into the machine 9 Close the front cover of the machine NOTE Drum wear and tear occurs due to use and rotation of the drum and interaction with paper toner and other materials in the paper path In designing this product Brother decided to use the number of rotations of the drum as a reasonable determinant of the drum life When a drum reaches the factory established rotation ...

Страница 511: ...ited to media type and media size Because we have no control over the many factors that determine the actual drum life we cannot guarantee a minimum number of pages that will be printed by your drum For best performance use only Brother Original toner The machine should be used only in a clean dust free environment with adequate ventilation Printing with a non Brother drum unit may reduce not only...

Страница 512: ...loth WARNING DO NOT use flammable substances any type of spray or an organic solvent liquid containing alcohol or ammonia to clean the inside or outside of the product Doing so could cause a fire Instead use only a dry lint free cloth IMPORTANT DO NOT use isopropyl alcohol to remove dirt from the control panel It may crack the panel To avoid print quality problems DO NOT touch the shaded parts sho...

Страница 513: ... Clean the Corona Wire Clean the Drum Unit Clean the Paper Pick up Rollers 507 ...

Страница 514: ...ree cloth moistened with water 1 2 3 3 In the ADF unit clean the white bar 1 and the scanner glass strip 2 underneath it with a soft lint free cloth moistened with water 2 1 4 Open the scanner glass cover 1 and then clean the other white bar 2 and scanner glass strip 3 supported models only 3 5 Close the document cover 6 Press to turn the machine on Related Information Clean the Machine Other Prob...

Страница 515: ...LCD Clean the Touchscreen LCD IMPORTANT DO NOT use any type of liquid cleaners including ethanol 1 Press and hold to turn the machine off 2 Clean the Touchscreen with a dry soft lint free cloth 3 Press to turn the machine on Related Information Clean the Machine 509 ...

Страница 516: ... cartridge and drum unit assembly from the machine 3 Clean the corona wire inside the drum unit by gently sliding the green tab from left to right and right to left several times Be sure to return the tab to the Home position a The arrow on the tab must be aligned with the arrow on the drum unit If it is not printed pages may have a vertical stripe 4 Install the toner cartridge and drum unit assem...

Страница 517: ...5 Close the front cover of the machine Related Information Clean the Machine Error and Maintenance Messages 511 ...

Страница 518: ... is in Ready Mode 2 Press Settings All Settings Print Reports Drum Dot Print 3 Press Yes The machine prints the Drum Dot Check Sheet 4 Press 5 Press and hold to turn the machine off 6 Open the front cover 7 Remove the toner cartridge and drum unit assembly from the machine 8 Push down the green lock lever and take the toner cartridge out of the drum unit 9 Turn the drum unit as shown in the illust...

Страница 519: ...rum region 2 11 Turn the edge of the drum unit toward you while looking at the drum surface to find the mark To avoid print quality problems DO NOT touch the surface of the drum unit only the edge You can turn the drum unit gear more easily by pulling down the black levers When you have finished turning the gear push the levers back to the original position 513 ...

Страница 520: ... into the drum unit until you hear it lock into place Make sure you put the toner cartridge in correctly or it may separate from the drum unit If you put it in properly the green lock lever will lift automatically 14 Install the toner cartridge and drum unit assembly back into the machine 15 Close the front cover of the machine 16 Press to turn the machine on Related Information Clean the Machine ...

Страница 521: ...s follows 1 Press and hold to turn the machine off 2 Pull the paper tray completely out of the machine 3 If paper is loaded or something is stuck inside in the paper tray remove it 4 Tightly wring out a lint free cloth soaked in lukewarm water and then wipe the separator pad on the paper tray to remove dust 5 Wipe the two pick up rollers inside the machine to remove dust 6 Reload the paper and put...

Страница 522: ...Related Information Clean the Machine Printing Problems 516 ...

Страница 523: ...Parts 1 Press Settings All Settings Machine Info Parts Life 2 Press the machine part you want to check The LCD displays the approximate remaining part life 3 Press To display the approximate remaining life of the toner cartridge press on the LCD Related Information Routine Maintenance 517 ...

Страница 524: ...ack the Optional Tray s separately in its original carton with original packing material If for any reason you must ship your machine carefully repack the machine in the original packaging to avoid any damage during transit The machine should be adequately insured with the carrier 1 Press and hold to turn the machine off Leave the machine off for at least 10 minutes to cool down 2 Disconnect all t...

Страница 525: ...5 Close the carton and tape it shut 6 If you have a Lower Tray repack it as shown Related Information Routine Maintenance 519 ...

Страница 526: ...mise settings and features create shortcuts and work with options displayed on the machine s LCD to make your Brother machine a more efficient work tool Change Machine Settings from the Control Panel Change Machine Settings from Your Computer 520 ...

Страница 527: ...ine Settings from the Control Panel Change Machine Settings from the Control Panel In the Event of Power Failure Memory Storage General Settings Save Your Favourite Settings as a Shortcut Print Reports Settings and Features Tables 521 ...

Страница 528: ...ntly and in the event of a power failure will not be lost Temporary settings for example Contrast Overseas Mode will be lost During a power failure the machine will retain the date and time and programmed fax timer jobs for example Delayed Fax for approximately 60 hours Other fax jobs in the machine s memory will not be lost Related Information Change Machine Settings from the Control Panel 522 ...

Страница 529: ...Sleep Mode Set Auto Power Off Mode Set the Date and Time Set the Time Zone Adjust the LCD Backlight Brightness Change How Long the LCD Backlight Stays On Set Your Station ID Set Tone or Pulse Dialling Mode Reduce Toner Consumption Add a Prefix to Every Fax Number Prevent Dialling a Wrong Number Dial Restriction Reduce Printing Noise Change the Language on the LCD 523 ...

Страница 530: ...me 2 Press one of the following options The options will vary depending on your machine Ring Adjust the ring volume Beep Adjust the volume of the beep you hear when you press a button make a mistake or after you send or receive a fax Speaker Adjust the speaker volume 3 Select the Off Low Med or High option and then press the option you want 4 Press Related Information General Settings 524 ...

Страница 531: ...the machine enters Sleep Mode You can choose how long the machine must be idle before it goes into Sleep Mode The timer will restart if any operation is carried out on the machine such as receiving a print job 1 Press Settings All Settings General Setup Ecology Sleep Time 2 Enter the length of time maximum 50 minutes the machine will remain idle before entering Sleep Mode and then press OK To enab...

Страница 532: ...time the machine will automatically enter Deep Sleep Mode The length of time is based on your specific model and settings Deep Sleep Mode uses less power than Sleep Mode Applicable Models Machine s LCD in Deep Sleep Mode Conditions That Will Wake the Machine All models The LCD backlight turns off and blinks The machine receives a job Someone presses or the Touchscreen LCD Related Information Gener...

Страница 533: ... Off Mode automatically The machine does not go into Power Off Mode when the machine is connected to a network or has secure print data in the memory To start printing press on the control panel and then send a print job 1 Press Settings All Settings General Setup Ecology Auto Power Off 2 Swipe up or down or press a or b to display the Off 1hour 2hours 4hours or 8hours option and then press the op...

Страница 534: ...ime Date 2 Enter the last two digits of the year using the LCD and then press OK 3 Enter the two digits for the month using the LCD and then press OK 4 Enter the two digits for the day using the LCD and then press OK 5 Press Time 6 Enter the time in 24 hour format using the LCD and then press OK For example enter 19 45 for 7 45 PM 7 Press Related Information General Settings 528 ...

Страница 535: ...rol Panel General Settings Set the Time Zone Set the Time Zone Set the time zone for your location on the machine 1 Press Settings All Settings Initial Setup Date Time Time Zone 2 Enter your time zone 3 Press OK 4 Press Related Information General Settings 529 ...

Страница 536: ...LCD Backlight Brightness Adjust the LCD Backlight Brightness If you are having difficulty reading the LCD changing the brightness setting may help 1 Press Settings All Settings General Setup LCD Settings Backlight 2 Press the Light Med or Dark option 3 Press Related Information General Settings 530 ...

Страница 537: ...Change How Long the LCD Backlight Stays On Change How Long the LCD Backlight Stays On Set how long the LCD backlight stays on 1 Press Settings All Settings General Setup LCD Settings Dim Timer 2 Press the Off 10Secs 20Secs or 30Secs option 3 Press Related Information General Settings 531 ...

Страница 538: ...s using the LCD and then press OK 5 Press Name 6 Enter your name up to 20 characters using the LCD and then press OK Press to cycle between letters numbers and special characters The characters available may differ depending on your country If you enter an incorrect character press d or c to move the cursor to it and press Press the correct character To enter a space press Space or c For more info...

Страница 539: ...r Pulse Dialling Mode Your Brother machine is set for a Tone dialling service If you have a Pulse dialling rotary service you must change the dialling mode This feature is not available in some countries 1 Press Settings All Settings Initial Setup Tone Pulse 2 Press Tone or Pulse 3 Press Related Information General Settings 533 ...

Страница 540: ... the Toner Save feature may reduce toner consumption When Toner Save is set to on the print on your documents appears lighter We DO NOT recommend using the Toner Save feature for printing photo or greyscale images 1 Press Settings All Settings General Setup Ecology Toner Save 2 Press On or Off 3 Press Related Information General Settings 534 ...

Страница 541: ...m requires a time break recall hookflash press on the LCD 1 Press Settings All Settings Initial Setup Dial Prefix 2 Press On or Off Option Description On To activate the prefix number setting select On If you selected On go to the next step to set a prefix number Off To deactivate the prefix number setting select Off If you selected Off press to exit 3 Press Dial Prefix 4 Enter a prefix number up ...

Страница 542: ... recognised as dial pad input and will not be restricted Shortcuts LDAP Server 3 Press one of the following options Option Description Enter Twice The machine prompts you to re enter the number and then if you re enter the same number correctly the machine will start dialling If you re enter the wrong number the LCD will display an error message On The machine restricts all fax sending and outboun...

Страница 543: ...ting Noise Reduce Printing Noise The Quiet Mode setting can reduce printing noise When Quiet Mode is turned on the print speed becomes slower The factory setting is off 1 Press Settings All Settings General Setup Ecology Quiet Mode 2 Press On or Off 3 Press Related Information General Settings 537 ...

Страница 544: ...ttings Change the Language on the LCD Change the Language on the LCD Change the LCD language if needed This feature is not available in some countries 1 Press Settings All Settings Initial Setup Local Language 2 Press your language 3 Press Related Information General Settings 538 ...

Страница 545: ...Home Machine Settings Change Machine Settings from the Control Panel Save Your Favourite Settings as a Shortcut Save Your Favourite Settings as a Shortcut Add Shortcuts Change or Delete Shortcuts 539 ...

Страница 546: ... or b to display Copy and then press Copy 5 Swipe up or down or press a or b to display the copy presets and then press the copy preset you want 6 Swipe up or down or press a or b to display the available settings and then press the setting you want to change 7 Swipe up or down or press a or b to display the available options for the setting and then press the option you want Repeat these two step...

Страница 547: ...the Shortcut until the options appear and then follow the on screen menus 4 Press Options 5 Change the settings for the Shortcut if needed 6 Press OK if needed 7 When finished press Save as Shortcut 8 Read and confirm the displayed list of settings you have selected and then press OK 9 Do one of the following To overwrite the Shortcut press Yes If you do not want to overwrite the Shortcut press No...

Страница 548: ...Home Machine Settings Change Machine Settings from the Control Panel Print Reports Print Reports Reports Print a Report 542 ...

Страница 549: ...it RX means Receive User Settings The User Settings report prints a list of your current settings Printer Settings The Printer Settings report prints a list of your current printer settings Network Configuration Models with network functionality The Network Configuration report prints a list of your current network settings Print File List The Print File List prints a list of the fonts and print m...

Страница 550: ...e Control Panel Print Reports Print a Report Print a Report 1 Press Settings All Settings Print Reports 2 Swipe up or down or press a or b to display the report you want to print and then press it 3 Press Yes 4 Press Related Information Print Reports 544 ...

Страница 551: ...ttings from the Control Panel Settings and Features Tables Settings and Features Tables The Settings tables will help you understand the menu selections and options that are found in the machine s programs Settings Tables Features Tables 545 ...

Страница 552: ...ay 3 1 Select the paper type that matches the paper in the Optional Tray Tray 3 Paper Size MP Tray Select the size of paper you loaded in the MP tray Tray 1 Select the size of paper you loaded in the standard paper tray Tray 2 1 Select the size of paper you loaded in the Optional Tray Tray 2 Tray 3 1 Select the size of paper you loaded in the Optional Tray Tray 3 Check Size Select whether to displ...

Страница 553: ...e the Macro and Font data of your machine to the default settings 1 Available if the Optional Tray s is installed All Settings Shortcut Settings Level 1 Level 2 Descriptions Select shortcut button Rename Change the shortcut name Edit Change the shortcut settings Delete Delete the shortcut All Settings Fax Level 1 Level 2 Level 3 Descriptions Setup Receive Receive Mode Select the Receive Mode that ...

Страница 554: ...scriptions Emulation Select the emulation mode Print Options Internal Font HP LaserJet Print a list of the machine s internal fonts BR Script 3 Test Print Print a test page 2 sided 2 sided Print Enable or disable 2 sided printing and choose long edge or short edge Single Image For a print job where the last page is a 1 sided image select the 1 sided Feed option to reduce printing time When you use...

Страница 555: ...dress of the secondary DNS server APIPA Set the machine to allocate the IP address from the link local address range automatically IPv6 Turn the IPv6 protocol on or off To use the IPv6 protocol go to the Brother Solutions Center at support brother com for more information Ethernet Select the Ethernet link mode Wired Status View the current wired status MAC Address View the machine s MAC address Se...

Страница 556: ...ff Setup Mail RX Auto Polling Auto Polling Check the server for new messages automatically Poll Frequency Set the interval for checking new messages on the server Header Select the contents of the email header to be printed Del Read Error Mail The POP3 server deletes error emails automatically The IMAP4 server deletes error emails automatically after you read them Notification Receive notification...

Страница 557: ... Network Configuration Print a list of your Network settings Print File List Print a list of data saved in the machine s memory Drum Dot Print Print the Drum Dot Check Sheet All Settings Machine Info Level 1 Level 2 Descriptions Serial No Check your machine s serial number Firmware Version Main Version Check your machine s firmware version Sub1 Version Page Counter Total Check the number of the pa...

Страница 558: ...qualisation for transmission difficulties VoIP service providers offer fax support using various standards If you regularly experience fax transmission errors select Basic for VoIP Reset Machine Reset Restore all the machine settings that you have changed such as Date and Time Network Restore all network settings back to the factory settings Address Book Fax Erase all stored phone numbers and fax ...

Страница 559: ... to listen to make sure a fax machine has answered and then press Fax Start Address Book Search Search within the Address Book Edit Add New Address Name Store Address Book numbers set up Group numbers for Broadcasting change and delete Address Book numbers pinyin Address Setup Groups Name pinyin Add Delete Change Select Address Delete Select Address Select Address Book Apply Start sending a fax us...

Страница 560: ...e Redial the last number called When you are entering a fax or telephone number on the Touchpanel Redial changes to Pause on the LCD Press Pause when you need a delay while dialling numbers such as access codes and credit card numbers You can also store a pause when you set up addresses Hook Press before dialling if you want to listen to make sure a fax machine has answered and then press Fax Star...

Страница 561: ...f your ID card Quick Copy Receipt Start Set the preset copy settings of Receipt ID Quick Copy Options Normal Start Set the preset copy settings of Normal ID Quick Copy Options 2in1 ID Start Set the preset copy settings of 2in1 ID ID Quick Copy Options 2in1 Start Set the preset copy settings of 2in1 ID Quick Copy Options 2sided 1 2 Start Set the preset copy settings of 2 sided 1 2 ID Quick Copy Opt...

Страница 562: ...short edge 2 sided Copy Page Layout Select a page layout option when you make 2 sided N in 1 copies from a 2 sided document Tray Use Select the tray that will be used Save as Shortcut Save the current settings as a shortcut Scan Level 1 Level 2 Level 3 Descriptions to OCR Scan Actions Convert your scanned document to an editable text file Select USB or PC Options Save as Shortcut Start to File Sca...

Страница 563: ... Scan to Email Server is downloaded Scan Actions Scan a monochrome or a colour document to your email server Cancel Address Book Search Edit Select Address Book Manual Next Destinations Options Save as Shortcut Start Destinations Select Address to FTP SFTP Scan Actions Send scanned data via FTP SFTP Select Profile name Options Save as Shortcut Start to Network Scan Actions Send scanned data to a C...

Страница 564: ...ed document to an editable text file to Image Select PC Scan a colour picture into your graphics application to USB Options Scan documents to a USB Flash memory drive Save as Shortcut to E mail Select PC Scan a monochrome or a colour document into your email application to E mail Server Available after Scan to Email Server is downloaded Address Book Scan a monochrome or a colour document to your e...

Страница 565: ...git password Active only when the machine has secure print data USB Level 1 Level 2 Descriptions USB Scan to USB Scan documents to a USB Flash memory drive Direct Print Print the data directly from the USB flash drive 2 in 1 ID Copy Level 1 Descriptions 2 in 1 ID Copy Copy both sides of an identification card onto one page Related Information Settings and Features Tables 559 ...

Страница 566: ...our Computer Change Machine Settings from Your Computer Change Machine Settings Using Web Based Management Change the Machine Settings Using Remote Setup Where Can I Find My Brother Machine s Network Settings Network Management Software and Utilities 560 ...

Страница 567: ... Management Web Based Management is a utility that uses a standard web browser to manage your machine using the Hyper Text Transfer Protocol HTTP or Hyper Text Transfer Protocol over Secure Socket Layer HTTPS What is Web Based Management Access Web Based Management Set a Login Password for Web Based Management Network Management Software and Utilities 561 ...

Страница 568: ...b browser make sure it is compatible with HTTP 1 0 and HTTP 1 1 You must use the TCP IP protocol on your network and have a valid IP address programmed into the print server and your computer The actual screen may differ from the screen shown above The following explanations are examples The available functions vary according to the model General Use this tab to confirm the current status of your ...

Страница 569: ...are mainly used by administrators You can also use Secure Function Lock to restrict functions according to the user Network Use this tab to change the network settings enable or disable the network protocols and configure the security and certificate settings Related Information Change Machine Settings Using Web Based Management 563 ...

Страница 570: ...main Name System or enable a NetBIOS name you can type another name such as SharedPrinter instead of the IP address For example http SharedPrinter If you enable a NetBIOS name you can also use the node name For example http brnxxxxxxxxxxxx The NetBIOS name can be found in the Network Configuration Report For Macintosh access Web Based Management by clicking the machine s icon on the Status Monitor...

Страница 571: ...lso use the node name For example http brnxxxxxxxxxxxx The NetBIOS name can be found in the Network Configuration Report For Macintosh access Web Based Management by clicking the machine s icon on the Status Monitor screen 3 No password is required by default Type a password if you have set one and then click 4 Click Administrator 5 Type the password you want to use in the Enter New Password field...

Страница 572: ...Remote Setup program lets you configure many of your Brother machine s settings from your computer When you start Remote Setup the settings on your Brother machine will be downloaded to your computer and displayed on your screen If you change the settings on your computer you can upload them directly to the machine Remote Setup Windows Remote Setup Macintosh 566 ...

Страница 573: ...Change the Machine Settings Using Remote Setup Remote Setup Windows Remote Setup Windows Set Up the Brother Machine from Your Computer Windows Set Up the Brother Machine Using ControlCenter4 Windows Set Up Your Machine s Address Book Using ControlCenter4 Windows 567 ...

Страница 574: ...s Click the drop down list and select your model name if not already selected Click Tools in the left navigation bar and then click Remote Setup Windows 8 Click Brother Utilities and then click the drop down list and select your model name if not already selected Click Tools in the left navigation bar and then click Remote Setup The Remote Setup Program window appears When your machine is connecte...

Страница 575: ...orrect and then click OK Cancel Click to exit the Remote Setup Program without uploading data to the machine Apply Click to upload data to the machine without exiting the Remote Setup Program 3 Click OK If your computer is protected by a firewall and is unable to use Remote Setup you may need to configure the firewall settings to allow communication through port numbers 137 and 161 If you are usin...

Страница 576: ... Click the Remote Setup button 4 Configure the settings as needed Export Click to save the current configuration settings to a file Click Export to save your address book or all settings for your machine Import Click to import a file and read its settings Print Click to print the selected items on the machine You cannot print the data until it is uploaded to the machine Click Apply to upload the n...

Страница 577: ...uter is protected by a firewall and is unable to use Remote Setup you may need to configure the firewall settings to allow communication through port numbers 137 and 161 If you are using Windows Firewall and you installed the Brother software and drivers from the CD ROM the necessary firewall settings have already been set Related Information ControlCenter4 Windows Remote Setup Windows 571 ...

Страница 578: ...r4 Windows Use Remote Setup through CC4 to add or change Address Book numbers on your computer If Secure Function Lock is set to On you cannot use Remote Setup 1 Click the ControlCenter4 icon in the task tray and then click Open 2 Click the Device Settings tab 3 Click the Address Book button The Address Book opens in a Remote Setup window 4 Add or update the Address Book information as needed 5 Cl...

Страница 579: ...ngs from Your Computer Change the Machine Settings Using Remote Setup Remote Setup Macintosh Remote Setup Macintosh Set Up the Brother Machine Using ControlCenter2 Macintosh Set Up Your Machine s Address Book Using ControlCenter2 Macintosh 573 ...

Страница 580: ...u cannot use Remote Setup 1 In the Finder menu bar click Go Applications Brother and then double click the ControlCenter icon The ControlCenter2 screen appears 2 Click the DEVICE SETTINGS tab 3 Click the Remote Setup button The Remote Setup Program screen appears 4 Configure the settings as needed Export Click to save the current configuration settings to a file Click Export to save your address b...

Страница 581: ...uploading data to the machine and then exit the Remote Setup Program If an error message appears enter the correct data again and then click OK Cancel Click to exit the Remote Setup Program without uploading data to the machine Apply Click to upload data to the machine without exiting the Remote Setup Program 5 When finished click OK Related Information ControlCenter2 Macintosh Remote Setup Macint...

Страница 582: ...Center2 to add or change Address Book numbers on your computer If Secure Function Lock is set to On you cannot use Remote Setup 1 In the Finder menu bar click Go Applications Brother and then double click the ControlCenter icon The ControlCenter2 screen appears 2 Click the DEVICE SETTINGS tab 3 Click the Address Book button The Address Book opens in a Remote Setup window 4 Add or update the Addres...

Страница 583: ...Home Appendix Appendix Specifications How to Enter Text on Your Brother Machine Supplies Accessories Brother Numbers 577 ...

Страница 584: ...tely 645 W at 25 C Printing Quiet Mode 2 Approximately 390 W at 25 C Copying 2 Approximately 645 W at 25 C Copying Quiet Mode 2 Approximately 390 W at 25 C Ready 2 Approximately 34 W at 25 C Sleep 2 Approximately 7 5 W Deep Sleep 2 Approximately 1 6 W Power Off 2 3 4 Approximately 0 04 W Dimensions Unit mm 435 486 427 Weights with supplies 16 5 kg Noise Level Sound Pressure Printing LpAm 54 dB A R...

Страница 585: ... Paper Input Paper Tray Standard Paper Type Plain Paper Letterhead Coloured Paper Thin Paper Recycled Paper Thick Paper 1 Paper Size A4 Letter B5 JIS A5 A5 Long Edge A6 Executive Legal Folio 16K 195x270mm 16K 184x260mm 16K 197x273mm Mexico Legal India Legal Paper Weight 60 to 120 g m2 Maximum Paper Capacity Up to 250 sheets of 80 g m2 Plain Paper Multi purpose tray MP tray Paper Type Plain Paper L...

Страница 586: ...tput paper tray immediately after they exit the machine to avoid the possibility of smudging Fax Specifications Compatibility ITU T Super Group 3 Coding System MH MR MMR JBIG Modem Speed 33 600 bps with Automatic Fallback 2 sided Print Receiving Yes Automatic 2 sided Sending MFC 8540DN Yes from ADF Scanning Width Maximum 208 mm Printing Width Maximum 208 mm Greyscale 8bit 256 levels Resolution Hor...

Страница 587: ...o 600 x 600 dpi from ADF Scanning Width Maximum 210 mm Automatic 2 sided Scanning MFC 8540DN Yes from ADF 1 Maximum 1200 1200 dpi scanning with the WIA driver in Windows XP Windows Vista Windows 7 Windows 8 and Windows 8 1 resolution up to 19200 19200 dpi can be selected by using the scanner utility Printer Specifications Automatic 2 sided Print Yes Emulation PCL6 BR Script3 IBM Proprinter XL Epso...

Страница 588: ...rvices Print Scan SNTP Client LDAP IMAP4 Available after Internet Fax I Fax is downloaded Protocols IPv6 NDP RA DNS resolver mDNS LLMNR responder LPR LPD Custom Raw Port Port9100 IPP IPPS POP3 Available after Internet Fax I Fax is downloaded SMTP Client FTP Client and Server CIFS Client TELNET Server SNMPv1 v2c HTTP HTTPS server TFTP client and server ICMPv6 SNTP Client LDAP Web Services Print Sca...

Страница 589: ... bit x86 or 64 bit x64 processor 50 MB N A Windows Server 2003 x64 Edition Windows Server 2008 Windows Server 2008 R2 64 bit x64 processor Windows Server 2012 Windows Server 2012 R2 Macin tosh Oper ating Syste m OS X v10 8 5 OS X v10 9 x OS X v10 10 x Printing PC Fax Send 5 Scanning Intel Processor 80 MB 400 MB 1 Third party USB ports are not supported 2 MFC 8530DN MFC 8535DN MFC 8540DN support 10...

Страница 590: ...nd then press Enter the correct character To insert a character press d or c to move the cursor to the correct place and then enter the character Press for each character you want to erase or press and hold to erase all the characters Entering Chinese characters You can use Chinese characters for some of the text input to your machine Simplified Chinese can be converted from Pinyin entry If 转换 app...

Страница 591: ... Set Your Station ID Store Fax Numbers Send an Internet Fax I Fax Relay Broadcast from Your Brother Machine 585 ...

Страница 592: ...8530DN MFC 8535DN MFC 8540DN High Yield Toner TN 3485 Approximately 8 000 pages 1 A4 or Letter page MFC 8530DN MFC 8535DN MFC 8540DN Super High Yield Toner TN 3495 Approximately 12 000 pages 1 A4 or Letter page MFC 8530DN MFC 8535DN MFC 8540DN Inbox Toner supplied with your machine Approximately 3 000 pages 1 A4 or Letter page MFC 8530DN MFC 8535DN MFC 8540DN Drum Unit DR 3450 Approximately 30 000...

Страница 593: ...or more information about the accessories for your machine visit http www brother com original index html or contact your Brother dealer or Brother customer service Model Name Item Applicable Models LT 5500 Lower Tray 250 sheets All models LT 6500 Lower Tray 520 sheets All models Related Information Appendix 587 ...

Страница 594: ... the call center in mainland China To seach Frequently asked questions FAQs ASCs Driver Manuals etc please visit our service website http www 95105369 com To search where to purchase consumables please visit the official website of BROTHER CHINA LTD http www brother cn Related Information Appendix 588 ...

Страница 595: ... A B C D E F G H I J L M N O P R S T U W A Active Directory Authentication Address Book Address Book List ADF Automatic Document Feeder APIPA APOP ARP Auto Reduction Automatic Fax Transmission Automatic Redial B Backup Print Beeper Volume BOOTP BRAdmin Light Windows BRAdmin Professional 3 Windows Broadcasting BRPrint Auditor Windows C CA Home Glossary 589 ...

Страница 596: ...thod Communication Error or Comm Error Compatibility Group Contrast CSR Custom Raw Port D Delayed Fax Density DHCP Digital Signature Distinctive Ring DNS Client DNS Server Driver Deployment Wizard Dual Access E ECM Error Correction Mode Extension Telephone Home Glossary 590 ...

Страница 597: ...Ring Time Fax Detect Fax Forwarding Fax Journal Fax Storage Fax Tones Fine Resolution FTP G Gateway Grey Scale Group Number H HTTP Web Server HTTPS I IEEE 802 1x Internet Fax IP Address IPP IPPS IPsec IPv6 Home Glossary 591 ...

Страница 598: ... mDNS Memory Receive N NetBIOS Name Resolution Network Configuration Report Network Connection Repair Tool Network PC FAX Network Remote Setup Network Shared Printing Node Name O OCR Optical Character Recognition Out of Paper Reception Overseas Mode Home Glossary 592 ...

Страница 599: ...em Pulse R RARP Real Time Transmission Remaining Jobs Remote Activation Code Fax Auto Mode only Remote Deactivation Code Fax Auto Mode only Remote Retrieval Access Remote Setup Resolution Ring Delay Ring Volume S Scan to Email Server Scanning Search Secure Function Lock 3 0 Home Glossary 593 ...

Страница 600: ...v3 SNTP SSL TLS Standard resolution Station ID Status Monitor Store Print Log to Network Subnet Mask Super Fine resolution Mono only T TAD Telephone Answering Device TCP IP TELNET Temporary Settings Tone Transmission Transmission Verification Report U User Settings List Home Glossary 594 ...

Страница 601: ...W Web Based Management Web Services WINS WINS Server Home Glossary 595 ...

Страница 602: ...erver the Automatic Private IP Addressing APIPA protocol will automatically assign an IP address from the range 169 254 1 0 to 169 254 254 255 APOP Authenticated Post Office Protocol APOP expands POP3 the Internet receiving protocol to include an authentication method that encrypts the password when the client receives email ARP Address Resolution Protocol ARP performs mapping of an IP address to ...

Страница 603: ...device settings and update device firmware from a Windows computer on your LAN BRAdmin Professional 3 can also log activity of Brother devices on your network and export the log data in an HTML CSV TXT or SQL format For users who want to monitor locally connected machines install the Print Auditor Client software on the client computer This utility allows you to use BRAdmin Professional 3 to monit...

Страница 604: ...itions CA A Certificate Authority CA is an entity that issues digital certificates especially X 509 certificates and vouches for the binding between the data items in a certificate CA Certificate A CA Certificate is the certification that identifies the CA itself and owns its private key A CA Certificate verifies a certificate issued by the CA Caller ID A service purchased from the telephone compa...

Страница 605: ...cuments lighter and light documents darker CSR A Certificate Signing Request CSR is a message sent from an applicant to a Certificate Authority CA to apply for issue of a certificate The CSR contains information identifying the applicant the public key generated by the applicant and the digital signature of the applicant Custom Raw Port Custom raw port is a commonly used printing protocol on a TCP...

Страница 606: ... server allows your computer to find its IP address automatically Driver Deployment Wizard Brother s Installation CD ROM includes the Windows printer driver and Brother network port driver LPR and NetBIOS If an administrator installs the printer driver and port driver using this application the administrator can save the file to the file server or send the file by email to users Then each user jus...

Страница 607: ...ion Resolution is 203 196 dpi It is used for small print and graphs FTP The File Transfer Protocol FTP allows the Brother machine to scan monochrome or colour documents directly to an FTP server located locally on your network or on the Internet Gateway A gateway is a network point that acts as an entrance to another network and sends data transmitted via the network to an exact destination The ro...

Страница 608: ...fax documents using the Internet as the transport mechanism Before using this feature configure the necessary machine s settings using the machine s control panel IP Address An Internet Protocol IP address is a series of numbers that identifies each device connected to a network An IP address consists of four numbers separated by dots Each number is between 0 and 255 Example In a small network you...

Страница 609: ...ethod developed by Cisco Systems Inc that uses a user ID and password for authentication LEAP is used in wireless networks LLMNR The Link Local Multicast Name Resolution LLMNR protocol resolves the names of neighboring computers if the network does not have a Domain Name System DNS server The LLMNR Responder feature works in both the IPv4 or IPv6 environment when using Windows Vista or greater LPD...

Страница 610: ...eceive Receives faxes into the machine s memory when the machine is out of paper NetBIOS Name Resolution Network Basic Input Output System NetBIOS name resolution enables you to obtain the IP address of the other device using its NetBIOS name during the network connection Network Configuration Report The Network Configuration Report prints a report listing the current network configuration includi...

Страница 611: ...verseas telephone lines Paging This feature enables your machine to call your cell phone or pager when a fax is received into its memory Pause Allows you to place a delay in the dialling sequence while you are dialling or while you are storing Address Book numbers Press Pause on the LCD as many times as needed for longer pauses PEAP Protected Extensible Authentication Protocol PEAP is a version of...

Страница 612: ...or different steps of the algorithm Pulse This feature is not available in some countries A form of rotary dialling on a telephone line RARP Reverse Address Resolution Protocol RARP finds the logical address for a machine that knows only its physical address To use RARP contact your network administrator Real Time Transmission When memory is full you can send faxes in real time Remaining Jobs You ...

Страница 613: ... for the machine s ring Scan to Email Server The Scan to Email Server feature lets you scan a monochrome or colour document and send it directly to an email address from the machine Scanning The process of sending an electronic image of a paper document into your computer Search An alphabetical electronic listing of stored Address Book and Group numbers Secure Function Lock 3 0 Secure Function Loc...

Страница 614: ... manage network devices securely SNTP The Simple Network Time Protocol SNTP is used to synchronize computer clocks on a TCP IP network You can configure the SNTP settings using Web Based Management SSL TLS Secure Socket Layer SSL or Transport Layer Security TLS is an effective method of protecting data that is sent over a local or wide area network SSL TLS works by encrypting data such as a print ...

Страница 615: ...d the first three segments are the network address Example Computer 1 can talk to Computer 2 Computer 1 IP Address 192 168 1 2 Subnet Mask 255 255 255 0 Computer 2 IP Address 192 168 1 3 Subnet Mask 255 255 255 0 0 denotes that there is no limit to communication at this part of the address Super Fine resolution Mono only 203 392 dpi Best for very small print and line art TAD Telephone Answering De...

Страница 616: ...d or get the following information from a machine on your network using a web browser Machine status information Change Fax configuration items such as General Setup Address Book settings and Remote Fax MFC models Change network settings such as TCP IP information Configure Secure Function Lock Configure Store Print Log to Network Configure Scan to FTP Configure Scan to Network Configure LDAP Soft...

Страница 617: ...viding service for NetBIOS name resolution It consolidates an IP address and a NetBIOS name that is in the local network WINS Server Windows Internet Name Service WINS Server maps IP addresses to computer names NetBIOS names in a Windows network Home Glossary 611 ...

Страница 618: ...World Wide Web www brother com These machines are approved for use in the country of purchase only Local Brother companies or their dealers will support only machines purchased in their own countries CHN ENG Version 0 ...

Отзывы: