


DB2-B720 series
36
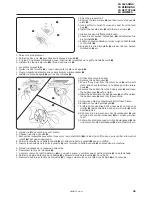
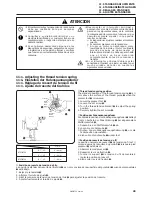
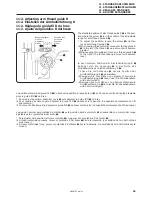
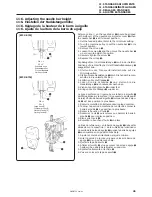
q
w
e
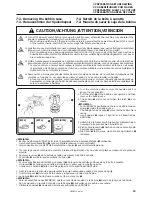
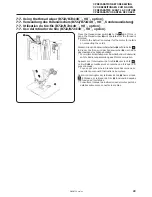
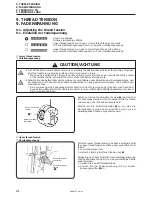
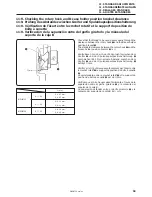
1. Raise the presser foot.
2. Remove the two screws
q
, and then remove the needle
plate
w
.
3. Use a soft wire brush to clean any dust from the feed
dog
e
.
4. Install the needle plate
w
with the two screws
q
.
1. Stellen Sie den Stoffdrückerfuß hoch.
2. Lösen Sie die beiden Schrauben
q
und entfernen Sie
die Stichplatte
w
.
3. Entfernen Sie den Staub mit einer weichen Drahtbürste
vom Greifer
e
.
4. Bringen Sie die Stichplatte
w
wieder mit den beiden
Schrauben
q
an.
1. Relever le pied presseur.
2. Retirer les deux vis
q
, puis déposer la plaque à aiguille
w
.
3. A l’aide d’une brosse métallique douce, éliminer les impuretés de la griffe d’entraînement
e
.
4. Installer la plaque à aiguille
w
à l’aide des deux vis
q
.
1. Levantar el prensatelas.
2. Quitar los dos tornillos
q
, y luego desmontar la placa de aguja
w
.
3. Usar un cepillo de alambre suave para limpiar el alimentador
e
.
4. Instalar la placa de aguja
w
con los dos tornillos
q
.
10. CLEANING
10. REINIGUNG
10. NETTOYAGE
10. LIMPIEZA
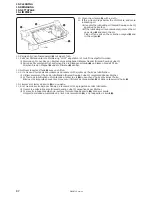
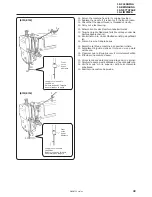
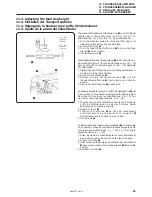
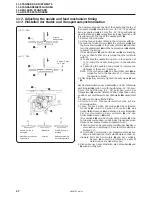
r
r
t
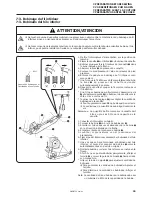
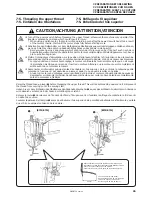
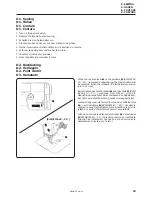
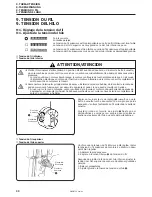
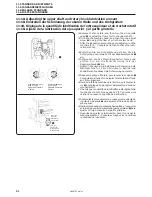
5. Tilt back the machine head.
6. Remove the bobbin case
r
.
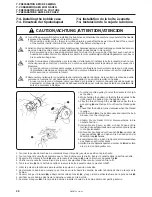
7. Wipe off any dust from the rotary hook
t
with a soft
cloth, and check that there is no damage to the rotary
hook
t
.
8. Remove the bobbin from the bobbin case
r
and clean
the bobbin case
r
with a cloth.
9. Insert the bobbin into the bobbin case
r
, and then place
the bobbin case
r
back into the machine.
5. Schwenken Sie das Maschinenoberteil nach hinten.
6. Entfernen Sie die Spulenkapsel
r
.
7. Entfernen Sie den Staub mit einem weichen Tuch vom
Greifer
t
und kontrollieren Sie, ob der Greifer
t
nicht
beschädigt ist.
8. Nehmen Sie die Spule aus der Spulenkapsel
r
und
reinigen Sie die Spulenkapsel
r
mit einem weichen
Tuch.
9. Setzen Sie die Spule wieder in die Spulenkapsel
r
ein
und setzen Sie die Spulenkapsel
r
in die Maschine ein.
5. Incliner la tête de machine vers l’arrière.
6. Déposer la boîte à canette
r
.
7. Essuyer les impuretés pouvant se trouver sur le crochet rotatif
t
à l’aide d’un chiffon doux, puis vérifier si le crochet
rotatif
t
n’est pas endommagé.
8. Retirer la canette de la boîte à canette
r
et nettoyer la boîte à canette
r
avec un chiffon.
9. Insérer la canette dans la boîte à canette
r
, puis remettre la boîte à canette
r
en place dans la machine.
5. Inclinar la cabeza de la máquina hacia atrás.
6. Desmontar la caja de la bobina
r
.
7. Limpiar el polvo del garfio giratorio
t
con un paño suave, y verificar que el garfio giratorio
t
no esté dañada.
8. Retirar la bobina de la caja de la bobina
r
y limpiar la caja de la bobina
r
con un paño.
9. Insertar la bobina en la caja de la bobina
r
, y luego colocar otra vez la caja de la bobina
r
en la máquina.


