Advanced LabelMark Techniques
31
Advanced LabelMark Techniques
Modifying a Label Part
LabelMark
contains an extensive list of master Brady parts. However, you may need to modify an existing
label part. The
Label Part Setup
feature allows you to do this by setting the label size, margins, etc.
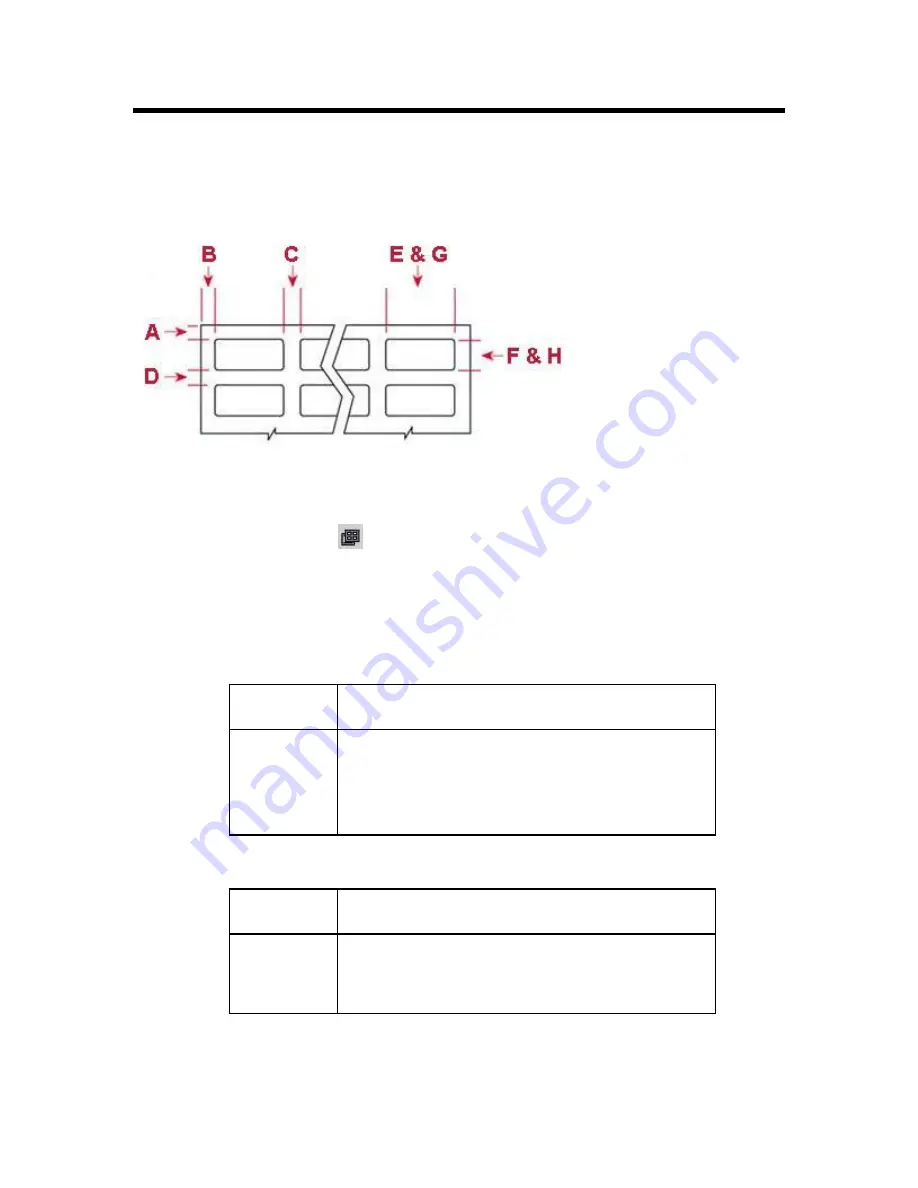
Standard Sheet-Fed Part Layout
A – Top margin
B – Left margin
C – Horizontal gap
D – Vertical gap
E – Label width
F – Label height
G – Printable width
H – Printable height
Note:
X- and Y-Offset are
zero.
To modify an existing label part’s settings:
1. Click
Label Part Setup
on the
Standard
toolbar.
2. Click
the
Edit Part
tab.
3. Make your desired modifications to the label settings:
Restore
– click
Restore
at any time to bring back the original settings and refresh the label
file if you applied the changes to the file.
Labels per page
– the number of labels on the page for a sheet or roll of labels.
Across
The number of labels across a sheet (left to right) or across
the width of a roll.
Down
The amount of rows per page.
For Dot Matrix, Thermal, and TLS2200/TLS PC Link
parts, this will generally be 1 to minimize label waste.
For Ink Jet and Laser parts, enter the amount that fits on
your page (8 1/2”x11” or A4).
Margins
– the absolute margin from the physical edge of the label liner to the label.
Left
The distance from the left edge of the liner to the left edge
of the label.
Top
The distance from top edge of the sheet liner to the top
edge of the label. Set
Top
to 0 for roll-fed parts, since it is
not applicable. Roll-fed parts use the horizontal and
vertical gaps for this purpose.
Содержание LabelMark 3
Страница 1: ...LabelMark 3 User Guide...
Страница 2: ......
Страница 6: ......
Страница 16: ......
Страница 52: ......
Страница 58: ......
Страница 86: ......
Страница 88: ...LabelMark 3 User Guide 82 Symbols Guide...
Страница 89: ...Symbols Guide Symbols Guide 83...
Страница 90: ......


