Vertical Configurability
|
15
SM Series Heat Pump
6 720 220 406 (2015/02)
Revised 02-15
Required Tools
•
5/16" hex head driver
•
3/8" hex head driver
•
7/16" hex head driver
•
Flat screw driver
•
Phillips screw driver
•
1/4" hex head driver
•
Needle nose pliers
Access to Internal Components
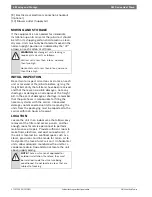
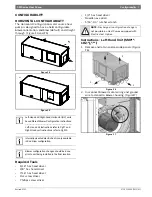
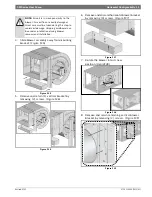
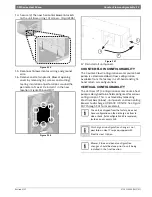
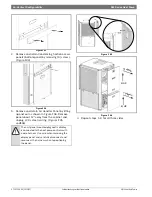
1. Using a Flat Screw driver remove and retain
Panel Belt by inserting the screwdriver into the
slot and releasing the catch.
(Figures#42and#43)
Figure # 42
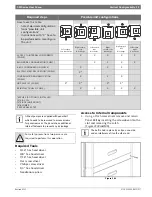
Required steps
Possible unit configurations
How to use this table:
•
Select desired configuration
from “possible unit
configurations”.
•
Instructions with “X” have to
be performed to reconfigure
the unit.
Left return,
top discharge
Right return,
top
discharge
Left return,
rear
discharge
Right
return, rear
discharge
Right return,
left
discharge
Left return,
right
discharge
ACCESS TO INTERNAL COMPONENTS
(PG#15)
X
X
X
X
X
BLOWER RE-CONFIGURATION (PG#17)
X
X
X
X
E-BOX CONFIGURATION (PG#24)
X
X
X
ELECTRIC HEAT RELOCATION* (PG#22)
X*
CONDENSATE DRAIN RELOCATION
(PG#20)
X
X
X
HRP SWITCH* (PG#21)
X*
X*
X*
X*
REINSTALL PANELS (PG#25)
X
X
X
X
X
*APPLIES IF OPTION IS INSTALLED
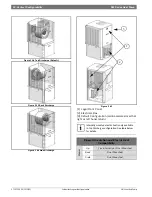
[1] AIR COIL
[2] E-BOX (UNIT FRONT)
[3] BLOWER
X APPLICABLE STEP
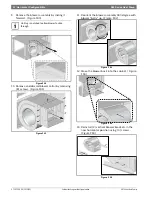
All heat pumps are supplied with panel belt
which needs to be removed to access screws
for panel removal. The panels have additional
internal fasteners to prevent any air leakage.
For safety precautions two persons are
required to perform this operation.
The belt is held in place by a clip on one side
and an interference fit on the other end.


