Blackmagicdesign MultiView 16 Скачать руководство пользователя страница 38

The RS-422 serial port is configured as 9600 N81:

9600 is the line speed, or baud rate, at 9600 bits/sec.

N represents no parity check, or ‘none’.

8 is the data length.

1 is for stop bits.

To summarize N81, data without a parity check begins with 1 start bit, includes 8 true data bits, 
and 1 stop bit. There are 10 bits in total.

The protocol is line oriented, with a maximum length of 250 characters per command. Each 
command from the client should be terminated with a carriage return (\r). Each response from 
the server will be terminated with a carriage return and line feed (\r\n).

Sources, destinations and levels are always specified in base-16, numbered from zero. Levels 
are always between 0 and 15 (“F”) . Blackmagic MultiView 16 only has one valid level – 
level zero.

On connecting to the serial port, the client should send a carriage return. Blackmagic MultiView 
16 will respond with a 

>

 character prompt, which is not followed by a carriage return or line feed. 

Receiving the prompt indicates that a connection has been established. The same prompt will 
be issued after each command received by the MultiView.

In the following documentation, commands in 

orange

 and values in 

blue

 must be typed literally, 

including any spaces. In the following example of an immediate command using destination 
port 7 and source port 3, 

@ X:0/

destination

,

source

 would be entered as: 

@ X:0/

6

,

2

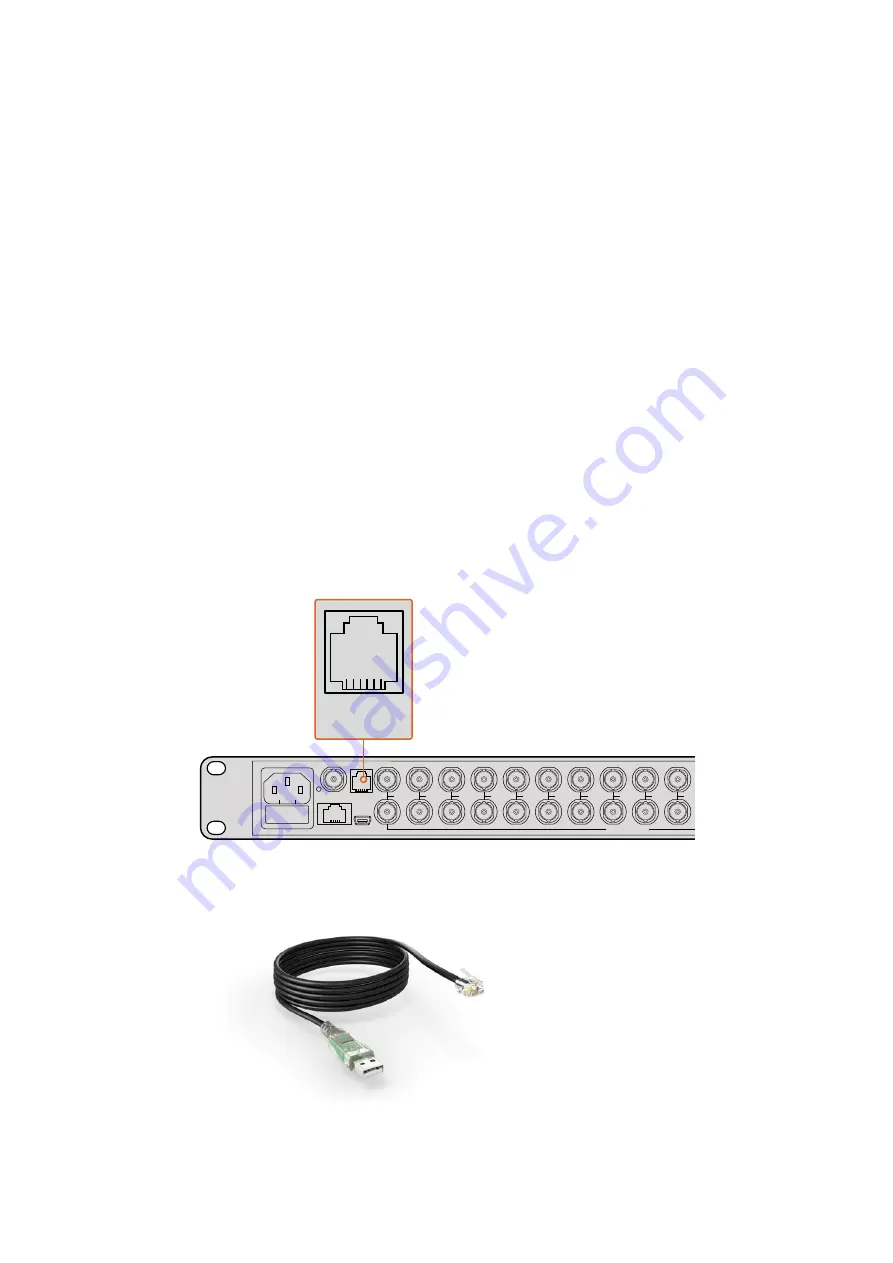
The RS-422 serial port lets you control Blackmagic MultiView 16 from third party routers and 
automation systems. The connector is an RJ11 connector, the same used in many landline 
telephone connections. By modifying an RS-422 to USB adapter cable terminated with an 
RJ11 connector, you can control Blackmagic MultiView 16 using external controllers via USB.

An RS-422 to USB adapter cable and RJ11 connector can be purchased 
from electronics stores such as Digi-Key.com. Refer to the pinout 
diagram below for help wiring the RJ11 connector to the adapter cable.

1

2

3

4

5

6

7

8

9

10

11

12

13

14

15

16

SOLO

SET

SRC

VIEW

MENU

Blackmagic MultiView 

16

ETHERNET

SD/HD/3G/6G-SDI IN

REF IN

LOOP OUT

IN

HDMI OUT

6G-SDI OUT

HD-SDI OUT

RS-422

CNTRL

USB

1

2

3

4

5

6

7

8

9

10

11

12

13

14

15

16

RS-422

CNTRL

39

Developer Information

Содержание MultiView 16

Страница 1: ...Installation and Operation Manual Blackmagic MultiView June 2018 English Fran ais Deutsch Espa ol Italiano Portugu s and T rk e...

Страница 2: ...u ll need to install your Blackmagic MultiView although it s always a good idea to ask a technical assistant for help if you are not sure what IP addresses are or if you re unsure about computer netwo...

Страница 3: ...Mini Smart Panel 17 Changing Settings using Switches 19 Built in Switches 19 Switch Settings for Blackmagic MultiView 4 20 Switch Settings for Blackmagic MultiView 4 HD 21 Using Blackmagic MultiView S...

Страница 4: ...matically detected and the video will be displayed in the multi view output To see the output simply connect a monitor to the SDI or HDMI multi view outputs Connect the video sources to your Blackmagi...

Страница 5: ...lighted when you first enter the settings menu Press the set button to edit the setting TIP On Blackmagic MultiView 16 you can output the multi view via dedicated HD SDI outputs or up to Ultra HD via...

Страница 6: ...Blackmagic Multiview 4 is the 2x2 layout To change the layout on your Blackmagic MultiView 4 to solo use the control button marked as 1 on your Teranex Mini Smart Panel and press button 2 to change it...

Страница 7: ...ection in this manual Connecting Serial Control Third party router controllers can control Blackmagic MultiView 16 using the RS 422 serial connection For more information on serial control see the sec...

Страница 8: ...tiView 4 s front panel and Blackmagic MultiView 4 HD s side panel let you change settings instantly using the tip of a pen To access the switches on Blackmagic MultiView 4 open the rubber dust cover o...

Страница 9: ...used for embedded audio in the HDMI and SDI multi view output signal Multi view layout This displays your selected multi view layout The home screen is the default display on Blackmagic MultiView 16...

Страница 10: ...o select menu items on the settings screen If you re unhappy with a selection you can return to a previously selected setting by pressing the rotary knob Turn the rotary knob clockwise or counter cloc...

Страница 11: ...grid For optimum monitoring of your inputs select the view layout to suit the number of inputs connected There are four multi view layouts you can choose from 2x2 displays 4 views If you have an Ultra...

Страница 12: ...e Borders Lets you separate each view in a grid like pattern Labels Makes view labels visible or hidden Labels can be changed using Blackmagic MultiView Setup Audio Meters Turns audio VU meters on or...

Страница 13: ...set the IP Subnet and Gateway addresses for your Blackmagic MultiView 16 when connecting to a network To set your Blackmagic MultiView 16 s IP address 1 Press the menu button on the front control pane...

Страница 14: ...e basic panel This tube should stay attached to the basic front panel 3 Align the connector on the rear of the Smart Panel with the adjoining connector on the face of your Blackmagic MultiView 4 and g...

Страница 15: ...input This information is located next to the multi view output frame rate and displays which SDI input is being used for embedded audio in the HDMI and SDI multi view output signal Multi view layout...

Страница 16: ...Smart Panel Changing settings using the Teranex Mini Smart Panel is more convenient and you can immediately confirm your settings visually on the LCD To enter your Blackmagic MultiView 4 s setup menu...

Страница 17: ...you set the IP Subnet and Gateway addresses for your Blackmagic MultiView 4 when connecting to a network To set your Blackmagic MultiView 4 s IP address 1 Press the menu button on the front control p...

Страница 18: ...ilt in Switches You ll find a switch settings diagram printed on the base of the unit Ensure your switch settings correspond to the legend by observing the switch numbers from 8 to 1 left to right 4 M...

Страница 19: ...on to display labels for each window in your multi view output signal These labels can be set using Blackmagic MultiView setup as detailed later in this manual Set switch 6 to off to hide labels Swit...

Страница 20: ...E When using the optional Teranex Mini Smart Panel the switch settings will be overridden by the Smart Panel settings Your Blackmagic MultiView 4 will retain its last settings whether applied via swit...

Страница 21: ...In 2x2 multi view layout switch 7 and 8 select the audio input Switch 5 Tally Set switch 5 to ON to display tally borders on the views Set to OFF to hide tally borders All additional data including AT...

Страница 22: ...s of Windows and on the latest Sierra and High Sierra versions of macOS To install the Blackmagic MultiView setup double click the installer and follow the prompts Windows installation 1 Double click...

Страница 23: ...of the home page To access settings for your Blackmagic MultiView click on the circular settings icon underneath the product image or you can click on the image itself Blackmagic MultiView Setup lets...

Страница 24: ...e The configure tab gives you control over settings such as device name customization video output and overlay settings plus network settings and serial control adjustments Sources Customizing Input L...

Страница 25: ...your Blackmagic MultiView 16 s front panel This is beneficial when controlling your MultiView 16 using Blackmagic Videohub Control software Customizing the solo output label in Blackmagic MultiView S...

Страница 26: ...to set the view layout Ultra HD video format HD output and SD aspect ratio On Blackmagic MultiView 4 you can choose whether to output Ultra HD or HD video via the SDI output as well as set the frame...

Страница 27: ...ty When selecting tally to correspond to the switcher input you can enter the camera number from 1 to 99 into the text field for inputs 1 to 4 Tally Override Tally signals are generally provided by th...

Страница 28: ...etup utility Overlay Display Blackmagic MultiView 16 and Blackmagic MultiView 4 have checkboxes in the overlay settings to enable each feature on your Blackmagic MultiView Overlay features are Borders...

Страница 29: ...ween Blackmagic MultiView models The Configure tab for a Blackmagic MultiView 16 or Blackmagic MultiView 4 has groups of settings for Details Overlay and Network settings For Blackmagic MultiView 4 HD...

Страница 30: ...magic MultiView setup and select your Blackmagic MultiView 16 by clicking on the product image or the settings icon below it 2 Click on the configure tab and set the Leitch Protocol switch to Leitch C...

Страница 31: ...utomatically display any Blackmagic MultiViews that are connected to your network 3 Select your Blackmagic MultiView by clicking on the product image or the settings icon below the product name 4 Blac...

Страница 32: ...o route sources to views on Blackmagic MultiView 16 plus other settings such as selecting the view for solo mode or the audio source for the multi view output On Blackmagic MultiView 4 you can use Vid...

Страница 33: ...ermine which input is displayed full screen when the solo button is enabled on the Blackmagic MultiView 16 s front panel Simply click on the solo input pushbutton in the Videohub Control destinations...

Страница 34: ...view sends a complete dump of the state of the device After the initial status dump status updates are sent every time the multi view status changes To be resilient to future protocol changes clients...

Страница 35: ...port one on the chassis The next three blocks describe the routing of the view ports VIDEO OUTPUT ROUTING 0 5 1 3 The next block describes the locking status of the views Each port has a lock status...

Страница 36: ...esponse the client should expect to see a status update from the MultiView showing the status change This is likely to be the same as the command that was sent but if the request could not be performe...

Страница 37: ...ltiView is established a client may send a special no operation command to check that the MultiView is still responding PING If the MultiView is responding it will respond with an ACK message as for a...

Страница 38: ...ndicates that a connection has been established The same prompt will be issued after each command received by the MultiView In the following documentation commands in orange and values in blue must be...

Страница 39: ...client commands are supported disable status reporting Status reporting is disabled by default enable status reporting Status reporting is enabled Z reset routing table Routing is reset so that the fi...

Страница 40: ...s in salvo If a routing change for the specified destination port is queued the route will be returned as a V notification V 0 request all ports status in salvo Each queued routing change in the salvo...

Страница 41: ...kmagic Design Support If you can t find the help you need in our support material or on the forum please click the Send us an email button on the support page to email a support request Alternatively...

Страница 42: ...radio frequency energy and if not installed and used in accordance with the instructions may cause harmful interference to radio communications Operation of this product in a residential area is likel...

Страница 43: ...age resulting from attempts by personnel other than Blackmagic Design representatives to install repair or service the product b to repair damage resulting from improper use or connection to incompati...

Отзывы: