background image

7

ENGLISH

(Original instructions)

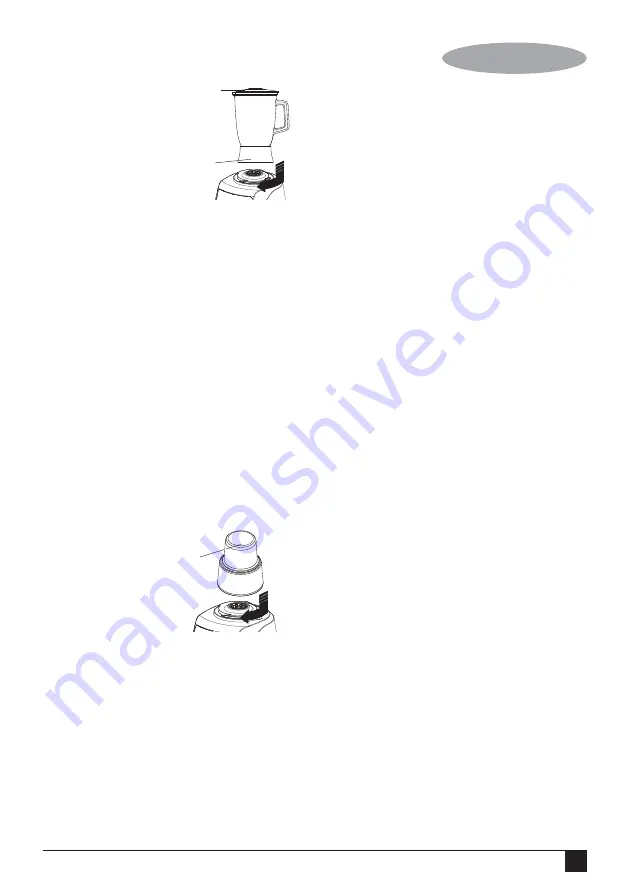
2.  Put sealing ring into 

blender  jar  base 

slot,  screw  and 

fasten  blender  jar 

(18) into blender jar 

b a s e  

( 1 9 ) 

(clockwise 

for 

fastening, 

and 

counterclockwise  for  loosening),  put  the  blender  jar 

cover and the measuring cup on.

3.  Clockwise screw the cutter seat into the main machine 

with your hand (counterclockwise for loosening), do not 

hold  the  blender  jar  with  your  hand  for  disassembling, 

else the jar will leave the blade seat making the food to 

leak out of the blender jar.

Egg mixing

Put  egg  without  eggshell  into  the  blender  jar  (18),  pour 

appropriate cool boiled water, add some flour.

Put and fasten the cover, press the button of weak grading 

for 1 min.

Vegetable or fruit mixing

For vegetable or fruit to be mixed, after peeling or shelling, 

and pitting, cut it into blocks or sections,every time put 600g, 

pour  appropriate  cool  boiled  water,  perform  assembly 

according  to  assembling  specification  for  use  turn  on  for 

mixing for 1min by 5 grading.

Processing using grinding mill

1.  Grinding mill (14&15) 

is applicable to dried 

food  to  be  ground 

into powder.

2.  During  using,every 

time  put  150g  into 

the  grinding  mill, 

cover  with  the 

grinding 

cutter 

seat,fasten  tight  clockwise;  mount  them  on  the  main 

machine according to the position shown in the diagram, 

fasten tight clockwise, press tight the grinding mill with 

your hand, turn on the button switch for grinding.

3.  When  grinding  sesame,  walnut  and  other  oily  food, 

adding a spoon of granulated sugar into the grinding cup 

for grinding together will produce better results.

Note: 

In case of idling during grinding, i.e., when the blade 

does not contact food, immediately stop, cut off power supply. 

Mix the food more softly, then turn on for grinding again.

Kneading blade

You can use the kneading blade (8) to knead yeast dough 

for bread and pizzas.

1.  Put the drive shaft in the bowl.
2.  Put the kneading blade on the drive shaft.

Note: 

Always put the drive shaft with the kneading blade in 

the bowl before you add the ingredients.
3.  Put the ingredients in the bowl.
4.  Put the lid on the bowl. Turn the lid clockwise to fix it

  (‘click’).
5.  Put the pusher in the feeding chute.
6.  Select the speed that corresponds with the accessory.
7.  When  you  have  finished  processing,  turn  the  speed 

selector to 0 and unplug the appliance 

Emulsifying disc

You can use the emulsifying disc (3) to whip cream and to 

whisk  eggs,  egg  whites,  instant  pudding,  mayonnaise  and 

sponge cake mixtures.

1.  Put the drive shaft in the bowl.

2.  Place the emulsifying disc on the drive shaft.

3.  Put the ingredients in the bowl.

4.  Put  the  lid  on  the  bowl.  Turn  the  lid  clockwise  to  fix  it 

(‘click’)

5.  Put the pusher in the feeding chute.

6.  Select the speed that corresponds the accessory

7.  When  you  have  finished  processing,  turn  the  speed 

selector to 0 and unplug the appliance

Tips

-  Do not use the emulsifying disc to prepare cake mixtures 

with  butter  or  margarine  or  to  knead  dough.  Use  the 

kneading blade for these jobs.

-  Make sure the bowl and the emulsifying disc are dry and 

free from grease when you whisk egg whites. Make sure 

the egg whites are at room temperature 

Cleaning and maintenance

Warning!

 Before performing any maintenance:

•  Switch off and disconnect from the mains supply.
•  Wait for the appliance to completely cool down.
•  If necessary scrape excess food particles from the tools.

Warning!

 The motor base must not be immersed in water or 

other liquid.
•  Wipe over the outside surface of the base with a damp  

cloth and polish with a soft dry cloth.

•  Wipe any excess food particles from the power cord.
•  Immerse the processing bowl, bowl cover, pusher, blade  

holder, cutting blades, chopper, kneading blade,  

emulsifying disc, citrus juicing head and plate and  

blender assembly in warm soapy water for complete  

cleaning. Then rinse under running water and wipe dry.

Grinding

mill

Blender

jar cover

Blender jar 

Blender

base

Содержание FX648-B5

Страница 1: ...www blackanddecker ae FX650 B5 FX649 B5 FX648 B5 AR FR EN...

Страница 2: ...2 1 2 9 4 3 5 6 7 8 10 11 12 13 14 15 16 17 18 19...

Страница 3: ...nstructions for food processors Warning Do not place near a hot Gas or electric oven Do not Immerse Food Processor Cord or Plug in any liquid Allow all moving parts of the appliance to come to a stop...

Страница 4: ...ifespan of the machine Intended use Your BLACK DECKER FX650 B5 FX649 B5 FX648 B5 food processor has been designed for use in slicing and chopping etc of various ingredients This appliance is intended...

Страница 5: ...od processor will not work unless the bowl is locked into position How to Assemble and Lock the Lid Align lid as illustrated by placing thumbon lid tab and twisting lid clockwise Four visual alignment...

Страница 6: ...sleeve on the bowl Put the slicer shredder disc 10 on to the drive shaft with the desired side facing up for either slicing or shredding Lock the lid onto the bowl 4 Insert food pusher in chute Always...

Страница 7: ...1 Put the drive shaft in the bowl 2 Put the kneading blade on the drive shaft Note Always put the drive shaft with the kneading blade in the bowl before you add the ingredients 3 Put the ingredients i...

Страница 8: ...Number carefully check the list below for a possible solution to your question Potential problem Probable cause solution Unit does not operate on Is the unit plugged in Does the outlet work any speed...

Страница 9: ...ir agents and full details of our after sales service and contacts are available on the Internet at www 2helpU com Black and Decker Overseas GmbH PO Box 17164 Dubai United Arab Emirates Accessories FX...

Страница 10: ...emplacer des pi ces diff rentes de celles qui sont indiqu es dans le pr sent manuel Consignes de s curit suppl mentaires pour les robots multifonctions AVERTISSEMENT Ne placez pas l appareil proximit...

Страница 11: ...reil int gre un dispositif de protection contre les temp ratures lev es Si la temp rature augmente trop l appareil s teint automatiquement et red marre une fois que le moteur a suf samment refroidi au...

Страница 12: ...e fonctionner si la cruche du mixeur ou le bol du robot multifonction et son couvercle ne sont pas correctement assembl s Consultez la sous section Guide de mod le de la section Donn es techniques pou...

Страница 13: ...tionnez du fromage p te ferme comme du cheddar du Monterey jack ou du fromage suisse Placez le fromage au cong lateur pendant 30 minutes avant de le pr parer Le disque trancher r per 10 est r versible...

Страница 14: ...u mixeur gras il est bon d ajouter une cuill re de sucre cristallis dans le bol du moulin pour obtenir de meilleurs r sultats Remarque En cas de marche vide pendant la mouture c est dire lorsque la la...

Страница 15: ...La section ci dessus concernant le remplacement de la prise lectrique s adresse au personnel des centres de service agr s D pannage Avant d appeler le num ro d assistance la client le v ri ez attenti...

Страница 16: ...r paration agr s BLACK DECKER et des informations compl tes concernant notre service apr s vente y compris les coordonn es sont disponibles en ligne l adresse suivante www 2helpU com Black et Decker...

Страница 17: ...ER BLACK DECKER BLACK DECKER BLACK DECKER www 2helpU com GmbH Black and Decker 17164 FX648 B5 FX649 B5 FX650 B5 G P P P dG fiA Yh d1 5 X X P d1 5 S q NA Yh X P P e P P P dGI T P P P dGh j dG U b P P P...

Страница 18: ...S jCG Y I M dG J dG H o hCG oj hCG dG oj M e d O J h I M dG b J G MG FGQ I M dG Q J k V h j G G G dG j Q dG Q e g Q d H U e I M dG g dG c fG c eCG e dG i A Zh A Y dG A Zh A Y dG g hCG j J EG dG aO Y...

Страница 19: ...ke R G O j M fG GhOC H d dG I FG dG dG j L c a eC G d GPEG i NCG FG S CG hCG A G G I Y b Z j j H q h e T b H I Y d LQ G dG eG a L Y f T b b dG H c e d dG dG j L jCG e J F H dG e Mh aG dGh A Y dG A Zh...

Страница 20: ...4 S j jh dG O Y d dG h G I dG G cG dG h a j G e S jh dEG J dG d dG h G I dG G cG dG dGh dG e dEG e G G c dG bG 5 Y VGh f EG Q NGh dB G J CG HG h G a c dG f MCG j f e dG H jh Gk H Q dG h G j Y dG c dG...

Страница 21: ...f K 30 I H G G dG I T G S H dG Q G G H G dG H CG HG kb JG cCG G b LCG e S 2 5 U H 1 H b EG J j G S Y S 1 U H 2 1 H b e S 10 U H 4 H b G dG I T G S H dG hCG Y dG dG hCG G d 9 G dG I T G SG S G b Y d S...

Страница 22: ...eCG CG hCG Q aE Gh dG c eCG Z H QG G dG V IO YEG Y f W b d k e F H dG Q d H OG eEG j CG j R G G g E a S e j I FG H U J hCG bD G e LQ N U J R L N IC G SG H e H F WEGh J H U G R G G SG R G G SG Y k FGO...

Страница 23: ...S G SG Y k FGO U MG G S G H j J h dG b O d I d R G JG Q e Y Gk H V dG H Gh j dG dGh jC G p HG G j J Yh IO G dG G T e e dG k FGO Q G J dG A KCGh A Y dG e F bh GAG LEG j e dP S SC G e dG W MG I YGQ dG...

Страница 24: ...idal St Amr Ibn Elaas Road 0021861 9094183 nissrine hajj aces com lb Benghazi Libya P O Box 18182 Salmany ext 103 LIBYA North Africa Trading P O Box 348 7 October 00218061 3383994 nissrine hajj aces c...

Страница 25: ......

Страница 26: ......

Страница 27: ......

Страница 28: ...FX649 B5 FX648 B5 WARRANTY REGISTRATION CARD YOUR NAME VOTRE NOM YOUR ADDRESS VOTRE ADRESSE POSTCODE CODE POSTAL DATE OF PURCHASE JOUR D ACHAT DEALER S NAME ADDRESS NOM ET ADRESSE DU VENDEUR r F M u d...

Отзывы: