38
6.1.3 Forks
–
bolting down/releasing.
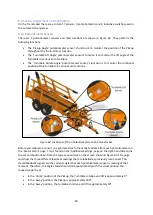
For the purpose of delivery, the forks are bolted to the clamp beam by M12 bolts. If the forks are
required, then these bolts and spacers must be removed and saved. It will be necessary to use the
forks if the bales are not sufficiently stable or when working on particularly steep ground.
The forks may be left bolted down if the bales are of sufficient depth (usually 0.8m or more). It is also
desirable to bolt the forks down during extensive use of the machine for moving stacks.
Should you wish to bolt the forks back down and the forks are out of position you will need to do the
following steps:
1.
Select
‘
Stack Mode
’
and ensure you are in an area clear of power lines and have ample space
to tip the trailer.
2.
Press the bottom right button and move joystick forward to raise the turntable to
approximately 45
o
3.
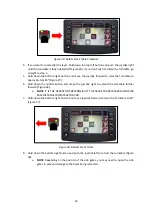
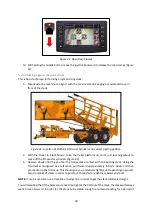
Pull the joystick backwards and tip the trailer all the way up to vertical (Figure 46).
4.
If the forks are
folded down go to step 5. If the forks are raised, change to ‘Field Mode’ and
press the bottom right button and move the joystick forward and hold. The forks will fold
themselves down (Figure 15). Then
return to ‘Stack Mode’.
5.
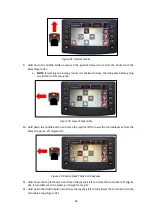
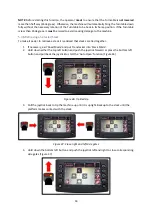
Press the bottom right button and move joystick left and hold to retract the turntable and the
forks should travel down the platform to the rear of the trailer (Figure 49).
6.
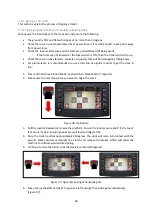
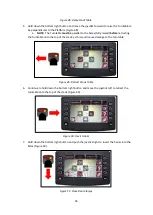
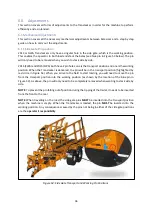
Once the forks are all the way to the rear of the trailer, push the joystick forward and bring
the Platform back down onto the stops (Figure 52).
7.
Stop the PTO and bolt the forks down at the rear and tighten the bolts.
8.
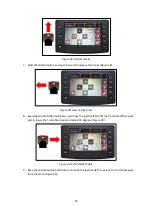
Return to the tractor and re-engage the PTO. S
elect ‘Field Mode’. Press the
bottom right
button and push the joystick forward to tension the cables (Figure 14).
NOTE
: Should you choose to operate with the forks bolted down, there is a setting in ‘Extra Settings’
called ‘Forks Forward Timer’ which can be reduced to speed up
the
‘Auto
-
Closing’
function of the
Transtacker (see section 6.3.3).
6.1.4 Number of tines and their positioning
This section gives you some basic idea of tine positions and the weight each tine can withstand. As a
basic rule, 2 tines will pickup up to a 300kg bale and 4 tines will be required for any heavier bales.
For 1.2x1.3m, 1.2x0.9m and 0.8x0.9m bales you will want 4 tines, 2 in the top holes and two in the
bottom holes of the tine frames.
For 1.2x0.7m bales, two tines in the bottom holes of the tine frames are sufficient.
NOTE
: Due to the height of the pickup required for the bales to land on the turntable correctly, you
CANNOT
have any tines in the top hole of the tine frames as this will clash with the turntable.
Therefore, if you wish to pickup 1.2x0.7m bales and either 1.2x0.9m or 0.8x0.9m, then you will need
4 tines, two in the bottom hole of the tine frames and two in the middle holes of the tine frames. To
install tines in middle holes, you will need to remove tine cylinder rod end pin, tighten the tine and
then reinstall the tine cylinder pins.
Tightening torque of tines is 250ft lbs or as tight as possible with the tools available to you.
NOTE:
Insufficient tightness will cause the tines to be loose, which will wear the grooves in the tine
frames and therefore cause the tines to twist in the frame.
Содержание Transtacker
Страница 7: ...7 3 0 Machine Overview Figure 1 Transtacker Overview...
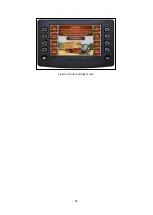
Страница 43: ...43 Figure 59 Auto Settings Screen...
Страница 57: ...57 8 1 Auto Pickup Sequence Figure 69 Auto Pickup Diagram...
Страница 58: ...58 8 2 Auto Stack Sequence both with and without tie Figure 70 Auto Stack Diagram...
Страница 59: ...59 8 3 Auto Lower Turntable Figure 71 Auto Lower Turntable Diagram...
Страница 60: ...60 8 4 Auto Open Sequence Figure 72 Auto Open Diagram...
Страница 61: ...61 8 5 Auto Tip Bed Down Sequence Figure 73 Auto Tip Bed Down Diagram...
Страница 62: ...62 8 6 Road Mode Sequence Figure 74 Road Mode Diagram...


