23
INSTALLER
10 .3 Electrical connections
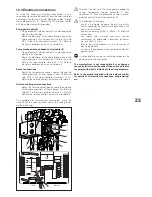
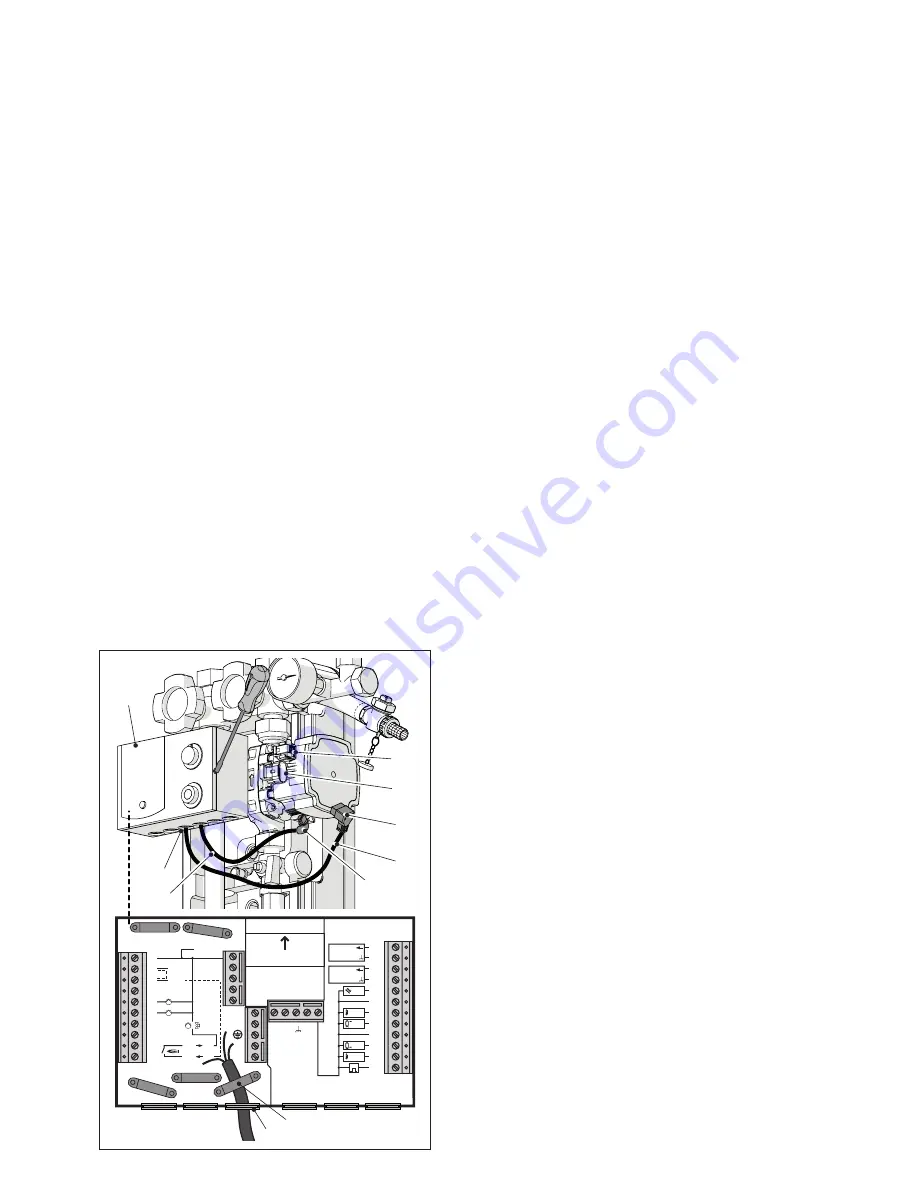
To make the necessary electrical connections, use a
screwdriver to remove the cover (E) from the solar controller
and access the terminals inside. Route the cables through
the cable grommets (F). Secure the 230 V power cables
with the cable clamps (G) provided.
Pump power cable (5)
- Plug connector C into connector C1 under the pump’s
electrical junction box
- Route the other end of the cable through one of the
cable grommets (F) and connect it to terminal strip
MO1 in the solar controller (terminals 1-6). Refer to
the solar controller’s own manual for details.
Pump management and speed control cable (6)
- Plug connector D into connector D1 under the pump’s
electrical junction box
- Route the other end of the cable through one of the
cable grommets (F) and connect it to terminal strip
MO2 in the solar controller (terminals 11-12). Refer to
the solar controller’s own manual for details.
Sensor connections
- Route the temperature sensor cables through the
cable grommets (F) and connect them to terminal
strip MO2 in the solar controller (terminals 15-22).
Refer to the solar controller’s own manual for details.
Solar controller power connections
- Route the solar controller power cable through one
of the cable grommets (F) and connect it to terminal
strip MO1 in the solar controller (terminals 1-2-GND).
Refer to the solar controller’s own manual for details.
On completion of the electrical connections, close the
cover (E) of the solar controller and fit the valve group’s
protective casing.
E
D1
N
GND
1
2
3
4
5
6
7
8
9
10
Sensor
230 V
11
12
13
14
15
16
17
18
19
20
21
22
A3
A2
A1 (n)
L1
N
T1
T2
L1’
/
Top
L1’
PWM
Pump A1
PWM
Pump A2
F2
2
F3
F4
F5
G
F1
5
G
F
MO1
MO2
5
6
C
F
C1
D
b
To make it easier to fit the valve group’s protective
casing, temporarily unplug connector C from
connector C1. With the protective casing in place,
plug connector C back into connector C1.
b
The following is mandatory:
-use of a multi-pole magnetic thermal trip switch
and disconnector that conforms to legislation in the
country of installation
-respect the polarity of the L1 (Phase) - N (Neutral)
connections
-use cables with insulation and cross section
conforming to applicable standards (minimum
cross section 1.5 mm
2
)
-refer to the wiring diagrams in this manual for all
electric operations
-make sure the appliance is connected to an efficient
ground (earth).
a
It is prohibited to use gas and/or water pipes for the
equipment's earth connection.
The manufacturer is not responsible for any damage
caused by failure to earth connect the device and failure
to comply with what is indicated in the wiring diagrams.
Refer to the manual supplied with the solar controller
for details of all electrical connections, programming,
etc..

