background image

Operation

29

Using the menus

The projector is equipped with on-screen display (OSD) menus for making various 
adjustments and settings.

There are 10 different menu languages. (Refer to 

"4. Advance menu" on page 34

 for more 

details.)

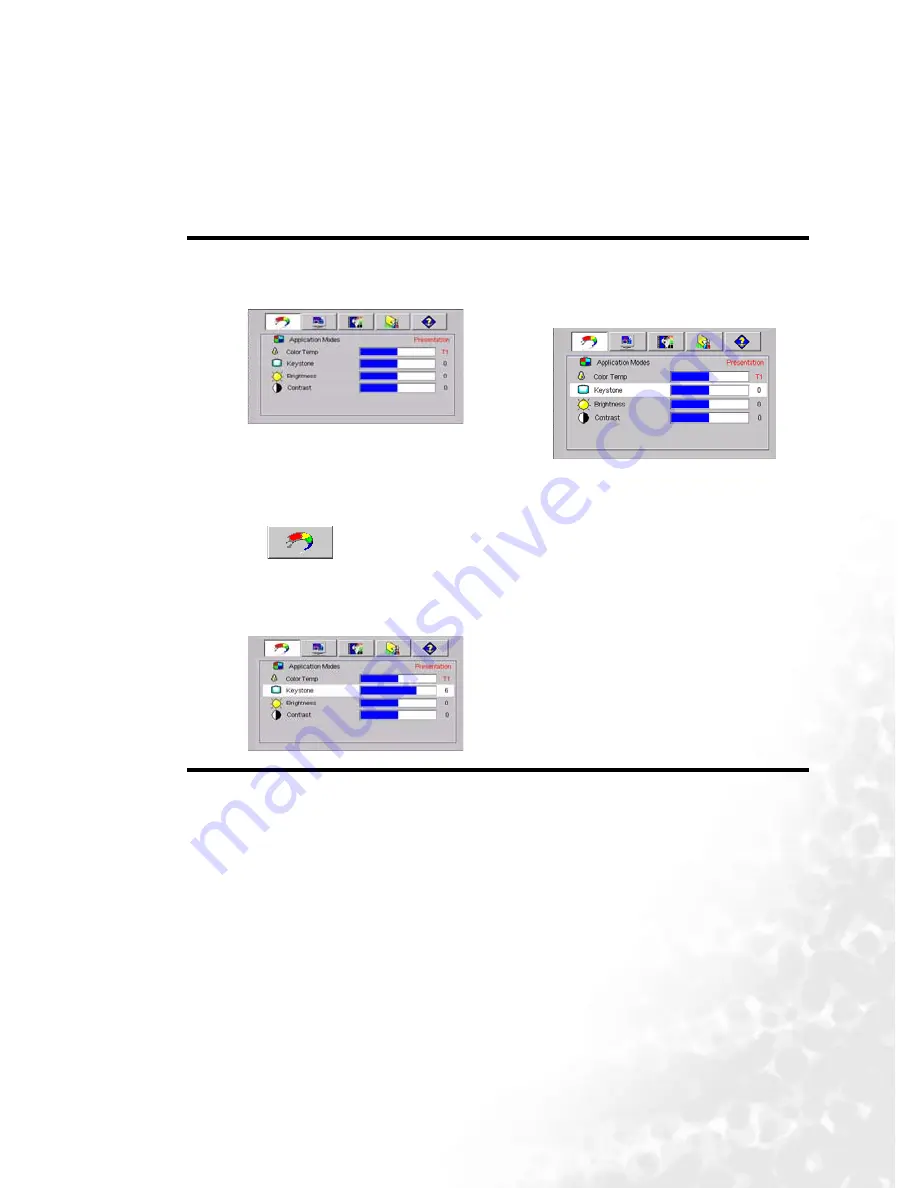
The following example describes the adjustment of the keystone.

1.

Press 

6

 Menu on the projector or Menu 

on the remote control to turn the on-
screen menu on.

4.

Adjust keystone values by 
pressing 

3

 Left / Right 

4

 on 

the projector or 

3

 / 

4

 on the 

remote control.    

2.

Use 

3

 Left/ Right 

4

 on the projector or  

3

 / 

4

 on the remote control to select 

the  

Picture menu.

3.

Press 

5

Exit or 

6

Menu on the projector 

or 

6

 / 

5

 on the remote control to select 

Keystone. 

5.

Press

5

Exit on the projector or 

press 

Menu

 twice* on the 

remote control to leave and save 
the setting.

*The first press leads you back to the 
submenu and the second press closes 
the on-screen menu.

Содержание PB6240 - XGA DLP Projector

Страница 1: ...Welcome PB6240 Digital Projector Portable Series User s Manual...

Страница 2: ...Disclaimer BenQ Corporation makes no representations or warranties either expressed or implied with respect to the contents hereof and specifically disclaims any warranties merchantability or fitness...

Страница 3: ...ining a preferred projected image size 13 How to determine the position of the projector for a given screen size 14 How to determine the recommended screen size for a given distance 14 Connection 16 C...

Страница 4: ...the projector 37 Cleaning the lens 37 Cleaning the projector case 37 Storing the projector 37 Transporting the projector 37 Lamp information 38 Warning message 38 Replacing the lamp 38 Temperature in...

Страница 5: ...Table of contents v Supported timing for Video and S Video inputs 46 Dimensions 47 Warranty 48 Limited Warranty 48 Regulation Statements 49 FCC statement 49 EEC statement 49 MIC statement 49...

Страница 6: ...Table of contents vi Memo...

Страница 7: ...jector Save this user s manual for future reference Do not look straight at the projector lens during operation The intense light beam may damage your eyes Refer servicing to qualified service personn...

Страница 8: ...onic components unless the projector is unplugged 4 Do not place this product on an unstable cart stand or table The product may fall sustaining serious damage 5 To reduce the risk of electric shock d...

Страница 9: ...40 C 104 F Locations where the altitudes are higher than 10000 feet 8 Do not block the ventilation holes Do not place this unit on a blanket bedding or any other soft surface Do not cover this unit wi...

Страница 10: ...lens with any objects when the projector is under operation as this could cause the objects to become heated and deformed or even cause a fire To temporarily turn off the lamp press Blank on the proj...

Страница 11: ...play Ultra high brightness projection lamp Ability to display 16 7 million colors Multi language on screen menus Switchable normal and Economic modes to reduce the power consumption Built in speaker p...

Страница 12: ...of purchase The supplied accessories will be suitable for your region and may differ from those illustrated Projector Soft carry case User s manual Pull the tab before using the remote control Quick s...

Страница 13: ...ation Plus 5 Component Video to VGA D sub adaptor cable 6 RS232 connector Projection lens Front adjuster foot Ventilation grill Front IR remote sensor Front adjuster button Focus ring and Zoom ring Ex...

Страница 14: ...ation on making connections to various equipment Lamp cover Front adjuster foot Rear adjuster foot Rear adjuster foot RGB PC Component video YPbPr YCbCr signal input socket RGB signal output socket RS...

Страница 15: ...fer to Using the menus on page 29 for more information 7 Auto Refer to Auto adjusting the image on page 24 for more information Automatically determines the best picture timings for the displayed imag...

Страница 16: ...efer to Using the menus on page 29 for more information Used to select the desired menu items and to make adjustments 6 Keystone Refer to Correcting keystone on page 25 for more information Manually c...

Страница 17: ...ters 20 feet Make sure that there are no obstacles between the remote control and the IR sensors on the projector that might obstruct the infra red beam Installing or replacing the remote control batt...

Страница 18: ...common way to position the projector for quick setup and portability II Ceiling front Select this location with the projector suspended upside down from the ceiling in front of the screen Purchase the...

Страница 19: ...e square to the horizontal centre of the screen This prevents image distortion caused by angled projections or projecting onto angled surfaces The modern digital projector does not project directly fo...

Страница 20: ...ge 25 for keystone correction How to determine the recommended screen size for a given distance This method can be used for situations where you have purchased this projector and would like to know wh...

Страница 21: ...Average Max length with min zoom 4 48 1219 1600 1780 1960 121 1500 1969 2190 2412 149 5 60 1524 2000 2225 2450 151 6 72 1829 2400 2670 2940 181 2000 2625 2920 3215 198 7 84 2134 2800 3115 3430 211 8...

Страница 22: ...PC or notebook see Remote paging operations on page 27 To connect the projector to a laptop or desktop computer 1 Take the supplied VGA cable and connect one end to the VGA output socket of the compu...

Страница 23: ...monitor as well as on the screen you can connect the RGB signal output socket on the projector to an external monitor with a VGA cable following the instructions below 1 Connect the projector to a co...

Страница 24: ...r Video source device you should elect to use the S Video option See Connecting an S Video source device on page 20 for how to connect the projector to an S Video device Least video quality Composite...

Страница 25: ...o VGA D Sub adaptor cable with a D Sub type connector to the D SUB COMP IN socket on the projector The final connection path should be like that shown in the following diagram The projector is only ca...

Страница 26: ...diagram The projector is only capable of outputting mixed mono audio even if a stereo audio input is connected See Connecting Audio on page 18 for details If the selected video image is not displayed...

Страница 27: ...et on the projector The final connection path should be like that shown in the following diagram The projector is only capable of outputting mixed mono audio even if a stereo audio input is connected...

Страница 28: ...the screen The search will continue until an input source signal is detected You can also press Source on the projector or remote control to select your desired input signal For more information plea...

Страница 29: ...ou did not record the password in this manual and you absolutely do not remember it you can use the password recall procedure To enter the password recall procedure Press and hold 4 for 5 seconds The...

Страница 30: ...e screen and the projector are not perpendicular to each other the projected image becomes vertically trapezoidal To correct this situation adjust the value of Keystone in the Picture menu on the proj...

Страница 31: ...image 2 Press on the remote control to display the status bar labelled Keystone then press to correct keystoning at the top of the image or press to correct keystoning at the bottom of the image 3 Pre...

Страница 32: ...ignals Data graphic PC presentations using mostly static images are generally brighter than Video using mostly moving images movies The input type affects the options available for the Application Mod...

Страница 33: ...rozen on the screen the pictures are running on the video or other device If the connected devices have active audio output you will still hear the audio even though the image is frozen Shutdown 1 Pre...

Страница 34: ...cture Application Mode Color Temp Keystone Brightness Contrast Application Mode Color Temp Keystone Brightness Contrast Color Tint Pro Picture Auto Resize Aspect Ratio H Position V Position Phase H Si...

Страница 35: ...n the remote control to turn the on screen menu on 4 Adjust keystone values by pressing 3 Left Right 4 on the projector or 3 4 on the remote control 2 Use 3 Left Right 4 on the projector or 3 4 on the...

Страница 36: ...egardless of brightness setting It is most suitable for viewing photos taken with an sRGB compatible and properly calibrated camera and for viewing PC graphic and drawing applications such as AutoCAD...

Страница 37: ...stoning of the image Refer to Correcting keystone on page 25 for more information Brightness Adjusts the brightness of the image The higher the value the brighter the image And lower the setting darke...

Страница 38: ...splay smaller than if resized to full screen You could adjust the zoom setting or move the projector towards the screen to increase the image size if necessary You may also need to refocus the project...

Страница 39: ...r to Utilizing the password function on page 22 Once the password is set and this function is selected the projector is password protected Users who do not know the correct password can not use the pr...

Страница 40: ...o black screen or blue screen High Altitude Mode A mode for extreme environments like high altitude or high temperature We recommend you use the High Altitude Mode when your environment is higher than...

Страница 41: ...ed the light output will be reduced and result in darker projected images Setting the projector in Economic mode does not extend the lamp timer automatic shutdown feature That is the lamp time warning...

Страница 42: ...s are in use Unavailable adjustments are not shown on the screen FUNCTION DESCRIPTION Source Shows the current signal source Resolution Shows the native resolution of the input signal Application Mode...

Страница 43: ...unplug the power cord To remove dirt or dust wipe the case with a soft dry lint free cloth To remove stubborn dirt or stains moisten a soft cloth with water and a neutral pH detergent Then wipe the ca...

Страница 44: ...he lamp To reduce the risk of severe burns allow the projector to cool for at least 45 minutes before replacing the lamp To reduce the risk of injuries to fingers and damage to internal components use...

Страница 45: ...rewdriver Step 5 Lift the handle so that it stands up Use the handle to slowly pull the lamp out of the projector Pulling it too quickly may cause the lamp to break and scatter broken glass in the pro...

Страница 46: ...it is warning you of the following possible problems 1 The internal temperature is too high 2 The fans are not working Turn the projector off and contact qualified service personnel for further help F...

Страница 47: ...shutdown automatically If you try to re start the projector it will shutdown again Please contact your dealer for assistance The projector has shutdown automatically If you try to re start the projec...

Страница 48: ...ord US 27 01818 000 Power cord EU 27 82718 281 Power cord UK 27 01018 000 VGA cable 50 J0508 503 Video cable 50 J1303 501 S Video cable 50 72920 011 RCA R W audio cable 50 J1311 001 PC PC audio cable...

Страница 49: ...projector on the ceiling we strongly recommend that you use a proper fitting BenQ projector ceiling mount kit and that you ensure it is securely and safely installed If you use a non BenQ brand projec...

Страница 50: ...orrectly connected to the input source device Check the connection The input signal has not been correctly selected Select the correct input signal with the Source key on the projector or remote contr...

Страница 51: ...mm H x 215 5 mm D Weight 6 38 lbs 2 9 Kg Input terminal Computer input RGB input D sub 15 pin female x 1 Video signal input S VIDEO Mini DIN 4 pin port x 1 VIDEO RCA jack x1 HDTV signal input D sub C...

Страница 52: ...061 56 250 SVGA_85 1024 x 768 48 363 60 004 65 000 XGA_60 56 476 70 069 75 000 XGA_70 60 023 75 029 78 750 XGA_75 68 667 84 997 94 500 XGA_85 1280 x 1024 63 981 60 020 108 000 SXGA_60 Signal Format H...

Страница 53: ...Specifications 47 Dimensions Unit mm...

Страница 54: ...warranty service immediately notify the dealer from which you purchased the product of any defects Important The above warranty shall be void if the customer fails to operate the product in accordanc...

Страница 55: ...to correct the interference by one or more of the following measures Reorient or relocate the receiving antenna Increase the distance between the equipment and receiver Connect the equipment into an...

Страница 56: ...Regulation Statements 50 Memo...

Отзывы: