background image

Mounting and wiring

EL47xx

24

Version: 2.7

4

Mounting and wiring

4.1

Instructions for ESD protection

NOTE

Destruction of the devices by electrostatic discharge possible!

The devices contain components at risk from electrostatic discharge caused by improper handling.

• Please ensure you are electrostatically discharged and avoid touching the contacts of the device directly.

• Avoid contact with highly insulating materials (synthetic fibers, plastic film etc.).

• Surroundings (working place, packaging and personnel) should by grounded probably, when handling

with the devices.

• Each assembly must be terminated at the right hand end with an 

EL9011

 or 

EL9012

 bus end cap, to en-

sure the protection class and ESD protection.

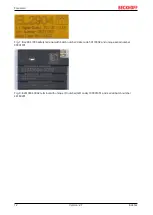
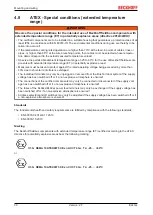
Fig. 14: Spring contacts of the Beckhoff I/O components

4.2

Installation on mounting rails

 WARNING

Risk of electric shock and damage of device!

Bring the bus terminal system into a safe, powered down state before starting installation, disassembly or
wiring of the bus terminals!

Содержание EL47 Series

Страница 1: ...Documentation EL47xx Analog output terminal with oversampling 2 7 2020 02 27 Version Date...

Страница 2: ......

Страница 3: ...allation instructions for enhanced mechanical load capacity 28 4 4 Connection system 28 4 5 Installation positions 31 4 6 Positioning of passive Terminals 34 4 7 ATEX Special conditions standard tempe...

Страница 4: ...lated cooperation with other terminals 139 5 6 5 Interference from equipment 140 5 7 Creation of the TwinCAT configuration 141 5 8 Process data and configuration 145 5 8 1 Process data 145 5 8 2 TwinC...

Страница 5: ...ines and standards Disclaimer The documentation has been prepared with care The products described are however constantly under development We reserve the right to revise and change the documentation...

Страница 6: ...ction distribution and utilization of this document as well as the communication of its contents to others without express authorization are prohibited Offenders will be held liable for the payment of...

Страница 7: ...ined specialists in control automation and drive engineering who are familiar with the applicable national standards Description of instructions In this documentation the following instructions are us...

Страница 8: ...Commissioning 2 2 Update chapter Notes on the documentation Update of Technical data Update chapter TwinCAT 2 1x TwinCAT Development Environment and TwinCAT Quick Start 2 1 Chapter Oversampling termi...

Страница 9: ...rmation in the form of an XML file which is available for download from the Beckhoff web site From 2014 01 the revision is shown on the outside of the IP20 terminals see Fig EL5021 EL terminal standar...

Страница 10: ...hardware version of I O PCB 1 Unique serial number ID ID number In addition in some series each individual module has its own unique serial number See also the further documentation in the area IP67...

Страница 11: ...0020 with serial batch number 26131006 and unique ID number 204418 Fig 5 EP1258 00001 IP67 EtherCAT Box with batch number date code 22090101 and unique serial number 158102 Fig 6 EP1908 0002 IP67 Eth...

Страница 12: ...Version 2 7 Fig 7 EL2904 IP20 safety terminal with batch number date code 50110302 and unique serial number 00331701 Fig 8 ELM3604 0002 terminal with unique ID number QR code 100001051 and serial bat...

Страница 13: ...product it can be found in the following places on the packaging unit directly on the product if space suffices on the packaging unit and the product The BIC is machine readable and contains informat...

Страница 14: ...s are used by Beckhoff and serve internal processes Structure of the BIC Example of composite information from item 1 to 4 and 6 The data identifiers are marked in red for better display BTN An import...

Страница 15: ...A output current The analog output terminal generates signals in the range 0 to 20 mA The current is set by the process with a resolution of 16 bit including sign and output in electrically isolated f...

Страница 16: ...nt consumption via E bus typ 100 mA typ 180 mA Bit width in process image Output n x 2 x 16 bit data 2 x 16 bit CycleCounter 4 byte StartTimeNextOutput if required Configuration via TwinCAT System Man...

Страница 17: ...802 3 Pin Color of conductor Signal Description 1 yellow TD Transmission Data 2 orange TD Transmission Data 3 white RD Receiver Data 6 blue RD Receiver Data Due to automatic cable detection auto cross...

Страница 18: ...l for longer than the set and activated SM watchdog time e g in the event of a line interruption the watchdog is triggered and the outputs are set to FALSE The OP state of the terminal is unaffected T...

Страница 19: ...the checkbox is not activated nothing is downloaded and the ESC settings remain unchanged Multiplier Multiplier Both watchdogs receive their pulses from the local terminal cycle divided by the watchdo...

Страница 20: ...witching off of the SM watchdog via SM watchdog 0 is only implemented in terminals from version 0016 In previous versions this operating mode should not be used CAUTION Damage of devices and undefined...

Страница 21: ...tional Safe Op During transition between Pre Op and Safe Op the EtherCAT slave checks whether the sync manager channels for process data communication and if required the distributed clocks settings a...

Страница 22: ...Init state In the Boot state mailbox communication via the file access over EtherCAT FoE protocol is possible but no other mailbox communication and no process data communication 3 5 CoE Interface no...

Страница 23: ...1 ns Zero point 1 1 2000 00 00 Size 64 bit sufficient for the next 584 years however some EtherCAT slaves only offer 32 bit support i e the variable overflows after approx 4 2 seconds The EtherCAT mas...

Страница 24: ...highly insulating materials synthetic fibers plastic film etc Surroundings working place packaging and personnel should by grounded probably when handling with the devices Each assembly must be termin...

Страница 25: ...lock clicks onto the mounting rail If the terminals are clipped onto the mounting rail first and then pushed together without tongue and groove the connection will not be operational When correctly as...

Страница 26: ...ents The six spring contacts of the K Bus E Bus deal with the transfer of the data and the supply of the Bus Terminal electronics The power contacts deal with the supply for the field electronics and...

Страница 27: ...ting or to damage on the terminal e g disruptive discharge to the PE line during insulation testing of a consumer with a nominal voltage of 230 V For insulation testing disconnect the PE supply line a...

Страница 28: ...tal extension of the terminal segment without coupler is 64 terminals 12 mm mounting with or 32 terminals 24 mm mounting with Avoid deformation twisting crushing and bending of the mounting rail durin...

Страница 29: ...risk of wires being mixed up The familiar dimensions of the terminal only had to be changed slightly The new connector adds about 3 mm The maximum height of the terminal remains unchanged A tab for st...

Страница 30: ...nals are implemented in spring force technology Connect the cables as follows 1 Open a spring loaded terminal by slightly pushing with a screwdriver or a rod into the square opening above the terminal...

Страница 31: ...technical data for a terminal to ascertain whether any restrictions regarding the installa tion position and or the operating temperature range have been specified When installing high power dissi pa...

Страница 32: ...in Fig Recommended distances for standard installation position is recommended Other installation positions All other installation positions are characterized by different spatial arrangement of the m...

Страница 33: ...Mounting and wiring EL47xx 33 Version 2 7 Fig 23 Other installation positions...

Страница 34: ...not take an active part in data transfer within the bus terminal block are so called passive terminals The passive terminals have no current consump tion out of the E Bus To ensure an optimal data tra...

Страница 35: ...d operating voltage being exceeded by more than 40 due to short term interference voltages The individual terminals may only be unplugged or removed from the Bus Terminal system if the supply voltage...

Страница 36: ...he rated operating voltage being exceeded by more than 40 due to short term interference voltages The individual terminals may only be unplugged or removed from the Bus Terminal system if the supply v...

Страница 37: ...of the Beckhoff homepage http www beckhoff com 4 10 UL notice Application Beckhoff EtherCAT modules are intended for use with Beckhoff s UL Listed EtherCAT Sys tem only Examination For cULus examinati...

Страница 38: ...irmware updates 160 of the terminal flashing State of the EtherCAT State Machine PREOP function for mailbox communication and different standard settings set single flash State of the EtherCAT State M...

Страница 39: ...d positive power contact 0 V 3 0 V internally connected to terminal point 7 and negative power contact Shield 4 Shield internally connected to terminal point 8 Output 2 5 Output 2 24 V 6 24 V internal...

Страница 40: ...1 1 Output 1 n c 2 not used GND 3 Signal ground for output 1 internally connected to terminal point 7 Shield 4 Shield internally connected to terminal point 8 Output 2 5 Output 2 n c 6 not used GND 7...

Страница 41: ...ger I O Configuration In particular TwinCAT driver installation Fieldbus components Fieldbus Cards and Switches FC900x PCI Cards for Ethernet Installation Devices contain the terminals for the actual...

Страница 42: ...on the following sample configuration the subsequent subsections describe the procedure for TwinCAT 2 and TwinCAT 3 Control system PLC CX2040 including CX2100 0004 power supply unit Connected to the...

Страница 43: ...004 and output EL2008 Note that all combinations of a configuration are possible for example the EL1004 terminal could also be connected after the coupler or the EL2008 terminal could additionally be...

Страница 44: ...tem Manager displays the following user interface after startup Fig 31 Initial TwinCAT 2 user interface Generally TwinCAT can be used in local or remote mode Once the TwinCAT system including the user...

Страница 45: ...shown in red perform a Broadcast Search if the exact computer name is not known enter the known computer IP or AmsNetID Fig 33 Specify the PLC for access by the TwinCAT System Manager selection of the...

Страница 46: ...enu Actions Set Reset TwinCAT to Config Mode Shift F4 Fig 34 Select Scan Devices Confirm the warning message which follows and select EtherCAT in the dialog Fig 35 Automatic detection of I O devices s...

Страница 47: ...u which then reads the elements present in the configuration below Fig 37 Reading of individual terminals connected to a device This functionality is useful if the actual configuration is modified at...

Страница 48: ...ction Chart Editor CFC Sequential Function Chart SFC The following section refers to Structured Text ST After starting TwinCAT PLC Control the following user interface is shown for an initial project...

Страница 49: ...cessful compilation TwinCAT PLC Control creates a tpy file in the directory in which the project was stored This file tpy contains variable assignments and is not known to the System Manager hence the...

Страница 50: ...Manager The two variables bEL1004_Ch4 and nEL2008_value can now be assigned to certain process objects of the I O configuration Assigning variables Open a window for selecting a suitable process objec...

Страница 51: ...aneously activate Continuous and All types Note that the Continuous checkbox was also activated This is designed to allocate the bits contained in the byte of the variable nEL2008_value sequentially t...

Страница 52: ...ntext menu of a PDO can be executed in the other direction so that the respective PLC instance can then be selected Activation of the configuration The allocation of PDO to PLC variables has now estab...

Страница 53: ...k the PLC with the real time system via menu option Online Login the F11 key or by clicking on the symbol The control program can then be loaded for execution This results in the message No program on...

Страница 54: ...onment areas available together with Microsoft Visual Studio after startup the project folder explorer appears on the left in the general window area cf TwinCAT System Manager of TwinCAT 2 for communi...

Страница 55: ...user interface First create a new project via or under File New Project In the following dialog make the corresponding entries as required as shown in the diagram Fig 49 Create new TwinCAT project The...

Страница 56: ...ed on the respective PLC TwinCAT can be used in local mode and thereby the next step is Insert Device 57 If the intention is to address the TwinCAT runtime environment installed on a PLC as developmen...

Страница 57: ...n entered it is available for selection as follows a password may have to be entered After confirmation with OK the target system can be accessed via the Visual Studio shell Adding devices In the proj...

Страница 58: ...be acknowledged Based on the sample configuration 42 described at the beginning of this section the result is as follows Fig 55 Mapping of the configuration in VS shell of the TwinCAT3 environment The...

Страница 59: ...l supports all languages described in IEC 61131 3 There are two text based languages and three graphical languages Text based languages Instruction List IL Structured Text ST Graphical languages Funct...

Страница 60: ...LC_example as project name for example and select a corresponding directory Fig 58 Specifying the name and directory for the PLC programming environment The Main program which already exists by select...

Страница 61: ...Commissioning EL47xx 61 Version 2 7 Fig 59 Initial Main program of the standard PLC project To continue sample variables and a sample program have now been created...

Страница 62: ...r followed by the compile process Fig 61 Start program compilation The following variables identified in the ST PLC program with AT are then available in under Assignments in the project folder explor...

Страница 63: ...on tree Fig 63 Selecting PDO of type BOOL According to the default setting certain PDO objects are now available for selection In this sample the input of channel 4 of the EL1004 terminal is selected...

Страница 64: ...for channel 8 of the PLC A special symbol at the yellow or red object of the variable indicates that a link exists The links can also be checked by selecting a Goto Link Variable from the context men...

Страница 65: ...ystem in Run mode with OK The corresponding assignments can be seen in the project folder explorer A few seconds later the corresponding status of the Run mode is displayed in the form of a rotating s...

Страница 66: ...re CNC within Windows NT 2000 XP Vista Windows 7 NT XP Embedded CE Interconnection to all common fieldbusses More Additional features TwinCAT 3 eXtended Automation Visual Studio Integration Choice of...

Страница 67: ...lowing dialog appears Fig 69 Overview of network interfaces Interfaces listed under Compatible devices can be assigned a driver via the Install button A driver should only be installed on compatible d...

Страница 68: ...s of the EtherCAT device can be opened by double click on Device EtherCAT within the Solution Explorer under I O After the installation the driver appears activated in the Windows overview for the net...

Страница 69: ...Commissioning EL47xx 69 Version 2 7 Fig 72 Exemplary correct driver setting for the Ethernet port Other possible settings have to be avoided...

Страница 70: ...Commissioning EL47xx 70 Version 2 7 Fig 73 Incorrect driver settings for the Ethernet port...

Страница 71: ...here an EL6601 or similar devices are used it is useful to specify a fixed IP address for this port via the Internet Protocol TCP IP driver setting and to disable DHCP In this way the delay associated...

Страница 72: ...was current at the time when the TwinCAT build was created For TwinCAT 2 11 TwinCAT 3 and higher the ESI directory can be updated from the System Manager if the programming PC is connected to the Inte...

Страница 73: ...on 1019 or for an older revision The ESI must then be requested from the manufacturer in this case Beckhoff b an ESI is present for the EL2521 0000 device but only in an older revision e g 1018 or 101...

Страница 74: ...leted as follows close all System Manager windows restart TwinCAT in Config mode delete OnlineDescription0000 xml restart TwinCAT System Manager This file should not be visible after this procedure if...

Страница 75: ...47xx 75 Version 2 7 Reasons may include Structure of the xml does not correspond to the associated xsd file check your schematics Contents cannot be translated into a device description contact the fi...

Страница 76: ...sence of the actual I O environment drives terminals EJ modules If the configuration is to be prepared in advance of the system configuration as a programming system e g on a laptop this is only possi...

Страница 77: ...ion 87 can also be carried out for comparison 5 2 5 OFFLINE configuration creation Creating the EtherCAT device Create an EtherCAT device in an empty System Manager window Fig 83 Append EtherCAT devic...

Страница 78: ...can be appended by right clicking on a device in the configuration tree Fig 87 Appending EtherCAT devices left TwinCAT 2 right TwinCAT 3 The dialog for selecting a new device opens Only devices for w...

Страница 79: ...ion can be displayed as Extended Information Fig 89 Display of device revision In many cases several device revisions were created for historic or functional reasons e g through technological advancem...

Страница 80: ...This also enables subsequent replacement of devices without changing the configuration different specifications are possible for drives Example If an EL2521 0025 1018 is specified in the configuration...

Страница 81: ...Commissioning EL47xx 81 Version 2 7 Fig 92 EtherCAT terminal in the TwinCAT tree left TwinCAT 2 right TwinCAT 3...

Страница 82: ...online search is not available in RUN mode production operation Note the differentiation be tween TwinCAT programming system and TwinCAT target system The TwinCAT 2 icon or TwinCAT 3 icon within the W...

Страница 83: ...e respective devices are lo cated in the stored ESI data and integrated in the configuration tree in the default state defined there Fig 97 Example default state NOTE Slave scanning in practice in ser...

Страница 84: ...iguration B tsm in order to check the built machine However if the series machine production department now doesn t use B tsm but instead carries out a scan to create the productive configuration the...

Страница 85: ...hed to online state OPERATIONAL Fig 103 Config FreeRun query left TwinCAT 2 right TwinCAT 3 In Config FreeRun mode the System Manager display alternates between blue and red and the EtherCAT device co...

Страница 86: ...ce is detected i e an EtherCAT slave for which no ESI XML description is available In this case the System Manager offers to read any ESI that may be stored in the device This case is described in the...

Страница 87: ...uration is then replaced by the revision found this can affect the supported process data and functions If a scan is initiated for an existing configuration the actual I O environment may match the co...

Страница 88: ...ed on the higher revision number Device selection based on revision compatibility The ESI description also defines the process image the communication type between master and slave device and the devi...

Страница 89: ...offers a function Change to Compatible Type for the exchange of a device whilst retaining the links in the task Fig 112 Dialog Change to Compatible Type left TwinCAT 2 right TwinCAT 3 This function i...

Страница 90: ...s are now available for configuring the terminal And yet the dimension of complexity of a subscriber determines which tabs are provided Thus as illustrated in the example above the terminal EL3751 pro...

Страница 91: ...the start up phase Tick the control box to the left of the input field in order to modify the default value Previous Port Name and port of the EtherCAT device to which this device is connected If it...

Страница 92: ...difications include mask out a channel displaying additional cyclic information 16 bit display instead of 8 bit data size etc In so called intelligent EtherCAT devices the process data information is...

Страница 93: ...incorrect configuration the EtherCAT slave usu ally refuses to start and change to OP state The System Manager displays an invalid SM cfg log ger message This error message invalid SM IN cfg or invali...

Страница 94: ...nt to the mailbox Move Up This button moves the selected request up by one position in the list Move Down This button moves the selected request down by one position in the list New This button adds a...

Страница 95: ...ect can be read but no data can be written to the object read only P An additional P identifies the object as a process data object Value Value of the object Update List The Update list button updates...

Страница 96: ...cts included in the object list of the slave is uploaded from the slave via SDO information The list below can be used to specify which object types are to be uploaded Offline via EDS File If this opt...

Страница 97: ...ain Current State Indicates the current state of the EtherCAT device Requested State Indicates the state requested for the EtherCAT device DLL Status Indicates the DLL status data link layer status of...

Страница 98: ...is deactivated not selected and greyed out this indicates that the input is excluded from the PDO assignment In order to be able to select a greyed out PDO the currently selected PDO has to be desele...

Страница 99: ...T Slave Application This summary briefly deals with a number of aspects of EtherCAT Slave operation under TwinCAT More detailed information on this may be found in the corresponding sections of for in...

Страница 100: ...olour Meaning yellow Input variables from the Slave to the EtherCAT Master updated in every cycle red Output variables from the Slave to the EtherCAT Master updated in every cycle green Information va...

Страница 101: ...Commissioning EL47xx 101 Version 2 7 Fig 125 Basic EtherCAT Slave Diagnosis in the PLC The following aspects are covered here...

Страница 102: ...y have effects on the process data of other Slaves that are located in the same Syn cUnit In order for the higher level PLC task or cor responding control applications to be able to rely on correct da...

Страница 103: ...ocally in the slave depends on the device EL terminals except the EL66xx are able to save in this way The user must manage the changes to the StartUp list Commissioning aid in the TwinCAT System Manag...

Страница 104: ...operation After the operating power is switched on an EtherCAT Slave must go through the following statuses INIT PREOP SAFEOP OP to ensure sound operation The EtherCAT Master directs these statuses i...

Страница 105: ...as standard EtherCAT Master OP Slaves OP This setting applies equally to all Slaves Fig 128 Default behaviour of the System Manager In addition the target state of any particular Slave can be set in...

Страница 106: ...e Fig 130 PLC function blocks Note regarding E Bus current EL ES terminals are placed on the DIN rail at a coupler on the terminal strand A Bus Coupler can supply the EL terminals added to it with the...

Страница 107: ...ove a warning message E Bus Power of Terminal is output in the logger window when such a configuration is activated Fig 132 Warning message for exceeding E Bus current NOTE Caution Malfunction possibl...

Страница 108: ...s boxes The definition of oversampling by the Beckhoff s point of view shouldn t be mixed up with the oversampling process of a deltaSigma ADC deltaSigma ADC the frequency used by the ADC to sample th...

Страница 109: ...EL3751 all EL3742 all EL3702 all EL3632 all EL2262 all EL1262 0050 all EL1262 all EP3632 0001 all EPP3632 0001 all Recording a PLC Variable with the TwinCAT 3 ScopeView By a precondition of an alread...

Страница 110: ...identification AT I stands for swapping out this array variable to link it with the process data objects PDOs of a terminal box later Notice that at least the number of elements has to be the same as...

Страница 111: ...f EL3773 Step 2b Creation of a PLC variable via a free task When a POU is not needed onto the particular system a referenced variable could be applied via a free task also If a free task is not existi...

Страница 112: ...ty Create symbols must be activated There s a default value given for the Port number 301 that should be changed if necessary This number has to make acquainted for the Scope if applicable later on By...

Страница 113: ...O U1 Samples of the EL3773 for MAIN aUI_Samples based by the last preceding paragraph Step 2a as illustrated above have to be done in the same way for Var 1 accordingly Step 4 Selection of the PLC arr...

Страница 114: ...ariable aUI_Samples C have to be done Fig 142 Appending the variable aUI_Samples below axis within the scope project of the solution explorer Variable don t appears into the target browser If ROUTES d...

Страница 115: ...nt cycle time The X axis view was fitted properly by using Panning X after the recording was stopped Following the Chart property Use X Axis SubGrid was set to true with 10 divisions as well as the Ch...

Страница 116: ...left sided solution explorer I O Devices Device EtherCAT Image Next the register card ADS have to be selected to activate each checkbox Enable ADS Server and Create symbols then the port entry is don...

Страница 117: ...EtherCAT device Also see Beckhoff Information System 5 4 2 TwinCAT 2 procedure The TwinCAT Scope2 supports the import and display of oversampling process data such as is used by oversampling able ter...

Страница 118: ...via ADS without further measures since PLC variables are always created as ADS symbols in the background Fig 147 PLC in the System Manager Note the Scope2 can only see such variables in the variable...

Страница 119: ...stem Manager an instance of it can be assigned to an additional task with a right click It appears in the overview sorted according to bit size Fig 150 Overview of declared types In this example the v...

Страница 120: ...task will not run automatically ADS symbol tables are then created for all variables that have this task in their process data images Fig 153 Settings in the additional task Step 2 Configuration in th...

Страница 121: ...ForceOversampling and DataType INT16 must be set in the channel which has now been created If necessary SymbolBased must be temporarily deactivated in addition Fig 156 Channel settings In order to che...

Страница 122: ...issioning EL47xx 122 Version 2 7 Fig 157 Activation of the marks An additional example illustrates the following image by representation of an oversampling variable from the EL3751 with 10 x oversampl...

Страница 123: ...activated due to the oversampling variable is not provided by the terminal box Proceeding with TwinCAT 2 alternatively via ADS In former TwinCAT 2 versions or a lower revision as specified in the tab...

Страница 124: ...tion tree I O Configuration I O Devices Device EtherCAT Device Image Next the register card ADS have to be selected to activate each checkbox Enable ADS Server and Create symbols then the port entry i...

Страница 125: ...rsampling record Beckhoff TwinCAT supports the Scope2 with some oversampling devices in a special way by automatically calculating a special ADS array symbol in the background which appears in the Sco...

Страница 126: ...ial value Analogous to pointing devices this is the measuring scale see IEC 61131 or also the dynamic range For analog I O devices from Beckhoff the rule is that the limit with the largest value is ch...

Страница 127: ...nd thermal stabiliza tion after a user calibration This applies to analog output devices 5 5 3 Temperature coefficient tK ppm K An electronic circuit is usually temperature dependent to a greater or l...

Страница 128: ...en two potential points For voltage measurements a large R is used in order to ensure a high impedance For current measurements a small R is used as shunt If the purpose is resistance measurement corr...

Страница 129: ...portant to pay attention to the quality of this potential noiselessness voltage stability At this GND point a wire may be connected to make sure that VCM max is not exceeded in the differential sensor...

Страница 130: ...ufactured on the application side to be connected with the right polarity to Signal and Signal It is important to refer to the information page Configuration of 0 4 20 mA differential inputs see docum...

Страница 131: ...and related product groups exactly the same Differential EL3x1x 0 20 mA EL3x2x 4 20 mA KL and related product groups exactly the same Preferred current direction because of internal diode Preferred cu...

Страница 132: ...Commissioning EL47xx 132 Version 2 7 Single ended Differential Fig 166 2 3 and 4 wire connection at single ended and differential inputs...

Страница 133: ...der consideration For multi channel terminals boxes with resistive direct ohmic galvanic or capacitive connection between the channels the reference ground should preferably be the symmetry point of a...

Страница 134: ...user perspective they all have a common characteristic after the conversion a certain digital value is available in the controller for further processing This digital value the so called analog proces...

Страница 135: ...hronous or more quickly if the AI channel operates in slow FreeRun mode or more slowly e g with oversampling is then a question of the fieldbus setting and which modes the AI device supports For Ether...

Страница 136: ...awtooth or sine A simultaneous square wave signal would be used as reference The signal delay ms s is then the interval between the applied electrical signal with a particular amplitude and the moment...

Страница 137: ...utput period e g 50 s is referred to as oversampling factor here 1 ms 50 s 20 The oversampling factor and therefore the EL47xx process data can be configured via corresponding dialogs 5 6 3 Distribute...

Страница 138: ...such as 1 2 5 or 100 are permitted but not 3 If implausible values are used the terminal will still reach the OP state but will not output correct process data This may result in a working counter er...

Страница 139: ...different oversampling factors their SYNC0 pulses no longer occur simultaneously The higher level SYNC1 pulse is retained If a value is entered under Shift time s in the TwinCAT System Manager DC tab...

Страница 140: ...atically allocates SYNC0 and SYNC1 settings that support reliable and timely process data acquisition User intervention at this point may lead to undesired behavior If these settings are changed in th...

Страница 141: ...described in section Mounting rail installation 24 Once the operating voltage has been switched on open the TwinCAT System Manager 90 Config mode and scan in the terminal see Fig Scanning in the Ethe...

Страница 142: ...4 Selecting the device EtherCAT Direct Mode Appending a new box see Fig Appending a new box Device right click Append Box In the dialog that follows select an EK1100 system coupler for example see Fig...

Страница 143: ...box see Fig Appending a new box Device right click Append Box In the dialog that follows select the EL4732 see Fig Selecting the EL4732 terminal and confirm with OK The terminal is added in the TwinC...

Страница 144: ...Commissioning EL47xx 144 Version 2 7 Fig 178 Selecting the EL4732 terminal Fig 179 Terminal in the TwinCAT tree...

Страница 145: ...0x7FFF The terminal is adjusted during production No further user intervention is required 5 8 2 TwinCAT tree The operating principle of the EL47xx in conjunction with SYNC0 and SYNC1 pulses was alre...

Страница 146: ...level control system can be used to verify the consistency of the record transfer By default the EL47xx is set to n 1 resulting in the process image shown in Fig TwinCAT tree EL4732 WcState 0 1 Onlin...

Страница 147: ...0x001_ Slave signals error 0x002_ Invalid vendorId productCode read 0x004_ Initialization error occurred 0x010_ Slave not present 0x020_ Slave signals link error 0x040_ Slave signals missing link 0x0...

Страница 148: ...ess data in delivery state Process data The scope of the offered process data and the assignment of the SyncManagers in delivery state can be viewed via the Process data tab see Fig Process data tab S...

Страница 149: ...Commissioning EL47xx 149 Version 2 7 Fig 184 Process data tab SM1 EL47xx...

Страница 150: ...ocess data is transferred from the terminal SM0 PDO Assignment 0x1C10 Index Index of excluded PDOs Size byte bit Name PDO content 0x1680 2 0 Ch 1 CycleCount Index 0x7800 01 Ch 1 CycleCount 0x1600 0x16...

Страница 151: ...be transferred are set automatically Sampling frequency If an oversampling factor is required that does not appear in the list the user has to specify the ratio between the SYNC0 pulse and the SYNC1 p...

Страница 152: ...AT 2 11 Fig 188 DC tab sample setting oversampling factor 2 TwinCAT 2 11 An oversampling setting of n 2 with two channels in use results in the process image shown in Fig TwinCAT tree sample setting 2...

Страница 153: ...rocess data cycle the time is specified at which the next SYNC1 pulse and therefore the next block of sample values begins This time is based on the terminal specific local distributed clock time The...

Страница 154: ...ons cannot be guaranteed To set an oversampling factor that is not listed in the dialog the ratio between SYNC0 and SYNC1 pulse can be set manually Open the Advanced Settings dialog in the DC tab Fig...

Страница 155: ...cycle time 4000 s The SYNC1 pulse is triggered every 4000 s The oversampling factor should be set to 80 This requires a SYNC0 interval of 50 s To this end either select a suitable factor for SYNC0 Cyc...

Страница 156: ...Commissioning EL47xx 156 Version 2 7 Fig 195 Process Data tab adaptation of process data in SM0...

Страница 157: ...oversampling factor process data If the number of process data does not match the oversampling factor n the terminal will reach the OP state but no process data will be created Sample Sample for setti...

Страница 158: ...a watchdog that prevents uncontrolled data output See corresponding section Notes for setting up the watchdog 18 A 100 ms watchdog is activated by default in which case the EL47xx behaves as follows...

Страница 159: ...serial number on the housing in ESC register 0E00hex To view the register proceed as follows see Fig Firmware version in EL37xx EL47xx oversampling terminals EL terminal in the EtherCAT system instal...

Страница 160: ...000 2010 10 08 2011 01 10 2011 02 03 08 11 EL4712 0000 0001 2012 12 12 2013 10 EL4732 Hardware HW Firmware FW Revision no Release date 00 01 02 EL4732 0000 0000 2008 03 03 2008 05 04 2008 07 02 04 05...

Страница 161: ...rd 1 to be entered in the download dialog If password 0 default setting only the firmware update is carried out without an ESI update for the device to support this function The function usually canno...

Страница 162: ...fer to the EtherCAT system documentation Update of XML ESI description The device revision is closely linked to the firmware and hardware used Incompatible combinations lead to malfunctions or even fi...

Страница 163: ...configured In this case the configuration can be adapted with the Copy Before button The Extended Information checkbox must be set in order to display the revision Changing the ESI slave identifier Th...

Страница 164: ...EtherCAT devices read a modified ESI description immediately or after startup from the INIT Some communication settings such as distributed clocks are only read during power on The Ether CAT slave the...

Страница 165: ...fline The EtherCAT Slave Information ESI XML may contain the default content of the CoE This CoE directory can only be displayed if it is included in the ESI e g Beckhoff EL5xxx xml The Advanced butto...

Страница 166: ...e by Beckhoff support Valid for TwinCAT 2 and 3 as EtherCAT master Switch TwinCAT system to ConfigMode FreeRun with cycle time 1 ms default in ConfigMode is 4 ms A FW Update during real time operation...

Страница 167: ...Controller firmware for processing I O signals FPGA firmware for EtherCAT communication only for terminals with FPGA The firmware version number included in the terminal serial number contains both f...

Страница 168: ...right click the table header and select Properties in the context menu Fig 207 Context menu Properties The Advanced Settings dialog appears where the columns to be displayed can be selected Under Dia...

Страница 169: ...terminal must have FPGA firmware version 10 or higher Older firmware versions can only be updated by the manufacturer Updating an EtherCAT device The following sequence order have to be met if no othe...

Страница 170: ...nager select the terminal for which the FPGA firmware is to be updated in the example Terminal 5 EL5001 and click the Advanced Settings button in the EtherCAT tab The Advanced Settings dialog appears...

Страница 171: ...the device A download of firmware to an EtherCAT device must not be interrupted in any case If you interrupt this process by switching off power supply or disconnecting the Ethernet link the EtherCAT...

Страница 172: ...PDO Double click on SubIndex 001 to enter the Set Value dialog Enter the value 1684107116 in field Dec or the value 0x64616F6C in field Hex and confirm with OK Fig Entering a restore value in the Set...

Страница 173: ...components there Beckhoff Headquarters Beckhoff Automation GmbH Co KG Huelshorstweg 20 33415 Verl Germany Phone 49 5246 963 0 Fax 49 5246 963 198 e mail info beckhoff com Beckhoff Support Support off...

Страница 174: ...n mounting rail 25 Fig 16 Disassembling of terminal 26 Fig 17 Power contact on left side 27 Fig 18 Standard wiring 29 Fig 19 Pluggable wiring 29 Fig 20 High Density Terminals 29 Fig 21 Mounting a cabl...

Страница 175: ...tween PLC variables and process objects 63 Fig 63 Selecting PDO of type BOOL 63 Fig 64 Selecting several PDOs simultaneously activate Continuous and All types 64 Fig 65 Application of a Goto Link vari...

Страница 176: ...onfig Mode toggling right below in the status bar 85 Fig 105 TwinCAT can also be switched to this state by using a button left TwinCAT 2 right Twin CAT 3 85 Fig 106 Online display example 86 Fig 107 F...

Страница 177: ...declaration 118 Fig 147 PLC in the System Manager 118 Fig 148 Add Variable Type 118 Fig 149 Definition of the variable type 119 Fig 150 Overview of declared types 119 Fig 151 Linking 120 Fig 152 Arra...

Страница 178: ...ut 153 Fig 191 TwinCAT tree entry StartTimeNextOutput 153 Fig 192 DC tab activation Advanced Settings TwinCAT 2 10 154 Fig 193 DC tab activation Advanced Settings TwinCAT 2 11 154 Fig 194 DC tab activ...

Отзывы: