5-2
BE1-67N Testing
9190700990 Rev F
8. Apply the proper power supply voltage to relay case terminals 3 and 4. (Refer to Section 1,
General
Information
for the voltage range for each power supply type.)
9. Insert the relay connection plugs.
10. Verify that the Power, Directional Timing Inhibit, and Directional Instantaneous Inhibit indicators are
lit.
11. Verify that the Relay Failure output contacts at case terminals 19 and 20 function properly. The
contacts should be open with relay operating power applied and closed with relay operating power
removed. When the upper connection plus is removed, the case shorting bar should place a short
circuit across terminals 19 and 20.
Time Overcurrent Pickup Test
1. Perform
the
Preliminary Test Setup
before proceeding with time overcurrent pickup testing.
2. Adjust the polarizing input voltage source (V
O
) for 4 Vac at a 0
°
phase angle.
3. Adjust the I
O
input current source for 0.25 Aac (low range) or 0.75 Aac (high range) at a 0
°
phase
angle.
4. Verify the minimum pickup point of the range by slowly rotating the Tap Calibration control
counterclockwise until the Timing indicator lights.
5. Rotate the Tap Calibration control fully clockwise. The Timing indicator should turn off. Slowly
increase the magnitude of the input current until the Timing indicator lights. The input current level
should be within
±
5% of 0.375 Aac (low range) or 1.125 Aac (high range). This verifies the pickup
accuracy of the tap A setting.
6. If verification of the remaining Tap Selector positions is desired, adjust the Tap Selector to its next
clockwise position, when slowly increase the input current magnitude until the Timing Indicator lights.
Observe that the current level is within
±
5% of the value listed in Table 5-1.
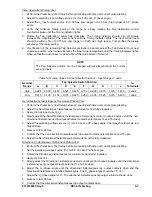
Table 5-1. Pickup Values for Tap Selector Positions – Input Ranges 1 and 2
Tap Selector Switch Position
Nominal
Range
A B C D E F G H I J
I
OP
Terminals
High 1.125 1.500 2.250 2.625 3.375 3.750 4.500 4.875 5.625 6.000 7
and
8
Low
0.375 0.500 0.750 0.875 1.125 1.250 1.500 1.625 1.875 2.000 7
and
9
Non-Directional, Instantaneous Overcurrent Pickup Test
1. Perform
the
Preliminary Test Setup
before proceeding with time overcurrent pickup testing.
2. Adjust the Non-Directional, Instantaneous Overcurrent control fully clockwise.
3. Apply 2.0 Aac input current (I
O
).
4. Slowly adjust the Non-Directional, Instantaneous Overcurrent control counterclockwise until the non-
directional instantaneous trip output activates (contacts at terminals 14 and 15 close).
5. Adjust the polarizing voltage source (V
O
) for 4 Vac at a 90
°
phase angle. The relay should remain in a
tripped state.
NOTE
The test procedures provided here for time overcurrent pickup, non-directional
instantaneous overcurrent pickup, and directional instantaneous overcurrent
pickup are performed using only voltage polarizing (V
O
) inputs.
NOTE
The Tap Selector position can be changed without disconnecting the current
sensing inputs.
Содержание BE1-67N
Страница 2: ......
Страница 6: ...iv BE1 67N Introduction 9190700990 Rev F This page intentionally left blank...
Страница 8: ...vi BE1 67N Introduction 9190700990 Rev F This page intentionally left blank...
Страница 10: ...ii BE1 67N General Information 9190700990 Rev F This page intentionally left blank...
Страница 18: ...1 8 BE1 67N General Information 9190700990 Rev F This page intentionally left blank...
Страница 20: ...ii BE1 67N Controls and Indicators 9190700990 Rev F This page intentionally left blank...
Страница 26: ...ii BE1 67N Functional Description 9190700990 Rev F This page intentionally left blank...
Страница 34: ...ii BE1 67N Installation 9190700990 Rev F This page intentionally left blank...
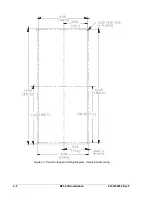
Страница 36: ...4 2 BE1 67N Installation 9190700990 Rev F Figure 4 1 Panel Cutting and Drilling Diagram Semi Flush Mounting...
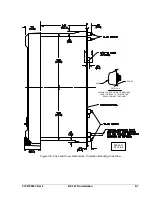
Страница 37: ...9190700990 Rev F BE1 67N Installation 4 3 Figure 4 2 Panel Drilling Diagram Projection Mounting...
Страница 38: ...4 4 BE1 67N Installation 9190700990 Rev F P0002 14 08 10 01 Figure 4 3 Cover Dimensions Front View...
Страница 39: ...9190700990 Rev F BE1 67N Installation 4 5 Figure 4 4 Case Dimensions Rear View...
Страница 43: ...9190700990 Rev F BE1 67N Installation 4 9 Figure 4 7 Typical Internal Connections...
Страница 46: ...4 12 BE1 67N Installation 9190700990 Rev F This page intentionally left blank...
Страница 48: ...ii BE1 67N Testing 9190700990 Rev F This page intentionally left blank...
Страница 58: ...ii BE1 67N Characteristic Curves 9190700990 Rev F This page intentionally left blank...
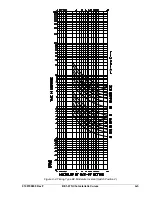
Страница 60: ...A 2 BE1 67N Characteristic Curves 9190700990 Rev F Figure A 1 Timing Type B1 Short Inverse Switch Position 3...
Страница 61: ...9190700990 Rev F BE1 67N Characteristic Curves A 3 Figure A 2 Timing Type B2 Long Inverse Switch Position 1...
Страница 62: ...A 4 BE1 67N Characteristic Curves 9190700990 Rev F Figure A 3 Timing Type B3 Definite Time Switch Position 5...
Страница 63: ...9190700990 Rev F BE1 67N Characteristic Curves A 5 Figure A 4 Timing Type B4 Moderate Inverse Switch Position 2...
Страница 64: ...A 6 BE1 67N Characteristic Curves 9190700990 Rev F Figure A 5 Timing Type B5 Inverse Switch Position 4...
Страница 65: ...9190700990 Rev F BE1 67N Characteristic Curves A 7 Figure A 6 Timing Type B6 Very Inverse Switch Position 6...
Страница 68: ...A 10 BE1 67N Characteristic Curves 9190700990 Rev F Figure A 9 Timing Type E4 BS 132 Inverse Switch Position 9...
Страница 69: ...9190700990 Rev F BE1 67N Characteristic Curves A 11 Figure A 10 Timing Type E5 BS 142 Inverse Switch Position A...
Страница 72: ...A 14 BE1 67N Characteristic Curves 9190700990 Rev F This page intentionally left blank...
Страница 74: ...B 2 BE1 67N Polar Graph Forms 9190700990 Rev F This page intentionally left blank...

