background image

03

Recommendations, Warnings & Installation

Receiving inspection

Upon receiving the pump, it should 

be  inspected  for  damage  or 
shortages.  If  damage  has  occurred, 

file  a  claim  immediately  with  the 

company that delivered the pump. If 
the  manual  is  removed  from  the 

packaging, do not lose or misplace.

Storage

Any  product  that  is  stored  for  a 

period  longer  than  six  (6)  months 
from the date of purchase should be 

bench  tested  prior  to  installation.  A 

bench test consists of, checking the 

impeller  to  assure  it  is  free  turning 

and  a  run  test  to  assure  the  motor 
(and  switch  if  provided)  operate 

properly.

Service Stations

To  find  the  nearest  Barmesa  Pumps 

authorized  service  shop,  please 
directly  contact  your  distributor  or 
the factory.

The  anchors  of  the  motor  are  to  be 
anchor, 

on 

raised 

base, 

approximately  4",  this  to  prevent 
accumulated water from entering the 

motor.

**See  Friction  Table  in  pipes  and 
fittings to determine the dimensions of 
the suction and discharge.

At any time exceeding six (6) months, 

but  no  more  than  twenty  four  (24), 
the  equipment  must  be  stored  in  a 
controlled area, keeping it away from 
contact with rain, dust, etc., and the 
temperature is maintained between 

43-104  °F.  If  there  is  a  possibility  of 
high  humidity  (coastlines,  etc.),  the 
entire  unit  must  be  sprayed  with 
antioxidant liquid.

Installation

The  pump  should  be  as  close  as 
possible to the liquid to be pumped, 

with  a  minimum  number  of 

couplings, adapters, etc., in order to 

reduce friction on the suction side.

The  suction  and  discharge  piping 
must  be  perfectly  aligned  in  the 

pump  volute  and  supported 

independently  using  support  or 

anchors,  this  to  prevent  excessive 

load on the volute.

A  successful  operation  depends  on 

the calculation of the friction loss in 

the  suction,  considering  acceptable 
limits. The minimum suction pipe size 
to  use  can  be  determined  by 

comparing the NPSH available at the 
pump  suction  against  the  NPSH 

required by the impeller, as shown in 
the performance curves.

Usually, we recommend using a pipe 
diameter of ½" to 1" greater as that of 

the suction volute or body.

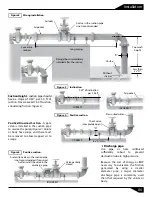
4"

Motor

Anchors

Eccentric

reducer

Vacuum gauge

Pippe

support

Straight pipping as short

as possible, but not less

than 6 times the

"D" diameter

Perfectly 

sealed joints

Appropriate size "D"

to avoid the excess

of friction

As close

as possible

4x "D"

min.

1x "D"

min.

Strainer

Suction

valve

Figure 1

Proper installation.

A strainer or sieve should be installed 
in the suction to prevent the entry of 
objects. The strainer must have a free 

entry  area  at  least  three  times  the 
pipe diameter. Usually a suction valve 
is combined with a strainer. (Figure 1)

Use  pipe  or  hose  reinforced 

sufficiently  robust  to  prevent 

collapsing  by  the  difference  in 
atmospheric pressure. Check for leaks 

at all joints.

Suction

barmesapumps.com

Содержание IA1-2-4

Страница 1: ...Installation Operation Maintenance Manual End Suction Centrifugal Pumps IA 2 125 HP 1750 3500 RPM IMPORTANT Read all instructions in this manual before operating or servicing a pump barmesapumps com...

Страница 2: ...cing the pump or any accessory items associated with or near the pump Do not block or restrict the discharge pipe hose T h i s p u m p i s n o t i n t e n d e d f o r u s e i n swimming pools or water...

Страница 3: ...ally balanced SEAL Mechanical type 01 Ceramic stationary part carbon ring seal and exclusion in the rotatingpart Buna Nelastomerandstainlesssteelspring SHAFTSLEEVE Stainlesssteel O RINGS Buna N MOTOR...

Страница 4: ...xidant liquid Installation The pump should be as close as possible to the liquid to be pumped with a minimum number of couplings adapters etc in order to reduce friction on the suction side The suctio...

Страница 5: ...1 21 9 7 28 1 86 0 6 180 757 66 3 26 7 8 9 2 27 0 73 0 3 200 833 80 32 2 10 07 2 72 0 87 0 35 220 908 95 38 1 12 6 3 21 1 03 0 41 240 984 111 44 5 14 7 3 74 1 2 0 48 260 1060 128 51 3 16 9 4 3 1 38 0...

Страница 6: ...3 36 STANDARD 45 ELBOW 0 38 0 54 0 61 0 77 0 92 1 15 1 53 1 83 2 29 STANDARD TEE 1 68 2 29 2 75 3 36 4 28 5 19 6 71 8 23 10 1 ANGLE GLOBE VALVE OPEN 3 97 5 49 6 71 8 23 10 7 12 2 16 8 21 3 25 9 GLOBE...

Страница 7: ...e must be removed to allow trapped air to escape 0 39 of inclination per 3 28 ft CORRECT INCORRECT Air pocket Figure 3 Inclination Check valve completely open CORRECT D 6x D min Pressurized water Figu...

Страница 8: ...tion check valve INCORRECT CORRECT Figure 6 Discharge piping Install the foot valve at the suction pipe Figure 1 and fill with liquid the superior part of the pump s body Sometimes air is trapped insi...

Страница 9: ...tighten the nuts until the dripping decreases but not cease Frame All pumps come with factory lubricated bearings It is very important to have oil in the oil tank Use oil DTE26 Change the oil every 1...

Страница 10: ...al type pumps generally use 2 different types of flexible couplings the Lovejoy type with rubber spider and the Steelflex type F with grids buffer The first mentioned coupling requires no lubrication...

Страница 11: ...ance between the hubs and rest it on any of the covers Lubricate the slots and clearance with as much grease as possible Fill the spaces between the grid and around it with grease Remove excess Oil th...

Страница 12: ...005 0 156 4 1 8 0 028 0 005 0 02 0 007 0 188 5 1 8 0 033 0 005 0 02 0 007 0 188 6 1 8 0 038 0 005 0 02 0 007 0 188 7 1 8 0 045 0 005 0 02 0 007 0 188 8 1 8 0 052 0 01 0 03 0 01 0 25 9 1 8 0 057 0 01 0...

Страница 13: ...5 3 63 11 81 IA1 7 5 2 7 5 3515 3 213JM 13 25 IA1 10 2 10 3505 3 215JM 7 14 75 IA1 15 2 15 3530 3 254JM 8 25 19 06 IA1 20 2 20 3525 3 256JM 10 19 65 IA1 H 3 4 3 1740 3 182JM 4 5 6 88 7 5 4 5 3 63 11 8...

Страница 14: ...525 3 284JM 7 11 75 11 9 5 4 75 20 5 4 5 6 88 7 5 3 63 11 81 0 41 6 25 10 10 4 5 0 53 MODEL HP RPM PHASE FRAME A B C D E F G H IA2 2 4 2 1735 3 145JM 3 5 6 88 5 5 5 2 75 12 4 03 0 34 IA2 10 2 10 3505...

Страница 15: ...NCL ODP 4 HOLES HIGH PRESSURE CENTRIFUGAL PUMP MODEL IA3 IA3H GENERAL DIMENSIONS MODEL HP RPM PHASE FRAME A B C D E F G H IA3 3 4 3 1740 3 182JM 4 5 IA3 5 4 5 1730 3 184JM IA3 7 5 4 7 5 1750 3 213JM 5...

Страница 16: ...DEL HP RPM PHASE FRAME A B C D E F G IA4 40 2 40 3530 3 324TSC 24 10 5 IA4 50 2 50 3530 3 326TSC 25 5 12 IA4 60 2 60 3565 3 364TSC 28 11 25 IA4 75 2 75 3555 3 365TSC 29 12 25 IA4 100 2 100 3560 3 405T...

Страница 17: ...IMPELLER IA1 5 2 6 81 03140031B IMPELLER IA1 2 4 IA1 7 5 2 7 50 03140031C 5 1 SHAFT SLEEVE 30400808 6 1 SLINGER 92010014 7 1 MECHANICAL SEAL 31030131 8 1 O RING 92010033 9 1 IMPELLER S SCREW 91010345C...

Страница 18: ...10 1 11 1 12 1 ITEM QTY DESCRIPTION PART ELECTRIC MOTOR 200 230 460 ODP 3 HP 1740 RPM 3 PH FRAME 182T JM 15 HP 3530 RPM 3 PH FRAME 254T JM 20 HP 3525 RPM 3 PH FRAME 256T JM 25 HP 3530 RPM 3 PH FRAME 2...

Страница 19: ...R S SCREW FOR 15 TO 40 HP 91010351 LOCK WASHER 3 8 SS FOR 3 TO 10 HP 91010061 LOCK WASHER 1 2 SS FOR 15 TO 40 HP 91010062 IMPELLER WASHER FOR 3 TO 10 HP 30400418 IMPELLER WASHER FOR 15 TO 40 HP 304004...

Страница 20: ...30400418 IMPELLER WASHER FOR 15 TO 50 HP 30400416 SHAFT KEY FOR 3 HP TO 7 5 HP 30400631 SHAFT KEY FOR 15 TO 50 HP 30400633 13 8 STUD 3 8 16X 1 50 91010303 14 8 HEX NUT 3 8 91010413 15 8 LOCK WASHER 3...

Страница 21: ...MPELLER IA1 XH 3 4 9 19 IMPELLER IA1 XH 5 4 9 19 5 1 SHAFT SLEEVE FOR 3 TO 25 HP 30400829 6 1 SLINGER FOR 3 TO 25 HP 92010016 7 1 MECH SEAL FOR 3 TO 25 HP 31030133 8 1 O RING 92010033 9 1 IMPELLER S S...

Страница 22: ...pacity is not too much The pump is operating in the range of NPSHR If reducing ow makes the noise gone then the problem is in the point above partially close the discharge valve The bearings for wear...

Страница 23: ......

Страница 24: ......

Отзывы: