11
Service
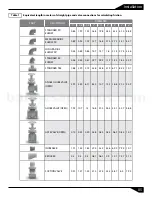
Table 3
Coupling installation.
NOTE 1: “X” is the difference between the measures of the clearance, taken at opposite
ends of the hub flanges.
NOTE 2: the values of the parallel offset may be absorbed by the articulation between
the hubs and the grid. In any case, the lifetime of the couplings will increase with a
minimum maintenance if a precision alignment is performed.
ANGULAR M
AX
REC
OMMENDED ANGULAR
TO
TAL A
XIAL
3
1/8"
0.026"
0.005"
0.015"
0.005"
0.156"
4
1/8"
0.028"
0.005"
0.02"
0.007"
0.188"
5
1/8"
0.033"
0.005"
0.02"
0.007"
0.188"
6
1/8"
0.038"
0.005"
0.02"
0.007"
0.188"
7
1/8"
0.045"
0.005"
0.02"
0.007"
0.188"
8
1/8"
0.052"
0.01"
0.03"
0.01"
0.25"
9
1/8"
0.057"
0.01"
0.04"
0.01"
0.25"
10
3/16"
0.063"
0.01"
0.04"
0.01"
0.375"
11
3/16"
0.071"
0.01"
0.04"
0.01"
0.375"
12
3/16"
0.078"
0.012"
0.04"
0.012"
0.375"
13
3/16"
0.091"
0.012"
0.04"
0.012"
0.375"
14
1/4"
0.098"
0.012"
0.045"
0.012"
0.5"
15
1/4"
0.1"
0.012"
0.045"
0.012"
0.5"
16
1/4"
0.1"
0.012"
0.045"
0.012"
0.5"
17
1/4"
0.105"
0.012"
0.045"
0.012"
0.5"
18
1/4"
0.125"
0.012"
0.045"
0.012"
0.5"
MISALIGNMENT
HUB GAP
COUPLING SIZE
MECHANICAL
PARALLEL OFFSE
T
M
AX P
AR
ALLEL
REC
OMMENDED
“X”
barmesapumps.com


