


page 72
page 72
page 72
page 72
page 72
475 A CRL
800-00167
S10A SWING MOTOR GEARBOX MAINTENANCE CONTINUED...
MAIN DISASSEMBLY - PART ONE
MAIN DISASSEMBLY - PART ONE
MAIN DISASSEMBLY - PART ONE
MAIN DISASSEMBLY - PART ONE
MAIN DISASSEMBLY - PART ONE
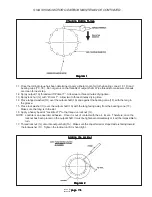
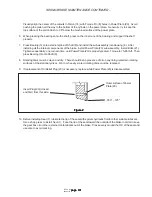
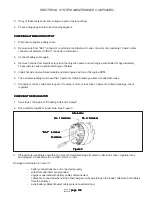
1. Remove pipe plugs (1M) and drain the oil from the unit.
2. Loosen and remove bolts (17).
3. Loosen and remove shoulder bolts (18).
4. Remove lock washers (23) and (22) from bolt (17) and shoulder bolt (18) holes.
5. Remove pipe plugs (6I).
6. Lift cover (6) off of ring gear (4) using hoist and eye-bolts.
7. At this point, begin cover disassembly.
COVER DISASSEMBLY
COVER DISASSEMBLY
COVER DISASSEMBLY
COVER DISASSEMBLY
COVER DISASSEMBLY
1. Remove o-ring (5) from rim around inside of cover (6).
2. Remove thrust washer (8).
3. Remove thrust washer (15).
4. At this point, begin main disassembly part two.
MAIN DISASSEMBLY-PART TWO
MAIN DISASSEMBLY-PART TWO
MAIN DISASSEMBLY-PART TWO
MAIN DISASSEMBLY-PART TWO
MAIN DISASSEMBLY-PART TWO
1. Remove thrust bearing (16) from counterbore of carrier (3A).
2. Remove thrust washer (15) from the counterbore of carrier (3A).
3. Remove ring gear (4) from mesh with carrier (3A).
4. Using hoist, remove carrier assembly (3) from mesh with internal gear (2) and set aside.
5. Remove input gear (13).
6. Remove thrust washer (15).
7. Remove thrust bearing (16).
8. Remove thrust washer (15).
9. Remove o-ring (5) from the counterbore around rim of hub (1G).
10. Remove pipe plug (1L) from hub (1G).
11. Remove internal gear (2) from hub (1G) using hoist.
12. Using hammer and punch, knock lock washer (1I) tang out of slot of lock nut (1J).
13. Loosen lock nut (1J) using lock nut wrench.
14. Remove lock nut (1J) from shaft (1A).
15.Remove lock washer (1I) from shaft (1A).
16. Remove tanged washer (1H) from shaft (1A).
17. Press output shaft (1A) out of hub (1G), and set aside.
18. Place internal gear end of output shaft (1A) down, and remove seal (1B).
19. Remove bearing cone (1D) from output shaft (1A).
20. Remove bearing cone (1F).
21. Remove bearing cups (1C) and (1E) from hub (1G).
22. Remove pipe plugs (1N) from hub (1G).
23. At this point, the main disassembly is complete.
CARRIER DISASSEMBLY
CARRIER DISASSEMBLY
CARRIER DISASSEMBLY
CARRIER DISASSEMBLY
CARRIER DISASSEMBLY
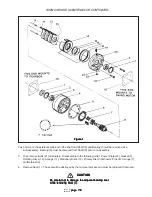
1. Remove retaining ring (3H) that holds planet shaft (3E) in carrier (3A)
2. Slide carrier (3A) so one set of holes containing cluster gear (3F) is off edge of work surface. Drive
planet shaft (3E) down out of carrier (3A).
3. Remove spacer (3G) from on top of cluster gear (3F).
4. Slide cluster gear (3F) out of carrier (3A).
5. Remove dowel pin (3B) from side of carrier (3A).
6. Remove bearing cone (3D) from cluster gear (3F).
7. Turn cluster gear (3F) over and remove other bearing cone (3D).
8. Remove bearing cup (3C) from cluster gear (3F).
9. Turn cluster gear (3F) over and remove other bearing cup (3C).
10. Repeat steps 1 to 9 to disassemble the other cluster gears.
11. At this point, the carrier disassembly is complete.


