background image

ILLUSTRATION CONVERSION

164

e

Move 

 to frame the image for the pattern.

f

Press .

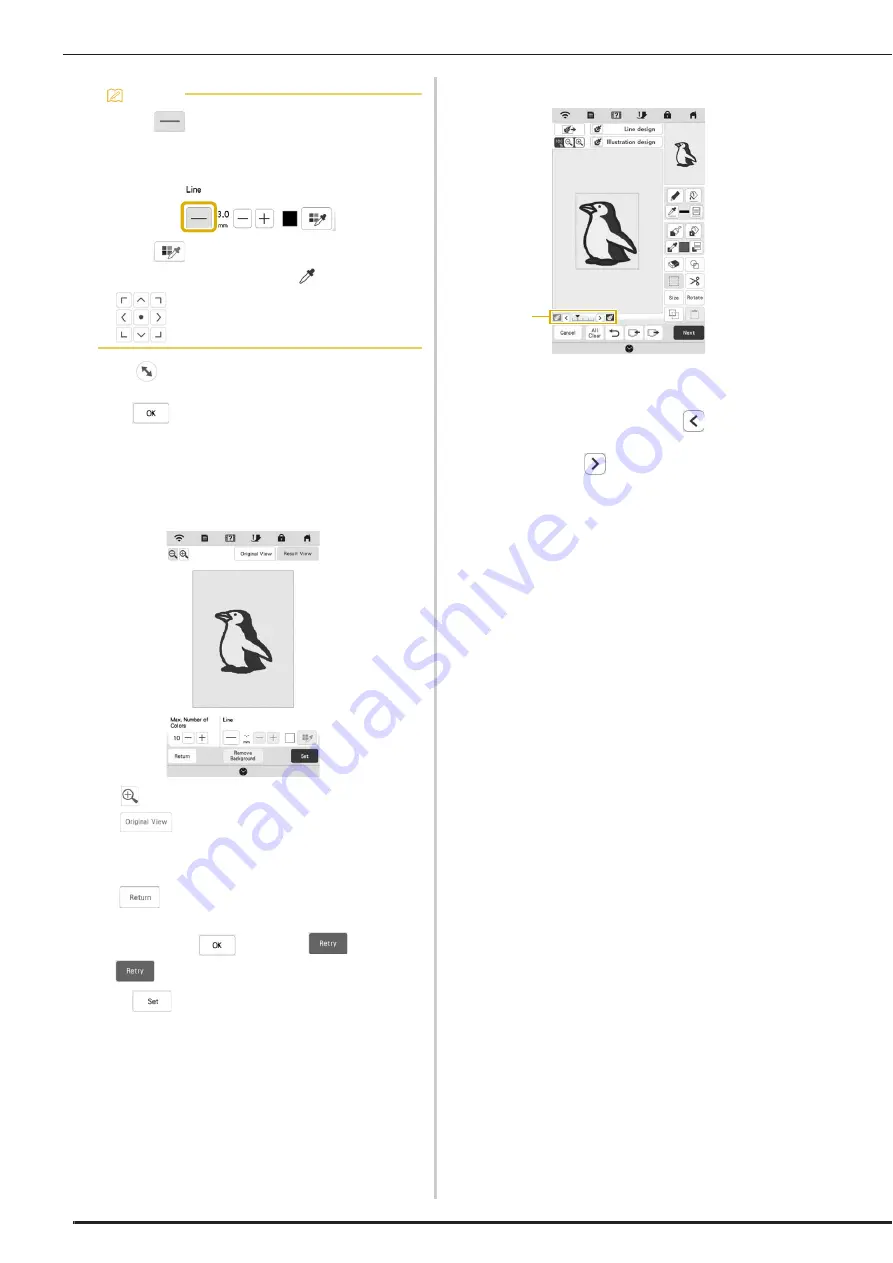
The screen for confirming the converted image 
appears.

g

In the screen for confirming the converted image, 
adjust the image as necessary as in step

d

.

*

 : Enlarge the image.

*

 : Display the image before being 

converted. Compare the images before and after 
being converted, and then change the settings if 
necessary.

*

 : Return to the previous screen.

After changes to the settings described above have 

been applied, 

 changes to 

. Press 

 to check that the image is as desired.

h

Press .

The pattern drawing screen appears.

i

If necessary, edit the loaded image.

*

After the loaded image is converted to stitching, it 
appears as a background in the pattern drawing 
screen. Use gauge 

1

 to adjust the transparency of 

the background. Each press of 

 lightens the 

background, making the illustration pattern darker. 

Each press of 

 darkens the background, making 

the illustration pattern lighter.

Memo

• Press 

 to detect the outline.

Line thickness can be specified from 1.0 mm (1/16 
inch) to 5.0 mm (3/16 inch).

• Press 

 to select the outline color. Select by 

touching the color, or moving 

 icon using 

 in the color selection screen.

1

Содержание BLTA

Страница 1: ......

Страница 2: ......

Страница 3: ...inverter If you are not sure what kind of power source you have contact a qualified electrician This machine is approved for use in the country of purchase only 4Never operate this machine if it has a...

Страница 4: ...be replaced by an authorized Baby Lock retailer In the event a malfunction occurs or adjustment is required first follow the troubleshooting table in the back of the Instruction and Reference Guide t...

Страница 5: ...ce to radio communications However there is no guarantee that interference will not occur in a particular installation If this equipment does cause harmful interference to radio or television receptio...

Страница 6: ...eans that the sewing machine does not produce hazardous laser radiation IEC 60825 1 Specification This machine is a Class 1 laser product as defined in IEC 60825 1 2007 and IEC 60825 1 2014 specificat...

Страница 7: ...entity Terms and Conditions 1 Grant of License 1 1 Subject to this Agreement Company hereby grants you a personal non exclusive non transferable and revocable license to use the Software only within t...

Страница 8: ...t in your possession and delete or destroy all copies of the Software or its derivative works in your possession In addition to the above you shall delete contents or design data created by you from t...

Страница 9: ...respective owners Redistribution and use in source and binary forms with or without modification are permitted provided that the following conditions are met Redistribution s of source code must reta...

Страница 10: ...Sewing Decorative Stitch Patterns 70 Chapter 3 Various Stitches 71 UTILITY STITCHES 72 Straight Stitches 72 Zigzag Stitches 76 Overcasting 76 Quilting 77 Blind Hem Stitches 83 Shell Tuck Stitches 85 S...

Страница 11: ...the Erase Key 157 Using the Select Key 157 STITCH SETTINGS SCREEN 158 Specifying Individual Stitch Settings 158 Specifying Global Stitch Settings 159 Loading the Background Image 160 LINE CONVERSION 1...

Страница 12: ...CONTENTS 10...

Страница 13: ...Chapter 1 Getting Ready Be sure to install the latest software Refer to UPGRADING YOUR MACHINE S SOFTWARE on page 190 www babylock com...

Страница 14: ...the motor to circulate Do not cover the air vent while the machine is being used J Main power switch page 22 K Foot controller page 58 L Power cord receptacle page 22 M Foot controller jack page 58 N...

Страница 15: ...tch pattern page 59 3 Reinforcement stitch button Press the reinforcement button to sew a single stitch repeatedly and tie off page 59 For character decorative stitches press this button to end with a...

Страница 16: ...r on each side of the accessory case to the unlocked position and then lift off the lid to open the case The case can only be opened or locked correctly if both bars are slid in the same direction 1 B...

Страница 17: ...X57789 351 Blind stitch foot R X56409 051 Button fitting foot M 130489 001 Dual feed foot XF4068 201 Straight stitch foot XD0826 051 J N G I A R M Free motion open toe quilting foot O XF4873 001 Free...

Страница 18: ...Screwdriver large XC4237 021 Disc shaped screwdriver XC1074 051 Multi purpose screwdriver BLMPD Part Name Part Code Spool cap small 130013 154 Spool cap medium 2 One spool cap is on machine X55260 153...

Страница 19: ...decal set H 24 cm W 24 cm H 9 1 2 inches W 9 1 2 inches EF97S Frame EF98 Embroidery sheet Embroidery frame with decal set H 18cm W 13cm H 7 inches W 5 inches EF75S Frame EF79 Embroidery sheet Embroid...

Страница 20: ...hrough your authorized Baby Lock retailer Part code XA5904 051 Please visit www babylock com to download the Embroidery Design Guide Part Name Part Code Multi function foot controller BLMA MFC Embroid...

Страница 21: ...Part Code Memo To obtain optional accessories or parts contact your authorized Baby Lock retailer or visit our site www babylock com All specifications are correct at the time of printing Please be a...

Страница 22: ...uide XE0776 001 2 Spool support XE4958 101 3 Spool pin 2 XA6313 051 4 Screw and washer XC7568 051 5 Spool cap XL 2 XE0779 001 6 Spool holder 2 XA0679 050 7 Spool cap base 2 XE0780 001 8 Spool felt 2 X...

Страница 23: ...NAMES OF MACHINE PARTS Getting Ready 21 1 How To Remove a Pull the spool stand up to remove it from the machine b Attach the upper cover to the machine...

Страница 24: ...ion During electrical storms CAUTION Use only the power cord included with this machine Do not use extension cords or multi plug adapters with many other appliances plugged in to them Fire or electric...

Страница 25: ...nction If the screen is difficult to read adjust its brightness 3 1 4 5 2 No Display Explanation Page Name 1 Select a utility stitch or character decorative stitch pattern 56 Sewing key 2 Select an em...

Страница 26: ...ed stitch display Shows the name and code number of the selected stitch 6 Stitch preview Shows a preview of the selected stitch When shown at 100 the stitch appears in the screen at nearly its actual...

Страница 27: ...ach time you press the key If the key is light gray after selecting the stitch the selected stitch cannot be sewn in the twin needle mode 44 5 Back to beginning key When sewing is stopped press this k...

Страница 28: ...ginning and end of stitching and to trim the threads at the end of stitching 64 F Automatic reverse reinforcement stitch key If you select this setting before sewing the machine will automatically sew...

Страница 29: ...r foot when sewing is stopped when the pivot setting is selected page 65 0 Select the height of the presser foot when the machine is set to free motion sewing mode page 80 A When set to ON the thickne...

Страница 30: ...the brightness of the work area lights 7 Select the screen display brightness 8 Set the Eco Mode and the Shutoff Support Mode to save the machine power page 29 9 Select the length of time until the s...

Страница 31: ...e the wireless LAN function page 33 2 Shows the connected SSID 3 Set the machine to connect wireless LAN function 4 Shows the machine name used on the wireless network This name is used when transferr...

Страница 32: ...appears c Display Screen Saver in the general settings screen d Press in Screen Saver e Press f Connect the USB media that contains your personal image to the USB port of the machine g Press to selec...

Страница 33: ...eir functions 2 Information about the operation buttons 3 Information about threading the machine changing presser feet etc 4 Information about attaching the embroidery unit preparing fabric for embro...

Страница 34: ...he device where the video is saved 1 Tutorial videos 2 Videos saved on the machine favorites 3 Videos from USB media plugged into the USB port 4 Videos from USB media plugged into the USB port for mou...

Страница 35: ...n g b standards and uses the 2 4 GHz frequency Setting Up the Wireless Network Connection There are multiple ways to set up the wireless network connection We recommend the method that uses the wizar...

Страница 36: ...ss to exit the setup Memo If the SSID that was noted does not appear in the list press If the SSID that was noted is not displayed specify it as described below 1 Select in the list of SSIDs 2 Enter t...

Страница 37: ...a USB mouse to the USB port Clicking a Key When the mouse is connected the pointer appears on the screen Move the mouse to position the pointer over the desired key and then click the left mouse butt...

Страница 38: ...s to the front from the bottom d Slide the spool cap onto the spool pin as far as possible to the right with the rounded side on the left WINDING INSTALLING THE BOBBIN CAUTION The included bobbin was...

Страница 39: ...the spool net over the spool before placing the spool of thread onto the spool pin If the spool net is too long fold it to fit the size of the spool When threading the spool with the spool net on make...

Страница 40: ...in winder shaft c Remove the spool cap and place the spool of thread for the bobbin onto the spool pin Slide the spool onto the spool pin so that the thread unwinds to the front from the bottom 1 Spoo...

Страница 41: ...ure that the thread is under the pretension disk Pull the thread as far as possible 1 Pretension disk 2 Thread guide h Follow steps g through j on page 37 through page 38 Using the Spool Stand To wind...

Страница 42: ...se a bobbin that has been correctly wound with thread otherwise the needle may break or the thread tension will be incorrect Before inserting or changing the bobbin be sure to press in the LCD to lock...

Страница 43: ...thread with the cutter Do not replace the bobbin cover c Press to unlock all keys and buttons d While lightly holding the upper thread with your left hand press Needle position button twice to lower a...

Страница 44: ...leading to injury When using the walking foot the side cutter or accessories not included with this machine attach the accessory to the machine after threading the machine The automatic threading func...

Страница 45: ...to have the machine automatically thread the needle The thread passes through the eye of the needle Memo Look in the upper groove area to check if the thread catches on the thread take up lever visibl...

Страница 46: ...ss to lock all keys and buttons and then install the twin needle CHANGING THE NEEDLE on page 47 b Thread the machine for the first needle according to the procedure for threading a single needle Upper...

Страница 47: ...he thread with your left hand and then guide the thread through the groove following the arrows in the illustration g Continue threading however do not pass the thread in the needle bar thread guide 6...

Страница 48: ...sing thread on a thin spool place the included spool felt on the spool pin place the thread spool on the spool pin so that the center of the spool is aligned with the hole at the center of the spool f...

Страница 49: ...GING THE NEEDLE CAUTION Always press on the screen to lock all keys and buttons before changing the needle If is not pressed and the Start Stop button or another operation button is pressed accidental...

Страница 50: ...needle 3 Flat side of the needle f Attach the presser foot page 50 g Press to unlock all keys and buttons CAUTION Be sure to push in the needle until it touches the stopper and securely tighten the n...

Страница 51: ...tterns and Decorative Stitch Patterns Needles and Threads When sewing lightweight medium weight or stretch fabrics use a ball point needle gold colored 90 14 When sewing heavyweight fabrics use a home...

Страница 52: ...bles you to have better fabric control when sewing difficult fabrics such as quilted fabrics or velvet or fabrics that slip such as vinyl leather or synthetic leather a Follow the steps in Replacing t...

Страница 53: ...fabrics that slip easily such as quilted fabrics or fabrics that tend to stick to the bottom of a presser foot such as vinyl leather or synthetic leather Attaching the Dual Feed Foot a Remove the pre...

Страница 54: ...vious screen is displayed Attaching Detaching Toe Attach the toe by aligning the pins with the notches and snap it into place If you push down on the front and back part of the dual feed foot the toe...

Страница 55: ...the feeding of the top fabric Select 00 for sewing in most cases If the feed amount for the top fabric is too little causing the fabric to be longer than the bottom fabric press to increase the feed...

Страница 56: ...CHANGING THE PRESSER FOOT 54...

Страница 57: ...Chapter 2 Sewing Basics...

Страница 58: ...le the machine is in operation Keep your hands away from moving parts while the machine is in operation Do not stretch or pull the fabric during sewing Doing so may lead to injury Do not use bent or b...

Страница 59: ...tton again to stop sewing j Press Thread cutter button to trim the upper and bobbin threads The needle will return to the up position automatically k When the needle has stopped moving raise the press...

Страница 60: ...following categories can be combined Example a Press b Select the following stitch pattern 8 35 c Press so that it displays d Press The display returns to the stitch selection screen e Select a font...

Страница 61: ...creen reverse stitches or reinforcement stitches will be sewn automatically at the beginning of sewing when the Start Stop button is pressed Press Reverse stitch button or Reinforcement stitch button...

Страница 62: ...ng Reverse stitch button Machine sews 3 5 reinforcement stitches while holding Reinforcement stitch button Machine sews reinforcement stitches while holding Reverse stitch button Machine sews reinforc...

Страница 63: ...forcement stitch button is pressed At the beginning of sewing reinforcement stitches are sewn automatically when Start Stop button is pressed Reverse stitch button Reinforcement stitch button 1 When A...

Страница 64: ...ginal setting Proper Thread Tension The upper thread and the bobbin thread should cross near the center of the fabric Only the upper thread should be visible from the right side of the fabric and only...

Страница 65: ...Select a stitch b Press c Press the numbered key of the settings to be retrieved Press to return to the original screen without retrieving settings 1 Numbered keys d Press The selected settings are re...

Страница 66: ...tching has been selected this operation is unnecessary After the reverse stitching or reinforcement stitching has been done the machine stops and the threads are cut Adjusting the Needle Drop Point wi...

Страница 67: ...n is pressed again the presser foot is automatically lowered and sewing continues This function is useful for stopping the machine to rotate the fabric a Select a stitch CAUTION When the pivot setting...

Страница 68: ...the knee lifter bar as far as possible b Use your knee to move the knee lifter bar to the right in order to raise the presser foot Slowly return the knee lifter bar to the left to lower the presser fo...

Страница 69: ...ion Stitch Placement is ON When the needle is nearly lowered by pressing Needle position button the feed dogs are lowered At this time the fabric can be shifted to finely adjust the needle drop point...

Страница 70: ...start sewing After sewing make sure to remove the straight stitch needle plate and the straight stitch foot and reinstall the regular needle plate the needle plate cover and the presser foot J 1 Round...

Страница 71: ...m approx 1 4 inch thick If the thickness of a seam causes sewing to occur at an angle help guide the fabric by hand and sew on the downward slope If the Fabric does not Fit under the Presser Foot If t...

Страница 72: ...bric sticks to the flat bed attachment sew with copy paper or tracing paper placed on top of the flat bed attachment so the fabric moves smoothly If the paper is positioned so that it does not cover t...

Страница 73: ...Chapter 3 Various Stitches...

Страница 74: ...lign the edge of the fabric with the 5 8 inch approx 1 6 cm mark on the needle plate or bobbin cover with mark depending on the needle position left or middle center needle position stitches only For...

Страница 75: ...J b Sew a reverse stitch at the beginning of the dart and then sew from the wide end to the other end without stretching the fabric 1 Basting c Cut the thread at the end leaving 5 cm approx 2 inches a...

Страница 76: ...the bobbin threads to obtain the desired amount of gather then tie the threads f Smooth the gathers by ironing them g Sew on the seam line and remove the basting stitch Flat Fell Seam Use for reinfor...

Страница 77: ...of the fabric 1 Wrong side b Turn the fabric and iron the folded parts only 1 Surface c Select and attach presser foot J d Sew a straight stitch along the fold When the automatic thread cutting and au...

Страница 78: ...orative finish Overcasting Sew overcasting stitches along the edges of cut fabric to prevent them from fraying Using Overcasting Foot G a Select a stitch b Attach overcasting foot G c Position the fab...

Страница 79: ...lt blocks make sure the seam allowance is 6 5 mm approx 1 4 inch a Select a stitch and attach presser foot J b Align the edge of the fabric with the edge of the presser foot and start sewing To sew a...

Страница 80: ...t side of the presser foot s front section Quilting Sewing the quilt top batting and backing together is called quilting You can sew the quilt with the dual feed foot to keep the quilt top batting and...

Страница 81: ...roller to sew with satin stitches Set the speed control slide to control the stitch width to make subtle changes in the stitch width during sewing a Attach the foot controller page 58 b Select and att...

Страница 82: ...with the presser foot holder screw aligned with the notch in the quilting foot f Hold the quilting foot in place with your right hand and tighten the presser foot holder screw using the disc shaped sc...

Страница 83: ...ppears as the quilting foot is raised to the necessary height and then the feed dogs are lowered for free motion sewing b Select a stitch c Remove the presser foot holder page 50 d Attach free motion...

Страница 84: ...recommend attaching the foot controller and sewing at a consistent speed Free motion echo quilting foot E measurements a Select b Press to set the machine to free motion sewing mode The key appears as...

Страница 85: ...f cylindrical pieces is too small to slide onto the arm or the length is too short the fabric will not feed and desired results may not be achieved For details on stitch patterns refer to STITCH SETTI...

Страница 86: ...fabric under the presser foot towards the left of the machine n Remove the basting stitching and turn the fabric with the right side facing out If the Needle Catches Too Much of the Hem Fold The needl...

Страница 87: ...es of projects a Select b Attach monogramming foot N c Stitch along the edge of the fabric making sure not to sew directly on the edge of the fabric d Trim along the stitches Be careful not to cut the...

Страница 88: ...ing Tape or Elastic a Select a straight stitch and attach presser foot J b Set the stitch length to 4 0 mm approx 3 16 inch and loosen the upper thread tension to 2 0 page 62 c Sew two rows of straigh...

Страница 89: ...any other objects during sewing The thread could tangle or the needle could break causing injury Memo Use a light to medium weight homespun fabric with a little stiffness For details on stitch patter...

Страница 90: ...the button that will be put through the buttonhole Then tighten the button holder plate around the button d Align the presser foot with the mark on the fabric and lower the presser foot Memo For deta...

Страница 91: ...thread onto the back of presser foot A Insert the ends into the grooves at the front of the presser foot and then temporarily tie them there b Lower the presser foot and start sewing c Once sewing is...

Страница 92: ...tton again e Select stitch to sew the bar tack and press the Start Stop button The machine will automatically stop after sewing the bar tack f Select stitch to sew the right side of the buttonhole and...

Страница 93: ...the buttonhole foot d Lower the buttonhole lever so that it is positioned behind the metal bracket on the buttonhole foot e Gently press the end of the upper thread and then press the Start Stop butto...

Страница 94: ...sewing is completed the machine will sew reinforcement stitches and stop automatically Bar Tacks On Thick Fabrics Place a piece of folded fabric or cardboard beside the fabric being sewn to level the...

Страница 95: ...thread through to the wrong side of the fabric Tie the two thread ends together and cut the threads g After the button is attached select another stitch and rotate the handwheel toward you countercloc...

Страница 96: ...g Multi Directional Sewing Straight Stitch and Zigzag Stitch Use these stitch patterns to attach patches or emblems to pant legs shirt sleeves etc a Remove the flat bed attachment to use the free arm...

Страница 97: ...1 4 to 3 8 inch from the seamed edge of the fabric then remove the basting Inserting a Side Zipper Use for side zippers in skirts or dresses a Select CAUTION When using zipper foot I make sure the str...

Страница 98: ...f the zipper the needle should drop on the right side of the presser foot When sewing the right side of the zipper the needle should drop on the left side of the presser foot k Set the fabric so that...

Страница 99: ...s each time the button is pressed and the stitch pattern will lengthen If the stitch pattern has gaps Press in the Fine Adjust Verti display The displayed value decreases each time the button is press...

Страница 100: ...tance equal to half of the stitch pattern s size to the left or right To combine the stitch patterns refer to page 58 Example a Press so that it displays b Press 9 11 c Press The next stitch pattern w...

Страница 101: ...estination 1 Retrieve from the machine s memory 2 Retrieve from a USB media When retrieving stitch patterns from a USB media insert the USB media into the USB port on the machine b Select the desired...

Страница 102: ...USING THE MEMORY FUNCTION 100...

Страница 103: ...Chapter 4 Basic Embroidery...

Страница 104: ...n place 36 5 Fabric preparation Attach a stabilizer material to the fabric and hoop it in the embroidery frame 122 6 Pattern selection Turn the main power to ON and select an embroidery pattern 104 7...

Страница 105: ...ies or damage may result To avoid distorting your embroidery design do not touch the embroidery carriage and frame when the machine is embroidering Do not push on the carriage when installing the embr...

Страница 106: ...y of patterns in the machine s memory or visit www babylock com You can also use patterns sold separately Once the machine has finished the initialization and the carriage has moved to the start posit...

Страница 107: ...ern selection key b Select a pattern Press the category tab or to return to the previous screen The selected pattern is displayed c Press to set the pattern Press to darken the background color for th...

Страница 108: ...mbroidering page 131 Selecting Character Patterns a Press b Press the key of the font you want to embroider View the next page View the previous page c Select the character category and then type in t...

Страница 109: ...to display and then select the character The spacing between the selected character and the next character is changed Move the one selected character up Move the one selected character down Reset the...

Страница 110: ...er The selected pattern is displayed on the screen d Press The edit screen appears e Follow the steps from d to g of Selecting Embroidery Patterns on page 105 Combining Patterns Example a Select a pat...

Страница 111: ...ected 1 Press or to check the patterns to be selected and then press The selected patterns are highlighted with a red box To deselect the selected patterns press 2 Press this key to deselect all selec...

Страница 112: ...currently selected 4 Degree of rotation for the pattern currently selected 5 Color sequence and stitching times of each step of the pattern Key Functions Using these keys you can edit the selected pat...

Страница 113: ...he spacing or edit separately afterwards Select where the patterns is to be separated Separate the patten A separated character pattern cannot be combined again Separate key B Edit characters 107 112...

Страница 114: ...t be selected Press to enlarge the image of the pattern The pattern can be embroidered as it appears in the display c Press to check the embroidering order The stitch simulator screen appears 1 Simula...

Страница 115: ...hen you select in step a press and then press to change the thread density Make the pattern less dense Make the pattern more dense d Press Creating Repeated Patterns Using the border function you can...

Страница 116: ...teps b through c e Press Repeating One Element of a Repeated Pattern You can select one element of a repeated pattern and repeat only that single element This function allows you to create complex rep...

Страница 117: ...thread or changing the embroidering order manually Assigning Thread Marks By sewing thread marks you can easily align patterns when rehooping the fabric to embroider a series When embroidering is fini...

Страница 118: ...rk is embroidered with the last thread color d Remove the embroidery frame e Rehoop the fabric in the embroidery frame f Attach the embroidery frame to the machine and then press Memo When there are t...

Страница 119: ...the machine a Press and then press The thread color palette appears b Press the color of the part to be changed Press or to display the thread color that is not on the screen The selected thread colo...

Страница 120: ...m Vivid Gradient or Soft sample color schemes for the selected effect are displayed a Press and then press b Press c Select the thread brand for colors and the number of colors you want to create the...

Страница 121: ...ect The effect will be created using the selected colors 1 Select colors from the palette 2 Selected colors are listed Manual setting for Gradient You can select one color to be used in the Gradient e...

Страница 122: ...ry order and sort it by thread colors a Press in the embroidery screen b Press Press again to check the sorted thread colors The embroidery color order is rearranged and sorted by thread colors Press...

Страница 123: ...oximate time that will be required The actual embroidering time may be longer than the displayed time depending on the embroidery frame that is used Key Functions Using these keys you can move or rota...

Страница 124: ...lected position 143 144 Starting point key F Move the needle forward or back in the pattern useful if the thread breaks while embroidering or if you want to start again from the beginning 133 Forward...

Страница 125: ...oped in an embroidery frame use stabilizer material as a base After lightly ironing the fabric to the stabilizer material hoop it in the embroidery frame If stabilizer material cannot be ironed onto t...

Страница 126: ...are even before you start embroidering 1 Outer frame 2 Inner frame 3 Fabric f Tighten the frame adjustment screw to keep the fabric from loosening while stitching g Return the frame adjustment screw...

Страница 127: ...utton to raise the presser foot b Align the embroidery frame guide with the right edge of the embroidery frame holder 1 Embroidery frame holder 2 Embroidery frame guide c Slide the embroidery frame in...

Страница 128: ...fore adjusting the LED pointer mark the actual needle drop point on the fabric to be embroidered and attach the embroidery frame a Press The settings screen appears b Press The embroidery settings scr...

Страница 129: ...e Screen of the Machine a Select the pattern page 104 b Photograph the fabric in the frame with the easy mode of the application and then transfer it to the machine For a detailed procedure refer to t...

Страница 130: ...circle in the embroidery positioning sticker 1 Center of the larger circle in the embroidery positioning sticker e Press The position of the background image is calibrated Aligning the Embroidering Po...

Страница 131: ...oved press Checking the Pattern Position The carriage moves and shows the pattern position Watch the embroidery frame closely to make sure the pattern will be embroidered in the right place a Press b...

Страница 132: ...cessary For details refer to Adjusting the Alternate Bobbin Case with No Color on the Screw on page 141 Embroidery Needle Plate Cover Under some conditions based on the type of fabric stabilizer or th...

Страница 133: ...Total stitch numbers 2 Current time Total time 3 Part of pattern to be embroidered next 4 Embroidered colors Total colors When the last color is embroidered Finished embroidering will appear on the d...

Страница 134: ...and then attach it to the base fabric within the outline of the position sewn in step b of 2 Sewing the Appliqu Position on the Base Fabric Memo The thread trimming function is originally set to trim...

Страница 135: ...e remove the embroidery frame and then replace the bobbin b Press c Press or to move the needle back the correct number of stitches before the area where the thread broke and then press Press to resta...

Страница 136: ...embroidery is stopped The next time the machine is turned on you have the option to continue or delete the pattern Note It is recommended to stitch over the top of the last two or three stitches for c...

Страница 137: ...Chapter 5 Advanced Embroidery...

Страница 138: ...an Appliqu Piece The following pattern will be used to create an appliqu piece VARIOUS EMBROIDERING FUNCTIONS Note It is recommended to finish combining and editing the pattern before selecting the ba...

Страница 139: ...shown below 1 Embroidering area 2 About 1cm 1 2 inch 3 Pattern size a b c Note When is pressed the pattern is moved to the center After selecting the appliqu setting move the pattern to the desired p...

Страница 140: ...d for the outline from step k embroider the outline APPLIQUE n After embroidering is finished remove the stabilizer material from the embroidery frame 1 Cutting line for appliqu Memo We recommend usin...

Страница 141: ...he water soluble stabilizer q Dry the appliqu piece and then iron it if necessary Adjusting Thread Tension When embroidering the thread tension should be set so that the upper thread can slightly be s...

Страница 142: ...ns If an individual embroidery pattern needs additional fine tuning refer to Adjusting Thread Tension on page 139 a Press The settings screen appears b Press The embroidery settings screen appears c D...

Страница 143: ...slightly appears on the wrong side of fabric Bobbin Thread Is Too Loose Bobbin thread appears slightly on the right side of fabric If this occurs turn the slotted screw clockwise being careful not to...

Страница 144: ...n Jump Stitch Trim The thread trimming function will automatically trim any excess thread jumps within the color This function is initially turned ON To turn this function OFF press key and then Your...

Страница 145: ...r e Use to select a thread brand Aligning the Pattern and the Needle Example Aligning the lower left side of a pattern and the needle Note If design has many trims it is recommended to select a higher...

Страница 146: ...mbroider linked characters in a single row when the entire pattern extends beyond the embroidery frame Example Linking FG to the characters ABCDE a Select the character patterns for ABCDE b Press c Pr...

Страница 147: ...the remaining characters FG can be embroidered and then attach the embroidery frame 1 End of the embroidering i As in step a select the character patterns for FG j Press k Press The needle is position...

Страница 148: ...USB media insert the USB media into the USB port on the machine 3 Retrieve the pattern via the wireless network connection For detailed procedures refer to Palette manual Version 11 or higher b Press...

Страница 149: ...the appliqu piece created in step a Attach the appliqu to the base fabric matching the shapes d Select the satin stitch frame pattern of the same shape as the appliqu Embroider over the fabric for th...

Страница 150: ...it embroidery patterns embroidery patterns larger than the embroidery frame are divided into multiple sections which combine to create a single pattern after each section is embroidered For details on...

Страница 151: ...ss to display the embroidery screen e Embroider the pattern section f When embroidering is finished the following screen appears Press A screen appears so that a section of the split embroidery patter...

Страница 152: ...EMBROIDERY APPLICATIONS 150...

Страница 153: ...Chapter 6 IQ Designer...

Страница 154: ...RAWING SCREEN Memo The actual dimension of the pattern area is the size of the embroidery frame which is shown in the pattern preview area The pattern you drew may be bigger than you expected Please r...

Страница 155: ...ttern drawing area The picked up color is shown as the currently selected region color beside the button and as the selected color in the Region Property screen 155 Brush tool key 9 Erase lines and sh...

Страница 156: ...nes Setting the Line Types Stitch Types and Colors You can set or change the line types stitch types and colors anytime You can also specify the line types stitch types and colors before drawing lines...

Страница 157: ...tion touch the color palette to activate the paint brush color Brush shapes sizes Fill stitch types Select when you don t want fill stitch Zigzag stitch Running stitch Triple stitch Candlewicking stit...

Страница 158: ...ess b Select a stamp type and stamp shape 1 Stamp shapes 2 Stamp types 3 Saved outlines 4 Frame embroidering areas Stamp shapes Stamp types Only for Basic shapes Select the outline fill stitch or outl...

Страница 159: ...elect the area you want to edit To select an area you want to edit hold the touch pen stylus at a point on the screen and drag the touch pen stylus to create the red box around your selected area to b...

Страница 160: ...Fill stitch settings Stippling stitch settings Decorative fill stitch settings STITCH SETTINGS SCREEN Zigzag width Specifies the width of the stitch Density Specifies the density of the stitch Run pit...

Страница 161: ...d Press to apply the setting appears on the tab for settings that were changed Change other settings in the same way Specifying Global Stitch Settings The same stitch settings can be changed at the s...

Страница 162: ...an enlarged view of the pattern 2 Save the embroidery data Loading the Background Image Prepare the data file of your favorite picture so that you can create an embroidery pattern Load the image file...

Страница 163: ...ded line drawings for Line Conversion Line drawings must be drawn clearly using lines with approximately 1 mm thickness Line drawings should be drawn in a strong contrast If the lines are too short or...

Страница 164: ...e Detection level again if necessary 1 The settings for the lines to be embroidered appear If you do not know how the settings should be changed first continue the operation without specifying setting...

Страница 165: ...the data and then press d When loading is finished specify the necessary settings in the loaded image confirmation screen Change the settings to adjust the image so it can easily be converted to the d...

Страница 166: ...hanges to Press to check that the image is as desired h Press The pattern drawing screen appears i If necessary edit the loaded image After the loaded image is converted to stitching it appears as a b...

Страница 167: ...te a stippling design with the basic procedure Example a Press You can also start the function by pressing in the embroidery pattern selection screen b Press c Select the square shape and then press d...

Страница 168: ...r Press after setting the color j Select the region you want to set stippling effect 1 Select this region k Press l Adjust the stippling stitch settings to create the desired effect and then press For...

Страница 169: ...ern is displayed c Set the distance and press A message appears and the pattern outline is registered as a stamp shape in IQ Designer Press d Press to continue to the embroidery screen and then embroi...

Страница 170: ...of the decorative stitching n Fill the region to be stitched outside of the stamp shape outline o Set the line type for the frame and pattern to and then press Stitch settings can be adjusted in the s...

Страница 171: ...esigner 6 STIPPLING 169 p Specify the stitch spacing and length in the stitch settings screen and then press Check the pattern and then press q Embroider the stippling stitch around the embroidery pat...

Страница 172: ...STIPPLING 170...

Страница 173: ...Chapter 7 Appendix...

Страница 174: ...a flame heater or air conditioner Outdoors or exposed to direct sunlight Exposed to extremely dusty or oily environments Cleaning the Race a Press Needle position button to raise the needle b Turn th...

Страница 175: ...ate base 2 Notch 3 Paper e g business card type 4 Tension spring Cleaning the Cutter in the Bobbin Case Area The cutter below the needle plate should be cleaned If dust or lint accumulate on the cutte...

Страница 176: ...on the screen turn the main power switch to OFF and back to ON The touch panel adjustment screen appears b Using the included touch pen lightly touch the center of each in order from 1 to 13 c Turn t...

Страница 177: ...through the fabric when the upper thread is pulled up For this reason the thread is visible from the right side of the fabric Remedy Correctly install the bobbin thread page 40 Tangled Thread on Wron...

Страница 178: ...appropriate thread tension differs according to the type of fabric and thread being used Adjust the thread tension while test sewing on a piece of scrap fabric that is the same as that used in your p...

Страница 179: ...w on the left side Finally firmly tighten the screw on the right side p Replace the bobbin case and the needle plate cover following steps h through j in Cleaning the Race q Check the condition of the...

Страница 180: ...42 h Perform trial sewing with normal fabric Untangling Thread from beneath the Bobbin Winder Seat If the bobbin winding starts when the thread is not passed through the pretension disk correctly the...

Страница 181: ...winding the bobbin the bobbin thread was wound below the bobbin winder seat You have not wound the bobbin thread properly when you initially wound thread on the bobbin Ensure that the bobbin thread w...

Страница 182: ...ric or thick seams 69 Stitch length is too short 62 Stabilizer is not attached to fabric being embroidered 122 1 Notch a Bobbin thread is incorrectly wound 36 Upper thread breaks Machine is not thread...

Страница 183: ...d dogs 172 Pieces of thread are caught in the race 172 Symptom Cause solution Reference Upper threading is incorrect 42 A bobbin designed specifically for this machine is not being used 36 There are n...

Страница 184: ...Lock retailer for the proper stabilizer 122 There was an object placed near the machine and the carriage or embroidery frame hit the object during embroidering 103 Fabric outside the frame edges inter...

Страница 185: ...e files in the USB media In this case delete a file from the USB media or use different USB media 9 In twin needle mode the automatic needle threading button cannot be used This message is displayed w...

Страница 186: ...aracters 28 Preventive maintenance is recommended This message is displayed when the machine needs to be maintained Once this message appears it is recommended to take your machine to an authorized Ba...

Страница 187: ...There is no needle plate cover Attach a needle plate cover This message is displayed when the needle plate cover is not attached 45 This editing function cannot be used when the pattern is out of the...

Страница 188: ...to raise the presser foot This message is displayed when the embroidery unit is attached and the power is turned on with the needle in the down position 58 When the speed controller is set to control...

Страница 189: ...ERROR MESSAGES 187 Appendix 7...

Страница 190: ...boxes complete Approx 34 5 kg approx 76 1 lb Data Precaution Memory Stitch patterns 1 MB Embroidery patterns 10 MB Images can be imported to the machine IQ Designer 100 MB Data Types Stitch patterns...

Страница 191: ...o the machine s USB port or plug the USB media Reader Writer into the machine s USB port Please be aware that some specifications may change without notice Condition of the Eco Mode and Shutoff Suppor...

Страница 192: ...are selected pressing Reverse stitch button will sew reverse stitches When any other stitch is selected pressing Reverse stitch button will sew reinforcement stitches The stitch pattern symbols indic...

Страница 193: ...0 7 0 0 1 4 4 0 3 16 0 4 5 0 1 64 3 16 Stitch Presser foot Stitch name Applications Stitch width mm inch Stitch length mm inch Auto Manual Auto Manual J O Overcasting stitch Stretch knit seam 5 0 3 1...

Страница 194: ...0 7 0 0 1 4 3 0 1 8 0 4 5 0 1 64 3 16 Stitch Presser foot Stitch name Applications Stitch width mm inch Stitch length mm inch Auto Manual Auto Manual J O Rick rack stitch Decorative top stitching 4 0...

Страница 195: ...anual Auto Manual A Round ended buttonhole Buttonholes with bar tack 5 0 3 16 3 0 6 0 1 8 15 64 0 4 1 64 0 2 1 0 1 64 1 16 A Round double ended buttonhole Buttonholes for fine medium to heavyweight fa...

Страница 196: ...corners J C Piecing stitch Middle Piecework patchwork 2 0 1 16 0 2 5 0 1 64 3 16 J O Piecing stitch Right Piecework patchwork 6 5 mm approx 1 4 inch right seam allowance 5 50 7 32 0 00 7 00 0 1 4 2 0...

Страница 197: ...00 0 1 4 2 5 3 32 0 4 5 0 1 64 3 16 J O Smocking stitch Smocking decorative stitching 5 00 3 16 0 00 7 00 0 1 4 1 6 1 16 0 4 5 0 1 64 3 16 J O Rick rack stitch Decorative top stitching 4 00 3 16 0 00...

Страница 198: ...adjusting the speed 143 automatic thread cutting function End color trim 142 key functions 121 resuming embroidery after turning off the power 134 selecting patterns 104 thread color display 143 thre...

Страница 199: ...146 machine s memory 99 146 stitch settings 63 utility stitches 63 Reverse stitch button 13 Reverse Reinforcement stitches 59 S Satin stitches 79 Saving character decorative stitches 99 embroidery pat...

Страница 200: ...Automatic threading button 42 USB mouse 35 USB port 12 Utility stitches key functions 25 pattern explanation key 32 retrieving 63 saving 63 sewing type selection key 31 stitch setting chart 190 V Viny...

Страница 201: ......

Страница 202: ......

Страница 203: ......

Страница 204: ...XH3853 001 English 882 W71...

Отзывы: