background image


AXIS 262 - Product Description

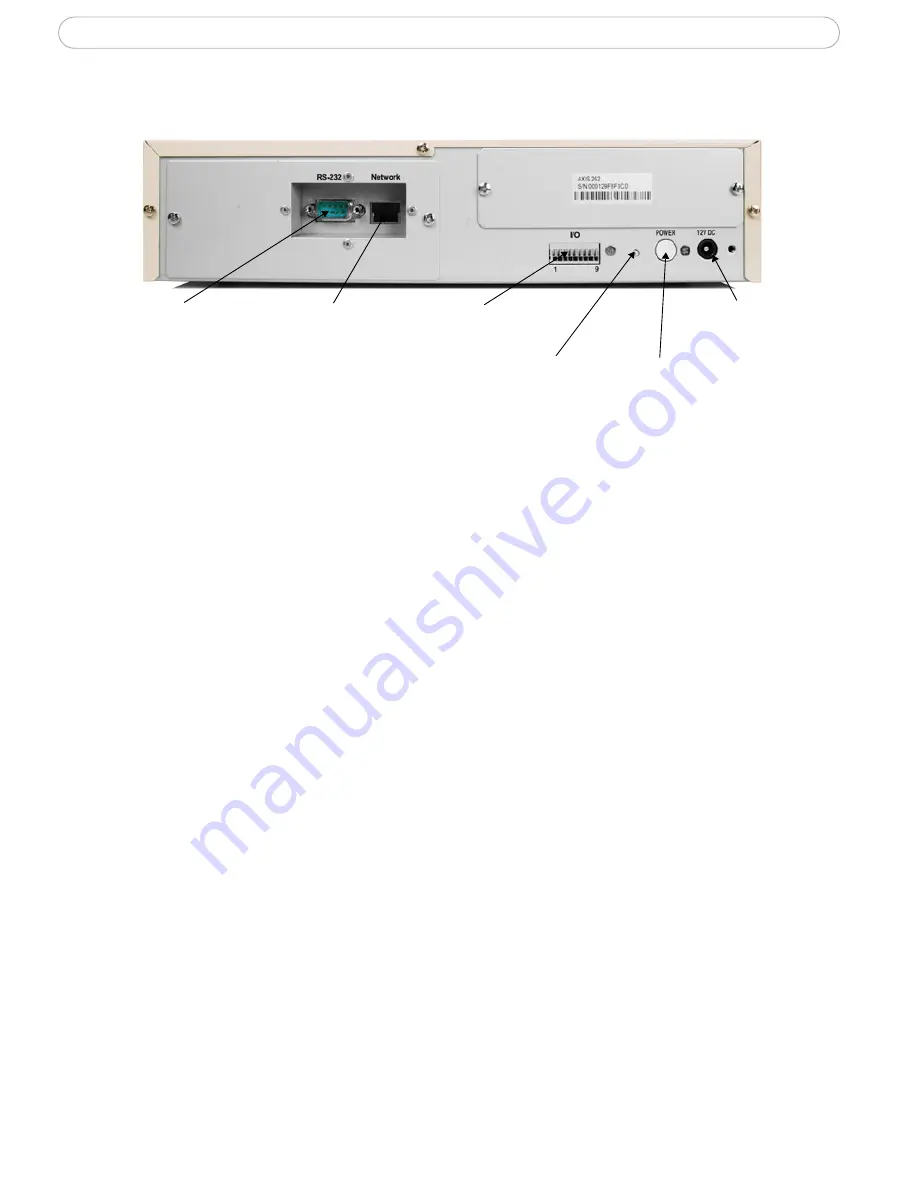
AXIS 262 rear panel

RS-232 connector

For the connection of a UPS (Uninterruptible Power Supply) unit. The approved UPS model 

is Smart-UPS from APC.

Network connector

Connect the AXIS 262 to your network using a standard CAT-5 network cable.

9-pin I/O terminal connector

Used to connect external devices, see I/O Terminal Connector, on page 34 for more 

information. 

Factory setup button

Used to reset the AXIS 262 to the factory default settings, see Resetting the AXIS 262, on 

page 36.

Power button

To shut the AXIS 262 down correctly, press and hold this button until a “beep” sound is 

heard. Shutdown will then complete after approximately 20 seconds. To start the unit, 

press the button once. 

Power adapter connector

Connect the power supply cable to the AXIS 262. The AXIS 262 starts up automatically 

after connecting the power supply cable to a power source. 

Important!

• Never disconnect the power cable when the AXIS 262 is on.
• Use the power button to switch off the AXIS 262.

RS-232 connector

9-pin I/O terminal

Power button

Power adapter

Network connector

Factory setup button

 connector

connector

Содержание 25221R3

Страница 1: ...AXIS 262 Network Video Recorder User s Manual ...

Страница 2: ...the material contained within this document including but not limited to the implied warranties of merchantability and fitness for a particular purpose Axis Communications AB shall not be liable nor responsible for incidental or consequential damages in connection with the furnishing performance or use of this material Axis Communications AB cannot be held responsible for any data loss in the even...

Страница 3: ... View 13 One camera view 13 Quad pattern view 14 Automatic sequence 15 Frame Rates 16 Live video 16 Recording 17 Recording Video 18 Scheduled recordings 18 Manual recordings 23 Play Video 24 Playback settings 24 Playback using date and time 25 Playback alarm from list 26 Save files to PC 27 Hard Disk 28 Disk utilization 28 Replacing the hard disk 28 System Options 30 Date Time 30 Network TCP IP 31...

Страница 4: ...I O Terminal Connector 34 Input ports 34 Output ports 34 Troubleshooting 36 Resetting the AXIS 262 36 Upgrading the firmware 37 LED Indicators 38 NAT traversal 38 Support 39 Technical Specifications 42 Glossary 44 ...

Страница 5: ...storing video at up to megapixel resolution There is no degradation in video quality as it will always give the same image quality as the original image from the camera or video server A 160 GB hard disk allows you to store for instance 10 days of VGA 640x480 resolution at one frame per second from eight video channels The main features of the AXIS 262 are Records video from up to eight network ca...

Страница 6: ...XIS 262 front panel The indicators on the front panel provide useful information about the current status of the AXIS 262 For a complete listing of LED indicator functions please see LED Indicators on page 38 Disk Network Status Power ...

Страница 7: ...ult settings see Resetting the AXIS 262 on page 36 Power button To shut the AXIS 262 down correctly press and hold this button until a beep sound is heard Shutdown will then complete after approximately 20 seconds To start the unit press the button once Power adapter connector Connect the power supply cable to the AXIS 262 The AXIS 262 starts up automatically after connecting the power supply cabl...

Страница 8: ...indows XP Professional SP2 running Internet Explorer 6 0 or later For more information please see www axis com techsup 1 Start your browser 2 Enter the IP address of the AXIS 262 in the Location Address field of your browser 3 Enter the user name and password set by the administrator the default user name is root and password is pass 4 The Main View page is displayed in your browser Camera Camera ...

Страница 9: ...mmander to be installed on your computer The language used in the Main View and the presentation of date and time are dependent on the settings in Windows e g Regional and Language Options in the Control Panel To access camera specific functions such as Pan Tilt Zoom and audio you can click on the cam era link button to open the home page of the currently selected camera ...

Страница 10: ...there can only be one administrator in the AXIS 262 To create a new operator or viewer user 1 Click Users in the device s Web pages 2 Select an unused User number from the drop down list 3 Enter the user name using a maximum of 8 characters 4 Select the user group for the user See above for the available groups 5 Enter and confirm the password for the user using a maximum of 8 characters 6 Click S...

Страница 11: ... down list 3 Enter the camera name using a maximum of 32 characters The following characters are not allowed 4 Enter the video server port if the camera is connected to a 4 port video server otherwise leave this as 1 5 Specify the IP address of the camera or video server 6 If a user name and password are required to access the device i e anonymous viewer login is not enabled in the device set the ...

Страница 12: ...ata download it to a PC before removing the camera see Save files to PC on page 27 The cameras added must be accessible on port 80 if the AXIS 262 shall be able to connect to the camera The AXIS 262 cannot connect to cameras located on the other side of a proxy server Important When a camera is removed the recorded data from that camera will also be deleted ...

Страница 13: ... can right click in the camera view in full screen and normal mode to open up a context sensitive menu with different options The title bar of the currently selected camera is shown in gray One camera view Camera selection Once you have added cameras you can view them in the Main View Select the Single display button and then select the camera you want to view One camera view Quad pattern view Vid...

Страница 14: ...ist 3 Give the pattern a name 4 Select the camera to be shown in each position or select OFF to leave a position blank 5 Set the Display to ON to make the pattern visible in the Main View 6 Click Save Note To remove a pattern select it in the Pattern number drop down list and click the Remove button a Select a pattern number b Give the pattern a name c Select the camera to display in each quadrant...

Страница 15: ...etween quad patterns in the Main View 1 Open the automatic sequence tab 2 Select the cameras or quad patterns to include in the sequence 3 Click to start the camera or quad view sequence 4 Click the stop button to stop the sequence Note You must select at least two cameras quad patterns to start a sequence a Click quad pattern view b Open the quad c Select the quad pattern tab pattern to view Clic...

Страница 16: ...ry minute Live video The frame rate of the live video shown in the Main View can be edited as follows 1 Click Live Streams in the device s Web pages 2 Select the camera to configure from the Camera number drop down list 3 Select the number of frames to record per second from the Live view frame rate drop down list 4 Click Save a Select the camera to configure b Select how many frames per second to...

Страница 17: ...led recording are different the AXIS 262 records data at the frame rate set for the camera in the manual recording Alarm recordings always use the frame rates specified when configuring an alarm recording Set manual recording frame rate To change the frame rate for manual recording 1 Click Manual in the device s Web pages 2 Select the camera to configure from the Camera number drop down list 3 Sel...

Страница 18: ...d what triggered the recording Scheduled recordings You can configure the times and days when recordings will occur each week Recordings can be scheduled to start and stop multiple times on any particular day e g every Tuesday between 10 00 12 45 14 00 16 15 and 20 30 23 00 Each day of the week can have different schedules or the same time periods can be set for multiple days simultaneously Schedu...

Страница 19: ...elete all the schedules in a day by selecting the day s then selecting the All day setting and clicking Delete Note Scheduled recordings can be turned off temporarily on all cameras by selecting the OFF radio button and clicking Save All camera schedules are saved for future use a Select the camera to configure Scheduled recordings e g Tue 09 00 17 00 b Select day s to schedule recordings c Select...

Страница 20: ...ding radio button to ON 4 Select if alarms are triggered by local input ports or by the camera 5 Click Save 6 Next open the Alarm Recordings page by clicking on the Alarm link in the devices web pages 7 Select the camera to configure from the Camera number drop down list 8 Select the frame rate for either input port or camera depending on how alarms are triggered see step 4 above 9 If alarms are t...

Страница 21: ...d configure the TCP server Note that TCP messaging is optional 13 Click Save to save the settings e Select the camera to configure Camera 1 triggered by local input port f Select frame rate for recorded video g Enable TCP notification messages h Enter TCP message text i Click Save k Configure TCP server notification messages j Enable TCP l Click Save Optional for TCP message notification ...

Страница 22: ...erator or an administrator Password Specify the password for the above user 3 The next step is to configure an event type that will send a notification to the event server the AXIS 262 Open the Event Types page in the Axis camera video server 4 To add a triggered event click Add triggered 5 The General and Respond to trigger settings do not need to be edited 6 Select the circumstances that start t...

Страница 23: ...as Each camera view has buttons at the bottom right of the window to start and stop recording In the Select camera tab there are buttons to start and stop recording on all cameras Click to start recording on this camera Click to stop recording on this camera Click to start recording on all cameras Click to stop recording on all cameras ...

Страница 24: ...s and backwards at various speeds Jump to the start and end of the recordings for any camera Synchronize playback to see what happened on four cameras at a certain point in time Pause recordings and move forward or back one image at a time Playback settings When you playback a recording you can select from the following options Only view manual and scheduled recordings View all recordings i e manu...

Страница 25: ...deo at the specified time The video will open at the next available image if there is no recording at the specified date and time 4 Use the controls to start playback or to fast forward through the video Note The playback settings will determine what type of recordings are played back e g you might select to only view alarm recordings a Select a camera b Select month c Select date d Select the tim...

Страница 26: ...w provides additional information on the alarm list If there are alarms for a camera the Alarm column will show Yes if there are alarms that have not yet been viewed for a camera the Alarm column will show New To open an alarm recording 1 Open the Alarm list tab 2 Select the camera s to view from the drop down list 3 Click once on an alarm from the list 4 Click the Go to button 5 The alarm recordi...

Страница 27: ...tart using the time search and the playback controls 5 When at the point in the recording where you want to start click the Set button in the START panel 6 Move to where you want to end and click the Set button in the STOP panel 7 Specify the folder on your computer to download to 8 Click the download button to start saving the recording to your computer a Select either manual scheduled recordings...

Страница 28: ... for each recording mode Note If set to OFF the hard disk can become full and it will not be possible to record any more data for that camera Replacing the hard disk If the hard disk in the AXIS 262 fails it can be replaced A hard disk up to 400 GB can be used but the recommended size is 160 GB Note that for the product warranty to be valid a the disk must be replaced with the 160 GB replacement d...

Страница 29: ... to the AXIS 262 6 Remove the bracket and loosen the screws that connect the hard disk to the bracket 7 Insert a new hard drive into the bracket and screw the bracket to the base of the AXIS 262 again 8 Attach the power and IDE cables replace the cover and reconnect the power cable Note Ensure that the jumper settings on the new hard disk are set to master Flash memory b Loosen the screws that a D...

Страница 30: ...enter the time zone and the date format displayed on recorded images Note Changing the time zone will cause the AXIS 262 to restart and recording will be stopped during this time maximum 10 minutes To set the time in the AXIS 262 1 Click Date Time in the device s Web pages 2 Select the Set manually radio button if you want the time to be updated manually or select the Synchronize with NTP server r...

Страница 31: ...IP address of the AXIS 262 and other network settings are configured during installation but they can be edited on the Network TCP IP page if they are lost or need to be changed The AXIS 262 supports dynamic and static IP addresses To allow the AXIS 262 to use host names you must provide the IP address of at least one the primary DNS server To access NTP and or SMTP servers by host names please no...

Страница 32: ...and secondary SMTP servers 5 If the SMTP server requires POP3 authentication before the AXIS 262 is allowed to send mail set POP3 Authentication to ON The default setting is OFF 6 If necessary enter the IP address or host name of the POP3 server the user name and the password 7 Click Save Maintenance The Maintenance page contains tools for maintaining upgrading and backing up the configuration of ...

Страница 33: ...ameter settings The log file is stored on the hard disk and is only erased when you press the factory setup button The Logs Reports page also allows you to save all parameters to a backup file To view the log file server report and parameter list 1 Click Maintenance in the device s Web pages 2 Click Logs Server Report or Parameter List to open up the file in a separate window ...

Страница 34: ... specify an input port as an alarm trigger this number corresponds to the camera number When AXIS 262 detects ON input pin is connected to GND pin recording is started and is stopped when OFF input pin is left floating or connected to 5V DC or higher is detected Maximum 5V DC is allowed on the input Output ports The output ports are on pins 5 8 They can drive a maximum load of 24V DC at 100mA dire...

Страница 35: ...on State Out1 Alarm recording starts If any of the sources start or stop alarm recording it outputs the status ON Alarm recording stops OFF Out2 Camera lost starts If any of the sources lost its connection it outputs the status ON Camera lost stops OFF Out3 Hard disk error If a hard disk error occurs it outputs the status ON Out4 Hard disk full If the hard disk is full it outputs the status ON Spa...

Страница 36: ...rameters except the IP parameters to their original factory settings Default The Default button on the Maintenance page is similar to Restore The only difference is that the IP parameters are also reset to their original settings Factory default settings This option resets all parameters including the IP address to the factory settings Resetting the device to factory settings may be used if you ca...

Страница 37: ...re New firmware can be downloaded to the AXIS 262 over the network Note All recorded data and configuration except network settings are erased when upgrading the firmware 1 Save the firmware file to your computer The latest version of the AXIS 262 firmware is available free of charge from the Axis Web site at www axis com techsup or from your local distributor 2 Go to Maintenance in the video serv...

Страница 38: ...versal You can type the IP address of the camera directly in Internet Explorer along with the port number that port 80 of the camera is mapped to in the router Disk Green Flashes when the hard disk is accessed Red Shows steady for failed reset to factory default failed firmware upgrade failed data base repair or for a hard disk error To save recorded video stored on the hard disk drive download th...

Страница 39: ... and a brief description of the problem Log file go to Logs Reports Logs The Log file records events within the unit and can prove a useful diagnostic tool for troubleshooting Server Report go to Logs Reports Server Report The server report contains important information about the server and its software as well as a list of the current parameters ...

Страница 40: ...ling the ActiveX component requires Administrator privileges on the PC Too many users The maximum number of users guaranteed to be able view video simultaneously is 4 Network problems The AXIS 262 uses ports 80 and 2000 for viewing video If web pages are available but video is not check that port 2000 has not been blocked The network cameras video servers that the AXIS 262 records from must be acc...

Страница 41: ...TEM AXIS 262 5002 031 ACC FAN CPU AXIS 262 For additional assistance please contact your reseller or check the product s support pages on the Axis Website at www axis com techsup The image frame rate is not as high as expected This may be due to using a PC that does not meet the recommended specifications insufficient bandwidth incorrect settings in the connected camera and or the AXIS 262 ...

Страница 42: ...alarm recordings can be specified independently from the frame rate of scheduled recordings Scheduled recording Recordings can be scheduled for the various video sources with different frame rates Manual recording Capability to manually start a recording with a predefined frame rate Playback Playback of recorded material fast forward fast reverse single step forward and reverse Synchronized playba...

Страница 43: ...Pro DirectX 9 0 or later Internet Explorer 6 x or later System integration support Powerful API for software integration is available at www axis com including HTTP API Embedded operating system Linux 2 4 The AXIS 262 can be configured to send a TCP notification when an alarm recording starts and stops Supported protocols HTTP TCP SMTP DHCP ARP DNS NTP More information on protocol usage available ...

Страница 44: ...t A widely used networking standard ETRAX Axis own microprocessor Firewall A virtual barrier between a LAN Local Area Network and other networks e g the Internet FTP File Transfer Protocol Used for the simple transfer of files to and from an FTP server FPS Frames per second Full duplex Transmission of data e g audio in two directions simultaneously G 711 G 711 is the international standard for enc...

Страница 45: ... to its final destination A router is often included as part of a network switch see below RTP Real Time Transfer Protocol A transfer protocol designed for delivery of live contents e g MPEG 4 Simplex In simplex operation a network cable or communications channel can only send information in one direction SMTP Simple Mail Transfer Protocol is the protocol used to send e mail across the Internet SM...

Страница 46: ......

Страница 47: ...AXIS COMMUNICATIONS Product Name Quick User s Guide AXIS 262 User s Manual Rev 1 0 Part No 25221 ...

Отзывы: