


40
AutoView 1000R/AutoView 2000R Installer/User Guide
Contents
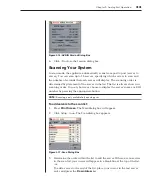
Firmware Management
This menu option contains the FLASH Download command. The FLASH
Download selection allows you to keep your AutoView 1000R/2000R firmware
current with upgrades available from Avocent. For more information, see
Appendix A: FLASH Upgrades
.
Enable Debug Messages
This menu option allows you to configure the AutoView 1000R/2000R to display
messages regarding the status of the AutoView 1000R/2000R. Once you select the
level of detail to receive, the AutoView 1000R/2000R will begin to display
information on your terminal screen. When you are finished viewing, press any
key to exit this mode.
Set/Change Password
The AutoView 1000R/2000R can be set to a secure mode where the Terminal
menu cannot be accessed without first entering a password.
To activate security:
1. Select the
Set/Change Password
menu option. You will be prompted with
the option to continue. Enter a
Y
.
2. Type a password for this AutoView 1000R/2000R and press
Enter
. This
password must be a minimum of 5 characters and can be up to a
maximum of 12 characters (10 are visible). The password must consist of a
combination of alpha and numeric characters.
3. You will be prompted to re-type the password. Once you complete this
step, security will be active and you will not be able to access AutoView
1000R/2000R terminal operations without the password.
To change the password:
1. Select the
Set/Change Password
menu option.
2. You will be prompted to type the old password and a new one.
3. Re-enter the new password to verify.
NOTE:
This password places your AutoView 1000R/2000R terminal in a secure mode. This
password should be guarded like any network password and care should be taken to avoid
forgetting or misplacing it. There are no means for recovering a lost password.
Exit
This menu selection will return you to the ready prompt.
Содержание AutoView 1000R
Страница 1: ...Installer User Guide AutoView 1000R AutoView 2000R...
Страница 6: ......
Страница 7: ...Contents Features and Benefits 3 Safety Precautions 5 1 Product Overview...
Страница 8: ......
Страница 12: ...6 AutoView 1000R AutoView 2000R Installer User Guide...
Страница 14: ......
Страница 22: ...16 AutoView 1000R AutoView 2000R Installer User Guide...
Страница 24: ......
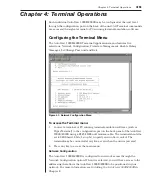
Страница 43: ...Contents Configuring the Terminal Menu 39 4 Terminal Operations...
Страница 44: ......
Страница 48: ......