S8700 component maintenance
352
Maintenance Procedures
December 2003
2
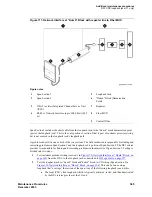
Partially pull out the hard drive bracket (
Figure 105, Hard drive bracket and hard drive,
352) so that you can disconnect the cables. Note the position of the ribbon cable within the chassis
so you can return it to exactly the same position later.
3
Unplug the 4-wire power cable from the back of the hard drive (
Figure 105, Hard drive bracket
4
Unplug the ribbon cable from the back of the hard drive (
Figure 105, Hard drive bracket and hard
on page 352). Note that the red stripe on the ribbon cable is on the side closest to the power
cable.
5
Pull the hard drive bracket from the media server, and place the hard drive and bracket assembly
on your antistatic mat.
6
Unscrew the four screws holding the hard drive in the hard-drive bracket (
on page 352). Remove the hard drive from the bracket.
Figure 105: Hard drive bracket and hard drive
Install new hard drive
1
Insert the new hard drive into the hard drive bracket so that the end of the hard drive is 1/8 to 1/4
inches from the faceplate of the bracket (
Figure 105, Hard drive bracket and hard drive,
352).
2
Reinsert the four bracket screws to attach the hard drive to the bracket (
Figure notes
1
Faceplate screw
5
Power cable
2
1/8 to 1/4 inch gap
6
Ribbon cable
3
Hard drive
7
Position of red stripe
4
Bracket screws
drdsdrtp LAO041503
S/N 0263J1BR633545
V11P204
WA
R
R
A
N
T
Y
VOID IF
R
E
M
O
V
ED
P4
1
2
3
4
4
4
4
1
5
6
7
Содержание CMC1
Страница 1: ...Maintenance Procedures 555 245 103 Issue 1 1 December 2003 ...
Страница 14: ...Contents 14 Maintenance Procedures December 2003 ...
Страница 158: ...Server initialization recovery and resets System resets 158 Maintenance Procedures December 2003 ...
Страница 416: ...Additional maintenance procedures IP Telephones 416 Maintenance Procedures December 2003 ...
Страница 426: ...Index X 426 Maintenance Procedures December 2003 ...


