background image

Power Supply

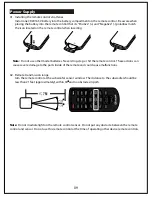
01. Installing the remote control's batteries

Install one CR2016 3V battery into the battery compartment on the remote control.  Be aware when 
placing the battery into the remote control that its "Positive" (+) and "Negative" (-) polarities match 
the icon located on the remote control when inserting.

02.

Note: 

 Do not irradiate light on the remote control sensor.  Do not put any obstacle between the remote

control and sensor.  Do not use this remote control at the time of operating other device remote controls.

Remote transmission range
Aim the remote control at the subwoofer sensor window.  The distance to the subwoofer should be 
less than 21 feet (approximately), within 30  and no obstacles in path.

Note: 

 Do not use other model batteries.  Never drop, step, or hit the remote control.  These actions can 

cause severe damage to the parts inside of the remote and could cause malfunctions.

09

M

UT

E

AU

IN

PU


CD

 IN

PU

T

Содержание HT50

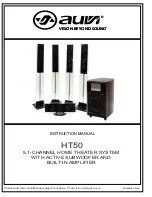
Страница 1: ...UND VISION BEYOND SOUND INSTRUCTION MANUAL Product and Instruction Manual subject to change Photo is for reference only HT50 5 1 CHANNEL HOME THEATER SYSTEM WITH ACTIVE SUBWOOFER AND BUILT IN AMPLIFIER Printed in China ...

Страница 2: ... INVISIDILE NON GUARDARE DIRETTAMENTE NELLA SORGENTE DEL L ASER ACHTUNG LASERLINSE NICHT BERÜHREN UNSICHTBARER LASERSTRAHL AVISO A LENTE NUNCA DEVE SER TOCADA The lightning flash and arrow head within the triangle is a warning sign alerting you of dangerous voltage inside the product WARNING To reduce the risk of electric shock do not remove cover or back No user serviceable parts inside Refer ser...

Страница 3: ...ower outlet if not in use To unplug the equipment always handle the power cord using the plug Do not pull out the plug by tugging the cord Place the equipment on a stable surface and avoid placing other objects on top of the unit To clean the unit use a soft dry cloth For stubborn dirt soak the cloth in a weak detergent solution wring out well and wipe to remove the dirt Do not use volatile agents...

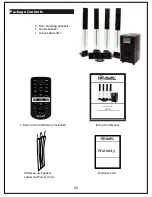
Страница 4: ...truction Manual Warranty Card All Necessary Speaker Cables and Power Cords MUTE AUX INPUT CD INPUT VISION BEYOND SOUND VISION BEYOND SOUND INSTRUCTION MANUAL Product and Instruction Manual subject to change Photo is for reference only HT50 5 1 CHANNEL HOME THEATRE SYSTEM VISION BEYOND SOUND VISION BEYOND SOUND Warranty ...

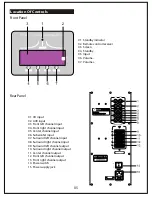
Страница 5: ...channel input 09 Surround left channel output 10 Surround right channel output 11 Center channel output 12 Front left channel output 13 Front right channel output 14 Power switch 15 Power supply jack 01 Standby indicator 02 Remote control receiver 03 Screen 04 Standby 05 Input 06 Volume 07 Volume 05 AC 110V T4AL 125V AC 110V T4AL 125V F U S E F U S E MODEL HT50 MODEL HT50 POWER CONSUMPTION 150W PO...

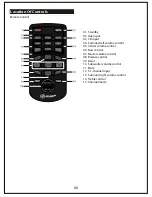
Страница 6: ...round left volume control 05 Center volume control 06 Bass control 07 Master volume control 08 Balance control 09 Reset 10 Subwoofer volume control 11 Mute 12 5 1 channel input 13 Surround right volume control 14 Treble control 15 Channel mode 06 MUTE AUX INPUT 5 1INPUT CD INPUT ...

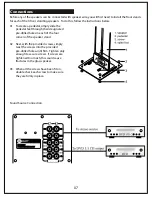
Страница 7: ...eet through their designated pre drilled holes in each of the four corners of the speaker stand Next with the provided screws simply twist the screws into the provided pre drilled holes until firm Tighten only enough to secure screws If screws are tightened too much this could cause fractures in the glass speaker When all the screws have been fit on double check each screw to make sure they are fi...

Страница 8: ...cable Twist the strands of the bare wire tightly see Figure A 02 For the binding post loosen the screw knob of the speakers input terminal and insert the wire into the input terminal from below Make sure that only the bare wire and no insulation is inserted into the hole Ensure that the wire is not touching the other terminal Tighten the screw knob see Figure B 03 For the spring clip press the spr...

Страница 9: ...ol sensor Do not put any obstacle between the remote control and sensor Do not use this remote control at the time of operating other device remote controls Remote transmission range Aim the remote control at the subwoofer sensor window The distance to the subwoofer should be less than 21 feet approximately within 30 and no obstacles in path Note Do not use other model batteries Never drop step or...

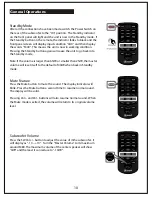
Страница 10: ...rger than 65dB or smaller than 25dB the master volume will reset itself to the default of 40dB when back in Standby mode 10 MUTE AUX INPUT CD INPUT Mute Feature Press the Mute button to mute the sound The display indicator will blink Press the Mute button a second time to resume normal sound The display will be solid Pressing Vol and Vol buttons will also resume normal sound When the Mute mode is ...

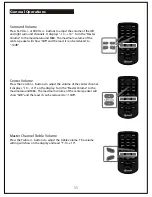
Страница 11: ...o 10dB 11 MUTE AUX INPUT CD INPUT Center Volume Press the Cen Vol buttons to adjust the volume of the center channel It displays 10 10 on the display Turn the Master Volume to the maximal around M80 The maximum volume of the center speaker will show 0dB and the least it can be reduced to 10dB MUTE AUX INPUT CD INPUT Master Channel Treble Volume Press the Treble buttons to adjust the treble volume ...

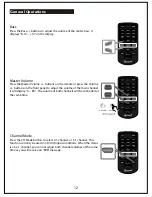
Страница 12: ...panel to adjust the volume of the main channel It will display 0 80 The volume of both channels will be controlled at the same time MUTE AUX INPUT CD INPUT Channel Mode Press the CH Mode button to select 2 1 channel or 5 1 channel This function can only be used in CD AUX input conditions When the status is on 2 1 channel you can not adjust both channel volumes at the same time as you will receive ...

Страница 13: ... button to restore to the factory settings and the master channel volume will default to 40dB The other channel volumes will reset as well MUTE AUX INPUT CD INPUT Signal Input Select Press any of the CD AUX or 5 1 buttons on the remote control or press the Input button of the front panel continuously to enter into signal Input Select The screen will display CD AUX or 5 1 accordingly It will be in ...

Страница 14: ...Make sure before letting go of the speaker it is sitting on a stable flat surface NOTE Placing the speaker on an unsteady non flat surface can create a dangerous hazard This could also lead to severe damage to the speaker unit and or any other object below the speaker It is recommended to place the subwoofer on the outside of either the right or left main speaker see Figure A The placement shown i...

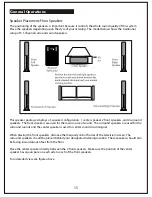
Страница 15: ... speakers are used for the main source of sound The surround speakers are used for the surround sounds and the center speaker is used for center sounds ie dialogue When placing the front speakers distance them equally on both sides of the television screen The surround speakers should be placed behind your designated listening location These speakers should also be facing inward about 6 feet from ...

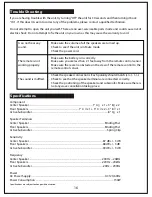
Страница 16: ...1 feet away from the remote control sensor Make sure there are no obstacles in the view of the remote control to the remote control sensor Check the speaker connections Each polarity should match Check to see that the speaker terminals are connected correctly Check the positioning of the speakers and subwoofer Make sure there is not any wave cancellation taking place 16 Specifications Component Ce...

Страница 17: ... uvi E onics N A ers M MO 63304 VISION BEYOND SOUND VISION BEYOND SOUND ...

Отзывы: