Chapter 8. Rewriting Image Files
This chapter explains the procedure for rewriting the image file written to Armadillo-IoT G3's internal storage (eMMC
and QSPI flash memory).
The bootloader image files used in this chapter are included on the development set DVD. The latest versions of the
files can be downloaded from the "Armadillo site". As over time new functionality is added and defects are fixed, we
recommend checking if versions newer than that on the DVD have been released or not and then using the latest version.
Armadillo Site - Armadillo-IoT G3 Documents / Downloads
http://armadillo.atmark-techno.com/armadillo-iot-g3/downloads
8.1. Using the Installation Disc
Using the installation disc, all of the images on the internal storage can be rewritten at once. They can be used as a recovery
method if Armadillo stops booting due to a software issue.
As all image files saved in the internal storage are overwritten, any data or appli-
cations already saved there will be deleted.
The installation disk is created with ATDE. The file used to create the installation disk is shown below.
Table 8.1. File Used for Creating Installation Disk
File
File Name
Install disk image
install_disk_sd_
[version]
.img
8.1.1. Creating an Installation Disk
1.
Please prepare an SD card with a 512MB or larger capacity.
2.
Connect the SD card to ATDE. For details, refer toSection 3.2.2, “Using Removable Devices”.
3.
Unmount the SD card if it is currently mounted.
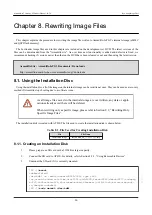
[PC ~]$mount
(abbreviated)
/dev/sdb1 on /media/atmark/B18A-3218 type vfat
⏎
(rw,nosuid,nodev,relatime,uid=1000,gid=1000,fmask=0022,dmask=0077,codepag
⏎
e=437,iocharset=utf8,shortname=mixed,showexec,utf8,flush,errors=remount-
⏎
ro,uhelper=udisks2)
[PC ~]$sudo umount /dev/sdb1
Armadillo-IoT Gateway G3Product Manual - INTL
Rewriting Image Files
96


