


16
Atmospheric Technology
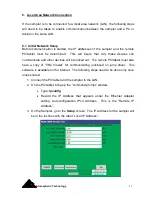
entered for each cartridge. This label will appear with the data to identify each
sample. If only one cartridge is to be sampled, the
Done
button is pressed and the
sampler will return to the main screen.
If additional channels are to be sampled, The
Next
button must be pressed to
display the schedule for the next port. For each subsequent port, the start date, start
time, and duration can be entered. If the port sampling time is to follow immediately
after the previous port and is of the same duration, the information can be entered
automatically by check the box labeled “Follow the previous port”. After all the ports
are displayed, the data for Channel 2 can be entered. The
Done
button can be used
to return to the main screen at any time. The Prev button will show the previous
screen.
5.4 Leak Check
The
Leak Check
tab is used to verify the cartridge connections prior to sampling.
The first screen is identified as “Port 1 Leak Check” and is used to leak check the
Port 1 cartridge. Cartridges are leak checked by turning on the vacuum pump and
closing the upstream isolation solenoid valve. The downstream solenoid valve
remains open to evacuate the cartridge, mass flow controller and tubing to the
pump. If a leak is present, the flow controller will show a small flow. A leak is
identified if the flow rate exceeds the flow leak limit set in the setup section.
The
Start
button is pressed to begin the leak check. The leak rate box will show
“testing” during the measurement period. The cartridge leak check runs for 30
seconds. During this time, the vacuum pump is started and the flow rate is
monitored. If the flow rate is above the leak limit at the end of the test, a “Failed”
message is displayed and the leak flow rate is displayed in red. If a cartridge fails,
the test should be repeated to verify the first test. After repeated failures, the fittings
should be checked and the cartridge re-tested or replaced. If the test passes, the
rate will appear in green. The test can be repeated by pressing the
Start
button, or
the
Next
button can be used to advance to the next port, or Channel 2.
Содержание 8000
Страница 2: ......
Страница 4: ...ii Atmospheric Technology ...
Страница 8: ...2 Atmospheric Technology ...
Страница 14: ...8 Atmospheric Technology ...
Страница 18: ...12 Atmospheric Technology ...
Страница 30: ...24 Atmospheric Technology ...
Страница 39: ...Atmospheric Technology 33 Appendix A Schmatics ...
Страница 40: ...34 Atmospheric Technology ...
Страница 41: ...1 Model 2200V11 Interface Board Schematic 1 sch 7 ...
Страница 42: ......
Страница 43: ...Model 2200V11 Interface Board Schematic 2 sch 2 7 ...
Страница 44: ......
Страница 45: ...Model 2200V11 Interface Board Schematic 3 sch 3 7 ...
Страница 46: ......
Страница 47: ...Model 2200V11 Interface Board Schmatic 4 sch 4 7 ...
Страница 48: ......
Страница 49: ...Model 2200V11 Interface Board Schematic 5 sch 5 7 ...
Страница 50: ......
Страница 51: ...Model 2200V11 Interface Board Schematic 6 sch 6 7 ...
Страница 52: ......
Страница 53: ...Model 2200V11 Interface Board Schematic 7 sch 7 7 ...
Страница 54: ......
Страница 55: ...Atmospheric Technology 49 Appendix B Manual for Mass Flow Controller ...
Страница 56: ......