background image

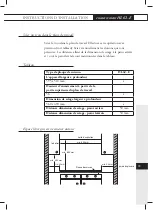
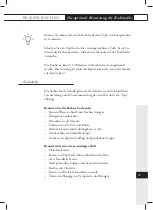
Scier un trou dans le plan de travail.

Sciez le trou dans le plan de travail. Effectuez cette opération avec 
précision (voir tableau). Sciez éventuellement les cloisons qui sont 
présentes. Les distances allant de la dimension de sciage à la paroi arrière 
et / ou à la paroi latérale sont mentionnées dans le tableau.

Tableau

Espace libre qui est nécessaire autour

INSTRUCTIONS D’INSTALLATION

encastrement HL62..E

Type de plaque de cuisson

HL62..E

L’appareil largeur x profondeur

595 x 510 mm

x

Hauteur d’encastrement à partir de la 
partie supérieure du plan de travail.

56

x

Dimension de sciage largeur x profondeur

560 x 490 mm

x

Distance dimension de sciage - paroi arrière

50 mm

Distance dimension de sciage - paroi latérale

50 mm

min. 600 mm

min. 650 mm

min. 450 mm

min. 40 mm

hotte d’aspiration

le boîtier

parois du placard

Plaque de cuisson

min. 40 mm

39

Содержание HL6271E

Страница 1: ...de contact avec le service apr s vente ayez aupr s de vous le num ro de type complet Halten Sie die vollst ndige Typennummer bereit wenn Sie mit der Kundendienstabteilung Kontakt aufnehmen When contac...

Страница 2: ...23 42 DE Bedienungsanleitung 43 62 GB Instructions for use 63 82 gebruikte pictogrammen pictogrammes utilis s benutzte Piktogramme pictograms used belangrijk om te weten important savoir Wissenswertes...

Страница 3: ...bediening instellen 6 comfortabel koken de kookplaat optimaal gebruiken 8 onderhoud algemeen 11 storingen tabel 12 milieu aspecten verpakking en toestel afvoeren 13 installatievoorschrift algemeen 14...

Страница 4: ...20 W 2 kookzone linksachter 140 1200 W 3 kookzone rechtsachter 180 1800 W 4 kookzone rechtsvoor 140 1200 W 5 restwarmtesignalering per zone 6 bedieningsknop linksachter 7 bedieningsknop linksvoor 8 be...

Страница 5: ...e als grote pannen Voor optimale veiligheid is de keramische kookplaat uitgerust met een restwarmtesignalering die aangeeft welke kookzones nog heet zijn In deze handleiding staat beschreven op welke...

Страница 6: ...diameter van de kookzone In en uitschakelen Inschakelen Zet een pan op een kookzone en draai de bedieningsknop in de gewenste stand De kookzone zal nu warm worden De kookzone schakelt automatisch aan...

Страница 7: ...ven Dubbelkrings kookzone inschakelen Inschakelen Draai de regelknop naar de maximaalstand stevig tegen de aanslag en kies dan een stand De twee kookzones zullen nu steeds samen warmte afgeven Uitscha...

Страница 8: ...zoals bakjes van kant en klaar gerechten om voedsel in te bereiden Wanneer aluminiumfolie op de kookzone smelt is het niet meer te verwijderen Aluminiumfolie heeft bovendien een zeer slechte warmteov...

Страница 9: ...afhankelijk is van de hoeveelheid en samenstelling van het gerecht en de pan Gebruik de hoogste stand voor snel aan de kook brengen slinken van bladgroenten blancheren van groenten verhitten van olie...

Страница 10: ...en van spek of bacon bakken van rauwe aardappelen bakken van wentelteefjes bakken van gepaneerde vis bakken van dun gepaneerd vlees bakken van omeletten Gebruik de middelste standen voor doorkoken van...

Страница 11: ...suiker en zuren bijvoorbeeld appelmoes rabarber of rode kool kunt u het beste meteen verwijderen met een vochtige vaatdoek om te voorkomen dat het inbrandt Wees voorzichtig met de hete kookzone Om har...

Страница 12: ...voeren Schade ontstaan door verkeerd aansluiten verkeerd inbouwen of verkeerd gebruik valt niet onder de garantie Storing Oorzaak Oplossing Kookzones worden niet warm Toestel verkeerd aangesloten Stek...

Страница 13: ...yclus op verantwoorde wijze worden afgevoerd De overheid kan u hieromtrent informatie verschaffen De verpakking van het toestel is recyclebaar Gebruikt kunnen zijn karton polyethyleenfolie PE CFK vrij...

Страница 14: ...ionale en lokale voorschriften Het toestel moet altijd geaard zijn Schade ontstaan door verkeerd aansluiten verkeerd inbouwen of verkeerd gebruik valt niet onder de garantie Voor een goede werking van...

Страница 15: ...kastje aan de onderzijde hebt geopend Open de deksel van het aansluitkastje met behulp van een schroevendraaier Wilt u een vaste aansluiting maken zorg er dan voor dat er een omnipolaire schakelaar me...

Страница 16: ...nimaal 32 A De aansluitkabel moet een aderdoorsnede hebben van minimaal 6 mm2 2 fasen met 2 nullen aansluiting 2 2N a c 230 V 50 Hz De spanning tussen de fase en de nul is 230 V a c Tussen de fasen ka...

Страница 17: ...nullen Breng een verbindingsbrug aan tussen de aansluitpunten 4 5 Uw groepen moeten afgezekerd zijn met minimaal 16 A 2x De aansluitkabel moet een aderdoorsnede hebben van minimaal 2 5 mm2 3 fasen me...

Страница 18: ...et aansluitblok aanwezige bruggen kunt u de vereiste doorverbindingen maken zoals in voorgaande illustraties staat aangegeven In het deksel van het aansluitkastje en in onderstaande illustratie staat...

Страница 19: ...terwand en of zijwand staan vermeld in de tabel Tabel Benodigde vrije ruimte rondom inbouwen HL62 E Kookplaattype HL62 E Toestel breedte x diepte 595 x 510 mm x Inbouwhoogte vanaf bovenkant werkblad 5...

Страница 20: ...de zijwand van de keukenkast voor het doorvoeren van de aansluitkabel bij inbouw in combinatie met een oven Dit is nodig wanneer de stekker na inbouw niet meer bereikbaar is Stopcontact en stekker moe...

Страница 21: ...Deze ruimte mag niet in verbinding staan met de ruimte boven de oven De afstand tussen onderzijde kookplaat en bovenzijde afschermplaat moet minimaal 25 mm bedragen Afdichtband Plak het afdichtband a...

Страница 22: ...rkblad worden gebruikt De schroeven moeten in de doorgedrukte gaten geschroefd worden Kookplaat aansluiten en controleren Maak de elektrische aansluiting door de stekker in het stopcontact te steken o...

Страница 23: ...24 introduction 25 commande r gler 26 cuisiner confortablement utilisation optimale 28 entretien g n ralit s 31 pannes tableau 32 environnement que faire de l emballage et de l appareil us 33 instruct...

Страница 24: ...n arri re droite 180 1800 W 4 zone de cuisson avant gauche 140 1200 W 5 voyant de chaleur r siduelle 6 bouton de commande avant gauche 7 bouton de commande arri re gauche 8 bouton de commande arri re...

Страница 25: ...ites zone de cuisson interne que pour des grandes casseroles En vue d assurer une s curit optimale la plaque de cuisson en c ramique est quip e d un voyant de chaleur r siduelle Il signale les zones d...

Страница 26: ...serole sur une zone de cuisson et r glez la touche de commande sur la position souhait e La zone de cuisson va maintenant chauffer La zone de cuisson s enclenche et s arr te automatiquement pour vous...

Страница 27: ...son double couronne Marche Tournez le bouton de r glage pour qu il se retrouve sur la position maximale fortement contre la but e et s lectionnez une position Les deux zones de cuisson mettront toujou...

Страница 28: ...ique N utilisez jamais d alu comme les petits bacs alimentaires pour y pr parer un repas L alu qui a fondu sur la zone de cuisson ne peut plus s enlever En outre le papier aluminium est un tr s mauvai...

Страница 29: ...uantit et de la composition du mets et de la casserole vous ne pouvez utiliser le tableau ci dessous qu titre informatif Utilisez la position la plus lev e pour bullition rapide faire revenir des l gu...

Страница 30: ...ire revenir des lardons ou du bacon cuire des pommes de terre crues cuire du pain perdu cuire des poissons pan s cuire des morceaux de viande fins pan s cuire des omelettes Utilisez la position du mil...

Страница 31: ...tendre l aide d un torchon humide les d chets alimentaires base de sucre ou d acide comme la compote de pommes la rhubarbe ou le chou rouge pour leur viter de produire des t ches sur la plaque Soyez p...

Страница 32: ...lectrique La garantie ne couvre pas les dommages provenant d une connexion erron e d une mauvaise construction ou d une utilisation erron e En cas de pannes consultez le site Internet www atag nl Pann...

Страница 33: ...L Administration peut vous fournir des informations sur ce sujet L emballage de l appareil est recyclable Il est possible de r utiliser le carton le film en poly thyl ne PE le polystyr ne sans CFC mou...

Страница 34: ...prescriptions nationales et locales L appareil doit tre mis la terre Les dommages caus s par une connexion erron e un mauvais emploi ou un encastrement erron ne sont pas couverts par la garantie Pour...

Страница 35: ...ous de l armoire lectrique Ouvrez le couvercle de l armoire en question avec un tournevis Si vous souhaitez faire une connexion fixe veillez ce qu un interrupteur omnipolaire avec une distance de cont...

Страница 36: ...de connexion doit avoir une section du conducteur de 6 mm2 au minimum Connexion 2 phases avec 2 neutres 2 2N a c 230 V 50 Hz La tension entre la phase et le neutre est de 230 V ca Entre les phases il...

Страница 37: ...ison entre les points de connexion 4 5 Vos groupes doivent avoir au minimum des fusibles de 16 A 2x Le c ble de connexion doit avoir une section du conducteur de 2 5 mm2 au minimum Connexion 3 phases...

Страница 38: ...n utilisant les ponts qui sont pr sents sur la barrette bornes vous pourrez faire les jonctions exig es comme indiqu dans les illustrations pr c dentes Dans le couvercle de l armoire lectrique et dans...

Страница 39: ...e libre qui est n cessaire autour INSTRUCTIONS D INSTALLATION encastrement HL62 E Type de plaque de cuisson HL62 E L appareil largeur x profondeur 595 x 510 mm x Hauteur d encastrement partir de la pa...

Страница 40: ...paroi lat rale du placard de cuisine avant de faire passer le c ble de raccordement en cas d encastrement combin un four C est n cessaire lorsque la fiche apr s encastrement n est plus accessible La...

Страница 41: ...pas entrer en contact avec l espace situ au dessus du four La distance entre la plaque de cuisson inf rieure et la plaque de protection sup rieure doit tre au minimum de 25 mm Ruban d obturation Coll...

Страница 42: ...s que 40 mm utilisez un bloc de garniture entre les bornes et le plan de travail Vissez les vis dans les trous bossel s brancher la plaque de cuisson et contr ler Effectuez la connexion lectrique en b...

Страница 43: ...g Einstellen 46 Bequem kochen Die optimale Benutzung der Kochmulde 48 Pflege Allgemeines 51 St rungen Tabelle 52 Umweltaspekte Verpackung und Ger t entsorgen 53 Installationsanweisung Allgemeines 54 E...

Страница 44: ...hzone hinten rechts 180 1800 W 4 Kochzone vorne rechts 140 1200 W 5 Restw rmeanzeige je Zone 6 Bedienungsknebel links vorne 7 Bedienungsknebel links hinten 8 Bedienungsknebel rechts hinten 9 Bedienung...

Страница 45: ...geeignet Zur optimalen Sicherheit ist das Glaskeramik Kochfeld mit einer Restw rmeanzeige ausgestattet Sie zeigt an welche Kochzonen noch hei sind In dieser Bedienungsanleitung ist beschrieben wie Sie...

Страница 46: ...Ein und Ausschalten Einschalten Stellen Sie einen Topf auf eine Kochzone und drehen Sie den Bedienungsknebel auf die gew nschte Stufe Die Kochzone wird jetzt warm Sie schaltet sich automatisch ein und...

Страница 47: ...eis Kochzone einschalten Einschalten Drehen Sie den Regelknopf auf die h chste Stufe bis zum Anschlag und w hlen Sie dann eine Stufe Die beiden Kochzonen geben jetzt stets zusammen W rme ab Ausschalte...

Страница 48: ...ggerichten zum Bereiten von Speisen Alufolie die auf dem Kochfeld schmilzt l t sich nicht mehr entfernen Alufolie ist zudem ein sehr schlechter W rmeleiter Heben Sie T pfe immer hoch wenn sie weggeste...

Страница 49: ...e und Zusammensetzung des Gerichts und vom Topf abh ngt Benutzen Sie die h chste Stufe zum Speisen Wasser schnell zum Kochen bringen Blattgem se einkochen Blanchieren von Gem se Erhitzen von l Fett un...

Страница 50: ...gen Fleisch durchbraten Speckw rfel oder Schinken auslassen Rohe Kartoffeln braten Braten von paniertem Fisch Arme Ritter braten Backen von Omeletts Benutzen Sie die mittlere Stufe zum Garen von gro e...

Страница 51: ...d abgek hlt ist bergekochte Speisen mit viel Zucker und S uren zum Beispiel Apfelmus Rhabarber oder Rotkohl sollten sofort mit einem feuchten Tuch entfernt werden um ein Einbrennen zu vermeiden Seien...

Страница 52: ...en Anschluss entstandener Schaden falscher Einbau oder unsachgem e Benutzung sind von der Garantie ausgeschlossen Ziehen Sie bei St rungen die Internetseite www atag nl zu Rate St rung Kochzonen werde...

Страница 53: ...gsgem entsorgt werden Die Beh rden k nnen f r entsprechende Informationen sorgen Die Verpackung des Ger tes ist wiederverwendbar Verwendet k nnen sein Pappe Polyethylenfolie PE CFK freies Polystyrol P...

Страница 54: ...n entsprechen Das Ger t mu geerdet sein Durch falschen Anschluss unsachgem e Benutzung oder falschen Einbau entstandener Schaden ist von der Garantie ausgeschlossen Zur einwandfreien Funktion des Ger...

Страница 55: ...der Unterseite erreichbar ffnen Sie den Deckel des Anschlusskastens mit einem Schraubendreher Wenn ein fester Anschluss gew nscht wird ist f r einen allpoligen Schalter mit einem Kontaktabstand von m...

Страница 56: ...nschlusskabel muss einen Aderdurchmesser von mindestens 6 mm2 haben 2 Phasen Netzanschluss mit 2 Nulleitern 2 2N Wechselstrom 230 V 50 Hz Die Spannung zwischen Phase und Null ist 230 V Wechselstrom Zw...

Страница 57: ...gen Sie f r eine Verbindungsbr cke zwischen den Anschlussstellen 4 5 Ihre Gruppen m ssen mit minimal 16 A 2 Sicherungen abgesichert sein Das Anschlusskabel muss einen Aderdurchmesser von mindestens 2...

Страница 58: ...2 5 mm2 haben Mit den auf der Anschlussleiste vorhandenen Br cken k nnen die erforderlichen Verbindungen hergestellt werden wie in obigen Illustrationen angegeben Im Deckel des Anschlusskastens und i...

Страница 59: ...r R ckwand und oder Seitenwand ist aus der Tabelle ersichtlich Tabelle Ben tigter Freiraum Einbau HL62 E Kochplattentyp HL62 E Ger t Breite x Tiefe 595 x 510 mm x Einbauh he ab Oberseite Arbeitsplatte...

Страница 60: ...nation mit einem Backofen Dies ist erforderlich wenn der Stecker nach dem Einbau nicht mehr erreichbar ist Steckdose und Stecker m ssen immer gut zug nglich sein Wenn das Kochfeld ber einem Backofen e...

Страница 61: ...bel ftet wird Dieser Raum darf nicht mit dem Raum ber dem Backofen in Verbindung stehen Der Abstand zwischen der Kochfeld Unterseite und der Abschirm platten Oberseite muss mindestens 25 mm betragen...

Страница 62: ...Arbeitsplatte zu verwenden Die Schrauben sind in die durchgedr ckten L cher zu schrauben Kochfeld anschlie en und berpr fen Den Stecker in die Steckdose stecken oder den Zuleitungsschalter bei festem...

Страница 63: ...ion 65 use setting 66 comfortable cooking optimal use of the hob 68 maintenance general 71 faults table 72 environmental aspects disposal of packaging appliance 73 installaton guide general 74 build i...

Страница 64: ...2 cooking zone rear left 140 1200 W 3 cooking zone rear right 180 1800 W 4 cooking zone front right 140 1200 W 5 residual heat indication by zone 6 control knob front left 7 control knob back left 8...

Страница 65: ...nd is suitable for both small inner cooking zone and large pans For optimum safety the ceramic hob is equipped with a residual heat indicator which shows which cooking zones are still hot This manual...

Страница 66: ...tching on and off switching on Place a pan on a cooking zone and turn the control knob to the desired setting The cooking zone will then heat up The cooking zone switches on and off automatically to p...

Страница 67: ...itching on the double ring cooking zone Switching on Turn the adjusting knob to the maximum setting hard against the stop and then choose a setting The two cooking zones will now always give off heat...

Страница 68: ...me too hot and a lot of energy is lost Pans that have already been used for cooking on a gas hob are no longer suitable for use on a ceramic hob Do not use aluminium foil such as the trays from ready...

Страница 69: ...ntended solely as a guide because the heat setting depends on the quantity of food and the composition of the pan Use the highest setting for bringing to the boil quickly shrinking down leaf vegetable...

Страница 70: ...ing large pieces of meat frying blocks of ham or bacon frying raw potatoes frying fish coated with breadcrumbs frying beef olives frying omelettes Use the medium settings for completing the cooking of...

Страница 71: ...the hob cool down before cleaning it Over cooked food containing a lot of sugar and acids such as apple sauce rhubarb or red cabbage are best removed immediately with a damp dish cloth to prevent the...

Страница 72: ...ower supply Damage caused by incorrect connection incorrect installation or incorrect use is not covered by the warranty In the case of faults visit the internet site www atag nl Fault Cooking zones d...

Страница 73: ...ce must be disposed of in a responsible manner The authorities can advise you on this The appliance packaging is recyclable The following may have been used cardboard polythene film PE CFC free polyst...

Страница 74: ...regulations The appliance should always be earthed Damage caused by incorrect connection incorrect use or incorrect building in is not covered by the guarantee For correct operation of the appliance...

Страница 75: ...opened the junction box on the underneath The junction box cover can be opened with a screwdriver If you want to make a fixed connection make sure that a multi polar switch with a contact separation o...

Страница 76: ...east 32 A The connecting power cable must have a minimum core cross section of 6 mm2 2 lives with 2 neutrals connection 2 2N a c 230 V 50 Hz The voltage between live and neutral is 230 V a c There may...

Страница 77: ...ll a connecting bridge between the connection points 4 5 Your groups must be fused with at least 16 A 2x The connecting power cable must have a minimum core cross section of 2 5 mm2 3 lives with 1 neu...

Страница 78: ...5 mm2 You can use the bridges provided on the connecting block to make the required interconnections as indicated in the preceding illustrations How to install the bridges is indicated in the junctio...

Страница 79: ...all is indicated in the table Table Space to be left free around the appliance build in HL62 E Type of hob HL62 E Appliance width x depth 595 x 510 mm x Installation height from top of worktop 56 x Cu...

Страница 80: ...he plug can no longer be reached after building in Wall socket and plug must be accessible at all times A certain height under the worktop is necessary if the hob is installed above an oven This heigh...

Страница 81: ...ot be connected with the space above the oven The space between the underside of the hob and the top of the protective plate must be at least 25 mm Sealing tape Stick the sealing tape on the underside...

Страница 82: ...asteners and the worktop The screws must be screwed into the pressed holes Connecting up and checking hob Make the electrical connection by inserting the plug in the socket or set the switch of the po...

Отзывы: