


Chapter 4: Motherboard information
4-2
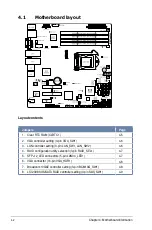
4.1
Motherboard layout
Layout contents
Jumpers
Page
1. Clear RTC RAM (CLRTC1)
4-5
2. VGA controller setting (3-pin VGA_SW1)
4-6
3. LAN controller setting (3-pin LAN_SW1, LAN_SW2)
4-6
4. RAID configuration utility selection (3-pin RAID_SEL1)
4-7
5. SFP+12_LED connectors (5-pin LAN34_LED1)
4-7
6. VGA connector (16-pin VGA_HDR1)
4-8
7. Broadcom 10GbE controller setting (3-pin BCM10G_SW1)
4-8
8. LSI 2308 SAS/SATA RAID controller setting (3 pin SAS_SW1)
4-9
Содержание RS300-H8-PS12
Страница 1: ...1U Rackmount Server RS300 H8 PS12 User Guide ...
Страница 12: ...xii ...
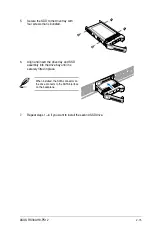
Страница 29: ...2 7 ASUS RS300 H8 PS12 4 Secure the airduct cover to the motherboard with a screw ...
Страница 72: ...Chapter 4 Motherboard information 4 24 ...
Страница 110: ...5 38 Chapter 5 BIOS setup ...
Страница 148: ...6 38 Chapter 6 RAID configuration ...
Страница 175: ...ASUS RS300 H8 PS12 7 27 8 Click Install to continue 9 When done click Finish to complete the installation ...
Страница 186: ...7 38 Chapter 7 Driver installation 7 Click Install to start installing the drivers 8 When done click Finish ...
Страница 188: ...7 40 Chapter 7 Driver installation 8 When done click Finish ...
Страница 192: ...A 4 Appendix ...


