


Chapter 1: Product introduction
1-8
1.6
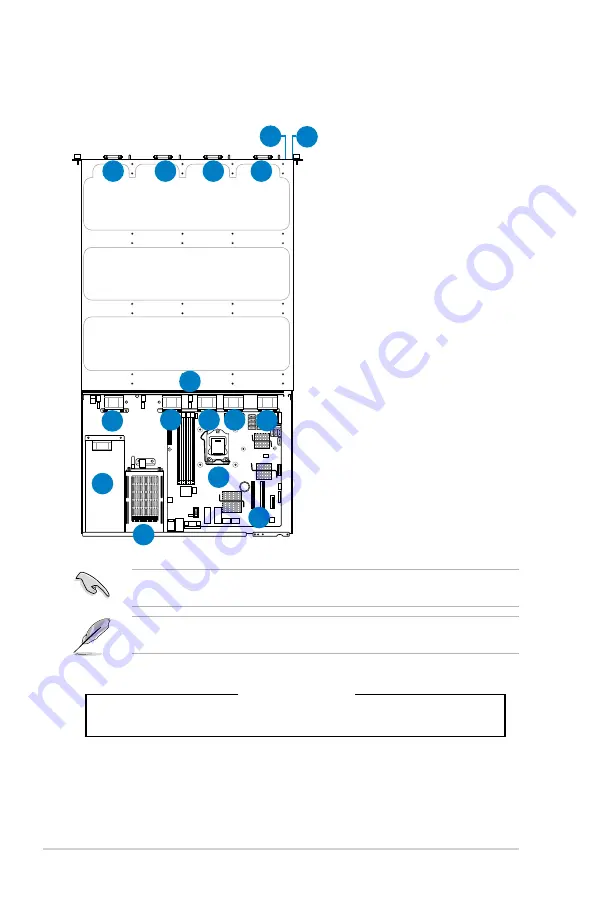
Internal features
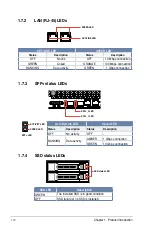
The barebone server includes the basic components as shown.
1.
Power supply
2.
PCI Express slot Riser Card
3.
ASUS P9D-MH Server Boards
4.
System fans
5.
SATA backplane (hidden)
6.
HDD tray 1—Connect to
SATA2/SATA3/SATA4 port
7.
HDD tray 2—Connect to
SAS7/SAS8/SATA1 port
8.
HDD tray 3—Connect to
SAS4/SAS5/SAS6 port
9.
HDD tray 4—Connect to
SAS1/SAS2/SAS3 port
10. Front I/O boards (hidden)
11. SSD bay
12. Asset Tag (hidden)
The barebone server does not include a floppy disk drive drive. Connect a USB floppy disk
drive to any of the USB ports on the front or rear panel if you need to use a floppy disk.
*WARNING
HAZARDOUS MOVING PARTS
KEEP FINGERS AND OTHER BODY PARTS AWAY
Turn off the system power and detach the power supply before removing or replacing any
system component.
1
2
3
4
4
4 4
10
9
6
7
8
11
5
12
4
HDD tray 1
SATA4
SATA3
SATA2
HDD tray 2
SATA1
SAS8
SAS7
HDD tray 3
SAS6
SAS5
SAS4
HDD tray 4
SAS3
SAS2
SAS1
Содержание RS300-H8-PS12
Страница 1: ...1U Rackmount Server RS300 H8 PS12 User Guide ...
Страница 12: ...xii ...
Страница 29: ...2 7 ASUS RS300 H8 PS12 4 Secure the airduct cover to the motherboard with a screw ...
Страница 72: ...Chapter 4 Motherboard information 4 24 ...
Страница 110: ...5 38 Chapter 5 BIOS setup ...
Страница 148: ...6 38 Chapter 6 RAID configuration ...
Страница 175: ...ASUS RS300 H8 PS12 7 27 8 Click Install to continue 9 When done click Finish to complete the installation ...
Страница 186: ...7 38 Chapter 7 Driver installation 7 Click Install to start installing the drivers 8 When done click Finish ...
Страница 188: ...7 40 Chapter 7 Driver installation 8 When done click Finish ...
Страница 192: ...A 4 Appendix ...


