


2-17
ASUS RS300-H8-PS12
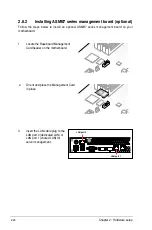
6.
Align and insert the PCIe card into the
riser card.
7.
Secure the PCIe card into the riser card
with the screw that you removed in step
5. Ensure that the PCIe card fits firmly
into the riser card slot.
8.
Align and insert the PCIe riser card and
PCIe card assembly into the PCIe slot on
the motherboard. Ensure that it is seated
firmly in place.
9.
Secure the PCIe riser card and PCIe
card assembly with the screw that you
removed in step 2.
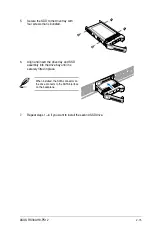
metal cover
Set aside the screw for later use.
5.
Release the screw that secures the
metal bracket cover.
metal bracket cover
7
8
Содержание RS300-H8-PS12
Страница 1: ...1U Rackmount Server RS300 H8 PS12 User Guide ...
Страница 12: ...xii ...
Страница 29: ...2 7 ASUS RS300 H8 PS12 4 Secure the airduct cover to the motherboard with a screw ...
Страница 72: ...Chapter 4 Motherboard information 4 24 ...
Страница 110: ...5 38 Chapter 5 BIOS setup ...
Страница 148: ...6 38 Chapter 6 RAID configuration ...
Страница 175: ...ASUS RS300 H8 PS12 7 27 8 Click Install to continue 9 When done click Finish to complete the installation ...
Страница 186: ...7 38 Chapter 7 Driver installation 7 Click Install to start installing the drivers 8 When done click Finish ...
Страница 188: ...7 40 Chapter 7 Driver installation 8 When done click Finish ...
Страница 192: ...A 4 Appendix ...


