2-6
Chapter 2: Basic Installation
Chapter 2
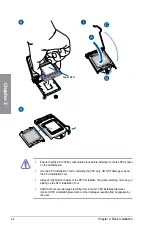
Top of CPU
•
Ensure that the CPU is firmly clicked into place before installing it onto the CPU socket
on the motherboard.
•
Use the CPU Installation Tool for installing the CPU only. DO NOT damage or bend
the CPU Installation Tool.
•
Always firmly hold both sides of the CPU Installation Tool when installing, removing, or
picking up the CPU Installation Tool.
•
ASUS will not cover damages resulting from incorrect CPU installation/removal,
incorrect CPU orientation/placement, or other damages resulting from negligence by
the user.
Содержание PRIME Z270-A Series
Страница 1: ...Motherboard TUF Z270 MARK 1 ...
Страница 16: ...xvi ...
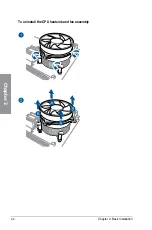
Страница 46: ...2 8 Chapter 2 Basic Installation Chapter 2 To uninstall the CPU heatsink and fan assembly ...
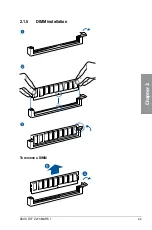
Страница 47: ...ASUS TUF Z270 MARK 1 2 9 Chapter 2 To remove a DIMM 2 1 5 DIMM installation ...
Страница 51: ...ASUS TUF Z270 MARK 1 2 13 Chapter 2 2 1 10 M 2 installation OR Supported M 2 type varies per motherboard ...
Страница 56: ...2 18 Chapter 2 Basic Installation Chapter 2 Connect to 4 Speakers Connect to 6 Speakers Connect to 8 Speakers ...
Страница 58: ...2 20 Chapter 2 Basic Installation Chapter 2 ...

