ASUS TUF Z270 MARK 1
2-1
Chapter 2
Basic Installation
2
2.1
Building your PC system
The diagrams in this section are for reference only. The motherboard layout may vary with
models, but the installation steps are the same for all models.
2.1.1
IO Cover installation
Chapter 2:
Basic Installation
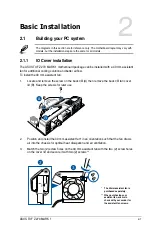
The ASUS TUF Z270 MARK 1 motherboard package can be installed with a 40 mm assistant
fan for additional cooling solution and better airflow.
To install the 40 mm assistant fan:
1.
Locate and remove the screw on the back I/O (A) then remove the back I/O fan cover
lid (B). Keep the screws for later use.
2.
Position and install the 40 mm assistant fan* in an orientation such that the fan draws
air into the chassis for optimal heat dissipation and air ventilation.
3.
Match the two (2) screw holes on the 40 mm assistant fan with the two (2) screw holes
on the cover lid and secure it with two (2) screws**.
* The 40mm assistant fan is
purchased separately.
** When purchasing your
assistant fan, ensure to
check with your vendor for
the assistant fan screws.
Содержание PRIME Z270-A Series
Страница 1: ...Motherboard TUF Z270 MARK 1 ...
Страница 16: ...xvi ...
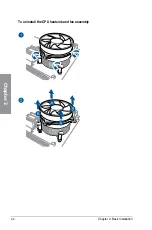
Страница 46: ...2 8 Chapter 2 Basic Installation Chapter 2 To uninstall the CPU heatsink and fan assembly ...
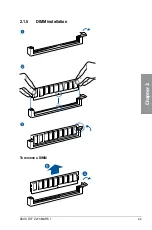
Страница 47: ...ASUS TUF Z270 MARK 1 2 9 Chapter 2 To remove a DIMM 2 1 5 DIMM installation ...
Страница 51: ...ASUS TUF Z270 MARK 1 2 13 Chapter 2 2 1 10 M 2 installation OR Supported M 2 type varies per motherboard ...
Страница 56: ...2 18 Chapter 2 Basic Installation Chapter 2 Connect to 4 Speakers Connect to 6 Speakers Connect to 8 Speakers ...
Страница 58: ...2 20 Chapter 2 Basic Installation Chapter 2 ...

